
 Lesson 3.3
Lesson 3.3 · Control — Making AI Obey
Conditioning from Sketches & Plans
Turning your own drawings into the brief the model must obey
The best conditioning image in the world is the one already on your desk.
Edge maps and depth maps are useful, but the real unlock is this: your own drawings are conditioning images. That napkin sketch, that CAD elevation, that SketchUp massing - each can become the scaffold the AI must build on, so the render that comes back is unmistakably your scheme, dressed in materials and light. This is the skill that turns generative AI from a moodboard toy into a genuine part of the design process. Let's drive the model from what you drew.
Draw the decisions; let the AI dress them. Beauty that betrays your plan is a failure.
From napkin to render - conditioning a sketch
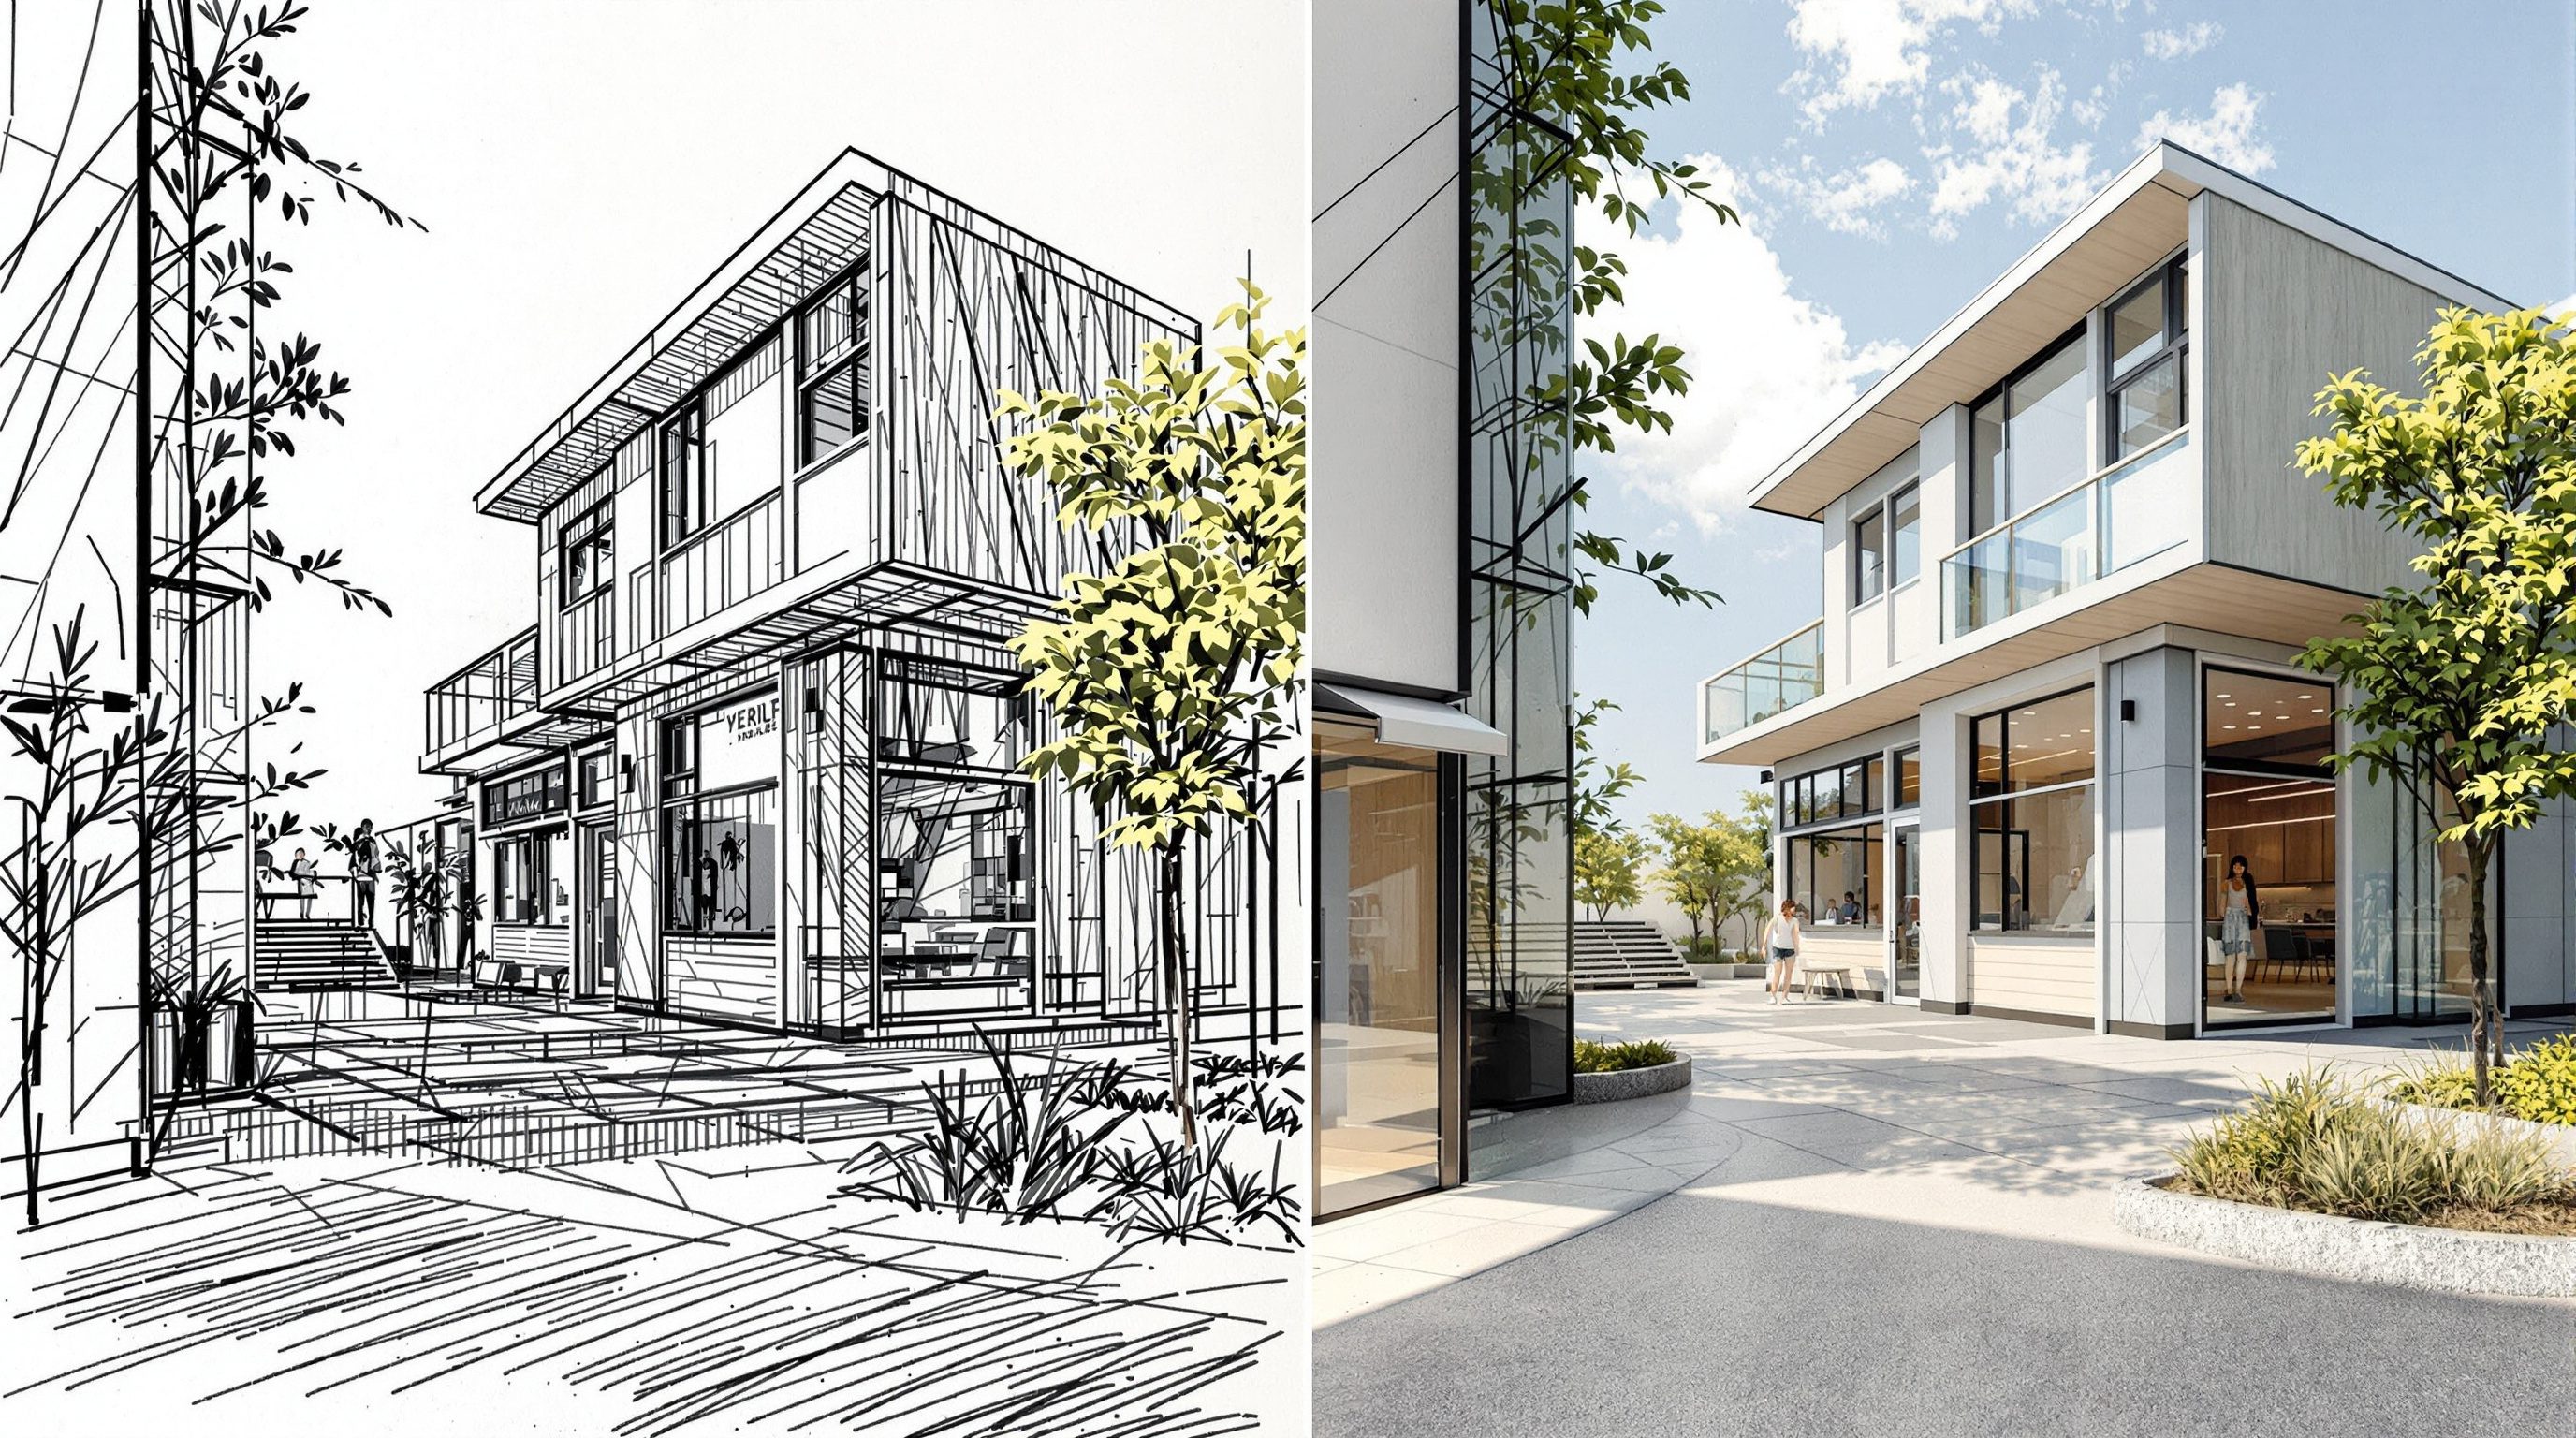
Start with the loosest input: a freehand sketch. Photograph or scan it - even a phone snap on a desk works, as long as the lines read clearly against the paper - feed it through a scribble or Canny preprocessor, and you have a condition map that holds your massing, roof line and openings while leaving everything else open. Prompt the materials, light and setting, and the model returns a rendered version of your sketch, not a lookalike it invented.
The grip is yours to set. Scribble is forgiving - use it when the sketch is rough and you want the model to interpret generously and fill the gaps. Canny is stricter - use it when the lines are clean and you want them traced faithfully. A practical middle path: sketch on white paper with a fairly bold pen so the preprocessor finds strong edges, start scribble at a moderate weight (about 0.8), and creep up only if the model wanders. The discipline is to draw the things you care about clearly - the silhouette, the key openings, the roof pitch - and leave the rest gestural, so the model fills the parts you haven't decided and obeys the parts you have. A worked case: a five-minute elevation doodle of a courtyard house, scribble-conditioned with red laterite and teak, warm monsoon-evening light, architectural photograph, comes back as a presentable concept in a single pass - the courtyard opening, the deep eave and the twin windows exactly where your pen put them, now clothed in a material and light you never had to describe geometrically.
Draw hard what you've decided; draw loose what you haven't. The leash follows your pen.
Plans and elevations - MLSD is your friend
For orthogonal drawings - plans, elevations, sections - MLSD is purpose-built, because it locks onto straight lines and ignores the noise around them. Condition an elevation with MLSD and every opening, floor line, mullion and edge stays put while you prompt the facade material and sky; you get a photoreal study of the exact elevation you drew, not a plausible cousin. Condition a plan and you can generate a furnished top-down visual or, with the right base model, an axonometric that respects your wall positions and door swings.
Clean input pays off enormously here. A CAD or BIM elevation exported as a crisp black-line image is close to ideal, because MLSD then has unambiguous lines to find; a smudged scan, or a drawing carrying hatching and dimension strings, will confuse it, so export a stripped 'linework only' layer where you can. Set the weight fairly high (1.0 to 1.2), since orthogonal work is exactly where you want faithful tracing, and keep the prompt strictly to surfaces, light and context. This is where AI stops being decorative and starts being useful in the process. The elevation you'll submit, the plan you're testing - those are the inputs, not stand-ins for them. Because the drawing is the contract, you can iterate a dozen material and mood options against it without ever putting the geometry at risk. Draw once; render endlessly. A single approved elevation can throw off a stone version, a plaster version, a timber-screen version and a dusk version before the meeting starts - every one dimensionally identical to the drawing on file.
Massing - depth keeps the third dimension
When your input already carries three dimensions - a SketchUp or Rhino massing, a clay-model photo, a grey-box render - depth is the preprocessor that keeps it. A depth condition holds the near-to-far arrangement of volumes, so the model can reskin your massing into a materialised building without flattening or reshaping it. Your five-minute grey box becomes a stone-and-glass proposal that still stands where you put it, at the height and set-back you modelled.
Depth and MLSD combine beautifully. Depth holds the volumes; MLSD holds the crisp edges; between them your massing survives almost intact while the surfaces come alive. Load them as two ControlNets - depth around weight 0.9, MLSD around 0.7 so it sharpens rather than dominates - and tune each independently until neither over-constrains the render. Stacking conditions like this is routine in serious workflows, because each guards a different property and can be relaxed on its own. This is the honest sweet spot of AI in early design: the decisions - how big, how tall, how the volumes meet - remain entirely yours, made in real 3D tools where dimensions are real; the AI only accelerates the dressing of those decisions into something a client can read at a glance. A concept that once took a day of manual rendering to communicate can now be shown in three materials and two lights before lunch - and every one of those options still stands exactly where you built it: same footprint, same eaves line, same relationship to the imagined street. The model changed the coat, never the body.
The grey box is the design. The render is the outfit. Never let the outfit redesign the body.
Keeping intent - the designer stays in charge
Conditioning is powerful enough to feel like cheating, so hold on to the principle underneath it: the model dresses your geometry; it does not design it. Set the control weight high enough that your lines are respected, and read every result critically - did it honour the opening you drew, or quietly slide it a metre to make a prettier composition? Where control slips, tighten the weight, clean the source drawing, or switch to a stricter preprocessor.
The workflow that keeps intent is a loop: draw or model the geometry you believe in, condition it, prompt the surfaces, then judge the output against your drawing - not against how pretty it is. Beauty that betrays your plan is a failure, however seductive. A concrete habit makes this reliable: overlay the render on the source at 50% opacity and look along the key lines. If the openings, floor levels and silhouette line up, the tool obeyed; if a window has slid or the ridge has risen, you know exactly where to tighten before anyone sees it. Never show a client an image you haven't checked this way, because they will read it as a promise of the building you'll deliver, and a moved window in a render becomes an argument on site.
Used with that discipline, conditioning doesn't outsource design; it compresses the distance between a decision and a picture of that decision, which is exactly what a design tool should do. It lets you fail cheaply and often on materials and mood while the hard-won geometry stays fixed - the ideal division of risk in early design, where surfaces are easy to change and layouts are expensive. Next lesson we add the finer edits - fixing, changing and extending regions - that turn a good conditioned render into a finished one.
A studio-ready workflow you can repeat
Fold all of this into a routine you can run on any project. One - fix the geometry in a real tool. Draw the plan or elevation in CAD, or block the massing in SketchUp, and decide the dimensions there, where they mean something. Two - export a clean condition source: a crisp linework image for MLSD, a bold sketch for scribble or Canny, or a depth-friendly grey-box view; strip dimension strings and hatching that would confuse the detector. Three - pick the preprocessor by what must not move - MLSD for orthogonal drawings, depth for massing, scribble or Canny for freehand - and start the weight near 1.0. Four - prompt only the dress: material, light, weather, era, and never the layout. Five - overlay and judge against the source, then tighten and regenerate until the geometry is unmistakably yours. Six - fan out the variations the client needs - three materials, two times of day - reusing the same condition so every option shares one geometry.
The payoff is a portfolio-grade artefact, and an honest one: source drawing, condition map and final render, side by side, with a note on what you held and what you let the model invent. That triptych proves the two skills that matter - you designed the geometry, and you directed the tool - and it keeps you truthful about where your hand ends and the AI begins. Run this loop a dozen times and conditioning stops feeling like a trick and starts feeling like what it is: rendering that finally obeys the drawing on your desk.
Fix geometry in real tools, export clean, condition, prompt the dress, overlay, fan out.
Scribble / Canny conditioning
Driving a render from a freehand or clean sketch
Scribble for a forgiving grip on rough sketches; Canny for faithful tracing of clean linework.
MLSD conditioning
Driving renders from plans, elevations and sections
Locks onto straight lines so openings, floor lines and proportions survive - purpose-built for orthogonal architecture.
Depth conditioning
Driving renders from massing models and grey-box 3D
Holds the near-to-far arrangement of volumes so a massing can be reskinned without being reshaped; pairs well with MLSD.
ControlNet in ComfyUI / Automatic1111 / DesignAI
Where you load your drawing as a condition
Free local tools expose the full preprocessor set; DesignAI wraps a guided version for quick studies.
Workshop - render your own drawing
Beat the 'hold geometry' failure from Lesson 3.1 by driving a render from a drawing you make now. Use Stable Diffusion with ControlNet (Automatic1111 or ComfyUI), or DesignAI's guided conditioning if you'd rather stay in the browser.
Stable Diffusion with ControlNet (Automatic1111 or ComfyUI) or Studio Matrx DesignAI. A drawing you make yourself - sketch, elevation or massing.
Goal: produce a render that keeps YOUR geometry, not a lookalike
Inputs: one sketch, plan or massing you draw + a base model with ControlNet
Time: ~45 minutes
- 1Make one source: a freehand sketch of a small building OR a clean elevation OR a quick grey-box massing. Draw the silhouette and key openings clearly; leave the rest loose.
- 2Choose the matching preprocessor - scribble/Canny for a sketch, MLSD for an elevation, depth for a massing - and generate the condition map. Check it actually captured the lines you cared about.
- 3Write a prompt for surfaces only: material, light, setting, era - e.g.
red laterite and teak, warm monsoon-evening light, architectural photograph. Do not describe the layout; the condition already carries it. - 4Generate, then overlay the result on your source drawing. Did it honour every opening and the massing? Mark anything it moved.
- 5Where it drifted, raise the control weight, clean the source, or switch to a stricter preprocessor - and regenerate until the geometry is unmistakably yours.
You’ll walk away with
A three-panel: your source drawing, the condition map, and the final render - with a one-line note on what the model kept and what it was allowed to invent.
Three altitudes on the same idea
Read the band that fits you — or all three.
This is the core production skill of AI-assisted practice. Your plans, sections, elevations and massing become conditioning images, so renders communicate the scheme you actually designed - to clients, to competitions, to yourself. MLSD for orthogonal drawings, depth for massing, Canny for clean linework. The decisions stay in your CAD and BIM tools; the AI only accelerates turning them into readable pictures. Guard the geometry: judge every output against the drawing it came from. Bake the overlay test into your process - render on source at 50% opacity - so no image reaches a client until you have confirmed it honours the drawing you will actually build.
Condition from your own layout drawings and you show true options of one room. Feed a plan or a clean perspective sketch through Canny to hold the arrangement, then prompt palette, materials and light for each option - same space, real alternatives. Depth from a rough 3D keeps the room's proportions while you restyle every surface. This is how you move a client through choices without redrawing the room each time. Reuse one condition across every option so the client is comparing true alternatives of the same room, not four different rooms wearing the same brief.
A sketch-to-render page built on YOUR drawing is one of the strongest things in a student portfolio. It proves you can design the geometry and direct the tool. Show the source sketch, the condition map, and the final render side by side, and annotate what you held versus let the model invent. That transparency reads as mastery - and it's honest about where your hand ends and the AI begins. Show the source, the condition map and the final render together and annotate what you held versus let the model invent; that transparency is exactly the honesty a strong portfolio needs.
“If I condition on my sketch, the AI is basically designing the building for me.”
Do it yourself
No tool needed - reason it through.
- 1Which preprocessor suits a rough freehand sketch, and which suits a clean elevation?
- 2Why should your prompt describe surfaces and light but NOT the layout when conditioning from a plan?
- 3You have a SketchUp massing and want to keep its volumes. Which preprocessor, and why?
- 4How do you check whether a conditioned render actually honoured your drawing?
- 5The output looks beautiful but moved a window you drew. Is it a success? What do you do?
The one line to carry out
Peer-reviewed journals & authoritative standards
- 01Zhang, L., Rao, A., & Agrawala, M. - Adding Conditional Control to Text-to-Image Diffusion Models — IEEE/CVF International Conference on Computer Vision (ICCV), 2023.
- 02Hu, E. J., et al. - LoRA: Low-Rank Adaptation of Large Language Models — arXiv preprint, 2021.
- 03Hugging Face - Diffusers: State-of-the-art diffusion models documentation — Hugging Face documentation, 2024.
You can now generate a render that keeps your geometry. But the first pass is rarely final - a window to fix, a corner to change, a frame to extend. So next we add the finishing controls: img2img, inpainting and outpainting.
The author
Amogh N P
Architect, interior designer, and creative polymath. Studio Matrx began in his notebooks — his vision of design made honest, useful, and open to everyone. Its Academy is written and taught in his memory, and free, forever.
More about Amogh →