
Draw the Shadow, Not Just the Window
PAGE 1
The Window Is Only the Beginning
In architectural education, students learn to draw windows long before investigating the daylight those windows produce. They measure the opening, establish its position within a wall, indicate sill and lintel levels, and represent it accurately in plans, sections and elevations. These drawings explain where the window is and how it belongs to the building. They do not necessarily explain how the opening changes the room throughout the day.
A window is a physical element, but daylight is a changing condition. Once light passes through the opening, its relationship with the room depends on several things: the direction from which it arrives, the depth of the space, the surfaces it encounters, the surrounding buildings or landscape, and the time of day. The same opening can produce noticeably different light-and-shadow relationships without changing the building itself.
This difference is important because architectural drawings often encourage us to read a window as a promise of daylight. A larger opening may appear more generous on plan, while a smaller window may seem less able to illuminate a room. But dimensions alone cannot establish what an occupied space will experience. An opening may admit direct sunlight for part of the day, provide diffuse skylight at another time, or be blocked by a neighbouring building. Drawing the opening is only the beginning of the investigation.
Shadow is equally important. Students sometimes treat it as the empty or dark portion of a rendering, something added to give an image depth and realism. In a daylight study, however, shadow is evidence. It reveals which surfaces receive direct light, which remain outside its reach, and how the relationship changes over time. Drawing only the illuminated area records an incomplete condition. The darker parts of the room are necessary to understand the brighter ones.
This exercise begins with a simple change in approach. Instead of designing a room and adding sunlight at the end to make the drawing attractive, students first observe how light behaves within a fixed space. They represent that behaviour at three different times and compare what changes while the architecture remains the same.
The objective is not to produce the most dramatic sunlight drawing. It is to develop the discipline of observation. A useful daylight study should allow another person to understand what was examined, when it was examined, what was visible and what remains uncertain.
For homeowners, the exercise reminds us to understand a window through everyday use rather than appearance alone. For practicing architects, it demonstrates the importance of recording environmental conditions before making design assumptions. For students, it establishes a fundamental skill: using drawings to investigate a building rather than merely represent it.
The central question, then, is not simply where the window sits.
It is what happens to the room because the window is there.
PAGE 2
Establish One Room Before Studying Three Moments
The strength of a comparative daylight drawing comes from keeping the architecture unchanged. If the room, window, or orientation changes between illustrations, it becomes difficult to distinguish a daylight change from a change caused by the drawing itself.
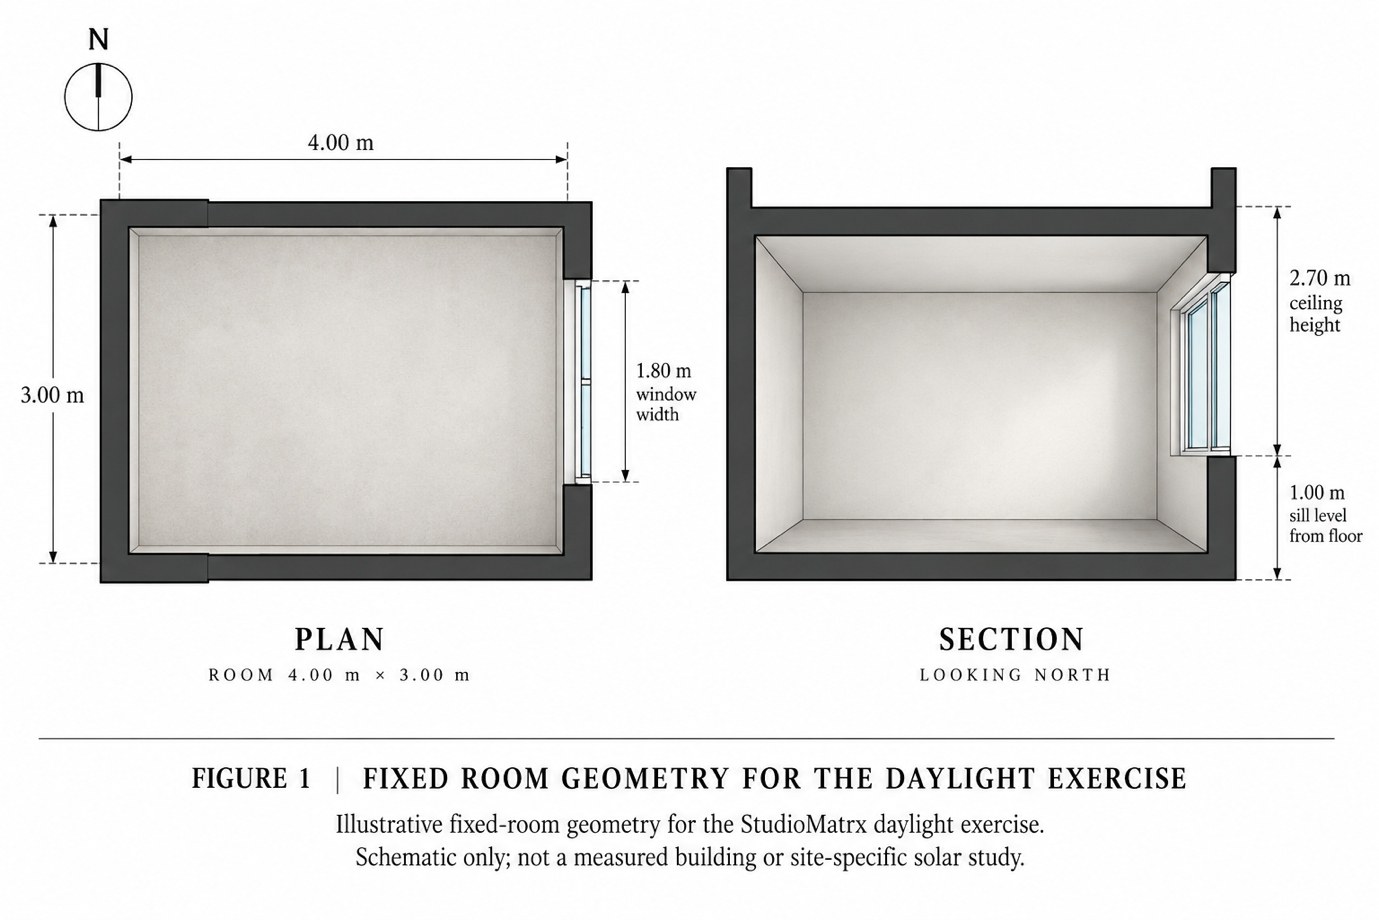
For this exercise, students should begin with one rectangular room containing a single principal window. The original StudioMatrx teaching diagram uses a simple room with an opening on the eastern wall. This remains a useful starting model because the fixed orientation gives students a clear relationship to investigate across the day. However, the model is illustrative; do not present its drawings as measurements or observations of a real building.
For a field exercise, students should select an actual room they can observe safely at three times on the same day. The room may be part of a house, studio, classroom, or another accessible building. A simple space is preferable because the exercise focuses on one opening and the daylight that reaches the interior, rather than on the combined effects of several complicated openings.
Before observing light, students must record the room itself. Measure or reasonably document its length and width, the opening’s position, approximate width and height, sill level, and the room's depth beyond it. Prepare a plan and at least one section. Establish north and show the window’s orientation. If the compass direction is approximate, state that instead of presenting it as a precise survey.
The surrounding conditions also belong to the record. Is another building close to the opening? Are there trees, projecting balconies, deep reveals, or exterior shading elements? Does the window contain tinted or frosted glass? Are curtains or blinds present? What are the principal wall, floor and ceiling finishes? These features may affect how daylight reaches and is reflected within the room.
Students should then establish a consistent observation method. Choose three periods—morning, midday and late afternoon—and record the actual clock time at each visit. The time must not be invented afterward to fit a diagram. Record the date, general location, approximate orientation, and weather conditions. Direct sunlight on a clear morning cannot be compared uncritically with diffuse daylight under a heavily clouded afternoon sky. Changing weather is part of the evidence and must be acknowledged.
Keep the window and surrounding conditions as consistent as reasonably possible. Curtains, blinds and artificial lights should not be changed between observations unless the change is part of a deliberately recorded test. Furniture should also remain in place during a real field observation. The empty-room illustrations in this article are teaching models, not instructions for rearranging an occupied building.
Distinguish two kinds of drawing from the beginning. A drawing made from direct observation may be labelled Observed Daylight Study, provided its date, location and observation conditions are recorded. A drawing based on an imaginary room, assumed sun direction or conceptual illustration must instead be labelled Schematic Daylight Study.
Neither approach is inherently without educational value. They simply support different claims. A schematic can explain a relationship, but it cannot establish what actually happened in a particular room.
PAGE 3
Morning: Follow the Light Beyond the Opening
The first observation should take place during the morning. For a room with an east-facing window, morning is a particularly useful period to examine because direct sunlight may reach the opening, depending on the location, season, weather and surrounding obstructions. This is a condition to investigate, not a result students should assume in advance.
Begin by standing at a position from which the opening and the main receiving surfaces are visible. Before drawing, spend several minutes looking carefully. Is there a clearly defined patch of direct sunlight? Does it reach the floor, an opposite wall, or another surface? Is the opening bright while the deeper room remains subdued? Are shadows sharp or soft? Does the exterior environment prevent direct sunlight from entering?
The first task is to record the actual condition, not the one the student expected to see. If a beam of direct sun reaches the floor, identify its visible boundary and the surfaces it occupies. If the room is lit mainly by diffuse daylight, record that condition instead. There is no requirement to invent a sunlight triangle simply because the exercise concerns an east-facing window.
A plan can show the approximate location of the visible light patch and the darker areas around it. A section can reveal how the opening, wall thickness, sill, head and receiving surfaces relate vertically. The student should use the same geometry established on Page 2. Add only the observed lighting condition.
Care is needed when drawing shadow. Trace a strong shadow edge where it is clearly visible, but do not convert a gradual transition between brighter and darker areas into an artificially precise line. Different drawing techniques can distinguish those conditions. Draw a clearly observed boundary with a defined edge, while representing an area of diffuse illumination through restrained tonal shading.
Annotations should explain what the drawing cannot communicate by itself. A note might record that direct sunlight reached part of the floor, that the wall opposite the opening remained comparatively subdued, or that a neighbouring obstruction shaded the window. Such statements must come from what was actually seen. They should not describe an imagined solar path as though it had been measured.
Photographs can support observations when taken from a consistent camera position. However, camera exposure may change automatically, making two conditions appear more similar or different than they were. If photographs are compared, their position and exposure method should be recorded. A photograph can document the scene's appearance, but it should not be treated as an illuminance measurement.
If suitable equipment is available, students may record illuminance at selected fixed points. Use the same positions, instrument, and measurement method for later observations. Without such equipment, the work should remain qualitative. Words such as brighter, more diffuse, or visibly shaded are appropriate; invented lux values are not.
The morning drawing should leave the student with a precise account of the first condition. It should show where light was visible, where shadow remained, and which architectural features appeared to influence that pattern.
The important achievement is not a beautiful drawing of sunlight.
It is an observation another person can understand and question.
PAGE 4
Midday: Keep the Room Fixed and Record What Has Changed
The second observation repeats the first procedure around midday. The room has not been redesigned, the window remains in the same wall, and the drawing scale and viewpoint remain unchanged. What may have changed is the daylight condition within that fixed geometry.
This repeated approach is essential. Architectural representation often relies on a single chosen lighting condition, particularly when a dramatic sunlight patch helps communicate a design. Yet a convincing rendering does not establish how the room performs at another hour. Comparing the same space at two times reveals which visual effects are temporary and which conditions persist.
The midday drawing should therefore be evaluated against the morning record. Students should examine whether the visible patch of direct sunlight has moved, reduced, disappeared, or changed its relationship with the surrounding surfaces. They should also look at the character of shadow. Has a strong edge become less distinct? Does the opening appear bright while the interior is more evenly illuminated? Has the contrast between the window wall and the deeper room changed?
There is no requirement for a particular outcome. The window’s orientation, the sun’s apparent position, nearby obstructions, and prevailing sky conditions all influence what you can observe. In some situations, the changes will be obvious. In others, the room may look relatively similar at both times. That, too, is a result worth recording.
The study becomes more reliable when students separate observation from interpretation. A note stating that a sunlight patch was no longer visible at midday records what was seen. A statement that the change was caused entirely by the sun’s movement is an interpretation and may require additional information, especially if clouds or shading conditions also changed.
The plan and section should identify what differs from the morning condition without redrawing the architecture. Keep the north arrow, opening dimensions, walls, and section cut in exactly the same positions. If the light patch has changed, show its new observed extent. If diffuse daylight makes exact boundaries hard to identify, use a less definite graphic treatment rather than suggesting a sharp line that wasn't present.
This repetition begins to reveal something drawings of a window alone cannot establish: a room does not possess one permanent lighting condition. Its apparent brightness, directionality, and contrast depend partly on time and environmental circumstances.
Students should avoid ranking the morning and midday drawings as good or bad too quickly. A bright direct patch might be visually attractive but inconvenient for certain activities. A quieter midday condition might be less dramatic but more consistent across a work surface. Those conclusions require considering occupation, which comes later in the exercise.
At this stage, the task is still to observe.
A successful second drawing demonstrates what changed, what stayed the same, and what might explain the difference.
PAGE 5
Late Afternoon: Learn to Record the Quieter Condition
The third observation takes place in the late afternoon. This is an important part of the exercise because it prevents daylight from being understood only through strong, directional sunlight.
In an east-facing room, direct sunlight entering through the eastern opening may be considerably reduced or absent later in the day. The room can still receive daylight from the sky and its surroundings, including light reflected from exterior and interior surfaces. The precise condition must be observed rather than assumed, particularly where neighbouring buildings, weather and the season affect the opening.
Students should begin with the same questions used in earlier observations. What surfaces appear brightest? Is there any clearly visible direct sunlight? Are the shadow boundaries distinct or gradual? How does the opening appear in relation to the deeper part of the room? Which surfaces remain comparatively subdued?
An important distinction emerges here between direct sunlight and diffuse daylight. Direct sunlight can produce recognisable patches and relatively defined shadows when the conditions allow. Diffuse skylight generally creates less clearly bounded patterns. Reflected light from walls, floors, and ceilings may also shape the interior’s appearance without appearing as a distinct beam.
A student who has learned to draw only a bright triangle entering a window may find the quieter condition difficult to represent. There may be no dramatic boundary to trace. The room may contain subtle differences between a brighter region near the opening and a more subdued region farther away. Representing this requires careful tonal judgment rather than decorative effects.
Students should resist the temptation to exaggerate these differences simply to make the third drawing more visually interesting. If the afternoon appears less directional, the drawing should communicate that reduction. If the room remains surprisingly bright, the observation should record that as well.
This stage also helps students understand how material surfaces participate in daylight. A pale wall may return light into neighbouring parts of the room, while a darker surface may appear comparatively subdued. Reflective finishes can produce visible highlights under some conditions. These observations are useful, but you should not claim their causes with certainty unless the evidence supports them.
The value of the final observation becomes clearer when it is placed beside the morning and midday drawings. What appeared to define the room in the morning may no longer be present. A surface that was strongly illuminated may now be quiet. A part of the room that remained relatively consistent through all three periods may begin to suggest a different architectural role.
The lesson is not that diffuse light is better than direct sunlight, nor that shadow should always be preserved. It is that different conditions have different consequences for the way a room can be occupied.
A daylight study becomes more useful when it records ordinary conditions as carefully as spectacular ones.
Architecture is experienced throughout the day, not only when the sun produces its most photographable effect.
PAGE 6
Three Drawings, One Comparison
Individual observations become a study when placed side by side. Students should prepare three equal-sized drawings representing morning, midday, and late afternoon. Each must use the same room dimensions, north direction, window position, drawing scale, and view.
This consistency lets the reader compare light without distraction from changes in architectural geometry. The sequence should not resemble three different interior proposals. It should show one room under three recorded conditions.
The drawings should use a consistent graphic language. Represent direct sunlight with a clearly defined tonal area when the observed boundary permits it. Show diffuse daylight through softer tonal variation. Areas outside direct sun should be distinguishable without suggesting they receive no light at all. Annotations should be limited to the information necessary to understand each frame.
Beneath each drawing, students must provide the observation time and a brief description of the sky and room condition. A comparison without these records can be visually engaging but difficult to assess as evidence. If clouds moved across the sky between observations, that information belongs beside the drawings. If the opening was partly shaded by an adjoining structure, that should also be recorded.
The three frames should then be read together. Students can look for the portion of the room that received direct sunlight for the shortest period, the surfaces that remained comparatively bright, and the areas that stayed subdued across the observation sequence. They can also identify where the strongest contrast occurred and whether the shadow type changed.
This comparative reading is more valuable than simply describing each drawing separately. It begins to identify persistent and temporary conditions. A bright patch present only in the morning may matter for a particular activity at that hour but be irrelevant later. A deeper zone that receives limited daylight throughout the observation period may require further investigation before placing a visually demanding task there.
The drawings should not be presented as a complete annual daylight analysis. Three observations on one day cannot establish how the room behaves in every season or under every sky condition. Nor can the drawings alone demonstrate compliance with a daylight-performance standard. They form a bounded record of selected conditions, and that limitation should remain explicit.
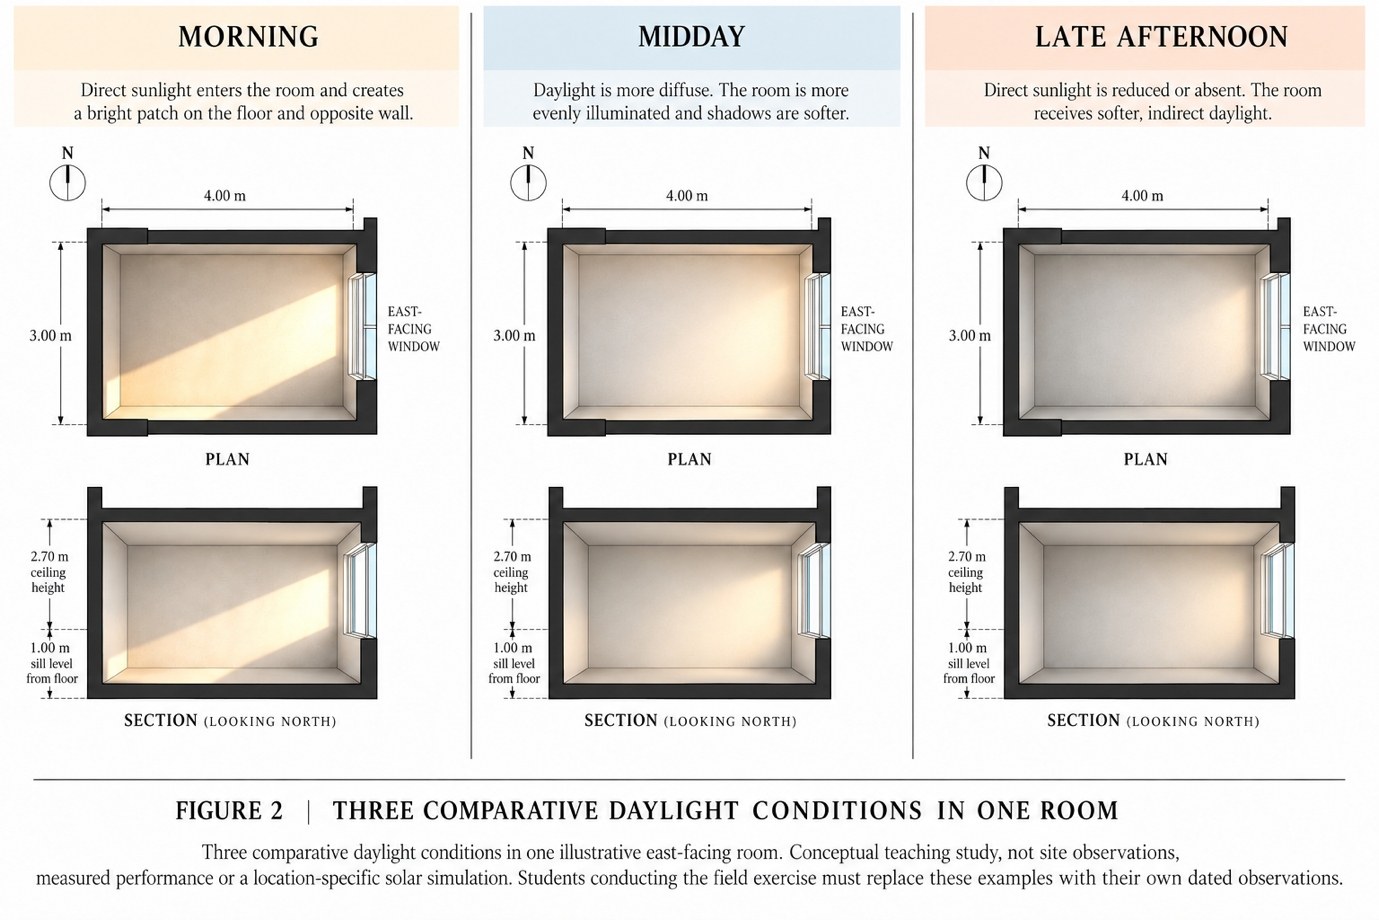
The strength of the final comparison lies in its consistency and honesty. A clearly documented modest change is more valuable than an impressive drawing that invents sunlight or hides uncertain conditions.
The aim is to make time legible through architecture.
PAGE 7
Only After the Observation Should Furniture Enter the Discussion
Until now, the exercise has focused on the opening, the room, and the changing light. Furniture and occupation now enter as questions to be examined against the recorded daylight conditions.
This sequence matters because people often propose furniture layouts before making environmental observations. A desk may sit directly beside a window because that position seems suitable for work. A reading chair may be positioned in the brightest part of the plan. A bed may be placed against a wall without considering whether direct sunlight affects it at a particular time of day.
These choices are not necessarily wrong. The problem is making them without investigating how the room actually behaves.
Students should return to their three drawings and select one proposed activity. A study desk is a useful example because it brings together the window position, the writing surface, the user, and, potentially, a computer screen. The question is not whether the desk is close to daylight, but what lighting conditions it would experience during the hours it is likely to be used.
If the proposed desk receives strong direct sunlight during part of the morning, students should consider what that means for its working surface and the user’s viewing direction. Would the sunlight fall across paper or a screen? Could the window or another bright surface appear behind the display? Will daylight conditions be more stable later in the day? The drawings may suggest questions about glare or contrast, but those effects must be checked from the intended seated position, not assumed from the plan alone.
A reading chair offers another example. A location near the window may be attractive during one observation period but comparatively subdued during another. The student can ask whether the chair’s likely hours of use coincide with the conditions recorded. A different position may provide a more consistent background, or the original position may remain suitable with additional shading or task lighting.
The purpose is not to establish a universal rule that furniture should be placed in the brightest or darkest part of the room. It is to demonstrate that occupation introduces another set of requirements against which daylight observations can be evaluated.
Students should therefore prepare one additional annotated plan showing the selected activity within the original room. Clearly distinguish the furniture from the observational drawings. This fourth drawing is a design proposal informed by observation, not an additional daylight measurement.
Beside the proposal, students should explain what evidence supports the chosen location and what still needs testing. A position may look promising in the three drawings but remain uncertain because the study covered only one day, did not include a seated-eye observation, or lacked glare and task-illuminance measurements.
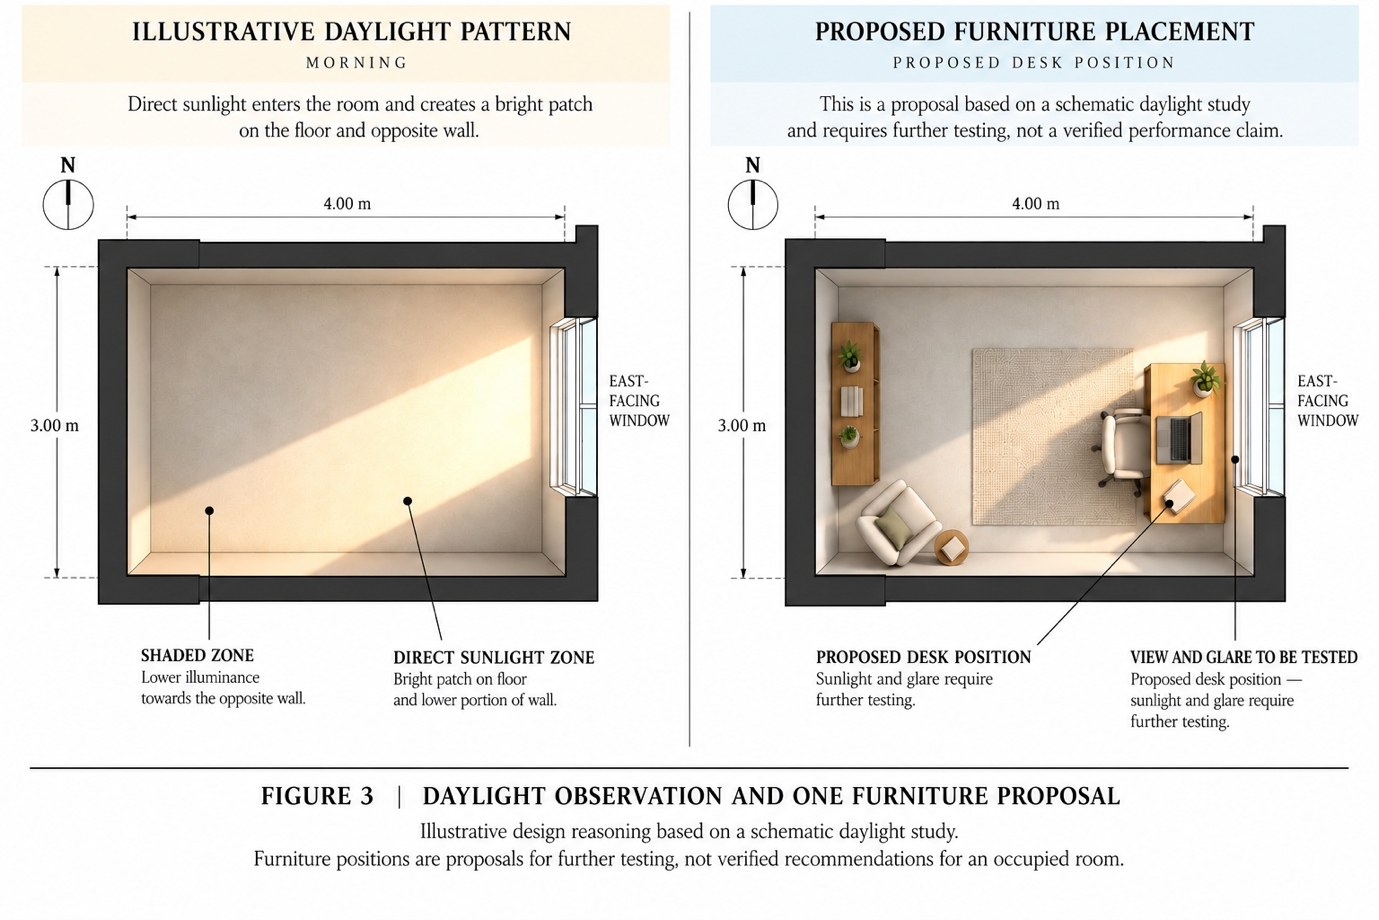
This is where the exercise becomes architectural rather than purely representational. Observation has begun to influence a decision, but it has not been mistaken for complete proof.
The student learns to use daylight evidence to make a proposal—and to recognise what still needs to be checked before accepting it.
PAGE 8
The Studio Exercise: Observe, Draw, Compare and Explain
The final task is to convert the ideas explored in this article into a reproducible piece of student work.
Each student should select one real room that can be visited safely at three times on the same day. The room should contain one clearly identifiable principal window. Before beginning, the student records the room’s approximate dimensions, the opening's position and size, its orientation, the principal interior finishes, and any significant external obstruction.
The student then prepares a fixed plan and section. These become the base for the entire investigation. The north arrow, window position, scale and geometry must remain unchanged in all three observation drawings.
Three visits are required: morning, midday and late afternoon. Select precise clock times to suit the room and record them honestly. During each visit, the student examines the visible daylight pattern, identifies any direct sunlight, records the surrounding shadow, and describes how the condition differs from the previous observation. Record weather, shading, and other changing circumstances rather than ignoring them.
Photographs may accompany the drawings, but they should be taken from a consistent viewpoint and their exposure limitations acknowledged. If illuminance measurements are available, the student must explain the instrument and measurement positions. If no measurements are taken, the submission must not invent values.
Once the three drawings are complete, the student prepares a short comparison explaining what changed, what remained similar, and which observations may be affected by weather or other limitations. Finally, the student proposes a location for one activity, such as reading or desk work, and identifies one further test needed before confirming the proposal.
Observation and Assessment Sheet
| Record | Student entry |
|---|---|
| Location / room | __________________________ |
| Observation date | __________________________ |
| Window orientation | __________________________ |
| Room and opening dimensions | __________________________ |
| Morning — time, sky condition, light and shadow | __________________________ |
| Midday — time, sky condition, light and shadow | __________________________ |
| Late afternoon — time, sky condition, light and shadow | __________________________ |
| Main changes between the drawings | __________________________ |
| Conditions that remained similar | __________________________ |
| Proposed activity and position | __________________________ |
| What the observations cannot establish | __________________________ |
| One further test required | __________________________ |
How the Work Should Be Evaluated
The submission is not judged by how dramatic the sunlight appears or how realistic the illustrations look. It is evaluated by the clarity of the investigation.
| Assessment criterion | Marks |
|---|---|
| Accurate and consistent room geometry, window position and orientation | 4 |
| Complete observation records, including date, time and conditions | 4 |
| Three clear drawings showing the observed light and shadow | 4 |
| Thoughtful comparison of changes, limitations and uncertainty | 4 |
| Reasoned furniture or activity proposal with a further test identified | 4 |
| Total | 20 |
A strong submission should let another student or tutor follow the investigation without guessing how the drawings were produced. It should distinguish visible evidence from interpretation and identify the limits of what can be concluded.
Where access to a real room is impossible, students may complete a separate hypothetical drawing exercise using the StudioMatrx teaching model. Such work must remain explicitly labelled Schematic Study — Not Field Observed. Do not present or assess it as though three real site visits occurred.
The exercise also has an important use beyond the classroom. For homeowners, the same observation process can reveal why an apparently well-positioned window does not always provide suitable daylight for a particular activity. For professionals, it demonstrates the value of consistent records before recommending changes to openings, shading, or furniture. For students, it offers a method they can repeat in more complex spaces and eventually develop through physical measurements or validated daylight simulation.
The exercise does not claim to produce a complete environmental assessment. It establishes a disciplined first step: observing a real condition, representing it consistently, comparing what changes, and asking what more must be known.
Architectural drawings already tell us where walls, openings, and furniture are located. A daylight study gives those drawings another responsibility. It asks them to describe how the environment interacts with the architecture over time.
A window may remain unchanged throughout the day, but its consequences do not.
Drawing the window tells us where the opening is. Drawing the shadow begins to tell us what the opening does.