
Lighting Design Basics, Room by Room
PAGE 1
Start With What The Room Has To Do
It is easy to begin lighting a room by looking at fittings. You open a ceiling plan, mark points, shortlist products, and the discussion quickly focuses on pendants, down-lights, wall lights, and lamps. But this sequence starts too late. Before deciding where a fitting should go, it is more useful to ask a simpler question: what actually happens in this room?
A living room may support conversation, television, reading, children playing on the floor, a quiet evening alone, and occasional laptop work. A kitchen may be used for preparation, cooking, washing, storage, cleaning, and informal conversation—a bedroom shifts between dressing, cleaning, reading, resting, and sleep. Even a corridor is not simply a space between rooms; it helps people understand direction, thresholds, handles, and level changes. Lighting becomes easier to plan once these activities are identified first.
That is why a room should not be treated as a single lighting condition. Architecture may define a single enclosure, but occupation divides it into different moments. The table has one job. The worktop another. A chair used for reading another. A wall carrying a painting may contribute visually without needing the same attention as the surface where hands are working.
The first useful step is to map activity before fixtures. Where do people sit? Where do they stand? What do they need to see clearly? Which surfaces are used directly? Which parts of the room help orientation? Which areas are primarily background? Which activities happen at the same time rather than separately?
These questions begin to reveal that not every part of a room requires the same kind of light.
A useful general layer may allow someone to enter the room, move through it, and understand its basic arrangement. But that does not provide enough attention where a particular activity takes place. A person reading at one end may need more localised light. A kitchen counter may need light directed toward the work surface rather than more brightness across the ceiling. A wall or object may deserve visual emphasis because it helps organise the room, while another area can remain quiet.
Thinking this way prevents a common mistake: asking a single source to do everything. A central ceiling fitting may provide useful general illumination, but it cannot serve reading, cooking, display, conversation, and quieter evening use equally well. The problem is not the fitting itself. The problem is expecting it to solve fundamentally different conditions.
This is where the idea of lighting layers becomes useful.
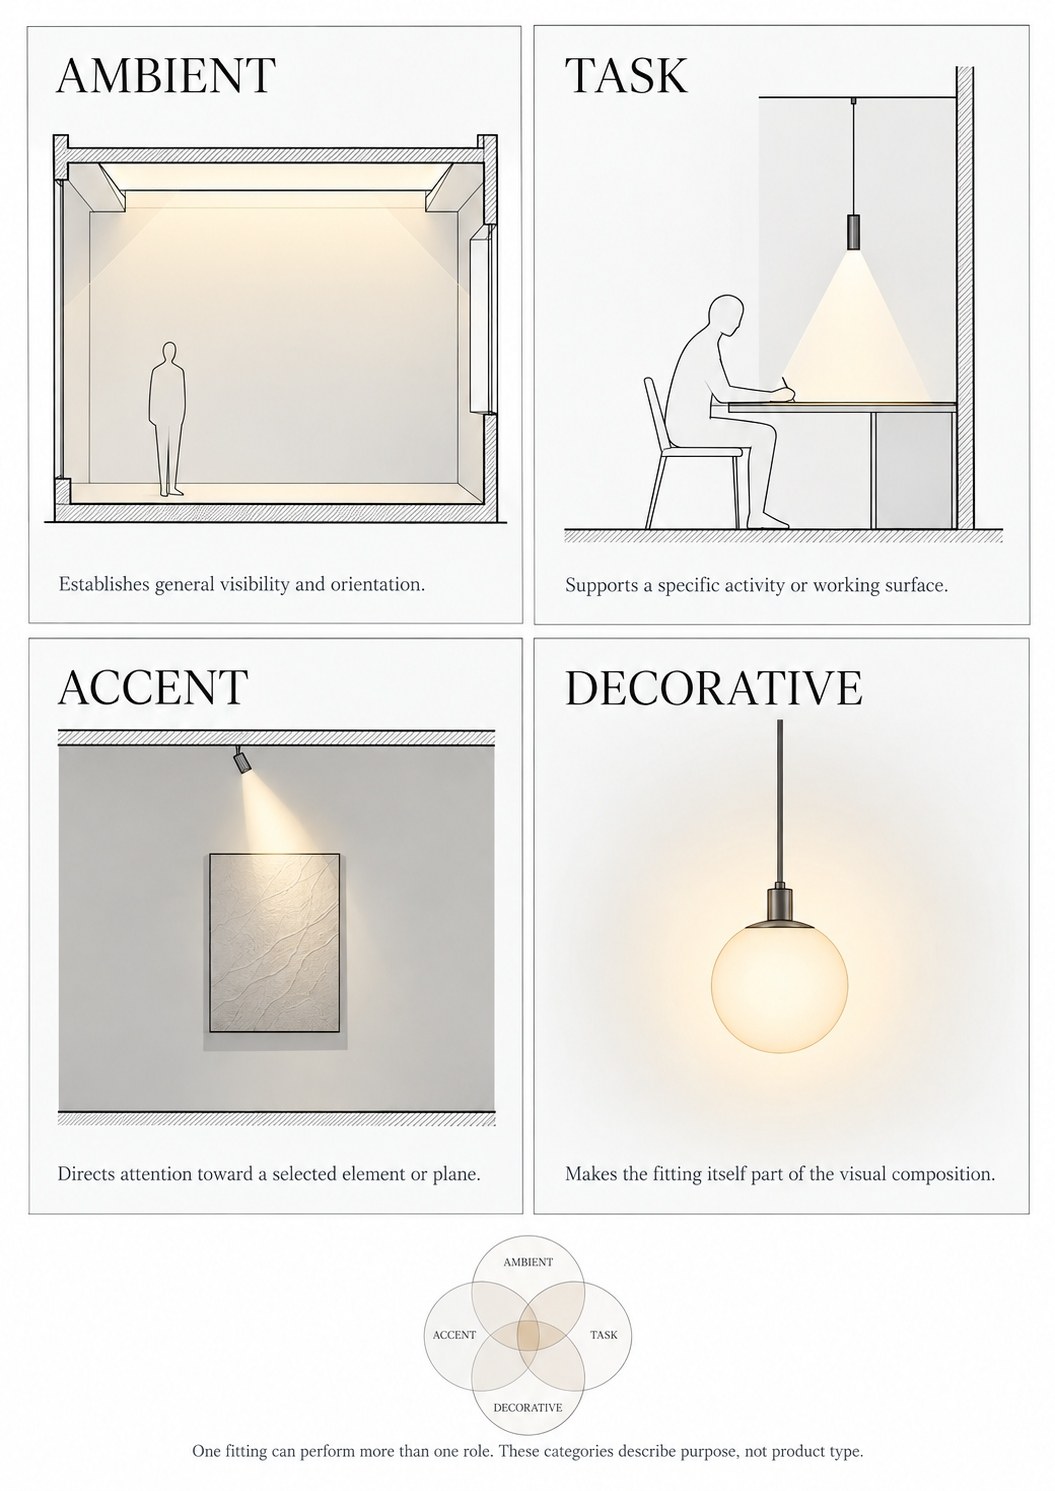
The word “layer” can make lighting sound more complicated than it is. In practice, it means different sources have different responsibilities. Some help us understand the room as a whole. Some support a task. Some guide attention toward a particular surface or object. Some are visible parts of the interior.
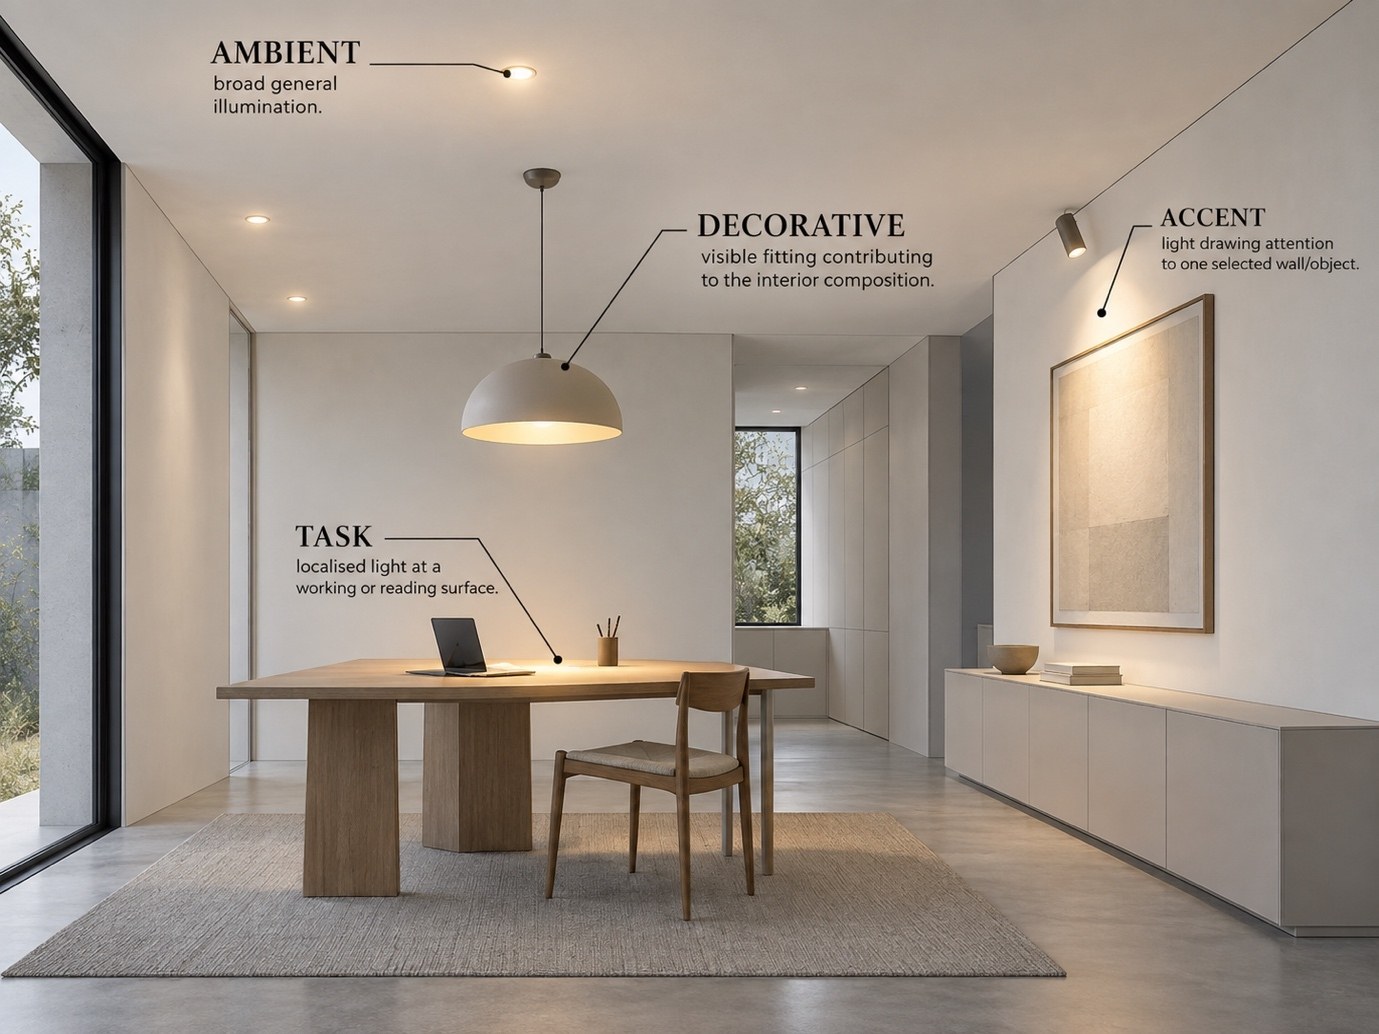
These roles are commonly described as ambient, task, accent and decorative lighting.
Ambient light is the broadest of the four. It provides a general level of illumination that helps the room function as a whole. It might come from the ceiling, reflected light, wall-based sources, or several sources working together. Ambient light does not mean that every surface must be equally bright. Its purpose is to give the room enough overall visibility and orientation for ordinary use.
Task light is more specific. It connects directly to an activity. It may help someone read, prepare food, work at a desk, use a mirror, or perform another visually demanding action. Task lighting works best when you consider its position in relation to the person and the work surface. A bright source in the wrong location may be less useful than a modest source placed correctly.
Accent light has another role. It guides attention. It may reveal artwork, a textured wall, a shelf, an architectural detail, or another selected element within the room. Its purpose is not to make the entire space brighter but to establish hierarchy—to make one part of the composition more visually present than another.
Decorative light differs because the fitting itself contributes visibly to the interior. A pendant, chandelier, sculptural lamp or distinctive wall fitting may be chosen partly for the object it introduces into the room. It can also provide useful illumination, but its visual presence is part of its role.
These four categories are not rigid compartments. One source may perform more than one job. A pendant over a dining table may be decorative while also contributing task and ambient light. A wall light may provide general illumination while also becoming an accent on the wall. The categories are useful not because every fitting must be assigned permanently to one of them, but because they force us to ask what the source is expected to do.
That question is the foundation of this Practical.
Before we move room by room, the method is simple:
Understand the activity. Identify the surface. Decide what needs attention. Then decide where the light should come from.
Only after that does the fitting become the question.
PAGE 2
One Room Does Not Need One Setting
Once you organise lighting around activity, another idea matters: the same room does not always need to behave the same way.
Consider an ordinary evening at home. A living room may begin with several people moving through it, talking, and using different parts of the space. Later, one person may read while another watches television. Later still, the room may be used only for sitting quietly before bed. The architecture has not changed, but the visual needs have.
If every source in that room is connected to one switch, all those moments are forced into the same lighting condition. Everything is either on or off at the same time. The room may be illuminated, but it has little ability to respond to changing use.
This is why lighting design is also a question of control.
Control does not mean a complex automation system. At its simplest, it means deciding which sources operate independently. General lighting might form one group. A wall-based layer another. A reading light might remain separate. A dining or display light may need its own control. The key point is that the user should not have to illuminate every layer for one activity.
Independent control changes a room's usefulness by letting its hierarchy shift.
During cleaning, broader illumination may be useful because more of the space needs to be visible. During conversation, the room may rely on a combination of general and lower-level light. During television viewing, some sources may be unnecessary or distracting. When reading, one localised source may matter more than the rest.
The lighting plan therefore follows time as well as space.
This matters particularly in homes because domestic rooms rarely perform only one function. A dining table may become a homework surface in the afternoon. A kitchen counter may also serve as a breakfast table. A bedroom may become a temporary work area. An entrance may sometimes need stronger illumination for cleaning or organising belongings and much less at other times.
The more a room changes use, the more useful it becomes to separate the sources that support those different conditions.
Dimming introduces another level of control. It lets a source's intensity change rather than switching fully on or off. But dimming should not substitute thoughtful placement. A poorly positioned light remains poorly positioned even when dimmed. Control can refine good lighting; it cannot correct bad placement.
The same principle applies to the number of fixtures. Adding more sources does not necessarily create a more flexible room. Flexibility comes from giving each source a reason to exist and controlling those reasons appropriately.
This distinction matters because layered lighting can become an excuse for accumulation. A ceiling layer is added, then wall lights, concealed strips, decorative pendants, and lamps. Soon the room contains many sources but no clear hierarchy.
Layering should work in the opposite direction. It should help decide which light is necessary at which moment.
You may reduce the general light because the task light is doing its job. The wall layer may become more important in the evening. A decorative fitting may remain visually present without providing most of the room’s illumination. A background surface may be left quieter because the occupied area already has enough attention.
This is where darkness becomes useful within a practical lighting strategy, not as an aesthetic effect imposed on the room, but as the natural result of not illuminating areas with no immediate reason to be prominent.
The goal is not to create theatrical scenes for ordinary life. It is to make the room adaptable without requiring the user to struggle with the lighting every time an activity changes.
One more condition must be recognised before moving room by room: daylight is already part of the lighting design.
Don't plan artificial light as if every room begins in darkness. During the day, windows, doors, skylights, and adjoining spaces may provide substantial illumination. Some parts of a room may need no artificial light for hours. Others may remain dim even when the room feels bright.
Daylight's amount and direction also change. Morning may illuminate one wall while leaving another quiet. Afternoon conditions may reverse this. A deep-plan room may receive plenty of light near the opening but much less farther inside.
Artificial lighting becomes more useful when it responds to existing conditions rather than competing with them.
This does not mean artificial light must imitate daylight. The two do not need to produce the same atmosphere. Instead, they should be understood as parts of the same daily sequence. Daylight carries the room through one period; artificial light gradually takes over where and when needed.
The homeowner doesn't need to start by memorising technical terms or buying a particular fixture. A more useful start is to observe the room over time.
Where is the first useful daylight in the morning? Which working surface becomes difficult later in the day? Which activity needs more localised attention? Which wall already receives enough light? Which source would benefit from independent control? What can remain quieter when the room shifts to evening use?
Those observations become the basis for the room-by-room decisions that follow.
The method remains consistent:
Activity first. Surface second. Light third. Control last.
Once you understand those four decisions, choosing the right lighting becomes much easier.
PAGE 3
Living Room — One Room, Several Ways Of Using It
The living room is often treated as one space, but in daily life it rarely functions as one thing. It can be the most social room in the house, the quietest room in the evening, where someone reads, watches television, or simply sits without needing every surface fully illuminated. That variety is why one fixed lighting condition is rarely enough.
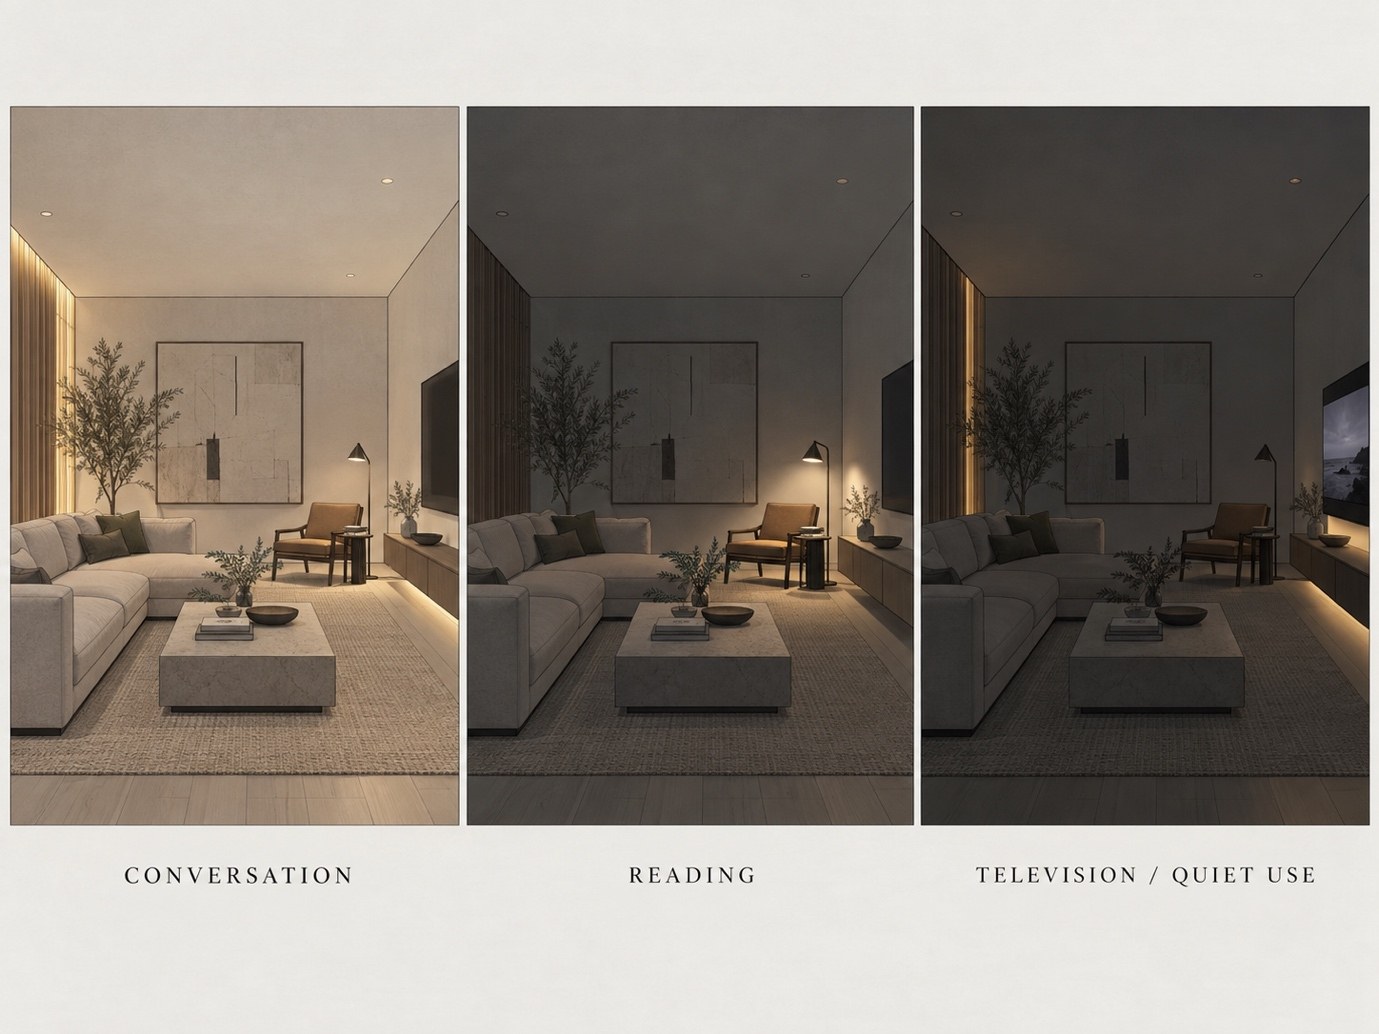
The first mistake is assuming general brightness will support all these activities. A room may be evenly lit from above yet feel visually unresolved because the light does not respond to where people sit, look, or spend time. Conversation does not require the same lighting as reading. Television viewing does not need the same brightness as cleaning. A quiet evening does not need as much illumination as a busy gathering.
This is where the living room benefits from separating layers. General light should make the room easy to enter, understand, and move through, but it does not need to stay at maximum intensity all evening. A localised light beside a chair can support reading without forcing the whole room into the same condition. A wall or artwork may receive accent light to add visual depth, while another corner can remain subdued.
The important point is that lighting should follow different zones of occupation rather than treating the room as one undivided space. A seating arrangement creates a social centre. If the entire ceiling is equally bright but the seating area has no local or vertical layer, the room may feel illuminated without feeling settled. Bringing light closer to the occupied zone can make the seating area feel more intentional without increasing the total light.
Television adds another requirement. Strong light directly opposite or around the screen can be distracting, while a completely dark room creates an abrupt contrast between the bright screen and the surroundings. The ideal condition is usually in between: enough surrounding light to prevent the screen from being the only luminous object, but not so much that the room competes with it.
Reading creates a different relationship. The task surface is the book, paper, or device in front of the reader. The most useful source reaches that surface without causing glare or placing the user’s body between the light and the page. A floor lamp, table lamp, wall-mounted reading light, or another local source can support this activity without changing the entire room.
Conversation, meanwhile, depends less on a single task surface and more on the people within the seating area being comfortably visible to one another. This is where softer general illumination, reflected light and lower-level sources can work together. The room does not need to be uniformly bright, but the faces of the people occupying it should not disappear into deep contrast while every surrounding wall is strongly illuminated.
The visual hierarchy of the room can also be shaped by what remains quieter. Not every corner needs emphasis. If one wall receives enough daylight during the day, it may not need to become a major illuminated feature at night. If the seating area is established through local and ambient light, a secondary corner can remain subdued without feeling unfinished.
This is where the living room demonstrates independent control. General light, local task light, and accent or wall light should not necessarily operate together. When separated, the room can move between conditions more naturally.
During active general use, broader illumination may be helpful. During reading, the local source can take priority. During television viewing, you can reduce some ceiling or accent sources. During a quieter evening, the room may rely more heavily on lower-level and reflected light while the general layer recedes.
The lighting plan therefore mirrors the rhythm of occupation.
This does not require a complicated control system. Even a few thoughtfully separated circuits can make the room more adaptable. What matters is that the user is not forced to choose between “everything on” and “everything off.”
The living room is also a place where daylight may vary. A large window may provide generous daylight, making artificial light unnecessary for several hours. But the part of the room closest to the window may perform very differently from a deeper seating area. As daylight fades, artificial light should gradually support zones that lose useful illumination rather than switching the entire room to a single night-time condition.
This is why the living room should be thought of as a sequence rather than a fixed scene.
Morning may belong mostly to daylight. Afternoon may require only a little additional support in deeper areas. Early evening may use a combination of ambient and wall light. Later, a reading lamp or one quieter layer may be enough.
The room does not need one perfect lighting setting.
It needs several useful ones.
PAGE 4
Living Room — Control The Change, Not Just The Light
A living room becomes flexible only when you can control its different lighting layers separately. The design may include good general light, a useful reading source, and a carefully placed wall or accent layer, but if all switch on together, much of that flexibility is lost. The room may have several lighting ideas yet still behave as one fixed condition.
This is why control should be considered alongside the fittings. Independent lighting controls and dimming allow the living room to respond to different activities throughout the day.
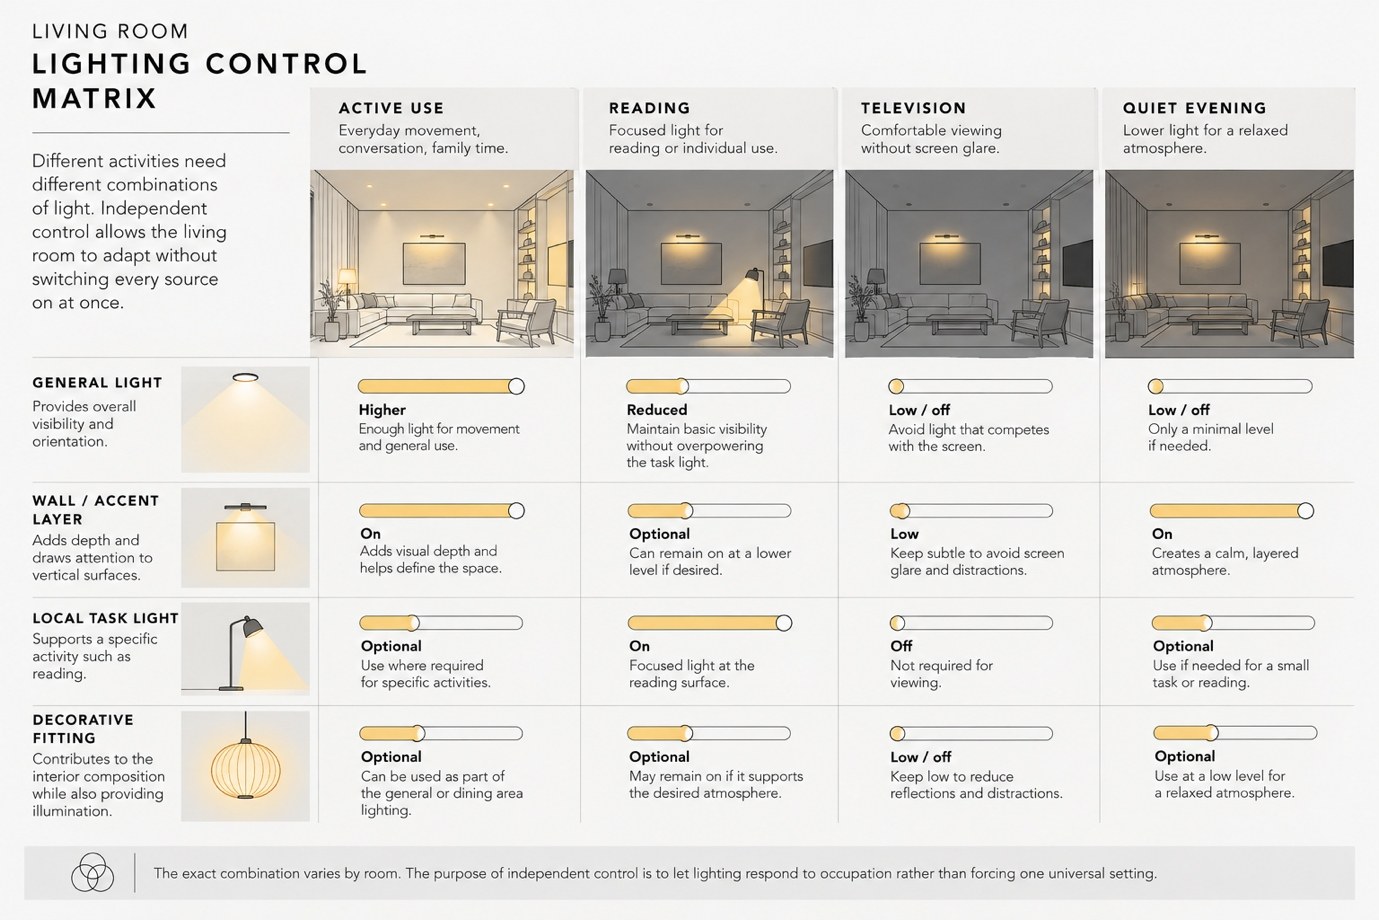
A useful way to think about the living room is not as one lighting scene but as a sequence of ordinary states. During active use, more of the room may need to be visible. When people talk, the seating area and nearby vertical surfaces carry most of the visual attention. When someone reads, a local source becomes more important. Later in the evening, you may reduce broader illumination while keeping one or two quieter layers.
The key point is that these changes should not require the user to switch each source individually every time. A practical lighting plan groups sources by function. General illumination might form one circuit, wall or accent lighting another, and local task lighting remain separately controlled. If a room has a decorative pendant, it may need its own control if its visual role differs from the room’s general light.
This does not mean every living room needs a complicated control panel. Even a simple three-circuit arrangement can significantly change how the room performs. What matters is that the controls reflect how the room is actually used.
Dimming adds another level of adjustment, but it works best when it supports an already clear lighting hierarchy. If the general layer is too dominant, dimming it can make the wall or local sources more visible. If a reading light is properly positioned, you can adjust its intensity without increasing the entire room's brightness. This way, dimming shifts the balance between layers rather than simply making everything brighter or darker together.
The location of the controls also deserves attention. A switch placed only at the entrance may be convenient when entering the room, but less useful once someone is seated. Local task lights often benefit from controls close to where they are used. A reading light that requires someone to cross the room every time it is switched on or off is technically functional, but not especially convenient.
Controls should also respond to daylight. During the day, the window may already provide most of the room’s general illumination. Switching on the entire artificial-lighting system simply because one deeper corner needs support wastes the opportunity to use the room selectively. A separate wall or task circuit lets artificial light supplement daylight rather than replace it.
As evening approaches, that relationship gradually reverses. Daylight becomes weaker, the window stops functioning as the dominant source, and artificial layers begin to take over. A well-planned room can make that transition gradual. There need not be a sudden moment when every artificial source is switched on at once.
This is particularly useful in a room used by several people. One person may want enough light to read, while another prefers a quieter setting. Someone may watch television while another moves through the room. The lighting should support these overlapping activities rather than forcing everyone into the same visual setting.
The living room therefore becomes less about finding one perfect lighting level and more about creating a small family of useful conditions.
A room with several carefully chosen sources but no independent control is only partly layered.
A room becomes adaptable when the user can decide which layer matters now.
PAGE 5
Dining — Make The Table The Visual Centre
The dining table is a prime example where lighting should be guided by activity, not by the fixture itself. People gather, interact, and remain seated for extended periods. Lighting should make the table feel intentional while maintaining its connection to the rest of the room.
A dining space is most effective when the table serves as the visual centre. This does not require it to be the brightest object or to have a dramatic pendant. The key is for lighting to give the table enough presence to organise the space, making it clear where activity and attention are focused.
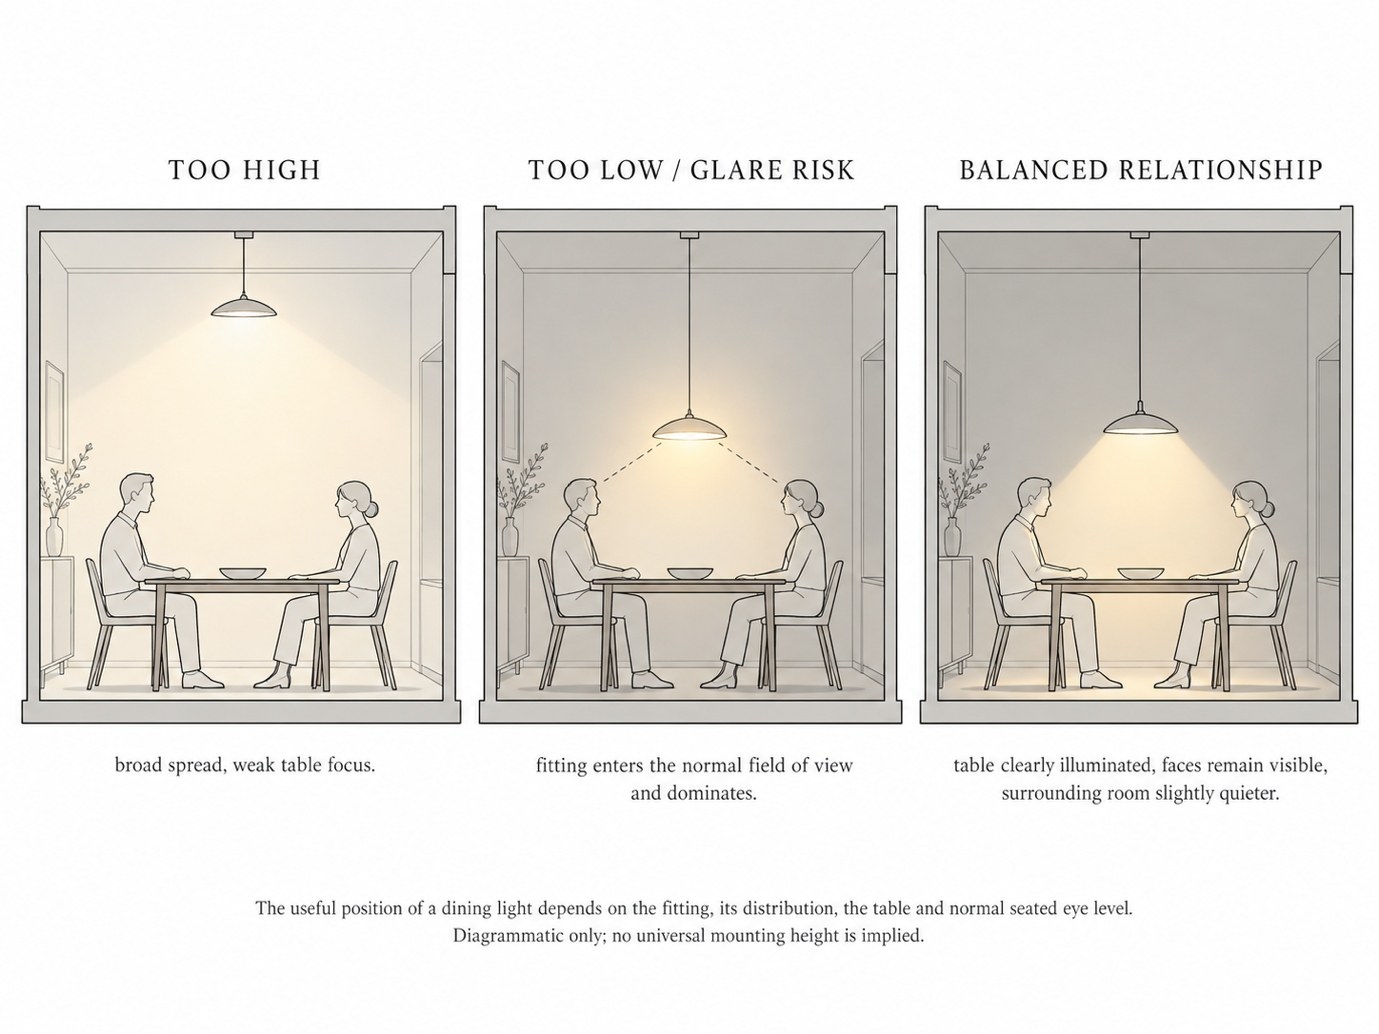
The relationship between the light source, table, and eye level is crucial. If the light is too high, the table may lose focus. If it is too low, it can obstruct views, dominate the space, or cause glare. The optimal position depends on the fixture’s form, its light distribution, and the table’s dimensions.
The goal is not to prescribe a universal hanging height, but to create a comfortable relationship between those seated, the light source, and the table surface.
The table needs sufficient illumination for food and objects, but lighting the faces around it is equally important. Strongly lighting the tabletop while leaving people in shadow creates imbalance. Conversely, a very bright surrounding room can diminish the table’s focus, even if the table is well lit.
This is why dining lighting benefits from contrast, but not isolation.
The table can be the main focal point, while the surrounding room remains more subdued. Nearby walls or vertical surfaces should have softer lighting to prevent the dining area from appearing isolated. The balance between these layers determines whether the space feels cohesive or fragmented.
A pendant can create focus, but it is not the only solution. Ceiling-mounted, track, concealed, or wall-based lighting can also be effective, depending on the architecture. The fixture should be chosen to meet the lighting needs, not the reverse.
This is especially important in open-plan homes, where the dining area is often between living and kitchen zones. Lighting can define the dining table as a distinct space without partitions. Adjusting lighting level, direction, or height can establish the zone even when floors and ceilings are continuous.
The dining table often serves multiple purposes, such as homework, laptop work, or food preparation. In these cases, subdued evening lighting may not suffice. A flexible arrangement allows the table light to increase or combine with broader lighting when greater visibility is needed.
At dinner, broader lighting may not be needed. The focus can return to the table, with surrounding light reduced but not turned off entirely.
Dimming is especially valuable here. It enables the same source to support various activities without altering the overall lighting plan. Brighter settings suit cleaning or work, while lower levels support dining and conversation. The table remains central, but its visual intensity adapts to use.
Consider the table’s material when selecting a light source. Glossy surfaces create stronger reflections, while pale surfaces reflect more light than dark timber or stone. The same fixture can behave differently depending on the surface. The table is part of the lighting condition, not just a surface for light.
Surrounding surfaces also influence lighting. A nearby wall can reflect light into the space, while a darker background increases contrast around the dining area. An open view into a bright room may reduce the table’s emphasis. Dining lighting works both vertically and across the wider field of view.
The practical question is simple: when someone sits down, can they see the food, the people around them and the table comfortably, without the fitting itself becoming the dominant thing they notice?
If the answer is yes, the lighting is doing its job.
The table should feel important due to its illumination, not because the fixture above it dominates the room.
PAGE 6
Kitchen — Light Where The Hands Actually Work
The kitchen is one of the easiest rooms to make bright and also one of the easiest to light badly. The ceiling can be filled with fixtures, the floor clearly visible, yet the room can still fail where light matters most: the worktop.
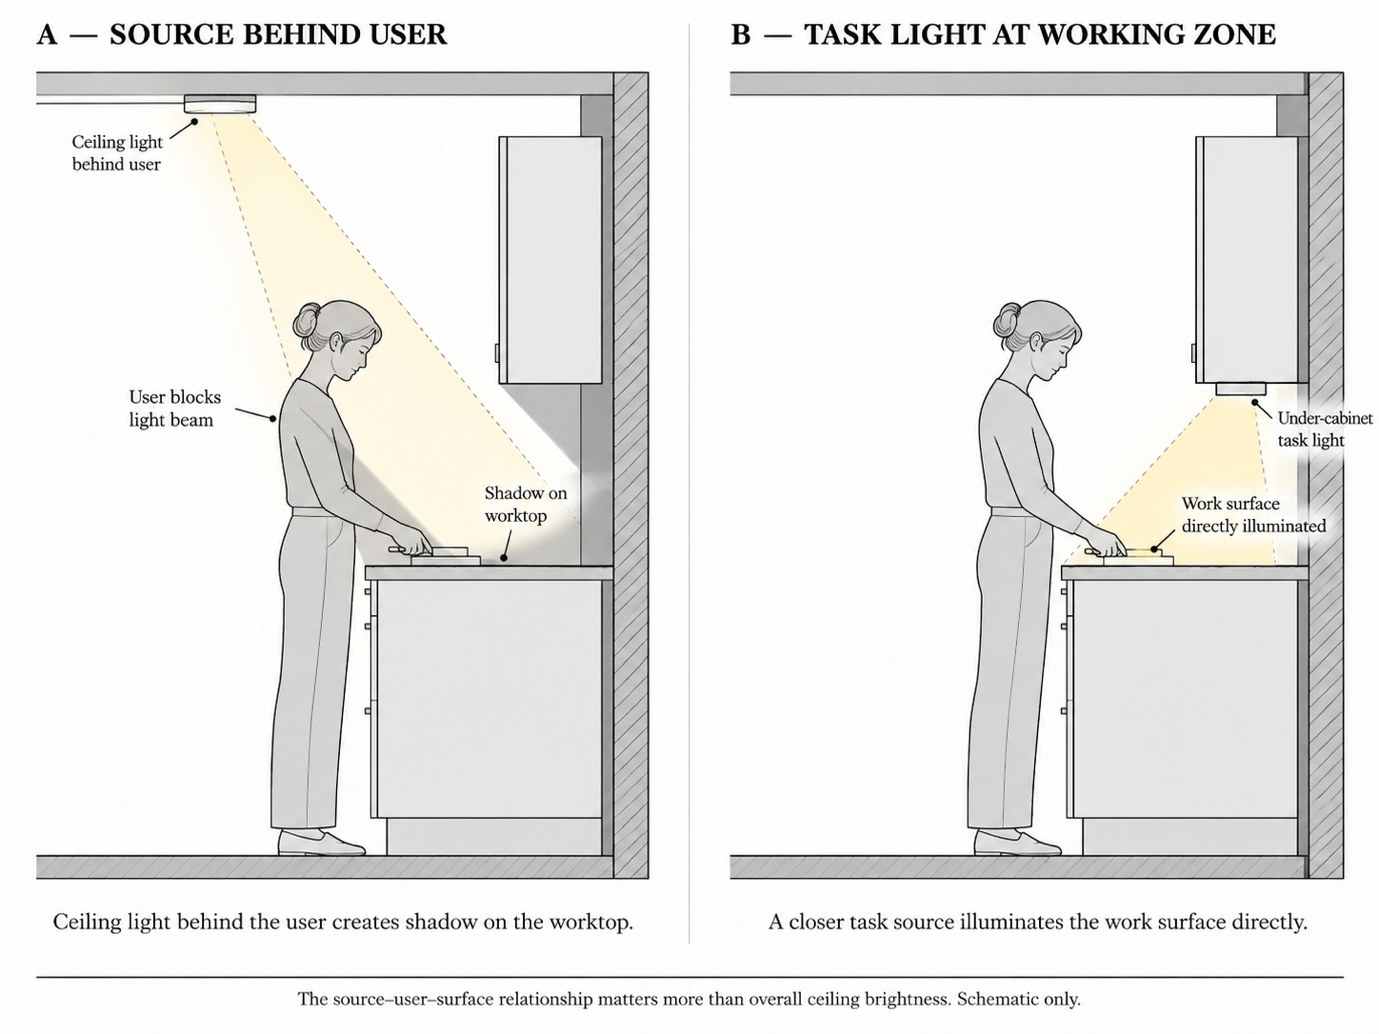
This happens because kitchen lighting is often planned from the ceiling down rather than from the activity up. The ceiling gets a regular pattern of fittings, but the person working at the counter stands between those fittings and the surface below. The result is predictable. The room looks illuminated, yet the user’s body creates shadow exactly where cutting, washing, measuring, or preparing food takes place.
The useful starting point, then, is not the ceiling plan. It is the working surface.
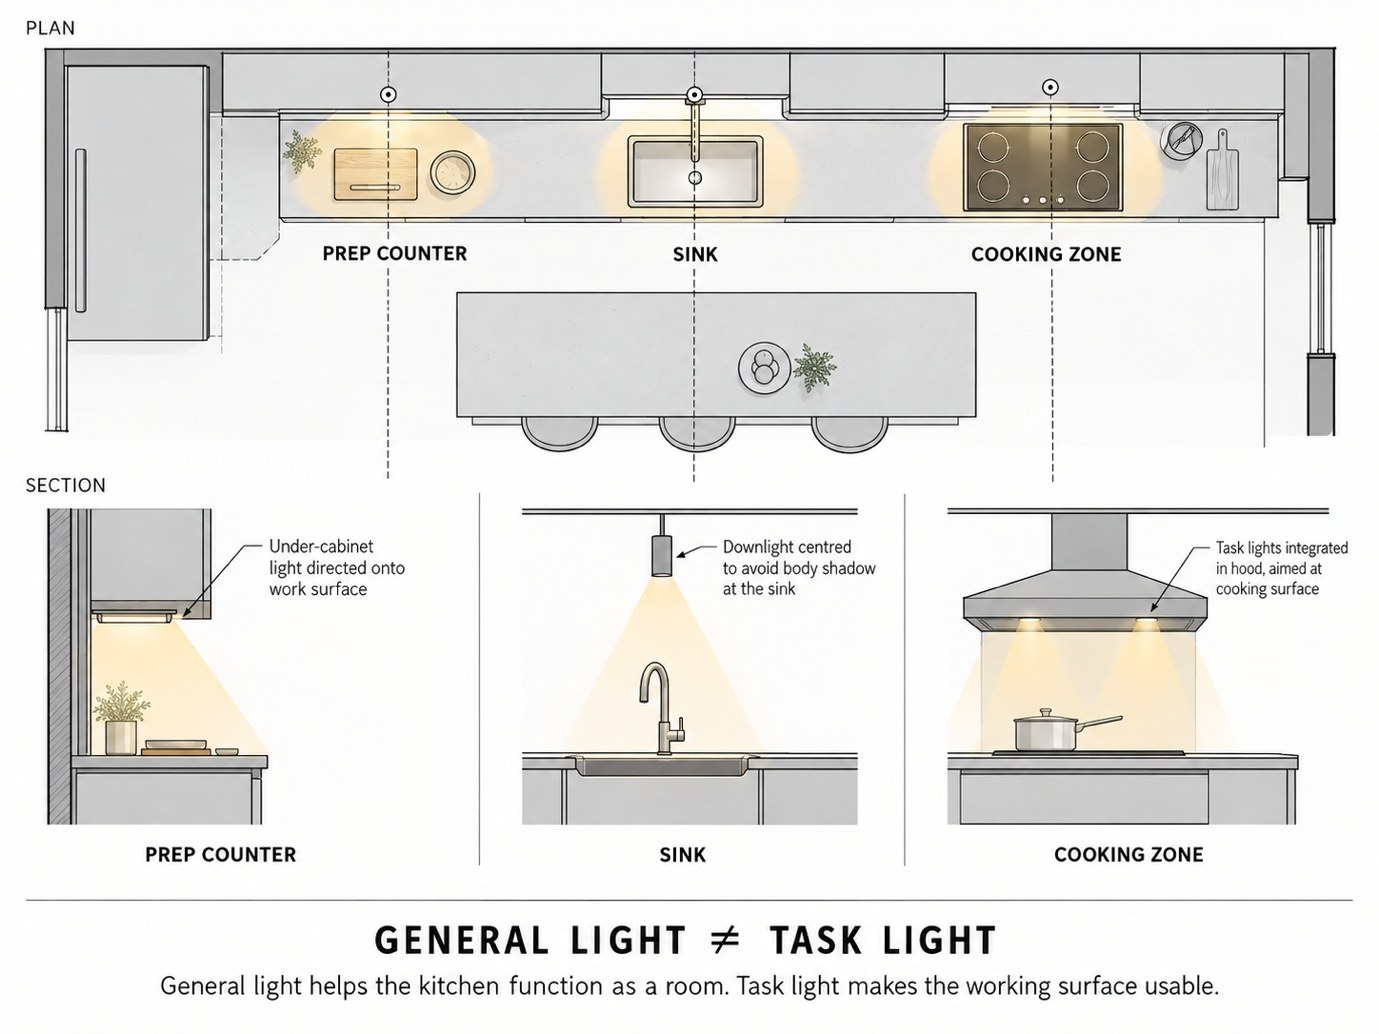
A kitchen contains several different working zones. The preparation counter, sink, cooking area and any frequently used secondary surface each have their own relationship with the person standing in front of them. Good lighting should reach those surfaces from a direction that remains useful once the user is actually in position.
This is why ceiling light alone can be unreliable at counters below upper cabinets. The fitting may be above the worktop, but if it sits behind the user, the person becomes the obstruction. More brightness from the same direction does not solve the problem. The geometry is still wrong.
Bringing the task source closer to the working surface changes that relationship. Light integrated beneath an upper cabinet, within a shelf, from a carefully positioned ceiling source, or another architectural element can place illumination in front of the user rather than behind. The aim is not to produce a dramatic strip of brightness but to make the work surface legible where the hands are active.
The same principle applies at the sink. Washing and cleaning involve looking down into a contained area. If the source sits too far behind, the user’s head and upper body may cast a strong shadow. If placed too far forward or overly exposed, it may become visually uncomfortable. The most useful condition lets the basin and surrounding surface remain visible without making the source the dominant object.
The cooking zone adds another layer. Visibility matters not only at the horizontal counter but also around the hob or cooking surface. The light should help the user distinguish ingredients, vessels, and the immediate working area. Again, the question is not just whether the room is bright enough but whether the active zone is illuminated from a useful direction.
Kitchen lighting therefore benefits from dividing the room into general and task lighting.
General light helps with movement, cleaning, storage, and orientation. It makes the room usable as a whole. Working light is more localised and supports the specific surfaces where detailed activity happens. One does not replace the other.
The mistake is expecting the general layer to solve every task.
This becomes particularly important in kitchens with deep worktops, dark finishes, or upper cabinets. Darker surfaces reflect less light back into the field of view. Deep counters place the working zone farther from the nearest ceiling source. Upper cabinets can block or reshape the light reaching the surface below. The same ceiling plan can behave very differently depending on the architecture.
The kitchen should be read as a section, not just a plan.
Where is the user standing? Where is the source? What lies between the source and the worktop? Where does the light land? Where does shadow fall?
Once those relationships are visible, the lighting problem becomes much easier to understand.
PAGE 7
Kitchen — Build The Light Around The Workflow
Once the working surfaces are properly illuminated, the next question is how the rest of the kitchen should support them.
A kitchen does not need every surface to compete visually. The worktop, sink, and cooking areas usually carry the most visual demand. Tall storage, cabinet fronts, splash-backs, and circulation zones play different roles. If everything is illuminated equally, the room may become visually busy without being easier to use.
This is where hierarchy becomes practical.
The active work surface should be easy to read. The surrounding space should provide enough visibility for movement and storage. Selected vertical surfaces may receive light to help define the room, but they should not overpower the places where work happens.
The relationship between light and cabinetry is important. Upper cabinets can create deep shadows beneath themselves. Open shelves can interrupt a wall wash. Reflective splash-backs may return strong highlights. Dark stone surfaces absorb more light than pale ones. Glossy cabinet doors may reveal the source more clearly than expected. Lighting must respond to the kitchen's materials and geometry rather than follow a standard template.
This is why concealed lighting needs careful treatment. A continuous strip beneath a cabinet can be useful if it distributes light evenly across the worktop, but it should not become a decorative line brighter than the surface it illuminates. The purpose is to reveal the work zone, not to advertise the fitting.
Placement within the cabinet depth also matters. A source placed too far back may create a bright splash-back while leaving the front edge of the worktop subdued. A source too close to the front may be directly visible from standing or seated positions. The right location depends on the cabinet, counter depth, diffuser or profile, and source distribution.
The useful question remains the same: where does the light actually land?
Kitchen islands introduce another condition. Unlike a perimeter counter, an island may be approached from several sides and may support more than one activity. Food preparation, serving, informal eating and conversation may all happen at the same surface. The lighting therefore needs to support both task clarity and how people gather around it.
A decorative pendant may contribute visually to the island, but the kitchen should not depend on it just because it is above the surface. If its distribution does not support the worktop, another layer may be necessary. Decorative presence and task performance are not the same.
This is where independent control becomes useful. General ceiling light, task lighting at worktops, and decorative or island layers do not always need to operate together. During preparation, the working layer may matter most. During cleaning, broader general light may be more useful. During informal evening use, the task layer may reduce while selected local or decorative sources remain.
A kitchen that allows these layers to operate separately can adapt without becoming over-lit.
The same principle applies during daylight hours. Kitchens with windows may receive strong daylight at certain times, especially on one side of the room. The task lighting strategy should acknowledge and reflect that natural light. A counter near a window may need little artificial support in the morning, while a deeper counter remains dim. Later, those conditions may change.
Artificial lighting should respond to that variation.
The most useful kitchen lighting is therefore not the system with the most fittings. It is the one that makes the working surfaces consistently legible as occupation and daylight change.
The test is simple.
Stand where someone actually cooks.
Place your hands where the work happens.
If your body creates the dominant shadow, the room may be bright, but the task lighting has not yet been solved.
PAGE 8
Bedroom — From Dressing Brightness To Evening Quiet
The bedroom clearly shows why a room should not have only one lighting condition. It may be the quietest room at night, but it is also used for dressing, cleaning, organising clothes, reading, packing, finding belongings, and sometimes working. These activities require different amounts, directions, and distributions of light.
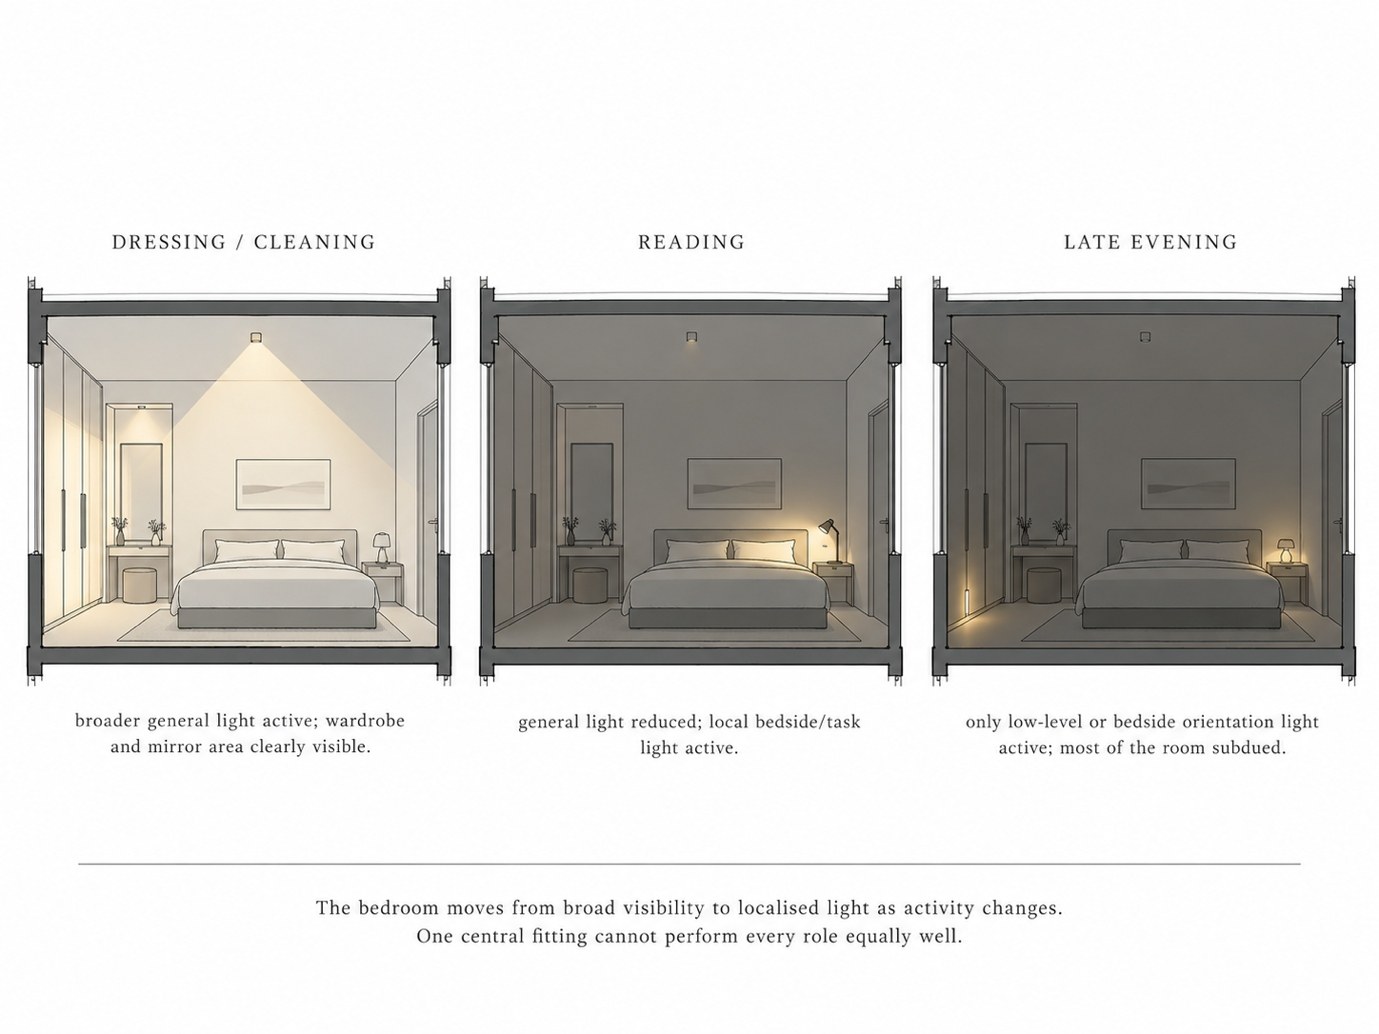
A single central fitting can make the room visible, but visibility alone does not make lighting adaptable. During cleaning or dressing, broader illumination helps because more of the room needs to be clearly visible. Later in the evening, that brightness may feel unnecessary. The bedroom benefits from a system that shifts between a more active and a quieter condition rather than relying on one source for both.
The first layer is general illumination. It should make the room easy to understand, help you move safely, and reveal storage or floor areas when needed. It may come from the ceiling, reflected light, wall sources, or a combination. The important point is that the general layer should not be the only one.
The bedside area creates a more local need. Reading, reaching for an object, checking a phone, or getting into bed does not require the entire room to be brightly lit. A bedside lamp, wall-mounted reading light, or another local source can provide useful light at the scale of the person rather than the room.
Its position matters. A reading light should illuminate the page or task area without shining into the reader’s eyes or disturbing another person. This is especially important in shared bedrooms, where one person may want light while the other wants darkness.
The dressing area creates another condition. Here, the goal is clarity, not atmosphere. Clothing, storage, and the person using the space need to be visible without harsh shadows. If a wardrobe or mirror is lit only from directly overhead, the face or clothing can fall into uneven shadow depending on where the person stands. A more useful arrangement considers both the person and the vertical surface being viewed.
This does not mean the bedroom needs many fixtures. The few sources it has should each have a distinct role.
A broad layer supports active use. A bedside source supports reading or late-night use. A wardrobe or mirror zone can get additional light only where needed. These layers can be controlled separately, so the room isn't fully lit just because one activity is happening.
Control is especially important because the bedroom changes more dramatically than most rooms over an evening. Earlier, someone may be dressing or organising clothes. Later, the room may be used for reading. Later still, only enough light for orientation is needed. The lighting should reduce gradually as these needs change.
This is where dimming can help, but it is not a substitute for good placement. A badly positioned central fitting remains badly positioned even when dimmed. The room works best when sources have clear roles and dimming adjusts those roles rather than rescues them.
Switch placement deserves more attention. A bedroom often needs control both at the entrance and near the bed. If every source can only be switched from the doorway, the user may have to cross the room in darkness or leave a bright light on longer than needed. Simple control near the point of use makes the room more practical.
Daylight also influences the bedroom. Morning light may provide enough illumination for much of the room. A wardrobe or dressing area farther from the opening may still need support. In the evening, the hierarchy changes as artificial light takes over.
The useful lighting strategy therefore follows the room through time.
Morning may be almost entirely daylight. Dressing may need broader visibility. Reading may depend on one local source. Late evening may need only a low-level or bedside layer.
The bedroom does not need one light that does everything.
It needs a small number of lights that know when not to do everything at once.
PAGE 9
Bathroom — The Face Is A Separate Lighting Problem
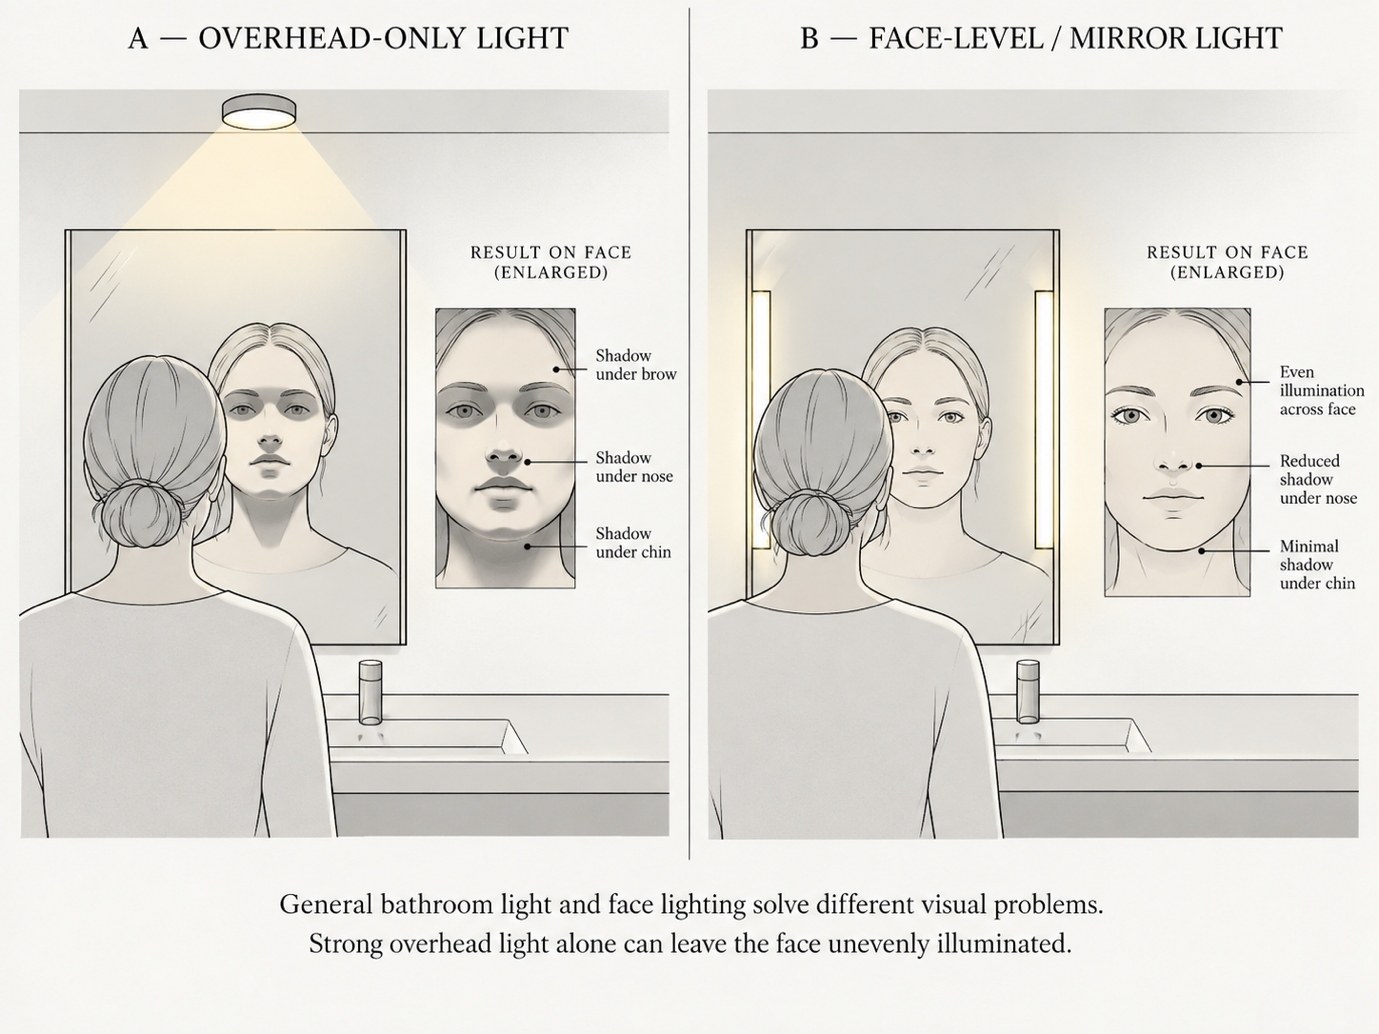
Bathrooms are often planned as if one ceiling light can solve the whole room. It may make the floor, walls, basin and shower visible, but when someone stands in front of the mirror, another lighting problem appears. The face is a vertical surface, and light from above does not always reveal it evenly.
When the strongest source is directly overhead, the forehead, nose, eye sockets and chin can cast shadows. The bathroom may be bright overall, but the mirror reflection can still feel harsh or uneven. This is why mirror lighting should be treated separately from general bathroom illumination rather than assumed to be a by-product.
A useful starting point is the relationship between the person, the mirror and the source. Light must reach the face from a direction that supports visibility without causing glare. A source placed near face level, beside or integrated around the mirror, or carefully positioned above it behaves very differently from a ceiling source several feet away.
This does not mean every bathroom needs lights on both sides of the mirror. The strategy depends on mirror size, wall layout, basin position and how the source distributes light. The principle is more important than the product: the face should not depend entirely on light falling vertically from the ceiling.
General lighting still matters. It helps people enter the room, understand the floor, use the shower, clean the space and move between fixtures. But these are different visual tasks from looking closely at a face in the mirror. One source can contribute to both, but you shouldn't assume it will perform equally well at both.
The mirror can also complicate the situation. Because it reflects whatever is behind the viewer, a bright exposed source can become visually dominant even if not aimed directly at the face. This is why source visibility matters as much as position. A fitting that produces useful light may still feel uncomfortable if its brightness is repeatedly reflected into the normal line of sight.
Wall colour and surrounding material also influence the condition. Pale surfaces return more light around the face, while darker finishes produce stronger contrast. Glossy stone, mirror edges or polished metal can introduce additional reflections. The bathroom works as a small reflective environment rather than a neutral box.
This is where the distinction between seeing the room and seeing yourself clearly becomes important.
A bathroom can be adequately illuminated for movement and still be poor at the mirror. Conversely, a bright mirror zone does not mean the bathroom is well considered. The two conditions should support one another, but they are not the same problem.
Control can help here as well. The general and mirror lighting layers do not always need to operate together. Someone using the mirror may need both, while a lower level of general or orientation lighting may be sufficient at other times. Separating these controls gives the bathroom greater flexibility without requiring additional fittings.
Because bathrooms contain wet areas, lighting fittings and electrical connections must be suitable for their specific locations. Their selection and installation should follow applicable electrical safety requirements and be carried out by qualified professionals.
The best test is simple: stand where the user would normally stand in front of the mirror and look at the face, not the room.
If the eyes, cheeks, and chin fall into strong shadow while the ceiling feels very bright, the bathroom is illuminated, but the mirror lighting hasn't been solved.
PAGE 10
Study / Work — Enough Light Without Fighting The Screen
A study or work area often seems straightforward to light because the activity appears simple: sit at a desk and see clearly. In reality, the working environment has several visual demands at once. The eyes move between paper, keyboard, screen, wall, shelves, and the wider room. If one part of that field is much brighter than the rest or if the source reflects into the screen, the workspace can become uncomfortable even with plenty of light.
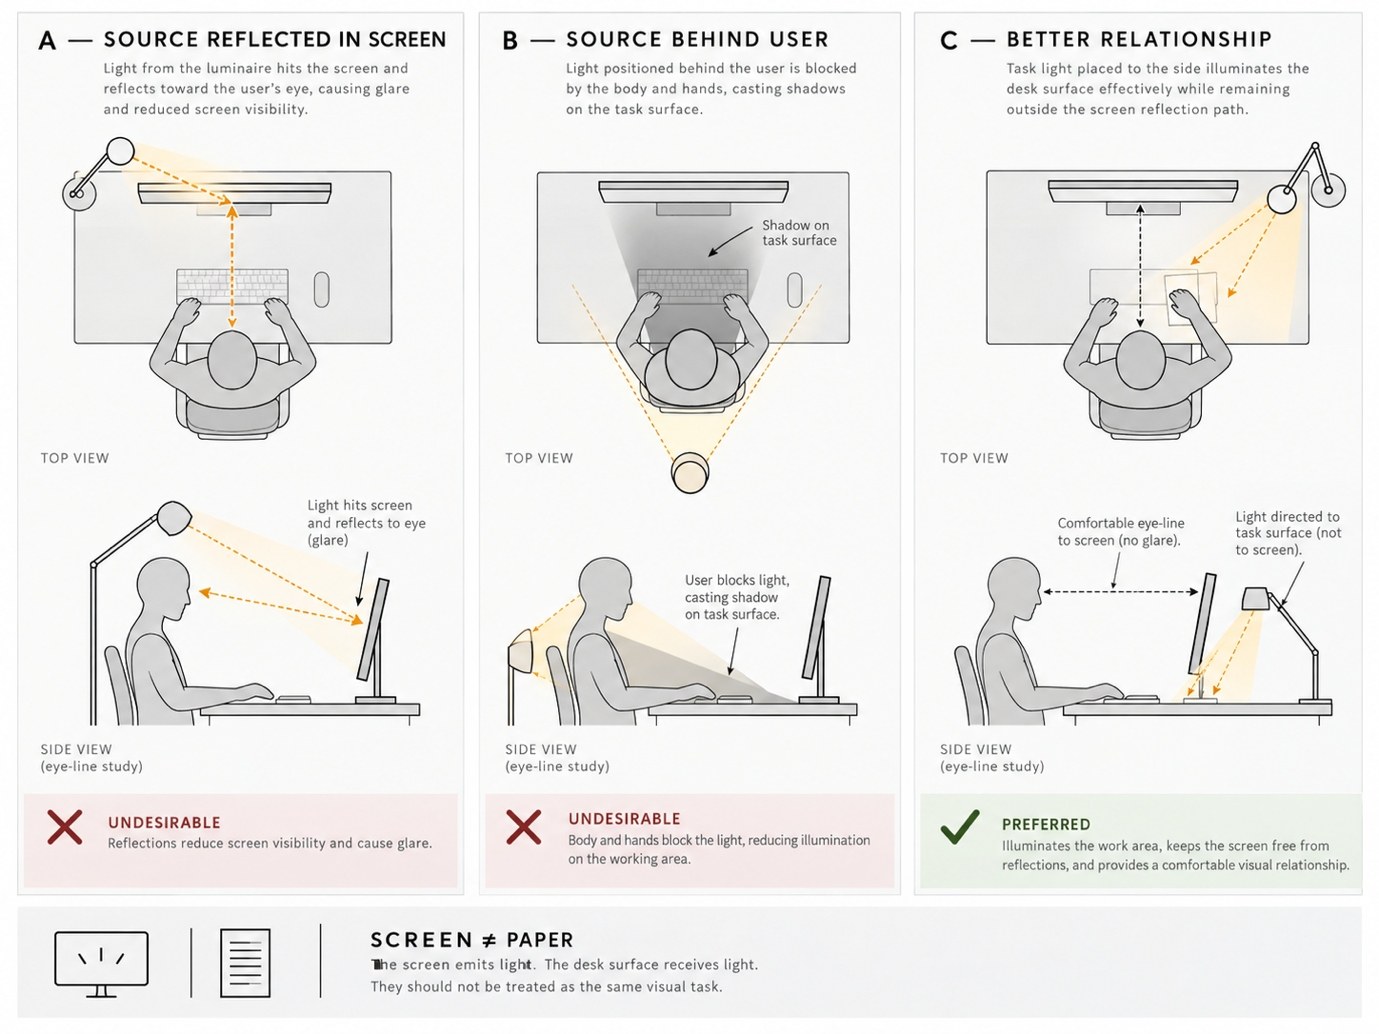
This is why study lighting should start with the relationship between the person, the task surface, and the screen. The desk needs enough illumination for reading, writing, and other close work, but the light should come from a direction that doesn't create strong reflections or cast the user’s hand and body across the working area.
A desk lamp can be useful because it brings light close to the task, but its position matters. If placed directly in front of a screen or reflected by a glossy surface, it may create glare. If placed too far behind the user, the body may block the light. If it is too bright compared with the rest of the room, the task area can feel isolated from its surroundings.
The screen adds another condition because it emits light rather than just receiving it. A very bright screen in a dark room creates strong visual contrast. The opposite problem occurs when a bright window or exposed fitting is within or behind the field of view. The user then constantly shifts between surfaces of very different brightness.
The aim is not to eliminate contrast completely. It is to avoid unnecessary extremes.
A useful workspace often has a moderate general layer, a properly positioned local task source, and enough surrounding illumination so the screen is not the only luminous object in the room. Task light can focus where the work happens, while the background stays visible without demanding the same attention.
Daylight can be excellent for work, but you need to consider its direction. A window directly behind the screen may create a bright background. A window behind the user may cause reflections on the screen. Side light is often easier to manage because it illuminates the desk without being directly in the line of sight, though every room and orientation behaves differently.
This is where the desk position becomes part of the lighting strategy. Don't plan a workspace only after the room is furnished. If you place the desk without considering daylight direction, screen orientation, and artificial light position, the lighting may have to compensate for a poor setup later.
The working surface also affects the result. A glossy desk reflects a source more strongly than a matte one. Pale surfaces return more light into the field of view. Darker surfaces need more local illumination to feel equally legible. The useful light level therefore depends on the material.
The same principle applies to shelves and storage around the desk. They may need enough illumination for books and objects to be identifiable, but they do not need to compete visually with the task surface. The desk should remain the place where concentration is easiest.
This is why the study area is one of the clearest places to resist the idea that more light is always better.
Additional brightness can help when the task surface is genuinely under-lit. But once the task is visible, adding more light from poorly positioned sources can increase reflection, contrast, and visual distraction without improving the work itself.
Control becomes useful again. The task light should be independently controllable from the general room light. Daylight may provide most of the room’s illumination during part of the day while the desk still needs local support. Later, artificial light may take over fully. Separate control lets the workspace respond to both conditions.
The test is simple: sit at the desk in the position where work actually happens. Look at the screen, then the paper, then the surrounding room.
If one source keeps pulling your eye away from the task, if the screen shows a bright reflection, or if your hand casts a deep shadow on the work surface, simply making the room brighter won't solve the problem.
The useful workspace is not the brightest one.
It is the one where the light makes the task the easiest thing to see.
PAGE 11
Entry And Circulation — Lighting Movement, Not Decoration
Entries, passages, and circulation spaces are often treated as secondary zones in lighting design. They sometimes receive whatever is left after the main rooms are resolved: a few ceiling lights, a decorative wall fixture, or a dramatic low-light treatment to create atmosphere. But circulation has a different responsibility from a living room or dining area.
Its first job is to help people understand where they are going.
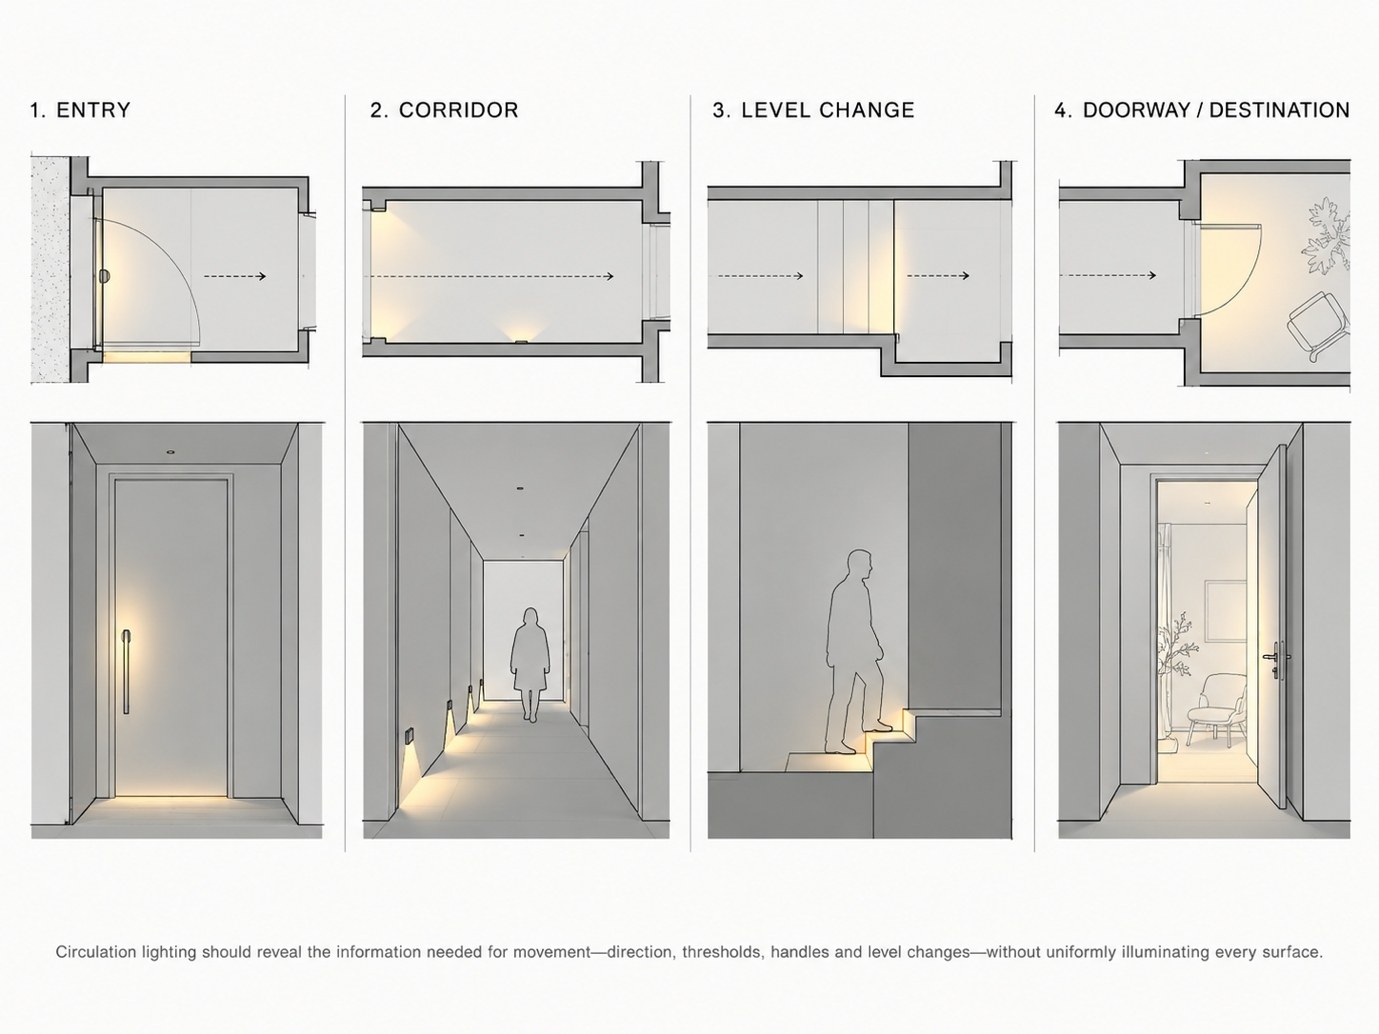
That sounds simple, but movement through architecture depends on small visual cues. A change in floor level, the edge of a step, a door handle, a threshold, the start of a corridor, or the turn toward another room—these details help the body read the space before moving through it. If they disappear into deep contrast, the problem is not that the space lacks atmosphere. The route has become harder to understand.
This is why circulation lighting should begin with orientation.
At an entrance, people need to read the transition from outside to inside. They need to identify the door, lock, handle, and immediate floor condition. The space may not need bright illumination, but the elements required for entry should be clear enough that the person does not have to search for them.
Once inside, the same principle applies. A corridor should reveal direction. A stair should make level changes legible. A passage should help distinguish one destination from another without making every wall and ceiling surface equally bright.
The most useful light is often not the most dramatic. It may be a small amount of illumination placed exactly where movement occurs.
A wall light can reveal a corridor's length. A low-level source can make the floor edge or stair direction easier to read. Light near a doorway can clarify a threshold. A small pool of illumination near a handle can make the point of entry immediately clear. In each case, the source supports movement rather than merely decorating the route.
This is an important distinction because circulation spaces tempt strong contrast. A dark corridor with a few pools of light can look striking in a photograph, but the occupied experience must be considered separately. If darkness falls where a floor level changes or where someone needs to identify a handle, the visual drama works against the space’s practical role.
Darkness can still be part of circulation lighting. It simply needs to be placed where it doesn't obscure information people need to move.
The relationship between adjacent rooms matters. A corridor may feel adequately illuminated on its own but very different when approached from a much brighter space. The eye needs time to adapt. A threshold between two strongly contrasting conditions can feel visually abrupt, even if each space looks comfortable on its own.
The transition itself should be considered.
A softly illuminated passage between a bright living area and a darker bedroom zone may help the eye adjust gradually. Similarly, an entrance from a dark exterior into a very bright interior can feel abrupt without an intermediate condition. Circulation lighting works not only within the passage but also between the conditions on either side.
This is why entries and corridors are often better understood as connective lighting zones rather than independent rooms.
They help prepare the eye for what comes next.
The controls also deserve attention. A passage may be used frequently but only for short periods. The lighting does not always need to operate at the same level as the rooms it connects. It may be controlled separately, linked to different entry points, or arranged so only the necessary section is illuminated when someone moves through it.
The goal is not to keep circulation constantly bright.
It is to ensure that when the route is used, the information required for movement is visible.
This is especially important on stairs. A stair is not simply a sculptural element. The nosing, changes in riser height, the beginning and end of the flight, and the nearby handrail all contribute to how the stair is read. Lighting that focuses only on the wall while leaving the step edges difficult to distinguish has prioritised appearance over use.
The same principle applies to thresholds between different floor finishes or levels. If the material changes but lighting makes both surfaces appear visually similar, the transition may be less obvious than expected. A small difference in illumination can make the threshold easier to understand without making it a visual feature.
The entry and circulation strategy therefore asks a very practical question:
What does the person need to see before taking the next step?
Once you answer that, the lighting can remain restrained.
A corridor does not need to become a showcase. A stair does not need every tread individually illuminated. An entrance does not need to glow brighter than the rooms beyond it.
It simply needs to make movement legible.
The best circulation lighting does not announce itself first.
It allows the route to make sense.
PAGE 12
Balcony / Terrace — Decide What Actually Needs To Be Seen
Exterior lighting often becomes excessive because darkness is seen as something to remove.
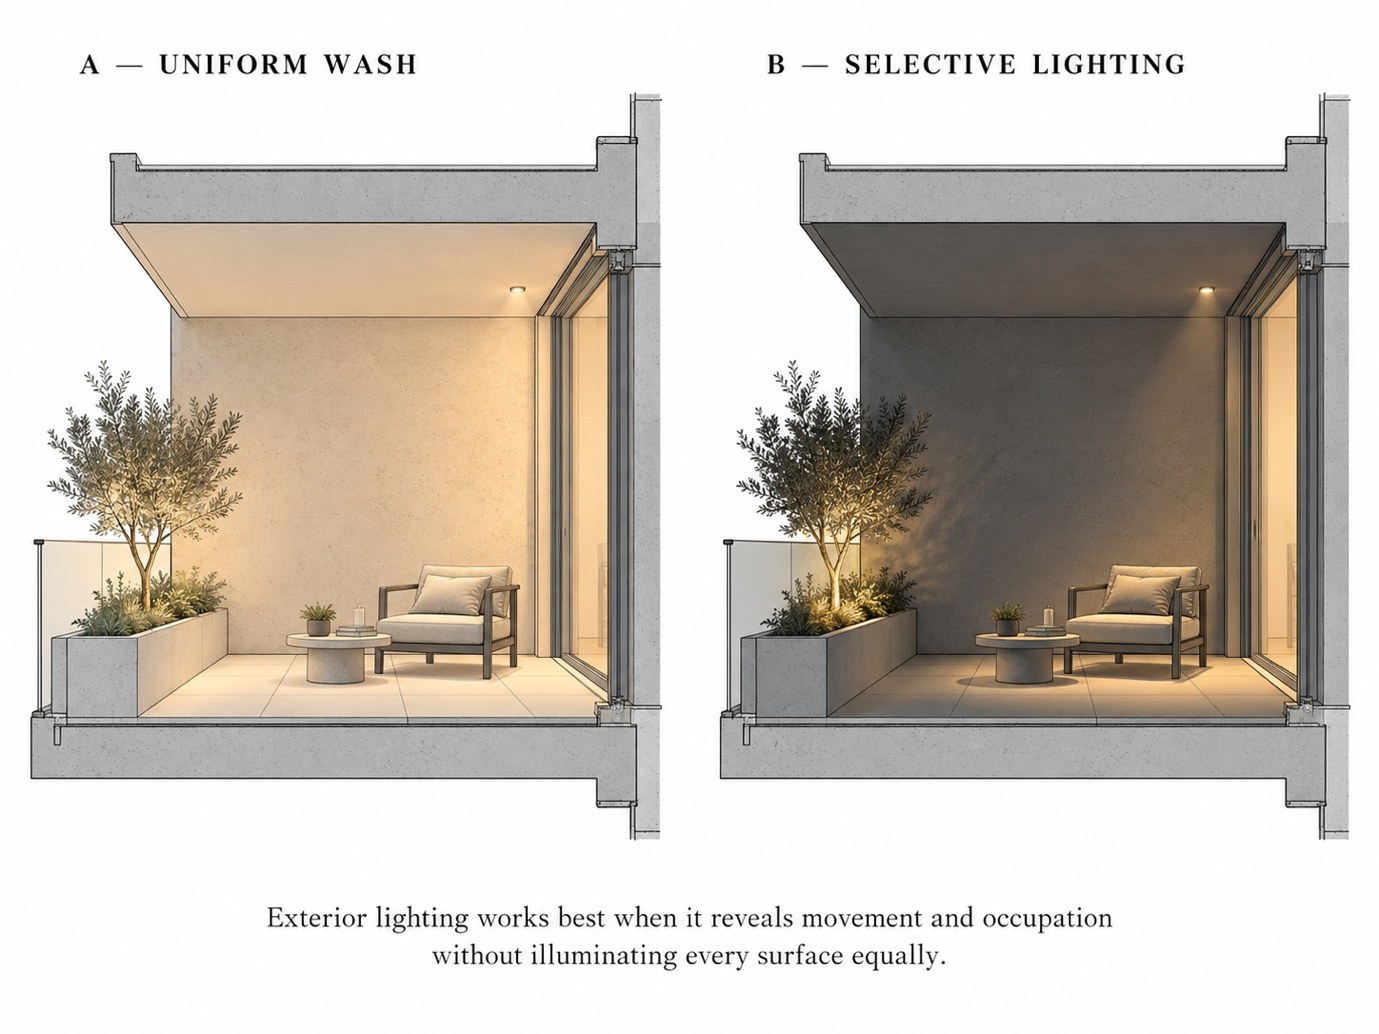
A balcony, terrace or small outdoor edge may have every wall, planter and surface illuminated simply because the space is outside. But exterior light works best when it helps the user understand where to move, where to sit and what part of the space deserves attention.
The starting point is not, “How do we make the exterior bright?” It is, “What information does the person need after dark?”
A balcony may need a legible threshold, a comfortable seating area, and a clear edge. A terrace may need enough light to support movement, a table or seating zone, and any changes in level. None of these conditions requires every surface to be equally bright.
This is where selective lighting becomes useful.
A low-level source near the floor can help define the edge of movement. A wall light can give a vertical plane enough presence to make the space feel contained. A local source near a seating area can create a useful zone without turning the entire balcony into a brightly lit extension of the interior. A planter or selected architectural surface may receive accent light but that should be a deliberate choice rather than a default treatment.
The surrounding darkness can help the exterior read more clearly. When everything is illuminated, the hierarchy is weak. The eye has no obvious sequence. One carefully lit threshold, one seating zone and one selected surface can create a stronger spatial reading than a uniform wash across every wall.
This is important when the exterior is viewed from inside. At night, a bright balcony can become visually dominant and flatten the relationship between interior and exterior. A more restrained exterior condition allows the window or opening to remain part of a larger composition rather than becoming a glowing backdrop.
The threshold between inside and outside deserves attention. The floor change, door track, handle, and immediate walking zone should be clear enough to read comfortably. Lighting should help the body understand that transition without creating a sudden jump from a bright interior to a dark exterior, or the reverse.
This is not only a question of brightness. It is also about adaptation. If the interior is strongly lit, the exterior may initially feel much darker than it really is. A softer transition can make the movement between the two spaces more comfortable.
The balcony or terrace itself often benefits from lower-level and localised sources because the activities are generally concentrated. People sit, talk, eat or move through a limited area.
Light that is placed close to those activities can be more useful than broad overhead lighting.
This also helps reduce the tendency to make the exterior look like a stage. The purpose is not to showcase every surface at night. It is to create enough clarity for occupation while allowing darkness to remain part of the space.
Planting, walls, and architectural details can still be highlighted selectively. But each should earn its light. If a planter does not contribute to orientation, atmosphere, or composition, it does not necessarily need its own source. If a wall already receives enough reflected light, another wash may add little.
The same principle applies to decorative fittings. A lantern or wall light may contribute to the balcony's visual identity, but it should still support the space rather than becoming the brightest object within it.
The exterior therefore asks the same question we have been asking throughout this Practical:
What is the light doing?
If it reveals a threshold, supports a seat, clarifies movement, or gives one selected surface a role, it is contributing. If it simply adds brightness because the space feels dark, it may not be necessary.
The most useful exterior lighting is often the lighting that knows where to stop.
It lets the balcony remain part of the night rather than erasing it completely.
PAGE 13
Colour Temperature And CRI — What The Light Makes Things Look Like
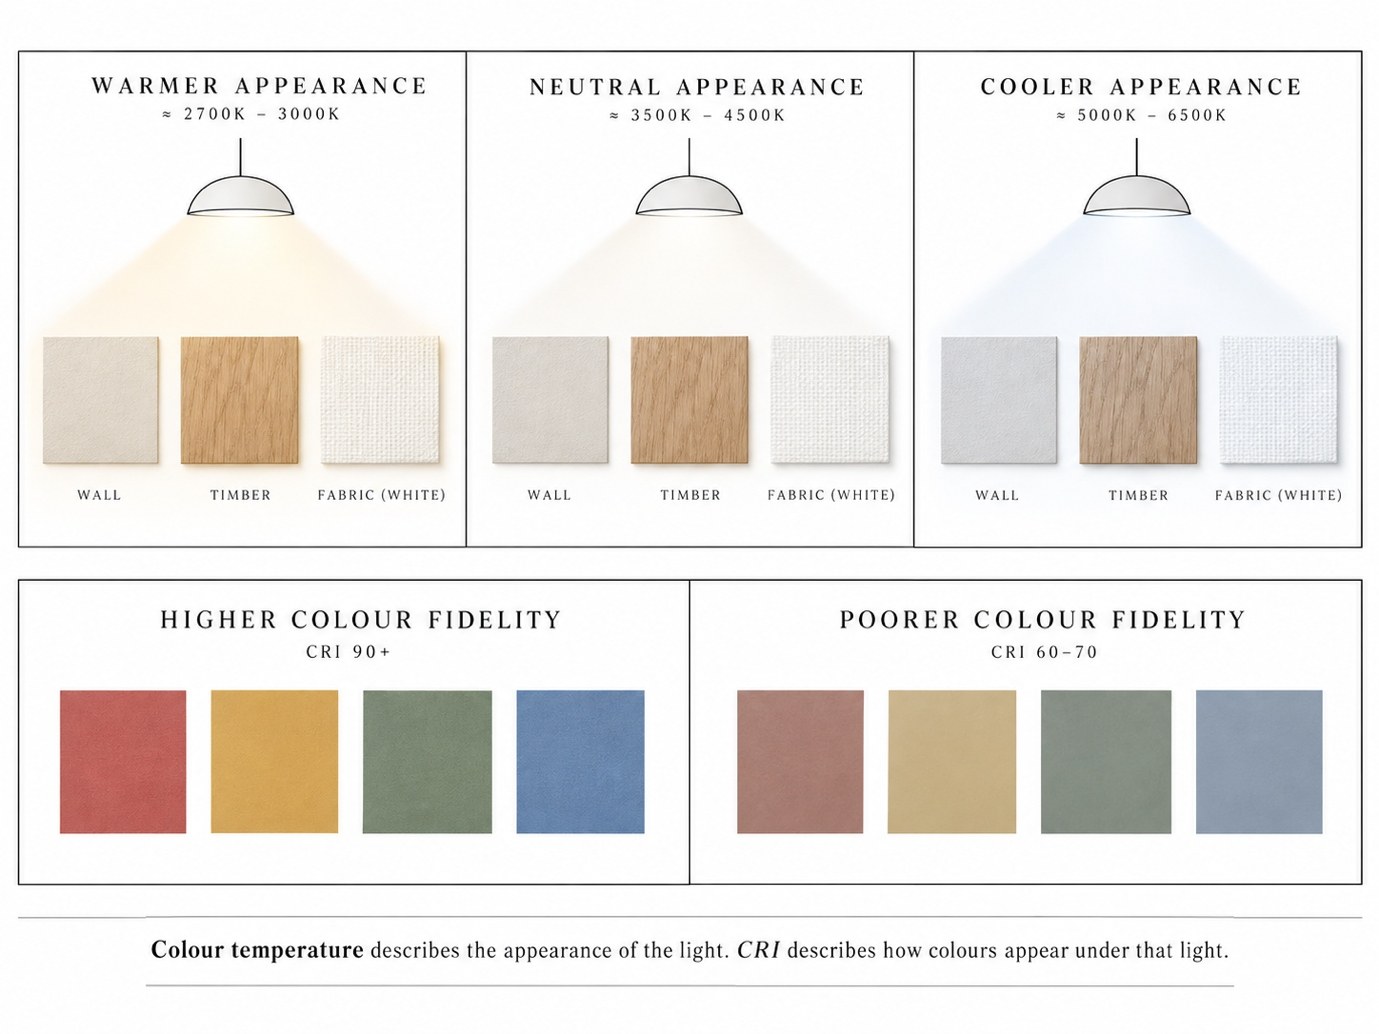
Two lights can illuminate the same room and still make it feel different. One may make timber, fabric and skin appear softer and warmer; another may make the same surfaces appear more neutral or cooler. This difference is often described through colour temperature.
Colour temperature is not a measure of how hot a lamp becomes. It describes the visual appearance of the light itself—from warmer-looking light through neutral conditions to cooler-looking light.
For homeowners, the useful question is not simply, “Which Kelvin value should I buy?” There is no single colour temperature suitable for every room. The right appearance depends on the room, its materials, the daylight present and the atmosphere the space should support.
A warmer-looking source may suit timber, brass, warm stone, or evening-focused interiors, while a more neutral source may make some work surfaces or pale finishes appear clearer.
But these are not fixed rules. The same nominal colour temperature can be perceived differently depending on surrounding surfaces and daylight in the room.
This is why colour temperature should be tested against the actual interior rather than selected in isolation.
A small sample viewed under showroom light tells us little about how the material will behave once installed. Wall paint, tile, or timber panel may look one way in daylight and another under artificial light. Surrounding colours also influence perception. Warm light next to a cool daylight opening can feel different from the same source after sunset, when artificial light dominates.
The practical approach is therefore to compare the source with the actual materials that matter in the room.
Place the light near the wall finish. Look at the timber, fabric, and skin. Observe the room in daylight and again after sunset. The purpose is not to find a universally “correct” colour temperature but to choose one that works with the architecture rather than fighting it.
This is why mixing different colour appearances carelessly within one visual field can make an interior feel inconsistent. If one part of a room appears distinctly warmer and another noticeably cooler without reason, the eye may notice the difference before the architecture.
Sometimes that contrast is deliberate. Often it is simply accidental.
A related term is CRI — Colour Rendering Index.
CRI describes how closely a light source renders colours compared with a reference light source of similar colour temperature. A higher CRI generally indicates better colour fidelity for the standard test colours. However, it does not guarantee that every colour will appear perfectly natural. CRI matters because lighting does not simply make objects visible; it also affects how their colours are perceived.
This is especially relevant where colour recognition matters. Food, clothing, artwork, finishes, and skin can look noticeably different under sources with different colour-rendering qualities.
A room can have the desired colour temperature and still render materials poorly. These are separate questions.
Colour temperature asks:
What does the light itself look like?
CRI asks:
How does that light allow colours to appear?
This distinction is important because homeowners often confuse the two terms.
A warm-looking source does not automatically render colour well. A neutral-looking source does not automatically render colour badly. One describes appearance; the other describes colour fidelity.
The practical lesson is simple.
Do not choose light only by the colour of the bulb or the number printed on the box.
Look at what the light does to the materials, faces and objects that actually matter in the room.
PAGE 14
Beam Angle — Where The Light Actually Goes
Even when the source is correctly positioned and the colour appearance is right, another question remains: how widely does the light spread?
This is where beam angle becomes useful.
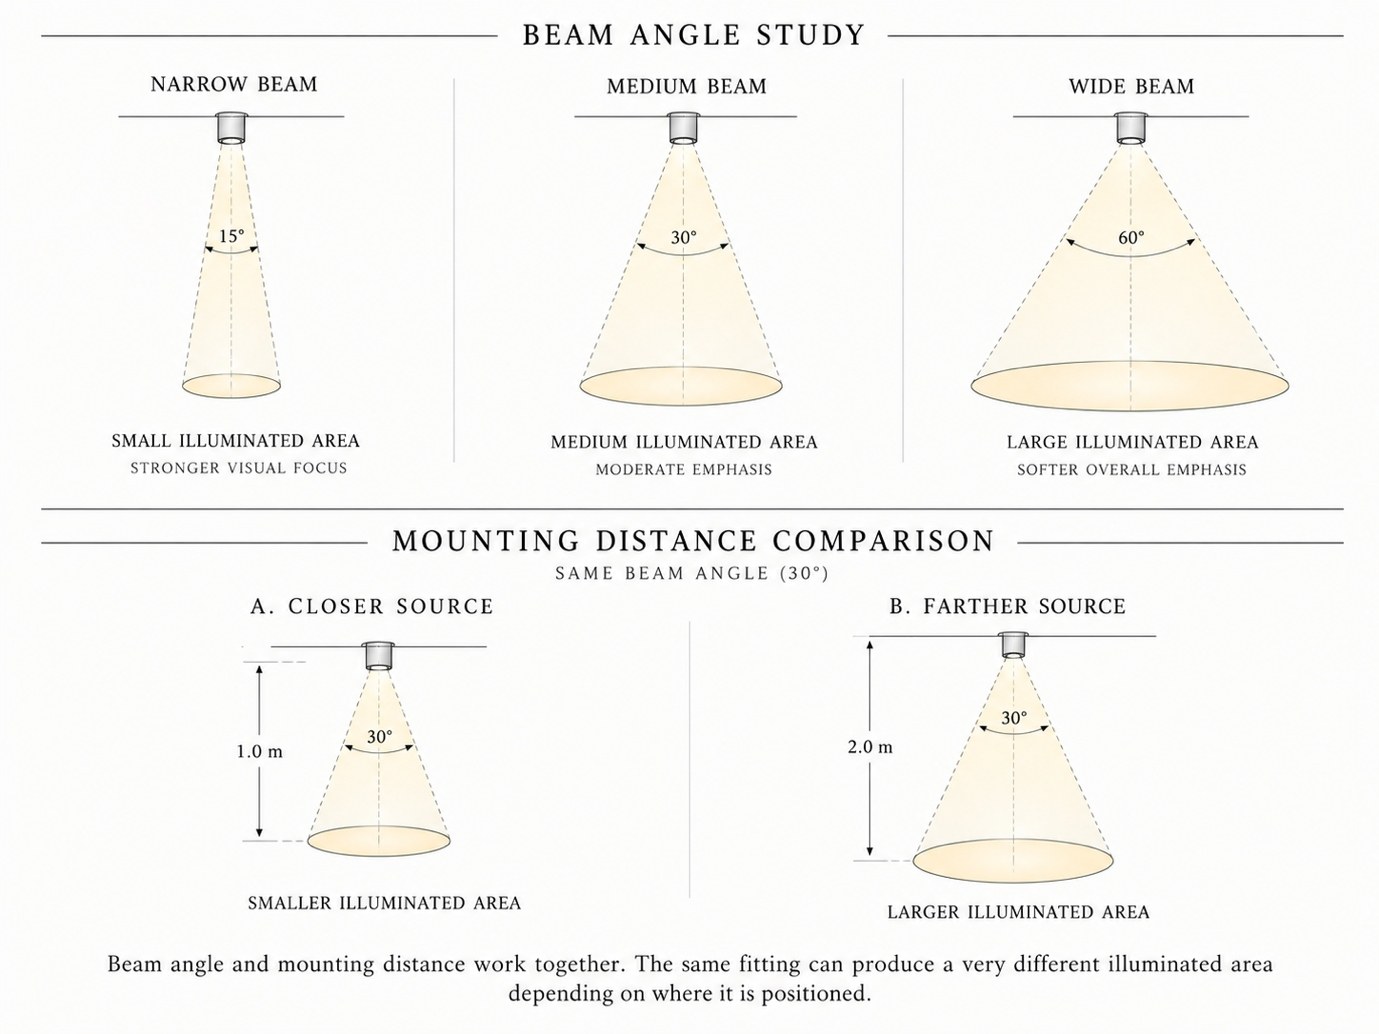
Beam angle describes the width of the main light distribution from a directional source. A narrow beam concentrates light into a smaller area. A wide beam spreads it across a broader surface.
The distinction sounds simple, but it strongly affects how a room is read.
A narrow beam can create a strong focal point. It is useful when an artwork, object, column or small surface needs attention. The light is concentrated, and the boundary between brighter and darker areas becomes more visible.
A wide beam behaves differently. It can illuminate a larger portion of a wall, table or floor and usually creates a broader field of light. It feels less concentrated and more integrated with the surrounding space.
Neither is universally better.
The useful choice depends on distance, surface size and purpose.
A narrow beam placed close to a wall may create a small, intense patch. The same beam placed farther away spreads more before reaching the surface. A wide beam positioned too close may spill beyond the area it is meant to illuminate.
That is why you shouldn't choose beam angle independently of mounting position.
The source and the receiving surface are related.
If the goal is to light a dining table, the spread should relate to the table rather than the surrounding ceiling. If the goal is to reveal an artwork, the beam should relate to the artwork rather than the entire wall. If the aim is general illumination, several narrow beams may create isolated pools rather than an even useful field.
Beam angle also affects contrast.
A concentrated beam creates a clearer difference between the illuminated area and its surroundings. A wide beam produces a gentler transition. This changes the room's hierarchy even when the overall light amount remains similar.
It also affects overlap.
When several directional fittings are used together, their beams may overlap, creating areas unintentionally brighter than others. If spaced too far apart, gaps can appear between them. The layout needs to consider not only each beam individually but also how the distributions work together.
This is one reason a reflected ceiling plan cannot be understood simply as a pattern of dots. Every dot represents a source with a direction, spread and relationship to a surface below or beside it.
The same applies to accent lighting. A source aimed at a wall does not simply “light the wall.” Its angle, distance and beam spread determine how much of that wall becomes visible and how sharply that illuminated area is defined.
Homeowners don't need to turn this into a photometric calculation. The key idea is to stop thinking of every spotlight as producing the same result.
Ask instead:
How large is the surface? How far is the source from it? Should the light be concentrated or broad? What should remain outside the beam?
Once you answer these questions, beam angle begins to make practical sense.
The fitting doesn't just determine where light comes from.
The beam determines where the light goes.
PAGE 15
Dimming, Circuits And Control — One Room, More Than One Condition
Lighting becomes genuinely flexible only when the user can control different parts independently. A room may have carefully chosen ambient, task and accent lighting, but if all those sources are connected to one switch, they behave as one system regardless of the activities in the room.
This is why circuits matter.
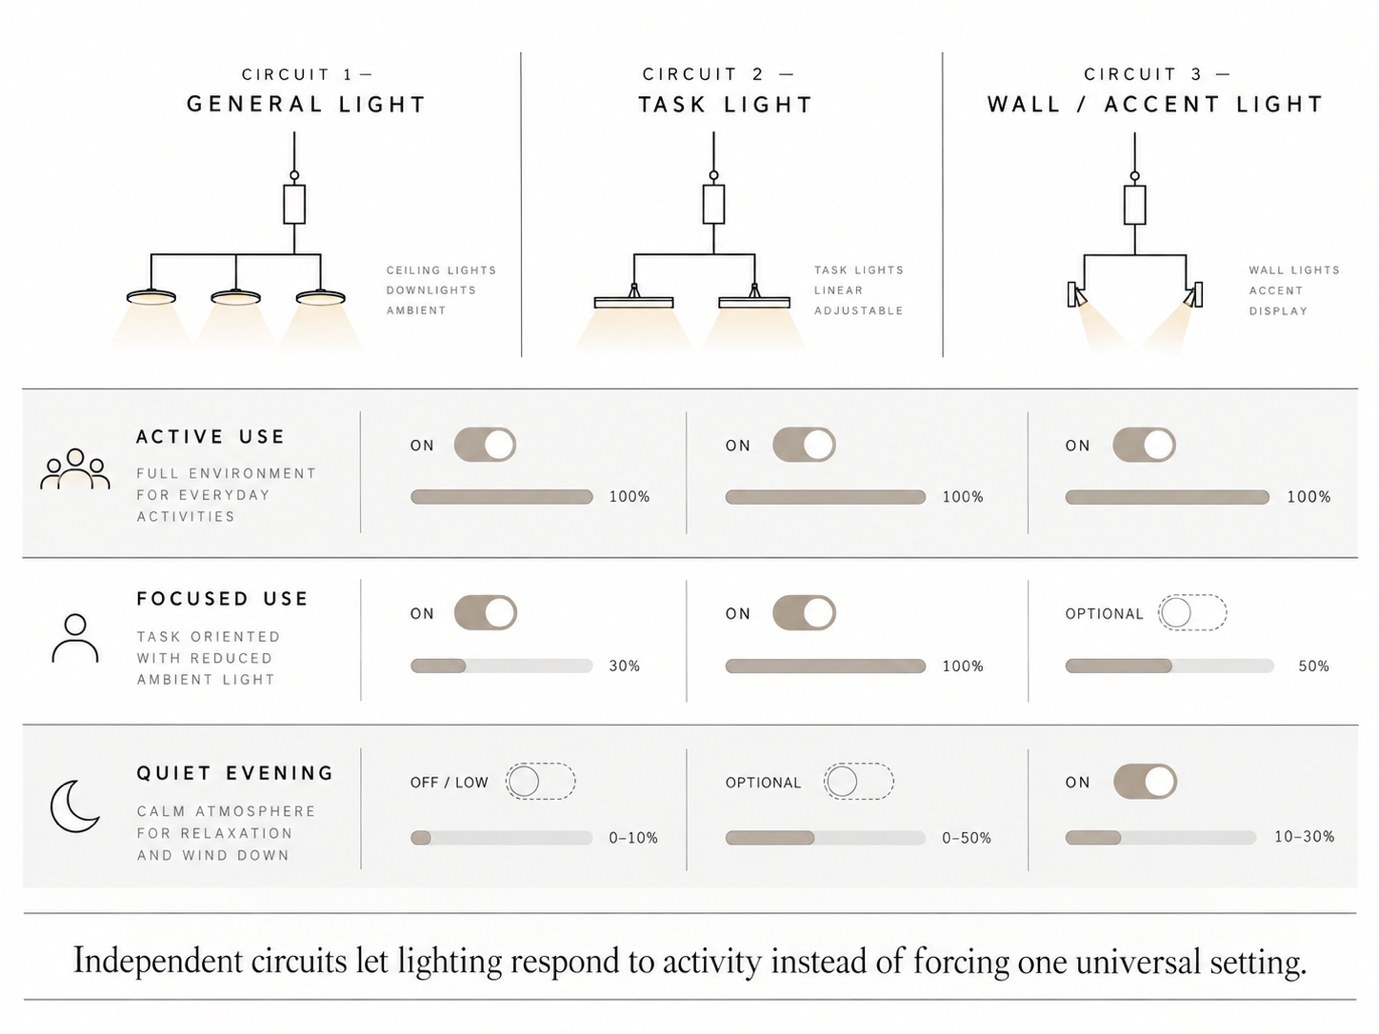
Lighting can be organised into independently controlled groups, allowing different sources to operate separately. In a simple home, this may involve separate switches or wiring arrangements, while more advanced systems can use electronic controls. The important question is not how many switches a room should have, but which lights need to operate independently because they serve different activities.
General lighting might form one control group. Task lighting might form another. Wall or accent lighting may form a third. Decorative lighting may need separate control if its role is mostly visual rather than functional. The exact arrangement depends on the room, but the principle is consistent: lights that do different jobs shouldn't automatically operate together.
Without independent control, the user has little choice. Either the room is fully illuminated or it is not.
Dimming adds flexibility by letting one source operate at multiple intensities. This is useful when the same fitting supports different conditions over time. But dimming should not be treated as a universal solution. If the light is badly positioned, reducing its intensity does not fix the geometry. If glare comes from a visible source, dimming may reduce it but does not eliminate the problem.
Before selecting a dimming system, it is important to check that the light source, LED driver and dimmer are compatible. Not all LED fittings support dimming, and incompatible components can cause flickering, uneven adjustment or poor performance.
Good control begins with good placement.
Once the source is doing the right job, dimming lets the user refine how strongly it expresses that job.
This is important because different lighting layers do not always need to be equally strong. A wall light may remain low while a task source is active. General lighting may be reduced when accent lighting becomes more important. A decorative fitting may remain visible while contributing relatively little to the overall illumination.
Control therefore changes the balance between layers.
The room begins to operate more like a system rather than a collection of fixtures.
This is why switch location matters. A well-planned lighting scheme becomes frustrating if users can't control it conveniently. A bedroom may benefit from control near the bed and the entrance. A reading light should be controllable from where you read. A kitchen task light may need independent access from the work area, not a distant wall.
The best controls are usually the ones users understand immediately.
A complicated system with many unexplained scenes may look sophisticated but be inconvenient to use every day. Simpler groupings can be more effective because the relationship between switch and light is obvious.
This does not mean automation has no role. Timers, sensors and programmable scenes can be useful when they genuinely support occupation. But they should follow the same logic as manual controls: the system should respond to how the room is used, not make the user adapt.
The key question is always the same:
What needs to change independently?
If one light is used for reading, another for general movement and another for a wall or artwork, they should not necessarily share one setting.
The room becomes more adaptable not because more fittings have been added, but because the existing ones can respond differently.
That is the real value of control.
It allows one space to support more than one condition without forcing every light to participate every time.
PAGE 16
Daylight + Artificial Light — One System, Not Two Separate Designs
Daylight and artificial light are often planned as if they belong to two separate worlds. Daylight is treated as an architectural condition created by windows, openings, and orientation, while artificial lighting is added later as a technical layer. But the room does not experience them separately. They overlap for much of the day.
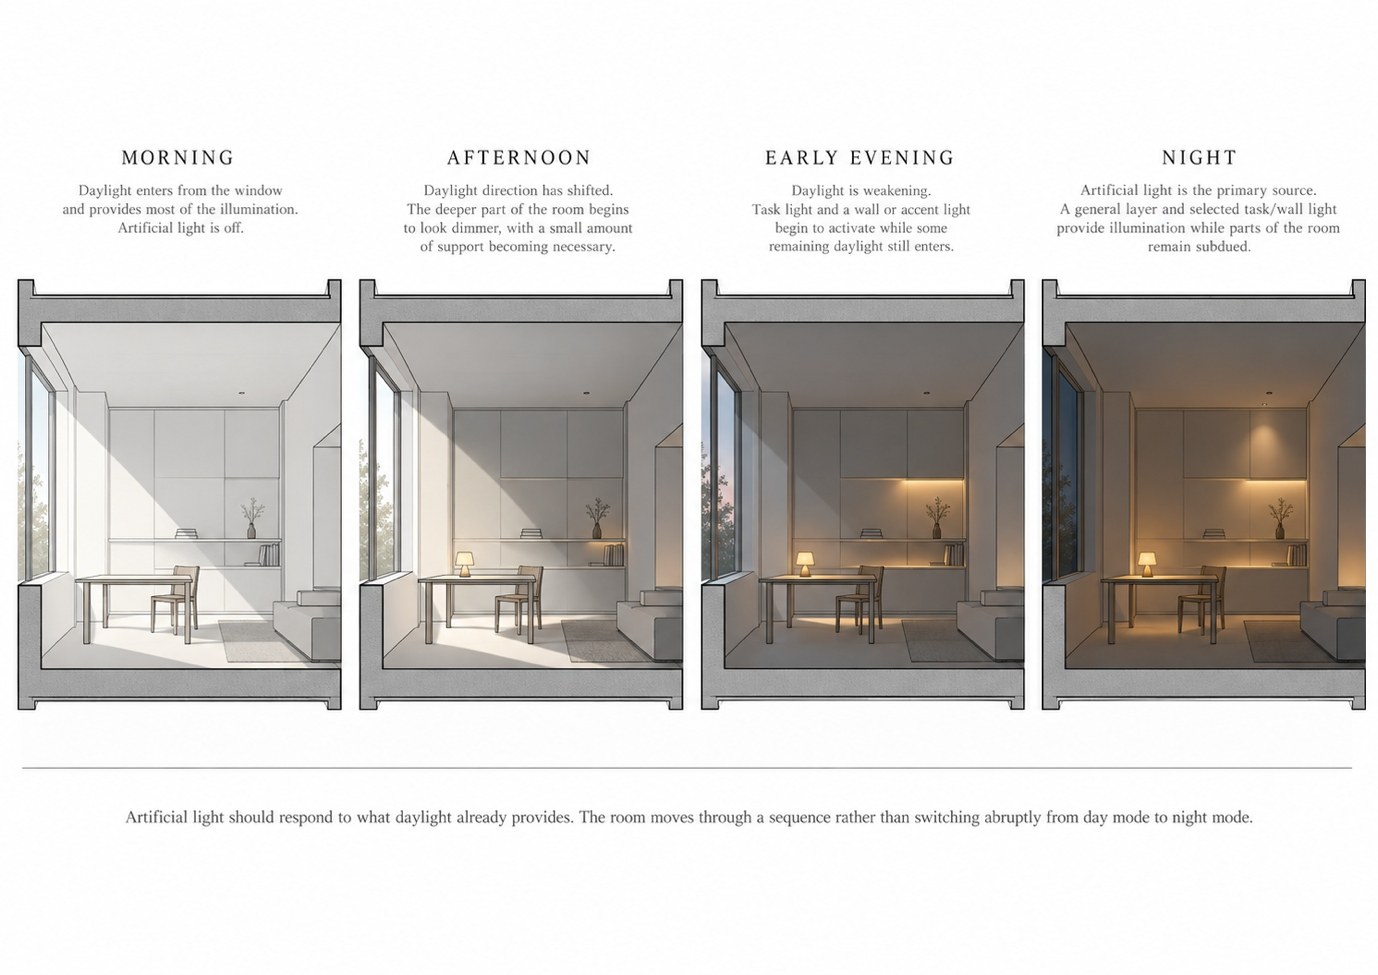
A window may do most of the work near one side of the room while the deeper part remains dim. A kitchen counter beside an opening may need no artificial light in the morning but require it later in the afternoon. A living room may be bright during the day while a reading corner still needs local light. The useful question is not simply how much artificial light a room needs, but where daylight stops being sufficient and artificial light should begin.
This is why lighting design should be read across time.
Morning, afternoon, and evening do not produce the same conditions. Daylight direction and intensity change. The surfaces receiving it change. A room that feels balanced at one time may feel uneven hours later. The artificial-lighting strategy should respond to these shifts rather than act as if the room is always dark.
This does not mean artificial light needs to imitate daylight. In fact, evening lighting often works best when it creates a different atmosphere rather than trying to recreate the daytime condition. The relationship is about continuity, not imitation.
During the day, daylight may establish the broadest layer. Artificial light can then support areas that remain under-lit, such as a deeper work surface or a local task zone. As daylight reduces, artificial layers gradually take on more responsibility. By night, they become the dominant system.
The transition between these conditions should feel natural.
This is where independent control becomes useful. If every artificial source turns on at once, lighting cannot respond selectively to changing daylight. But if you separate general, task, and accent layers, the room can use only what it needs at each moment.
For example, a study area near a window may need no general ceiling light during the day. A local task source may suffice when clouds reduce light or when the work surface lies outside the strongest daylight zone. Later, as evening approaches, the broader room may require more illumination.
The same principle applies in the kitchen. A worktop near a window may perform well in the morning, while a counter deeper in the room depends on artificial light. Treating both areas the same ignores the actual daylight conditions.
That is why the lighting plan shouldn't simply repeat the room evenly.
It should respond to the way daylight is distributed.
Surfaces also affect that distribution. Pale walls and ceilings may reflect daylight deeper into the room. Darker finishes can increase the contrast between the area near the opening and the deeper interior. A glossy surface may introduce reflections. A textured surface may reveal direction more clearly. Daylight and material work together before you switch on artificial light.
The same is true of orientation. An opening receiving strong direct sun behaves differently from one receiving softer, indirect daylight. But the useful lesson for homeowners is not to memorise orientation rules. It is to observe the room at different times.
Where is the room brightest in the morning? Which surface loses useful light first? Which task area remains difficult even when the rest of the room appears bright? At what point does artificial light begin to become useful?
These observations reveal more than simply switching on every fitting and deciding if the room looks bright enough.
This is also where the Practical comes back to the method established at the beginning:
Activity first. Surface second. Light third. Control last.
Daylight belongs inside that method.
If daylight supports an activity, artificial light may not need to compete. If a task surface remains under-lit, place artificial light where it adds value. If one area becomes too bright compared to another, the system should allow the balance to change.
The goal is not to design one “day” lighting scheme and one “night” lighting scheme as separate ideas.
The goal is to allow the room to move between them.
A successful lighting strategy therefore begins before you switch on the first artificial source. It begins with understanding what the architecture already provides.
Then artificial light takes over only where it needs to.
A Simple Home Lighting Audit
Before changing the lighting in a room, observe how it performs during everyday use. Record the following:
| What to check | Your observation |
|---|---|
| Observed problem | What lighting problem have you noticed? |
| Activity | What are you trying to do? |
| Surface | Which area needs better lighting? |
| Proposed test | What lighting change could you try? |
| What is still unknown? | What needs further checking? |
This simple exercise helps identify lighting problems before purchasing additional fittings.
Research Sources & Technical References
1. General, Task and Accent Lighting
U.S. Department of Energy — Efficient Lighting Strategies
https://www1.eere.energy.gov/buildings/publications/pdfs/building_america/26467.pdf
2. Interior Lighting, Visual Comfort and Glare
International Commission on Illumination (CIE) — ISO/CIE 8995-1:2025, Lighting of Indoor Workplaces
https://cie.co.at/publications/light-and-lighting-lighting-work-places-part-1-indoor-0
3. Colour Temperature and Colour Rendering Index (CRI)
CIE — Method of Measuring and Specifying Colour Rendering Properties of Light Sources, CIE 13.3-1995
4. Beam Angle and Light Distribution
Illuminating Engineering Society (IES) — Beam Angle Definition
https://www.ies.org/definitions/beam-angle/
5. Lighting Controls and Independent Control Groups
U.S. Department of Energy — Lighting Controls Solutions
https://www.energy.gov/cmei/ssl/lighting-controls-solutions
6. LED Dimming and Dimmer Compatibility
LEDVANCE — Dimming Conformity and Compatibility
7. Daylight and Artificial Lighting
U.S. Department of Energy — Energy 101: Daylighting
https://www.energy.gov/articles/energy-101-daylighting
8. Luminaire Electrical Safety
International Electrotechnical Commission (IEC) — IEC 60598-1:2024, Luminaires: General Requirements and Tests
https://webstore.iec.ch/en/publication/66620
9. Indian Interior Lighting Standards
Bureau of Indian Standards (BIS) — IS 3646 (Part 1):2025, Interior Illumination — Code of Practice
https://standardsbis.bsbedge.com/BIS_SearchStandard.aspx?Standard_Number=IS+3646&id=0