
Burglar Alarm Installation in India: Planning, Wiring & Commissioning (2026)
A room-by-room guide to installing a home burglar alarm: where the panel, keypad and siren go, how sensors are placed per zone, wired versus wireless mounting, power and battery backup, GSM SIM, then walk-testing and handover.
A burglar alarm bought off a shelf does nothing. What protects a home is the install: the panel tucked somewhere a burglar cannot smash it, a sensor on every realistic entry point, a siren loud enough to matter, a battery that rides out the evening power cut, and a walk-test that proves each device actually reports before anyone signs off. Skip the care and you get the worst of both worlds — a system that misses the real break-in and cries wolf at a ceiling fan.
This guide is the practical, hands-on step in Studio Matrx's burglar alarm hub: once you have chosen a system, how does a burglar alarm installation actually come together, and who does which part? The honest division is this — you plan the zones, the response chain and the day-to-day operation; a qualified installer or electrician does the panel wiring, the mains connection, the drilling at height and the commissioning. Plan well and the coordination is easy.
Scope & safety. This guide helps you plan an install and hold your installer to a proper commissioning and handover — it is not a wiring manual. Mains connection to the panel, drilling into walls, work at height for outdoor sirens or beam sensors, and any cabling near the electrical board are licensed-professional jobs; see the electrical hub. An alarm must never obstruct a fire-escape route or lock anyone in. This is educational guidance, not legal advice.
The install at a glance: survey to handover
A tidy install follows a sequence, and rushing any step is what produces false alarms and blind spots later. The order below is the one a good installer works to; your job is to be there for the survey and the handover, and to have decided your zones and call-list before day one.
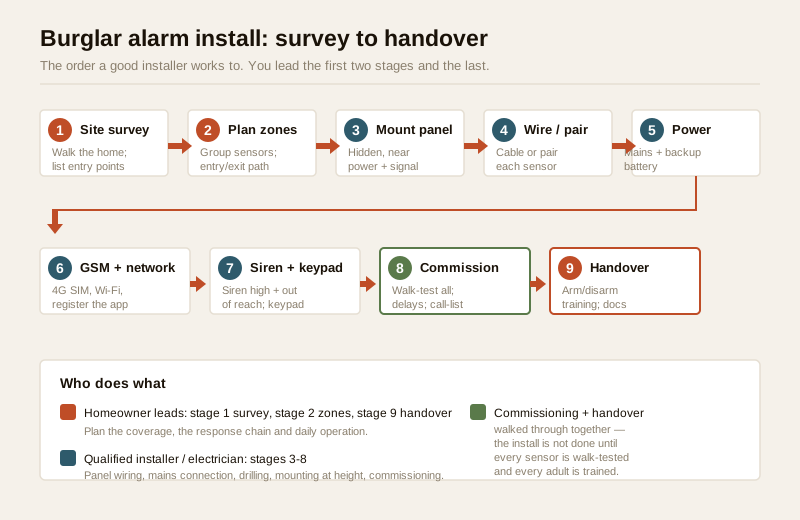
| Stage | What happens | Who leads |
|---|---|---|
| 1. Site survey | Walk the home; list every door, window, and the paths a burglar would actually use | You + installer |
| 2. Plan zones | Group devices into zones and decide the entry/exit route — see alarm zoning | You |
| 3. Mount the panel | Fix the control panel out of sight, near power and signal | Installer |
| 4. Wire / pair sensors | Run cable (wired) or pair devices (wireless) | Installer |
| 5. Power + backup | Connect mains and the backup battery | Installer (electrician) |
| 6. GSM + network | Fit a 4G SIM, connect Wi-Fi, register the app | Installer + you |
| 7. Siren + keypad | Site the internal/external sirens and the keypad | Installer |
| 8. Commission | Walk-test every sensor, set delays, program the call-list | Installer + you |
| 9. Handover | Arm/disarm training, user codes, documentation | You |
Stage 1-2: Survey the home and plan the zones
Everything good starts with a slow walk of the house, ideally at dusk when you can see where shadows and blind corners fall. You are looking for two things: every point a person could get in, and the route you take in and out every day.
- List the entry points. Every external door, every reachable window, the terrace door, the utility balcony, the garage shutter. On the ground floor and anything a person could climb to — a boundary wall, a portico roof, a drainpipe next to a first-floor window.
- Mark the daily path. The door you come home through and walk from to reach the keypad is your entry route; the door you leave by is the exit route. These get a timed delay; nothing else should.
- Group into zones. A zone is a named group of sensors you can arm together — front perimeter, rear perimeter, ground-floor interior, bedrooms. Zoning lets you arm the shell of the house at night while you sleep inside, and everything when you leave. Done right it is about complete staged coverage, never about leaving a room unwatched. The alarm zoning guide works through this in detail.
The output of this stage is a simple marked-up floor plan: a dot for every sensor, a label for every zone, and the entry/exit door circled. Hand that to the installer and half the arguments disappear. Studio Matrx's alarm system selector can help you settle on wired, wireless or hybrid before this stage.
Stage 3: Where the control panel goes
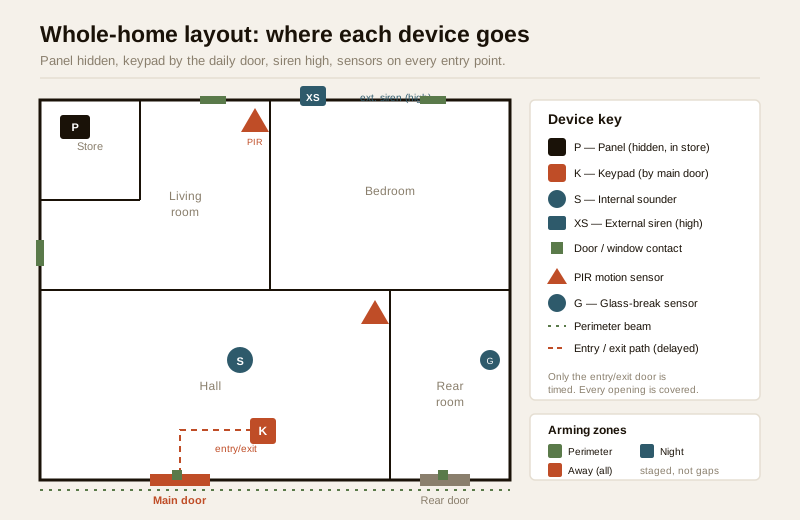
The panel is the brain — it powers the sensors, holds the logic, dials out on GSM, and houses the backup battery. Its placement is a security decision, not a convenience one.
- Out of sight, hard to reach fast. Mount it inside a cupboard, a utility area or a locked box — not on the entrance wall where an intruder can smash it in the first ten seconds. The classic mistake is putting the all-in-one panel-keypad right by the front door; a crash-and-smash attacker destroys it before the entry delay expires. If your panel and keypad are one unit, either choose a system that reports to the monitoring/app the instant the panel is tampered, or split the keypad from the panel.
- Near power and signal. It needs a mains point (on a circuit that is not casually switched off) and a spot where the GSM signal and Wi-Fi are strong. Test the phone-signal bars at that exact wall before fixing anything.
- Off the floor, away from damp. Keep it clear of bathrooms, kitchens and outer walls that sweat in the monsoon.
Stage 4: Placing and connecting the sensors
This is where coverage is won or lost. Each sensor type has a right home; getting placement right is also the single biggest lever against false alarms — see false-alarm prevention.
Door and window contacts
Two-part magnetic contacts guard openings. Fit the two halves so they sit within a few millimetres when the door or window is shut — a poorly aligned Indian door that has swelled in the monsoon is a leading false-alarm cause, because the gap grows and the contact "opens" on its own. Use them on every external door and reachable window; see door sensors and window sensors.
Motion (PIR) sensors
A PIR motion sensor watches a volume of a room and is the interior backbone. Placement rules that matter in Indian homes:
- Corner-mount at about 2.2-2.4 m, angled to sweep the room, covering the path an intruder must cross to reach valuables — not pointed at a wall.
- Never aim a PIR at a window, a ceiling fan, an AC vent, a geyser, or direct sunlight. Moving hot air and rapid temperature change are the classic triggers of a false alarm. This is about correct aiming for reliable detection, not about creating gaps.
- Pets? Use a pet-friendly PIR rated for your animal's weight, or a dual-technology sensor that needs both infrared and microwave to agree before it triggers.
Glass-break and perimeter sensors
A glass-break sensor covers a large picture window or a glazed door that a contact alone would miss. Outdoors, a beam sensor across a boundary or a full perimeter alarm gives you the earliest possible warning — a person detected at the wall, before they reach the house.
Wired versus wireless mounting
| Aspect | Wired install | Wireless install |
|---|---|---|
| Mounting | Cable run in conduit/casing to each device; more drilling | Device stuck/screwed up; battery inside |
| Best fitted | During construction or renovation | Retrofit into a finished home |
| Reliability | No batteries, no RF interference | Depends on battery health + signal |
| Upkeep | Very low | Battery changes every 1-3 years |
| Disruption | High (chasing walls) | Low |
| Who fits it | Electrician/installer | Installer, some DIY-capable |
Wired is cleaner and lower-maintenance if walls are open; wireless wins for a finished home. Many Indian homes end up hybrid — wired where cable already runs, wireless for the awkward far window. Whatever you choose, the placement logic above is identical.
Stage 5: Power and battery backup
This is the stage that quietly decides whether your alarm is reliable in India, because the power will cut.
- Mains, then battery. The panel runs on mains and keeps a rechargeable backup battery charged. When the grid drops — which in most of India is a daily event — the battery carries the system so it neither goes deaf nor fires a false alarm on the power blip. A typical backup battery holds the panel for several hours; ask your installer for the rated standby time and size it for your longest routine cut.
- Do not skimp here. A system with a dead or missing backup battery is worse than none, because it fails silently. The battery is a wear item — plan to replace it every 3-5 years (see maintenance).
- Mains work is an electrician's job. Connecting the panel's mains supply, and any spur off the board, is licensed electrical work — never a DIY splice. This is where you hand over to the electrical professional.
Stage 6: GSM SIM and network
The alert path is what turns a noise-maker into a system that reaches you when you are three cities away.
- Choose 4G, not 2G. India's 2G networks are being retired; a panel or GSM dialler that only speaks 2G is a dead end. Insist on 4G.
- Fit and top up the SIM. A GSM alarm needs an active SIM with a working balance/validity. The silent killer here is a prepaid SIM whose validity lapses — the alarm looks fine but can no longer call or text. Put a reminder to keep it recharged, or use a plan built for it.
- Register the app and Wi-Fi. An app-based system also connects over Wi-Fi for arm/disarm and push alerts; register the app to your phone during commissioning so you can confirm alerts actually arrive.
- Decide monitoring. Most Indian homes are self-monitored — the siren sounds and the panel messages you and your call-list. If you want a manned station, arrange an alarm monitoring service now. Be realistic about police response: there is no automatic verified-alarm dispatch in India, so a human on your call-list verifies and dials 112/100.
Stage 7: Siren and keypad siting
- Internal sounder where it will wake the house and disorient an intruder — a central hallway or landing, loud.
- External siren high on the front facade, under an eave, out of easy reach so it cannot be silenced, and weather-protected against monsoon and dust. Pair it with a strobe so neighbours can see which house is calling. See audible sirens.
- Keypad beside the door you use daily, on the entry route, at a comfortable height. It is the one part meant to be reached quickly — which is exactly why the panel should be elsewhere.
- Panic button somewhere reachable from the bed or the shop counter for a silent or audible panic alert.
Stage 8: Commissioning — proving it works
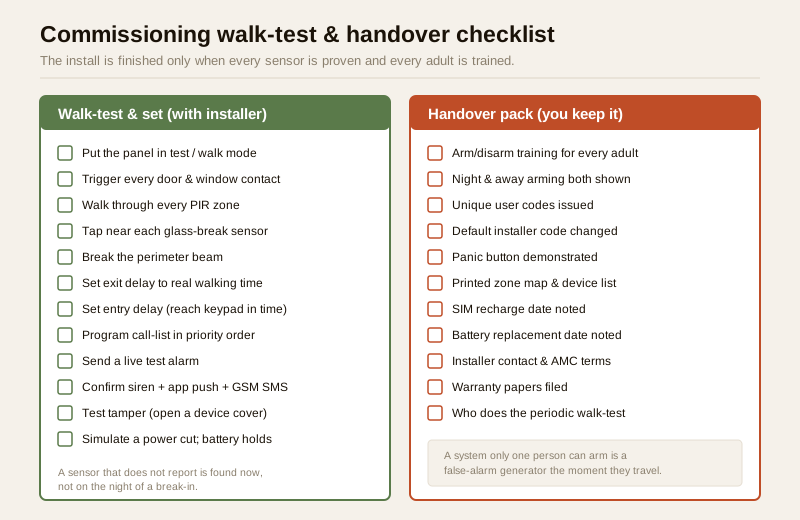
An install is not finished when devices are on the wall. It is finished when every one has been tested and the delays and call-list are set. Insist your installer walk this with you.
- Walk-test every sensor. Put the panel into test/walk mode and physically trigger each device in turn — open every door and window, walk through every PIR's field, tap near a glass-break, break a beam. The panel should announce each one by its zone name. A sensor that does not report is found now, not on the night of a break-in.
- Set the entry and exit delays. The exit delay is the countdown to leave after arming (typically 30-60 seconds); the entry delay is the grace to reach the keypad and disarm on the way in. Set them to your real walking time — too long defeats the purpose, too short causes self-inflicted false alarms.
- Program the call-list. Enter the numbers the panel dials/messages, in priority order — you first, then a family member, then the society guard or a trusted neighbour who can physically check. The guard or neighbour is your practical first responder in India.
- Test the alert end-to-end. Trigger a real alarm and confirm the siren sounds, the app push arrives, and the GSM call/SMS actually reaches the first number on the list. Walk outside Wi-Fi range and confirm the GSM path still reaches you.
- Test tamper and low-power. Confirm the panel reports if a device cover is opened, and simulate a power cut to check the battery holds and the system flags mains-loss.
Stage 9: Handover — the step most installers rush
The system is now yours to run. A proper handover means every adult in the house can operate it without thinking, and you hold the documentation.
- Arm/disarm training for everyone. Every adult should be able to arm away when leaving, arm the perimeter/night mode before bed, and disarm on the way in within the entry delay. A system only one person can work is a false-alarm generator the moment they travel.
- User codes. Issue a separate code per user where the panel allows it, and change the default installer code — a factory or installer default left in place is a real weakness. Keep a master code private.
- Documentation. Take a printed or PDF pack: the zone map, the device list, the SIM number and recharge date, the battery-replacement due date, warranty papers, and the installer's contact and any AMC terms. Note what it all cost against the cost guide and cost estimator.
- Agree the upkeep. Confirm who does the periodic walk-test, who changes batteries, and how faults are logged.
Indicative install cost (2026)
Treat these as ballpark ranges to sanity-check a quote, not fixed prices — they move with city, brand, home size, sensor count and whether you self-install. GST applies on equipment and labour.
| Setup | Indicative range (2026, incl. GST) | Notes |
|---|---|---|
| DIY wireless starter kit, small home | ₹6,000 – ₹18,000 | Panel + few sensors; you mount it |
| Installer-fitted wireless, 2-3 BHK | ₹15,000 – ₹45,000 | Equipment + professional fit + commissioning |
| Installer-fitted wired/hybrid, larger home/villa | ₹40,000 – ₹1,20,000+ | More devices, cabling labour, perimeter |
| Professional monitoring (optional) | ₹3,000 – ₹12,000 / yr | Manned station subscription |
| Recurring: SIM + battery + AMC | SIM ~₹1,500/yr; battery every 3-5 yr; AMC 5-12% of kit | Keep the SIM live and battery fresh |
For a fuller breakdown by home size and tier, see the dedicated burglar alarm cost guide.
When to bring in a professional. You plan the zones, decide the call-list, choose the sensors and run the daily operation. Hand the panel mains connection, any board-level electrical work, drilling and mounting at height, outdoor siren and beam fitting, and the formal commissioning to a licensed installer/electrician — see the electrical hub. Insist the installer walk-tests every sensor with you and leaves a written zone map and device list. A system nobody was trained to arm is the most common cause of both missed break-ins and false alarms.
Key takeaways
- Plan before anyone drills. Survey the home, list every entry point, mark your entry/exit route, and hand the installer a floor plan with zones and sensor dots — see alarm zoning.
- Hide the panel, expose only the keypad. Mount the brain out of sight against crash-and-smash; the keypad sits by the daily door on the entry route.
- Placement beats everything for false alarms — aim PIRs away from fans, ACs, windows and sun; align door contacts on swollen monsoon doors; use pet-friendly or dual-tech sensors where pets roam.
- Power and network are the India-specific make-or-break — a healthy backup battery for constant power cuts, and a 4G SIM kept recharged so alerts actually reach you.
- Commissioning and handover are the install. Walk-test every sensor, set real entry/exit delays, program a call-list ending with a guard or neighbour, change the default code, and train every adult — then keep the printed documentation.
References
- Manufacturer specifications and installation manuals — verify each device's mounting height, PIR coverage angle, battery/standby rating, RF range and 4G-band support on the maker's own datasheet before fitting or ordering.
- Emergency response — India has no automatic verified-alarm-to-police dispatch; a person on your call-list verifies an alarm and dials the national emergency number 112 (or 100). Program the call-list accordingly.
- National Building Code of India (SP 7), Bureau of Indian Standards, and local municipal bye-laws for any electrical, wiring or life-safety aspect of the install; confirm the current edition via the BIS catalogue: https://www.services.bis.gov.in/
This is an educational overview, not legal advice. Mains connection, board-level wiring, work at height and formal commissioning are qualified professional tasks — engage a licensed installer or electrician and verify any standard's current status via the BIS catalogue before relying on it.
Export this guide
Related Guides — Deep-dive reading
False Alarm Prevention for Burglar Alarms in India: Causes & Fixes (2026)
Why home alarms cry wolf — ceiling fans, pets, heat, insects, weak batteries, power blips and poor door alignment — and how correct placement, the right sensors and simple upkeep keep the system trusted and armed.
SecurityHow to Choose a Burglar Alarm in India (2026): Sensors, Alerts and What Actually Matters
A homeowner's guide to selecting an intruder alarm that fits your flat, villa or shop and alerts you the way you want — matching the sensor mix, control panel and the big siren-versus-monitored decision to your real risk, and dodging the false-alarm traps that make people switch systems off.
SecurityGlass-Break Sensors in India (2026): Catching a Smashed Pane Before Entry
How acoustic glass-break sensors listen for the twin sound of breaking glass, why they cover what door and window contacts miss, and how to place one sensor to protect a whole room of windows in an Indian home or shop.
SecurityRelated Tools — Try Free
Burglar Alarm System Selector
Answer a few questions about your property, cabling, coverage, monitoring and power and get the right burglar alarm — wired / wireless / hybrid, self or professionally monitored — with the design non-negotiables.
Alarm SelectorSite & Perimeter Security Assessment
Rate your site across five areas — site, neighbourhood, perimeter, entry/exit and lighting — for a readiness score and prioritised fixes.
Site AssessmentCCTV Mounting Height & Angle Calculator
Height, target distance and lens angle to the downward tilt, the blind dead-zone below and where coverage begins and ends.
Height & Angle