
Lift Shaft Design Guide (India): Hoistway Dimensions, Walls, Ventilation and Tolerances
How to size, build, plumb, ventilate and finish a residential lift hoistway in India — coordinated to the vendor's GA drawing.
The hoistway — the vertical well the car travels in, also called the lift well or shaft — is the one element of a home lift that the building, not the lift vendor, must get exactly right. Everything else can be tuned later: you can change the cabin finish, upgrade the controller, add a handrail. But the shaft is poured concrete. If it is a few centimetres too narrow, out of plumb, or finished with the wrong surface, the lift either does not fit or never runs smoothly — and the fix is a demolition bill, not a service call.
This guide is the deep, dimensional treatment of the hoistway for Indian homes: how to size it by capacity, what wall thickness and material to specify, how vertical (plumb) the shaft must be, how much clearance to leave between the car and the walls, how guide-rail brackets fix into the walls, and how to ventilate, drain and finish the well. It sits beneath the Architect's Residential Elevator Handbook (India) and is a sibling to the dedicated lift pit and machine-room guides — we deliberately do not repeat those here; we link to them.
The single rule that governs this whole guide: the structural engineer designs the shaft to the lift vendor's General Arrangement (GA) drawing and reaction-load schedule. Never cast a shaft before the vendor's GA is fixed. Every dimension below is indicative — confirm against your supplier's GA and your local municipal bye-laws.
What the shaft is — and what it is not
The hoistway is the enclosed vertical volume bounded by four walls, a pit at the bottom and an overhead (headroom) at the top. In a modern machine-room-less (MRL) installation — the 2026 norm for homes — the drive machine sits inside the top of this same well, so there is no separate machine room. The shaft contains the car, its guide rails, the counterweight (on traction lifts) and the landing-door assemblies; the buyer-side overview of these lift types lives in the Residential Elevator Buyer's Guide.
The shaft is not a structural shear element you bolt the rest of the house onto as an afterthought, and it is not a service duct you can route pipes or wiring through. Under IS 14665 and NBC 2016 Part 8 Section 5, the well is a dedicated enclosure: nothing unrelated to the lift may pass through it.
Sizing the shaft by capacity
Shaft (plan) size is driven by three things in order: the car size (set by capacity), the door type and width, and the running-clearance and counterweight allowances the vendor adds around the car. A pneumatic vacuum elevator (PVE) is the exception — it is self-supporting and needs no masonry shaft at all, which is why it dominates the retrofit conversation.
The table below gives indicative internal clear shaft dimensions for common Indian home capacities. These are starting points for early planning only — the GA always wins.
| Capacity | Car (approx, mm) | Door type / clear width | Indicative clear shaft W × D (mm) | Typical drive |
|---|---|---|---|---|
| 2 person (~150–204 kg) | 700 × 800 | Manual swing / compact auto | 1219 × 1100 | Hydraulic / screw / PVE |
| 3 person (~225 kg) | 800 × 1000 | Auto sliding | 1300 × 1300 | MRL traction / hydraulic |
| 4–5 person (~320–375 kg) | 1000 × 1100 | Auto telescopic, ~800 mm | 1450 × 1450 | MRL traction |
| 6 person (~408 kg) | 1100 × 1300 | Auto telescopic, ~900 mm | 1600 × 1600 | MRL traction |
| 8 person / accessible (~544 kg) | 1100 × 1400 | Auto, ≥900 mm | 1700 × 1700 (approx) | MRL traction |
Two things to read carefully from this table. First, door type drives shaft width more than capacity does: a manual swing door is cheapest but is not wheelchair-friendly, while an automatic telescopic door needs more wall width for its pocket — and the accessibility benchmark is a ≥900 mm clear door, set out in the CPWD Harmonised Guidelines and the RPwD Act framework. Second, an accessible home car of about 1100 × 1400 mm (large enough for a wheelchair plus attendant) is also, conveniently, the size used for a fireman's lift — relevant only on the tallest homes (see lift fire-safety planning). For the room-by-room spatial logic of where this footprint goes, see home lift space requirements.

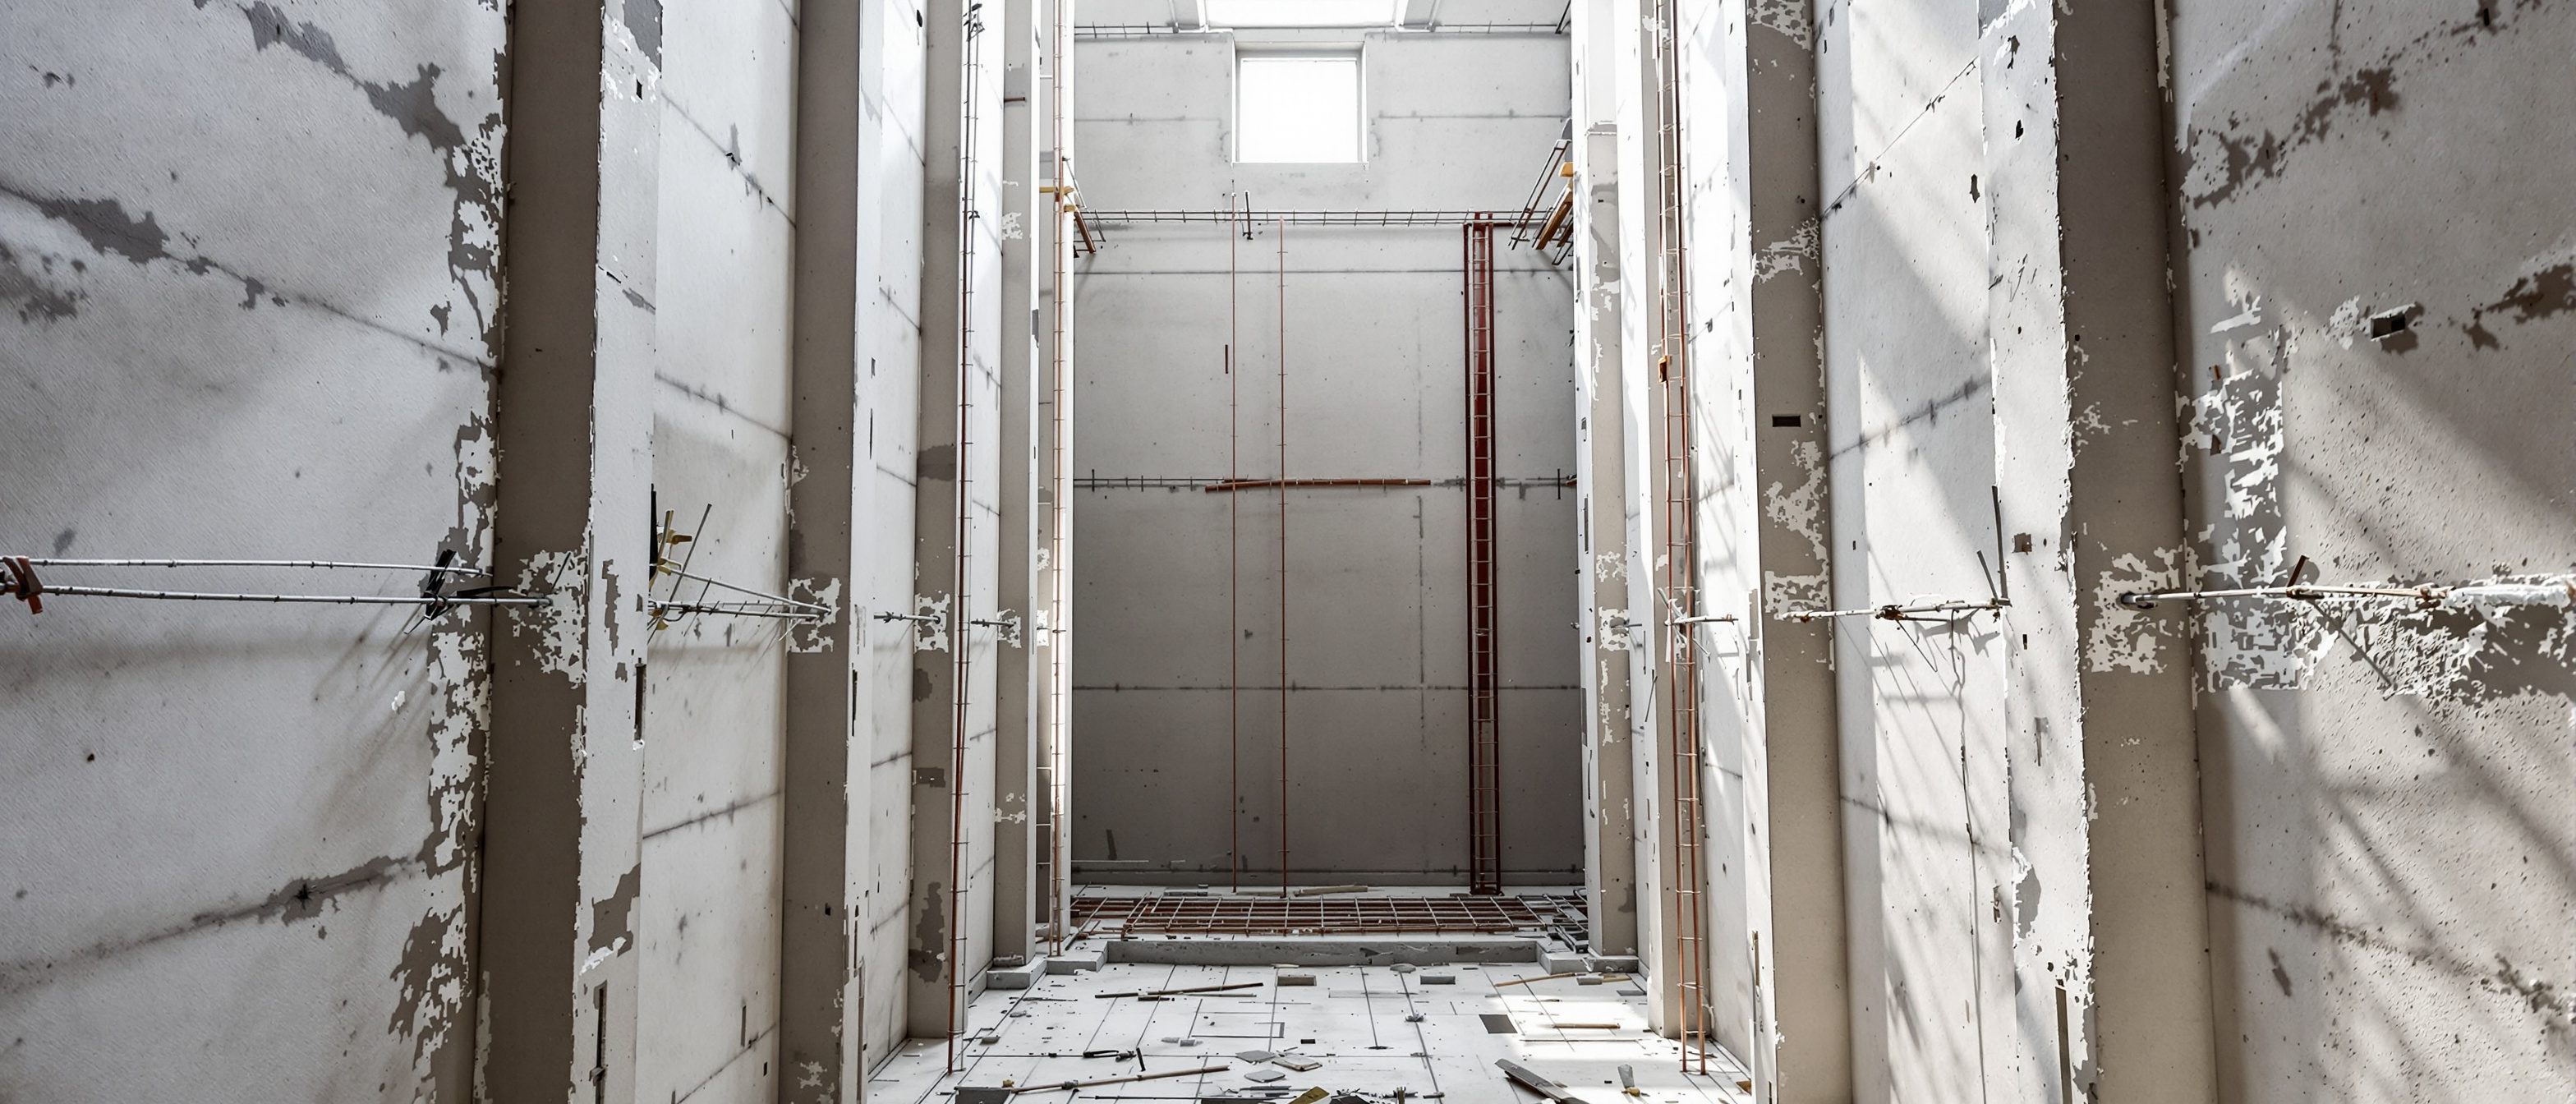
Wall material and thickness — and why you leave it bare
For an Indian home lift, the shaft is almost always built as reinforced cement concrete (RCC) walls 150 to 200 mm thick. RCC is preferred over block masonry because the walls do double duty: they enclose the well and they receive the guide-rail bracket reactions — concentrated vertical and horizontal forces the rails dump into the wall at regular intervals up the height of the shaft. A 150 mm RCC wall, correctly reinforced and designed to the vendor's reaction schedule, can take these; thin block walls generally cannot without piers or a frame. The broader load path — how these forces travel down to the foundation — is covered in home lift structural design.
Leave the internal face of the shaft UNPLASTERED. This is the most-missed instruction on site in India. Plaster on the inside of the well eats into the running clearance, and worse, it can crack and spall onto the running gear — guide rails, shoes, ropes — over the life of the lift. The vendor sizes the shaft assuming a bare concrete face. A plastering contractor who "tidies up" the inside of the shaft has just narrowed it and seeded a maintenance problem.

What this means in practice:
- Specify RCC 150–200 mm on the drawings, with the internal face called out as fair-faced / unplastered.
- Tell the masonry and plastering subcontractors, in writing, that the shaft interior is out of scope for plaster.
- Cast clean, true faces — the formwork quality on the inside of the shaft directly becomes your running surface.
- Coordinate bracket fixing zones (below) so reinforcement and any cast-in inserts are present where the rails land.
Plumb and verticality tolerance
A lift runs on two vertical guide rails. Those rails can only be as straight and plumb as the well that carries them. If the shaft leans, twists or bulges, the rails are forced to follow — or the fixing brackets have to be packed out with long shims, which is a bodge that introduces flex and noise. So the shaft must be built truly vertical (plumb) within tight limits over its full height.
The discipline points are:
- Plumb the well, not just each floor. The deviation that matters is cumulative over the whole travel, not the error on any one storey. Check the shaft against a plumb line or laser dropped from top to bottom.
- The vendor's GA states the permitted out-of-plumb tolerance for the well; it is small — a matter of a few millimetres over the height — because the running clearances it allows are themselves small.
- Bulges and steps are as bad as lean. Form-tie blowouts, a misaligned lift in the formwork between pours, or a slab edge protruding into the well all reduce clearance at a point. Survey the inside faces, not only the corners.
- Where a multi-storey shaft is poured floor by floor, re-establish the vertical reference at every pour so errors do not accumulate.
If you discover the shaft is out of tolerance after striking the formwork, fix it before the lift arrives — chip back high spots, do not let the installer "absorb" it by reducing clearances. A shaft built true is the cheapest reliability you will ever buy.
Clearances between the car and the walls
Inside the well, the gap between the car (and the counterweight) and the surrounding structure is not slack — it is engineered. Too tight and the car rubs or jams as the building moves and the structure shifts; too loose and you have wasted a shaft that could have carried a bigger car. The vendor's GA fixes every one of these gaps:
- Running clearance around the car so it never touches the wall through its travel.
- A defined counterweight zone (on traction lifts) running up one side or the back of the well, with its own clearance.
- Door-operator and landing-door pocket allowances at the entrance side.
- Bracket projection — the guide-rail brackets stand off the wall and into the well; the car path is set clear of them.
This is precisely why you do not plaster the inside and why plumb matters: the clearances are designed against a bare, true concrete face. Add 12–20 mm of plaster on two faces and you can lose the running clearance entirely. The section figure below shows the clearances and the relationship between car, rails and walls through the height.

Guide-rail fixing into the shaft walls
The two guide rails are the spine of the lift. They are held to the shaft by brackets fixed into the walls at intervals up the full height of the well. Each bracket transmits both vertical (rail self-weight and friction) and horizontal (guiding and, critically, safety-gear arrest) forces into the structure — which is the whole reason the walls are RCC, not thin masonry.
The practical coordination is:
- The exact bracket loads, spacing and fixing levels come from the lift supplier, on the GA and reaction schedule. They are model-specific — do not assume a generic spacing.
- Decide the fixing method with the vendor before casting: cast-in plates / channels (cleanest, no drilling into reinforcement later) versus post-fixed chemical/expansion anchors into hardened concrete.
- Ensure the wall reinforcement does not clash with anchor positions, and that there is sound concrete (not a honeycombed pour) where every bracket lands.
- The arrest force when the safety gear grips the rails in an overspeed event is a large, sudden horizontal load — the walls and brackets must carry it. This is one reason a real reaction schedule, not a rule of thumb, governs the design (structural design guide).
Shaft ventilation and smoke venting
A lift well is a tall, sealed vertical volume, and two things must escape it: ordinary heat and moisture in day-to-day running, and smoke in a fire. NBC 2016 Part 8 Section 5 treats the well as part of the building's fire compartmentation, and the landing/shaft doors contribute to that — fire-rated landing doors matter where the bye-laws require them.
For homes, the working rules are:
- Provide shaft ventilation — typically a vent opening at the top of the well so heat and moisture do not build up around the machine and electronics (especially in MRL lifts, where the machine lives in the top of the shaft).
- Where the bye-laws require it, the top vent doubles as a smoke vent so a fire in or below the shaft does not pressurise the well.
- A normal home passenger lift is not an escape route in a fire — occupants use the stairs. On a fire alarm the lift should return to a designated floor and park with its doors open. The detailed fire logic is in lift fire-safety planning.
- An Automatic Rescue Device (ARD) — battery backup that brings the car to the nearest floor and opens the doors on a power cut — is essential in India given the frequency of outages. Do not commission a lift without one.
- Ventilation areas and the height thresholds for fire provisions vary by state — verify against your local bye-laws and, on taller homes, the fire NOC.
Sump and drainage at the base
Water is the enemy at the bottom of a shaft. The pit is, in effect, a below-ground concrete box, and in Indian conditions — monsoon, high water tables, washdown — it will see water unless you design it out. The full pit treatment (depth by lift type, waterproofing, lateral earth pressure, buffer-impact slab) is in the dedicated lift pit requirements guide; here we cover only the shaft-side drainage logic so the two coordinate.
- Make the pit RCC and waterproof — a tanked concrete box — and design its walls for lateral earth pressure because it sits below ground.
- Provide a sump at the pit floor with a fall toward it, so any water that does get in collects in one place rather than pooling under the buffers and running gear.
- Drain or pump the sump out; a flooded pit is a common AMC exclusion ("acts of God"), so prevention is on you, not the service contractor.
- Keep the buffer-impact provision (plates / shock provision under the slab) clear of the drainage detail so neither compromises the other.

Internal finishes — and what NOT to do
The inside of the shaft is a working surface, not a room. Treat it accordingly.
- Do leave the internal RCC face bare / unplastered, true and clean.
- Do keep the well dedicated — nothing but lift equipment inside it.
- Do provide a shaft light and a means of access for maintenance as the vendor specifies.
- Do NOT plaster the internal face (it narrows clearances and spalls onto running gear).
- Do NOT tile, clad or "finish" the inside of the shaft.
- Do NOT route plumbing, drainage, electrical conduit or any other service through the well.
- Do NOT let any structure — slab nibs, beam haunches, form-tie remnants — project into the running zone.
- Do NOT finalise or pour the shaft before the vendor's GA is fixed.
Common shaft mistakes on Indian sites
| Mistake | Consequence | Fix |
|---|---|---|
| Plastering the inside of the well | Lost clearance; spalling onto rails/ropes | Specify unplastered fair-faced RCC; tell subcontractors in writing |
| Undersizing the shaft | Lift does not fit; downgrade or demolition | Size to the vendor GA, not a generic table |
| Building out of plumb | Rails forced off-line; noise, shimming, rubbing | Plumb the full well; survey faces, not just corners |
| Thin block walls | Cannot take guide-rail bracket reactions | RCC 150–200 mm to the reaction schedule |
| Casting before GA is fixed | Re-work when the real dimensions arrive | Lock the GA first — golden rule |
| No top vent / smoke vent | Heat and moisture build-up; bye-law non-compliance | Provide a top vent per local rules |
| No sump or waterproofing | Flooded pit; corroded gear; AMC exclusion | Waterproof RCC pit with a drained sump |
| Routing services through the shaft | Code violation; fire and safety risk | Keep the well dedicated to the lift |
How this fits the rest of your lift planning
The shaft is one piece of a coordinated set. Pair this guide with home lift space requirements for the room-planning footprint, the lift pit and machine-room guides for the top and bottom of the well, and home lift structural design for the load path down to the foundation. If you are planning around the building, see designing a lift into a new house, retrofitting a lift into an existing home, and the lift-and-staircase integration guide. For typology specifics, see duplex homes, villas, narrow plots, senior-friendly homes and luxury residences. Many Indian clients also ask about placement: see lift placement and Vastu, and the related staircase Vastu and Vastu house-plan guides — treating Vastu as a cultural preference that engineering and safety override where they conflict. Before commissioning, run the lift specification checklist and design the home to be lift-ready and future-proof. For the staircase that usually sits beside the shaft, see designing a staircase (India) and duplex house plans.
References
- IS 14665 (Electric Traction Lifts), Part 1 — Outline dimensions (car, well/hoistway, pit, headroom, machine room, door types), BIS. https://law.resource.org/pub/in/bis/S05/is.14665.1.2000.pdf
- IS 14665, Part 2 — Code of practice for installation, operation and maintenance, BIS. https://law.resource.org/pub/in/bis/S05/is.14665.2.1-2.2000.pdf
- IS 15259 — Hydraulic lifts (companion code), BIS (named standard).
- National Building Code of India 2016, Part 8 (Building Services), Section 5 — Installation of Lifts, Escalators and Moving Walks, BIS. https://www.bis.gov.in/standards/technical-department/national-building-code/
- Guide for Using NBC 2016, BIS. https://www.bis.gov.in/wp-content/uploads/2022/08/Booklet-Guide-for-Using-NBC-2016.pdf
- Rights of Persons with Disabilities (RPwD) Act, 2016 — Sections 40, 44, 45. https://ssepd.odisha.gov.in/sites/default/files/2024-01/RPWD%20ACT.pdf
- CPWD / MoHUA Harmonised Guidelines and Space Standards for a Barrier-Free Built Environment (2016). https://www.cpwd.gov.in/Publication/Harmonisedguidelinesdreleasedon23rdMarch2016.pdf
- Structural requirement for lifts and lift pits, Civilera. https://www.civilera.com/post/structural-requirement-for-lifts-and-lift-pits
- Guidelines for the structural design of a lift well / shaft, SketchUp 3D Construction. https://www.sketchup3dconstruction.com/const/guidelines-for-making-perfect-structural-design-of-a-lift.html
- Lift regulations in India (state Lift Acts overview), 99acres. https://www.99acres.com/articles/know-all-about-the-lift-regulations-in-india.html
- State Lift Acts named in this guide: Maharashtra Lifts, Escalators and Moving Walks Act 2017; Karnataka Lifts, Escalators and Passenger Conveyors Act 2015; Delhi Lifts and Escalators Act 2007; Tamil Nadu Lifts Act 1997.
All dimensions, thicknesses and regulatory triggers in this guide are indicative — confirm them against your lift vendor's General Arrangement drawing, your structural engineer's design, and your local municipal bye-laws and State Lift Act before construction.
Export this guide
Related Guides — Deep-dive reading
Designing Adaptable & Universal-Design Homes
Accessibility, Aging-in-Place, and the Multi-Stage Family — Code, Anthropometrics, and Plan-Stage Discipline for Indian Residential Architects
Room PlanningArchitect's Residential Elevator Planning Handbook (India): Shaft, Loads, Code & Coordination
The plan-stage reference for carrying a home lift through the drawing board — shaft, structure, pit, code, licensing and accessibility.
Home Lifts & AccessibilityLift and Fire Safety Planning (India): What Home Lifts Must Do When There's a Fire
Why your home lift is never the escape route, how fire recall works, when a fireman's lift is required, and the local fire NOC and bye-law checks every Indian homeowner should make.
Home Lifts & AccessibilityRelated Tools — Try Free
Accessibility Compliance Calculator
Check a planned lift against the CPWD and RPwD accessible-lift benchmarks for a score.
Lift CheckerRainwater Tank Sizer
How big should your rainwater tank be? Computes annual harvest, recommended tank capacity in litres, water-bill savings, and payback — for 10 Indian cities.
RWH CalculatorElevator Capacity Calculator
Pick the right home-lift capacity — 2 to 8 person — with car size and wheelchair fit.
Lift Calculator