
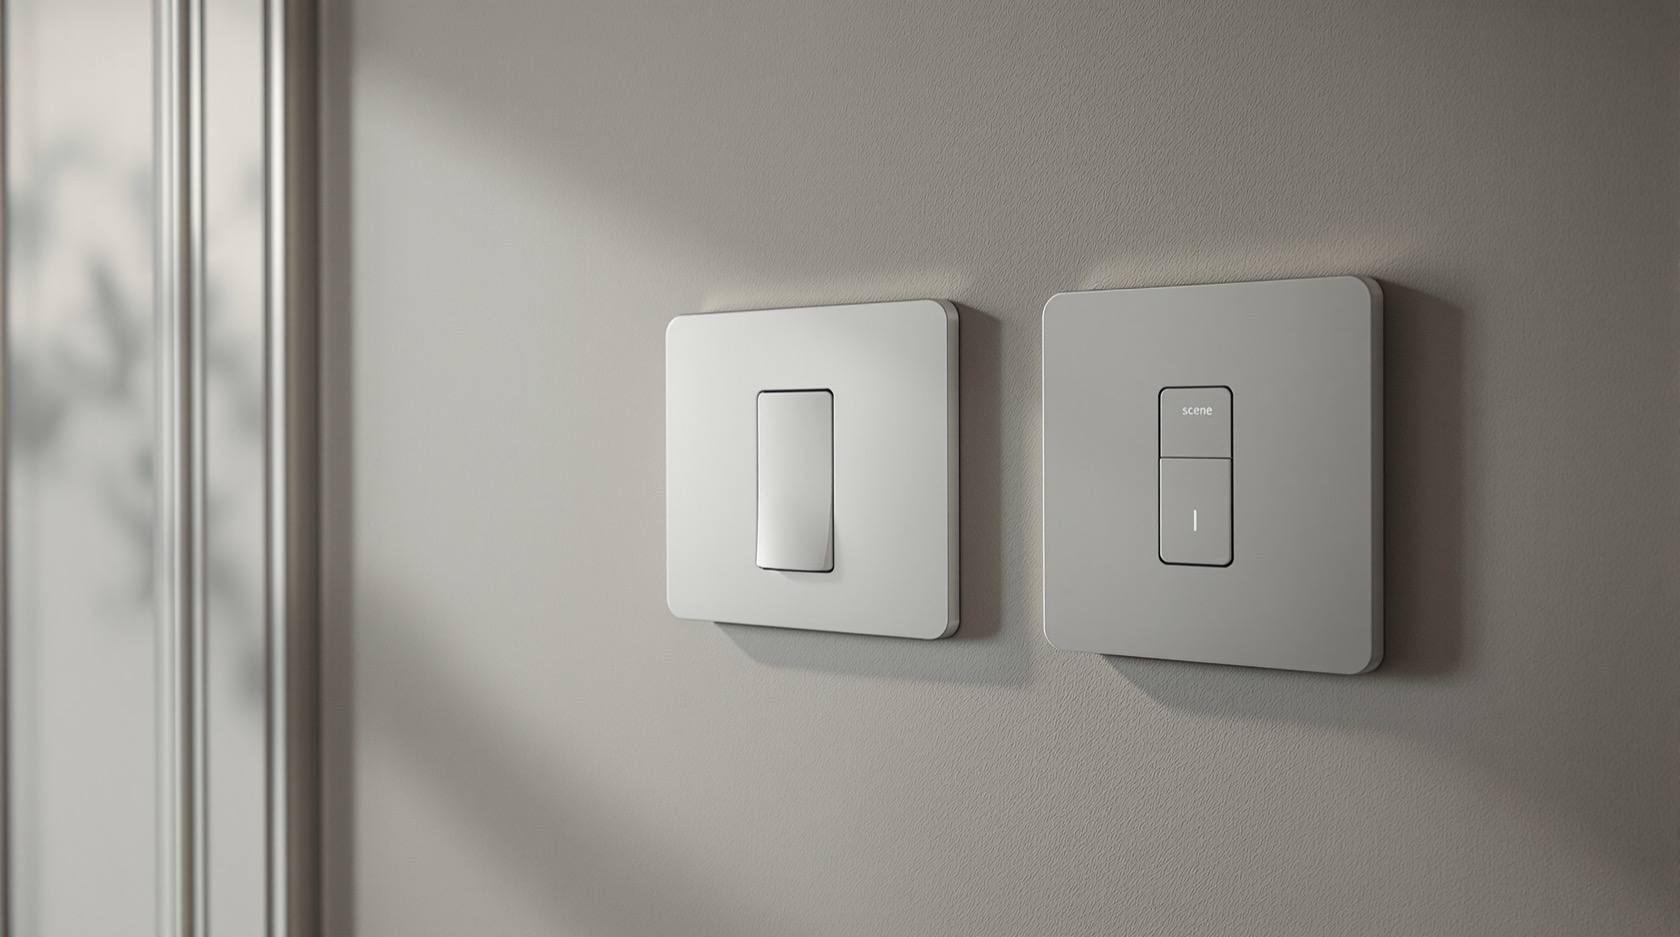
Lighting Controls & Dimming Design: Zones, Scenes & Switches (2026)
How to plan lighting control so an Indian home's light is flexible — split each room's layers onto separate switches, choose dimmers that actually work with LEDs, add two-way switching where you need it, and layer scenes on top. The design decisions you must settle before the electrician wires.
Control is the difference between a room that does exactly one thing and a room that sets any mood you want. Two homes can own the same fixtures — the same downlights, the same cove, the same reading lamp — and feel completely different, because one wired every light to a single switch and the other split them into layers that dim independently. Bright and even for cleaning and homework; low, warm and pooled for a film or a quiet evening; a soft glow for the pooja corner while the room stays dim around it. None of that is about buying more lights. It is about how the lights you already have are switched, grouped and dimmed.
This is the control-planning guide for the Lighting hub. It covers the decisions you make on paper — zoning, dimming, two-way switching, switch layout and scenes — so your scheme is flexible from day one. It is the natural next step after you have designed the layered lighting scheme and decided the mood and scene feel you want, and it sits beside the rest of the buy-run-maintain set: the lighting buying guide, the energy-efficient lighting guide and the common lighting mistakes guide. Start from the pillar, the complete guide to lighting in India, if you want the whole map.
Scope & how to read this. This is a design-and-planning guide, not a wiring manual. Everything here is about the decisions you settle before the electrician arrives — which lights share a switch, where dimmers go, where you need two-way control. The actual work — circuits, cabling, load, dimmer installation, earthing, compliance — is safety-critical and belongs to a licensed electrician: never open a switchboard or wire a dimmer yourself. Deep automation — schedules, geofencing, whole-home logic — lives in the Smart Home hub. All costs are indicative bands to help you brief and budget, never firm quotes.
Why control is the whole point
Layers of light only earn their keep if you can use them independently. If your ambient downlights, your cove, your accent spots and your reading lamp all come on together from one switch, you have four layers behaving as one — you have paid for flexibility and thrown it away at the switchboard. Real control means three things working together:
- Separation — each layer on its own switch, so you can turn any one on or off without the others.
- Dimming — each layer's brightness adjustable, so the same fixtures give a bright morning and a low evening.
- Recall — a way to set a whole combination at once (a scene), so you do not fiddle with four dimmers every time.
Get those three right and one room does the work of many. Get them wrong and you live with a light level someone chose during construction and never questioned again. The good news: the most important of them — separation, i.e. zoning — costs almost nothing to plan and a fortune to add later, because it is decided by how the room is wired.
Zoning: the single most important control decision
Zoning means splitting the light in a room onto separate switches and circuits so each layer works on its own. It is the one control decision that must be made at the wiring stage, before the walls are closed — which is why it belongs in your plan, not the electrician's guesswork.
The rule is simple: give each light layer its own switch (and, where it helps, its own dimmer). In a typical living room that means ambient ceiling light on one control, task lamps on another, accent wall-wash or spots on a third, and decorative cove or feature light on a fourth. Design the layers first using the layered lighting guide; zoning is simply the promise that those layers stay independent at the switch.
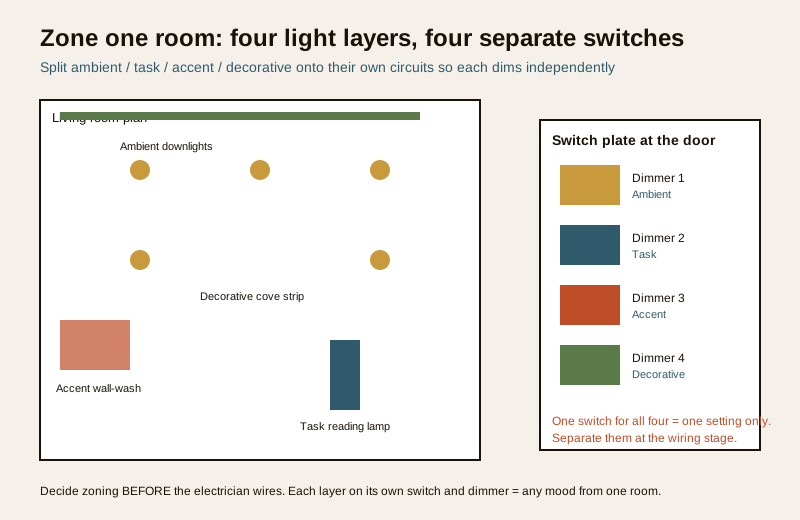
Why it has to happen before wiring: which lights share a switch is fixed by the cabling behind the wall. Two lights on the same circuit cannot be controlled separately without pulling out plaster and re-running wire. So the sequence is: you decide the zones, mark them on the plan, and the electrician wires to that plan. A rough zoning brief per room looks like this:
| Room | Sensible zones (separate switches) | Which zones want a dimmer |
|---|---|---|
| Living room | Ambient downlights; accent/wall-wash; cove/decorative; lamps (often on a socket) | Ambient, accent and cove all benefit |
| Bedroom | Ambient; bedside reading (each side ideally its own); cove/night glow | Ambient and cove; two-way for bed + door |
| Kitchen | Ceiling ambient; under-cabinet task; any dining/breakfast light | Task rarely dimmed; ambient can be |
| Dining | Pendant over table; ambient; accent (crockery unit) | Pendant on a dimmer is the key one |
| Pooja room | Ambient; focused deity accent; decorative/diya-style | Accent and decorative for aarti vs everyday |
| Bathroom | Ceiling ambient; mirror/vanity task; optional night light | Vanity task usually full; night light dim |
Room-specific zoning is worked through in the living room, bedroom, kitchen, dining room and pooja room guides. The principle never changes: one layer, one switch.
Dimming: getting it right with LEDs
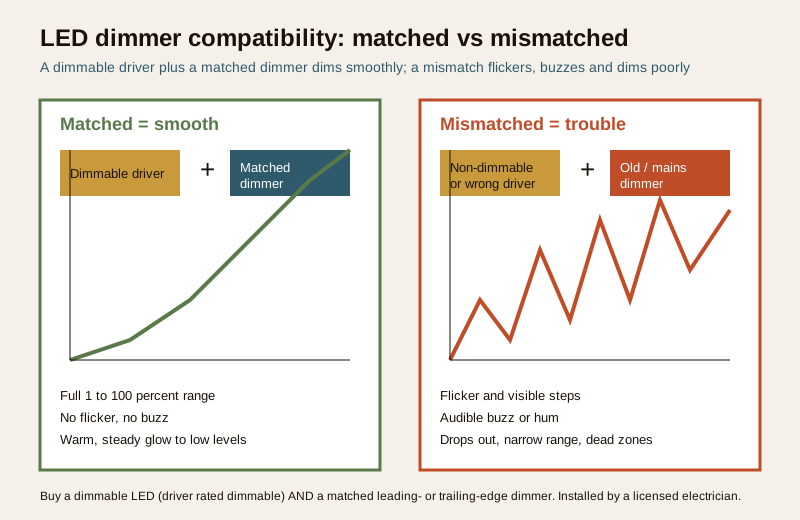
Dimming is what turns a fixed installation into a variable one — the same downlights at 100 percent for cleaning and 20 percent for a film. With LEDs, though, dimming is the single most common thing that goes wrong in Indian homes, and almost always for one reason: the LED and the dimmer were not matched.
An LED does not dim like the old incandescent bulb the dimmer was designed for. To dim smoothly it needs a driver rated as dimmable, and that driver needs to be paired with a compatible dimmer. Mix a non-dimmable LED with any dimmer, or a dimmable LED with the wrong type of dimmer, and you get the familiar complaints: flicker, an audible buzz or hum, a narrow range that jumps from bright to off with nothing in between, or lights that drop out or shimmer at low levels.
The two main dimmer families are worth knowing by name when you brief an electrician or buy a fixture:
| Dimmer type | Works best with | Notes for LEDs |
|---|---|---|
| Leading-edge (older, "TRIAC") | Higher-wattage / mains-voltage loads | Cheap and common, but can flicker or buzz with low-wattage LEDs; needs a minimum load |
| Trailing-edge ("ELV") | Modern low-wattage LED drivers | Smoother, quieter, better low-end dimming; the safer default for LED homes |
| 0-10V / DALI (driver-level) | LED strip, coves, larger schemes | Wired dimming signal to the driver; flicker-free but needs compatible drivers and wiring |
| Smart dimmer / module | Any LED marked dimmable | App and voice control; still must match the LED — smart does not fix incompatibility |
Two practical rules save almost every dimming headache. First, buy the light and the dimmer as a matched pair — check the LED is marked "dimmable" and that the dimmer is rated for LED loads and for the total wattage on that circuit (LED loads are small, and some dimmers have a minimum load below which they misbehave). Second, ask for a trailing-edge or driver-level dimmer for low-wattage LED unless there is a reason not to. The deep electrical detail — driver types, load ranges, wiring — sits with your electrician and the Electrical hub; this guide's job is to make sure you specify a dimmable fixture and a matched dimmer in the first place.
Warm-dim is worth asking for in bedrooms, dining and lounges: these LEDs shift warmer as you dim them (say from 3000K down toward a candle-like 2200K), mimicking how a filament bulb glowed amber when turned low. It makes low light feel cosy rather than merely dim — the ideal is explained further in colour temperature and CRI.
Two-way and multi-way switching
Two-way switching lets you control the same light from two different places; multi-way extends that to three or more. It is pure planning — the electrician wires it — but you must ask for it, because a light wired to a single switch cannot be made two-way later without re-cabling.
You want it wherever you enter a space at one point and leave or settle at another:
- Staircases and long corridors — switch on at the bottom, off at the top (a genuine safety point, not just convenience).
- Bedrooms — the ceiling light controlled from both the door and the bedside, so you never cross a dark room to get into bed.
- Long living/dining rooms — controlled from either end.
- A room with two doors — light switchable from either entrance.
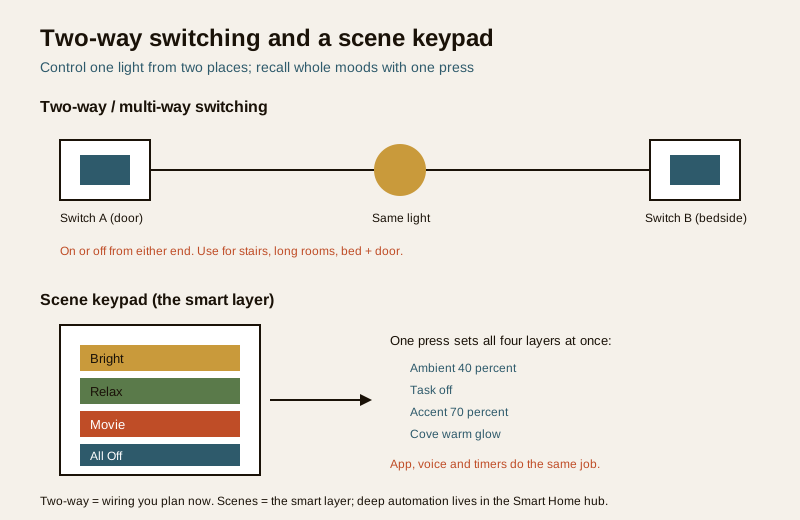
Mark two-way locations on your plan room by room. The bedside-and-door pair alone is one of the most appreciated small luxuries in a home, and it costs only a little extra cable if planned up front.
Switch planning: layout you will thank yourself for
Where switches sit, how they are grouped and how they are labelled decides whether control feels effortless or maddening. This is a design decision as much as an electrical one, and it is easy to get wrong by leaving it to chance:
- Put switches where you reach for them — just inside each door, on the handle side, at a comfortable height. A common, comfortable range is around 1.2m from the floor; confirm mounting height and any accessibility needs (the RPwD Act's accessibility intent) with your electrician.
- Group logically, not randomly — a plate should read like the room. Left-to-right order that matches the lights (front to back, or by layer) beats a scrambled bank where you hunt for the right switch every time.
- Do not build one giant bank — a plate with ten unlabelled switches is a daily puzzle. Split controls across the doors people actually use, and keep frequently-used ones (ambient, the main dimmer) easy to find by touch.
- Label them — even discreet engraving or a consistent order removes the guesswork, especially for guests, help and elderly family members.
- Choose good modular switches — the plate is touched dozens of times a day and is part of the wall's finish. The modular switches and sockets guide covers picking a range that lasts and looks right.
Scenes and smart control: the flexible layer on top
Once layers are zoned and dimmable, a scene is simply a saved combination — ambient at 40 percent, task off, accent at 70, cove on a warm glow — recalled with one press instead of adjusting four dimmers. Scenes are where control stops being a chore and starts feeling designed. Ways to set and recall them:
- Scene keypads — a wall plate with buttons like Bright, Relax, Movie, All-Off, each firing a whole preset. The most reliable, guest-proof control there is.
- App control — dim and switch from your phone, set scenes, group rooms.
- Voice — "set the living room to movie" via a smart assistant.
- Timers and schedules — the cove comes on at dusk; the corridor night light fades on after 10pm.
- Sensors — light responds to presence or daylight (below).
This is the smart layer, and it is where this guide hands off. How to choose and set up smart control properly — hubs vs standalone, protocols, reliability, whether to use smart bulbs or smart switches — is the whole subject of the smart lighting guide and, for the switch hardware, the smart switches guide. The broader logic of a connected home lives in the Smart Home hub. Design the scenes you want here; build the automation there.
Occupancy and daylight sensors
Two sensor types earn their place in a control plan, mostly for convenience and energy saving rather than mood:
- Occupancy / presence sensors — lights come on when someone enters and switch off after an empty room goes still. Ideal for corridors, staircases, utility areas, bathrooms and stores — spaces you pass through with full hands. See staircase and corridor lighting.
- Daylight (photocell) sensors — hold a set light level by dimming electric light as daylight rises, or switch outdoor and facade lights on only after dark.
Both cut waste, which is why they sit at the heart of the energy-efficient lighting guide; you can size the savings with the LED savings calculator. Energy codes such as ECBC encourage controls like these for exactly this reason.
Retrofit control: when you cannot rewire
If the walls are already closed — a rented flat, a finished home — you can still add real control without touching the wiring. Two renter-friendly routes:
- Smart bulbs — the control lives in the bulb; screw it in, dim and set scenes by app or voice. Best where a fitting takes a standard bulb and you want per-bulb control. The catch: the wall switch must stay on for the bulb to listen, so retrain the household not to flip it off.
- Smart switch modules — a module fitted behind an existing switch (electrician job, but no re-cabling) makes a whole existing circuit dimmable and app-controllable, keeping the normal wall switch working. Better where several lights share a switch.
Both are covered in depth in smart lighting and smart switches. Retrofit rarely matches the cleanliness of zoning designed in from the start — but it recovers most of the flexibility, and for a rental it is often the only option.
Control-planning checklist
Run this room by room before you finalise the wiring plan — it is the whole guide as a decision list:
| Decision | What to settle | When it must happen |
|---|---|---|
| Zoning | Each light layer (ambient/task/accent/decorative) on its own switch | At the wiring stage — cannot be added cheaply later |
| Dimming | Which layers dim; dimmable LED + matched dimmer specified | Choose fixtures and dimmers together, before buying |
| Dimmer type | Trailing-edge / driver-level for low-wattage LED unless advised otherwise | Before purchase; confirm load range with electrician |
| Two-way / multi-way | Stairs, corridors, bed + door, long rooms, two-door rooms | At the wiring stage — needs extra cable |
| Switch layout | Position at doors, logical grouping, labels, comfortable height | On the plan, before wiring |
| Scenes | Which presets each room needs (Bright / Relax / Movie / Off) | Design now; build via Smart Home hub |
| Sensors | Occupancy for through-spaces; daylight for outdoor/edge | On the plan; check compatibility |
| Retrofit route | Smart bulbs vs smart-switch modules where rewiring is impossible | Anytime — no wiring change needed |
How it connects
- Design the layers first in the layered lighting guide, then decide the feel in mood and scene lighting — this guide makes both controllable.
- Buy the right dimmable fixtures with the lighting buying guide and avoid the classic traps in common lighting mistakes.
- Save energy with sensors and dimming via the energy-efficient lighting guide and the LED savings calculator.
- Take control further into automation with the smart lighting guide, the smart switches guide and the whole Smart Home hub.
- Pick switch hardware that lasts and looks right in the modular switches and sockets guide; for the deep electrical side of dimmers and drivers, cross to the Electrical hub.
- Start-here map: the complete guide to lighting in India.
Key takeaways
- Control, not more fixtures, sets the mood — separation, dimming and scene recall together turn one room into many.
- Zoning is the single most important decision and it happens at the wiring stage — put each layer (ambient/task/accent/decorative) on its own switch; decide it before the electrician wires, because it is expensive to add later.
- LED dimming fails when the LED and dimmer are mismatched — buy a dimmable driver and a matched, LED-rated dimmer (trailing-edge or driver-level for low wattage) to avoid flicker, buzz and dead zones; ask for warm-dim in cosy rooms.
- Ask for two-way switching where you enter and leave at different points — stairs, corridors, bed and door — it needs extra cable planned up front.
- Plan switch layout deliberately — at the doors you use, grouped logically, labelled, at a comfortable height; never one giant unlabelled bank.
- Scenes and sensors are the smart layer — design them here, build the automation via the Smart Home hub.
- Can't rewire? Retrofit with smart bulbs or smart-switch modules for renter-friendly control.
- Wiring and dimmer installation is a licensed electrician's job — you plan and specify; they design, install and certify.
References
- National Building Code of India, NBC (SP 7:2026), Bureau of Indian Standards — general provisions for illumination and lighting controls (named generally).
- IS 3646 — code of practice for interior illumination, including guidance on control of lighting installations (named generally).
- National Lighting Code — good-practice guidance on lighting design and control (named generally).
- IS 16107 / IEC 60598 — LED luminaire performance and luminaire safety, relevant to dimmable drivers (named generally).
- Energy Conservation Building Code (ECBC) and BEE star ratings — lighting controls and efficiency, including occupancy and daylight controls (named generally).
- RPwD Act 2016 — accessibility intent for switch heights and reachable controls (named generally).
- A licensed electrician and the fixture and dimmer manufacturers' compatibility data — the authority on circuits, load, driver type and dimmer matching for your specific installation.
Every zoning suggestion, dimmer note and cost band here is an indicative planning aid to help you brief a professional; confirm the governing values against IS codes, NBC (SP 7:2026), ECBC and manufacturer compatibility data, and have all wiring, circuit and dimmer work designed, installed and certified by a licensed electrician — electrical work is safety-critical and never a DIY task.
Export this guide
Related Guides — Deep-dive reading
The Homeowner's Guide to Lighting Your Home: Start to Finish (2026)
The warm, plain-English capstone for the whole Lighting hub - how to light an Indian home from empty to done, in the order things actually happen, with the one rule that saves you the most money: decide the whole scheme before the electrician wires.
LightingBathroom Lighting India: The Complete Guide to Layers, Lux, Colour Temperature & IP Safety Zones (2026)
How to light an Indian bathroom properly — the three layers of ambient, task and accent light, the right lux levels and a neutral ~4000K colour temperature for grooming, the IP safety zones near water that decide which fitting goes where, waterproof fixtures, dimming and scenes, mirror lighting done right, motion sensors and energy.
BathroomsLiving Room Lighting Design for Indian Homes (2026)
The design guide to lighting the most-used, most-layered room in the house - how to build a flexible, dimmable, multi-scene living room scheme with ambient, task, accent and decorative layers, warm evening light, a comfortable TV wall and open-plan zoning.
LightingRelated Tools — Try Free
Electrical Safety & Load Audit
Home electrical audit — 10 categories, 65+ checkpoints across earthing, RCCB, MCB, wiring, switchboards, appliance circuits, DG/inverter backup.
Safety AuditFull-Room BOQ — Living, Bedroom, Kitchen, Bath
Room-wise BOQ across living, bedrooms, kitchen, utility, and bathrooms with line-item pricing.
Full-Room BOQModular Kitchen Budget Calculator
Live breakdown by running feet, countertop area, material tier and city — with wastage, design fee, GST.
Kitchen Calculator