
Energy-Efficient Lighting: Bright Homes, Lower Bills (2026)
A homeowner's design playbook for lighting an Indian home beautifully while cutting the electricity it burns — the LED switch, right-sizing so you never over-light, controls as the efficiency multiplier, daylight and solar first, and how to measure and lower the bill.
Good lighting and low bills are not a trade-off — they are the same project done well. A home that is lit with intention almost always uses less electricity than one that is over-lit out of habit, because efficiency is mostly about putting the right amount of light where you need it, when you need it, and nowhere else. The average Indian home spends a meaningful slice of its monthly electricity on lighting, and the disappointing part is how much of that is wasted: legacy bulbs burning four times the watts they need, whole rooms blazing when one lamp would do, corridor lights left on all night, fixtures so dusty they have quietly lost a third of their output.
This is the design-and-decisions guide to fixing all of that. It is about the choices you make — which lamps, how much light, what controls, how much daylight — not about wiring them up. For the deep technical side (LED buying, lumens and CRI, load and circuits) we cross-link the electrical LED lighting guide and the energy-efficient home design guide rather than repeat them here.
Scope & how to read this. This is a design-led efficiency guide to help you plan, specify and brief — every rupee figure is an indicative band, not a quote, so get local prices. Choosing lamps, setting light levels and planning zones is design; wiring, dimmer and sensor installation, and any circuit change is safety-critical electrical work for a licensed electrician — never DIY it. Automation and app control belong to the Smart Home hub. Light levels and power-density figures follow IS 3646 (interior illumination), NBC (SP 7:2026), BEE star rating for LED and ECBC lighting-power-density thinking, all named generally.
The seven efficiency levers
There is no single trick to an efficient home; there are seven levers, and the savings compound when you pull them together. The plate below is the whole strategy on one page — read the rest of the guide as an unpacking of it.
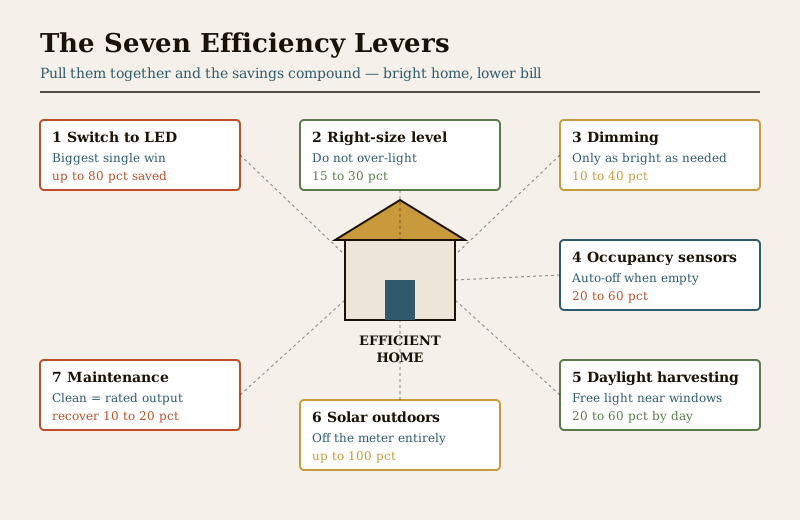
| Lever | What it does | Rough saving vs a lazy baseline |
|---|---|---|
| Switch to LED | Cuts watts for the same brightness | The biggest single win — up to 80 percent vs halogen/incandescent |
| Right-size the level | Stops you over-lighting rooms | 15 to 30 percent by not exceeding needed lux |
| Dimming | Runs light only as bright as the moment needs | 10 to 40 percent in living/bedroom scenes |
| Occupancy sensors | Auto-off in spaces used in passing | 20 to 60 percent in corridors, baths, utility |
| Daylight harvesting | Uses free daylight, dims electric near windows | 20 to 60 percent of daytime perimeter lighting |
| Solar outdoors | Removes garden/path lighting from the meter | Up to 100 percent of that load |
| Maintenance | Keeps rated output so you do not over-compensate | 10 to 20 percent of lost output recovered |
The biggest win: switch everything to LED
If a single lamp in your home is still a CFL, tube light or halogen, that is the first and largest saving on the table. LED does the same job — the same brightness, measured in lumens — for a fraction of the watts, and the number that matters is efficacy: lumens per watt. A halogen delivers roughly 15 lm/W, an old CFL around 55 to 65, and a good modern LED 90 to 130 lm/W and climbing. That means an LED can be four to eight times as efficient as what it replaces, for identical light on your desk or dining table.
Two practical rules. First, buy by lumens, not watts — a 9 to 10 W LED replaces a 60 W incandescent; stop thinking in watts. Second, look for the BEE star rating: more stars means more lumens per watt, and the label makes brands comparable at a glance. For the full buying logic — CRI, colour, dimmable vs not, driver quality — see the electrical LED lighting guide and the honest LED vs CFL comparison; the sustainability angle (lifespan, disposal, embodied impact) sits in the sustainable lighting design guide. Do not wait for old lamps to fail — an inefficient lamp burning daily pays back its LED replacement in months, so a planned swap of the whole house is worth doing at once.
Right-sizing: do not over-light
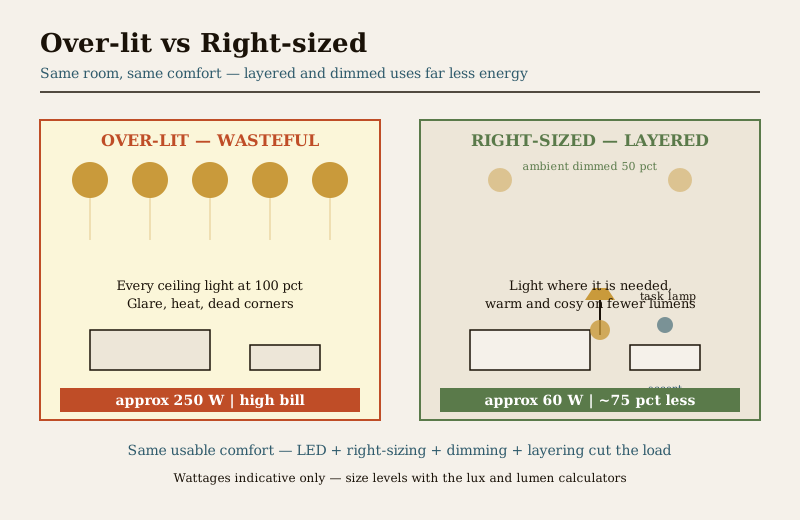
The second lever is the one nobody talks about: more light than you need is wasted energy, full stop. Doubling the lux in a room does not make it twice as usable — past the level the task actually requires, extra brightness only adds glare, heat and cost. Codes like IS 3646 give sensible target levels — roughly 100 to 150 lux for a living room's general light, 300 to 500 for a kitchen counter or a study desk, less for a bedroom or corridor — and the efficient home lands near those numbers rather than blasting past them everywhere.
The design move that saves the most is task lighting: put the light where the work happens instead of over-lighting the whole room to serve one corner. A focused reading lamp, an under-cabinet strip over the kitchen counter, a desk lamp at the study — each delivers high lux exactly where you need it while the ambient layer stays modest. That is far more efficient than pushing the ceiling light up until the far desk is bright enough. To size it honestly rather than guess, run your room through the lux level calculator and the lumen requirement calculator — they turn area and task into a target so you buy neither too little nor too much.
There is also a perception trick worth knowing. Warm, dim light feels cosy and complete at a lower output than cool, bright light — a living room at 2700 K softly dimmed reads as warm and inviting on far fewer lumens than the same room lit cold and flat. Using warmth and dimming to hit "mood" rather than "maximum" is efficiency you actually enjoy; the mood and scene lighting guide covers how to compose it.
Controls: the efficiency multiplier
LED sets the floor for how little each hour of light costs; controls decide how many of those hours you pay for. This is the multiplier — an efficient lamp left on all day is still wasteful, while a modest lamp that switches itself off the moment a room empties barely registers on the bill.
- Dimming. A dimmed LED draws proportionally less power, so running a scene at 50 percent is a real saving, not just a mood choice. Put dimmers where light levels genuinely vary through the day — living, dining, bedroom.
- Occupancy and motion sensors. The single most effective control for transient spaces: light that turns itself off when nobody is there. Corridors, staircases, utility areas, store rooms and bathrooms are lit in passing and left on for hours — a sensor makes that impossible.
- Daylight harvesting / daylight dimming. Near windows, a sensor dims or switches electric light as daylight rises, so you never pay to light a room the sun is already lighting. Pair it with the daylighting and windows guide.
- Timers. For outdoor, garden, gate and facade lighting, a timer or dusk-to-dawn sensor stops lights burning through the day or deep into the night unwatched.
- Zoning. Wire the home so you light only the zone in use — the reading corner without the whole living room, the cooking counter without the full kitchen. Zoning is the quiet backbone of efficiency.
The design of these controls — which zones, which sensors, what scenes — is covered in the lighting controls and dimming design guide; app-based and voice automation belongs to smart lighting and the Smart Home hub. Installing dimmers and sensors and any rewiring is a licensed electrician's job — you design the scheme and specify it; they wire it safely.
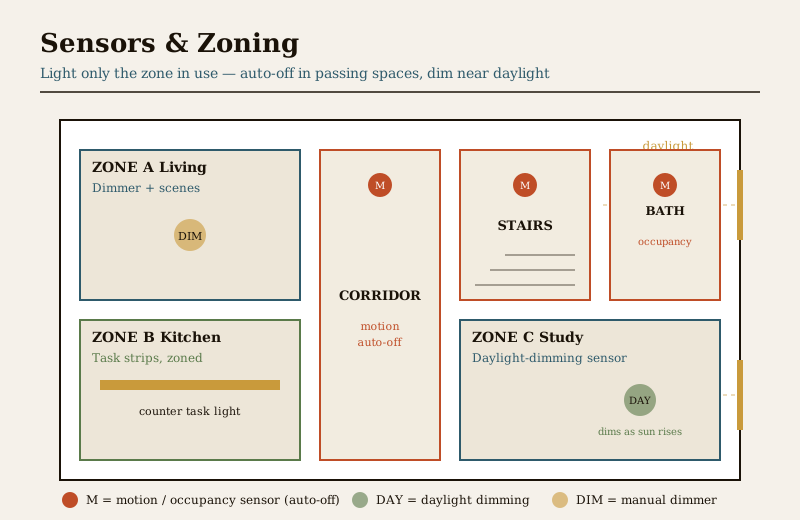
Room-by-room: where sensors and dimming pay off
| Space | Best control | Why it saves |
|---|---|---|
| Corridor / passage | Occupancy sensor, auto-off | Used only in passing; never needs to stay lit |
| Staircase | Motion sensor (both landings) | Safety on demand, dark when empty — also fewer falls |
| Bathroom / WC | Occupancy sensor | Routinely left on for hours after use |
| Utility / store / wardrobe | Motion or door sensor | Short visits; easy to forget the switch |
| Living room | Dimmer + zones | Levels vary hugely from day to evening scenes |
| Bedroom | Dimmer + two-way switching | Low-level night use; dim warm at night |
| Kitchen | Task strips + zoned switches | Bright at the counter, low elsewhere |
| Study / home office | Task lamp + daylight dimming | High desk lux only where and when needed |
| Near large windows | Daylight-harvesting sensor | Free daylight replaces electric light by day |
| Outdoor / garden / facade | Timer or dusk-to-dawn + solar | No daytime burn; solar takes it off the meter |
Design for daylight first
The cheapest lumen is the one you do not pay for. Before any electric fixture, an efficient home is designed to borrow daylight — deep enough windows, light shelves, pale ceilings and walls that bounce it, glazing placed to reach the back of the room. A well-daylit living or kitchen space can go the entire working day with the lights off, which no amount of LED can beat. This is architecture, not fixtures, and it is the subject of the daylighting and windows guide and the broader energy-efficient home design guide. Marry good daylight with the daylight-dimming controls above and the perimeter of your home barely draws electric light until dusk.
Solar for outdoor and garden lighting
Outdoor lighting is the easiest place to leave the meter entirely. Standalone solar path lights, bollards, garden spikes and wall lights charge by day and run at night on their own battery — no wiring trench, no load on your bill, and they keep working in a power cut. They suit gardens, boundary walls, driveways and pathway markers where perfect brightness is not critical; for a bright, reliable facade wash you may still want mains lighting on a timer. The full trade-off — where solar delivers and where it disappoints — is in the sustainable lighting design guide and the sustainability and green buildings hub.
LPD and ECBC awareness
Behind all of this sits a simple professional yardstick: lighting power density (LPD) — the watts of lighting per square metre of floor. India's ECBC (Energy Conservation Building Code) sets LPD ceilings for larger and commercial buildings, and while your home is not bound by it, the idea is a brilliant self-check: total up your fixture watts, divide by the floor area, and if the number looks high you are almost certainly over-lit. Aim to deliver the light levels IS 3646 suggests using as few watts per square metre as you can — that is exactly what LED, right-sizing and controls achieve together.
Maintenance keeps the savings
Efficiency you designed in slowly leaks away if fixtures are neglected. A dusty fixture, a yellowed diffuser or a grimy reflector can lose 20 to 30 percent of its light output — and the natural reaction is to add more lamps or a brighter bulb, which piles on watts to fix a cleaning problem. Wipe fixtures and lamps a few times a year, keep diffusers and glass clean, and replace failed drivers rather than whole efficient fittings. Clean fixtures at rated output mean you never over-specify to compensate. The full routine is in the lighting maintenance guide.
Measuring and lowering the bill
You cannot improve what you do not measure. Start by finding your biggest offenders — the lamps that burn the longest hours (living room, kitchen, outdoor, corridors), because hours matter as much as watts. Then model the change: the LED savings calculator shows what swapping a specific lamp saves over a year, and the lighting electricity bill calculator turns your fixtures, wattages and daily hours into a monthly rupee figure you can attack line by line. For the whole-home energy picture — appliances, fans, cooling alongside lighting — the home energy management guide sets lighting in context.
The order of attack is the order of this guide: swap to LED, right-size the levels, add dimming and sensors where hours are long, let daylight and solar carry what they can, and keep it all clean.
How it connects
- Start at the complete guide to lighting (the pillar), then run the numbers with the LED savings calculator and the lighting electricity bill calculator.
- Go deep on the technical LED side in the LED lighting guide and the LED vs CFL comparison; on the green side in the sustainable lighting design guide and the sustainability and green buildings hub.
- Make controls the multiplier with the lighting controls and dimming design guide; size levels with the lux level calculator and lumen requirement calculator.
- Design daylight in with the daylighting and windows guide and the energy-efficient home design guide; protect the savings with the lighting maintenance guide and set it in context with the home energy management guide.
- Budget the swap honestly with the lighting cost guide, and hand app control and automation to smart lighting and the Smart Home hub.
Key takeaways
- LED is the biggest single win — buy by lumens not watts, chase high efficacy and BEE stars, and replace any lingering CFL, tube or halogen now rather than at failure.
- Do not over-light — target the lux levels IS 3646 suggests, use task lighting where you work instead of blasting the whole room, and let warm dim scenes feel cosy on fewer lumens.
- Controls are the efficiency multiplier — dimming, occupancy sensors on corridors/stairs/baths, daylight dimming near windows, timers outdoors and honest zoning cut the hours you pay for.
- Design for daylight first and solar outdoors — the cheapest lumen is free; borrow daylight by day and let solar carry garden and path lighting off the meter.
- Watch power density and maintain fixtures — keep watts per square metre low in the ECBC/LPD spirit, and clean fixtures so lost output never tempts you to over-specify.
- Measure to lower the bill — model swaps and hours with the savings and electricity-bill calculators, then attack the longest-burning lamps first.
- You design; a licensed electrician wires — specify the lamps, levels, sensors and zones, but leave dimmer, sensor and circuit installation to a qualified professional, and automation to the Smart Home hub.
References
- IS 3646 — code of practice for interior illumination and recommended lux levels (named generally).
- National Building Code of India, NBC (SP 7:2026), Bureau of Indian Standards — general illumination and lighting provisions.
- ECBC (Energy Conservation Building Code), Bureau of Energy Efficiency — lighting power density (LPD) framework for buildings.
- BEE star rating for LED lamps and luminaires, Bureau of Energy Efficiency — comparative energy-efficiency labelling.
- IS 16107 / IEC 60598 — LED luminaire performance and luminaire safety (named generally).
- A licensed electrician and your local DISCOM tariff — for safe installation of dimmers, sensors and circuits, and for the actual per-unit rate behind your bill.
Every lux level, efficacy figure, saving percentage and rupee band here is an indicative planning aid only; confirm against IS 3646, NBC (SP 7:2026), ECBC and BEE labelling, get local quotes, and have a licensed electrician design, install and certify any wiring, dimmer, sensor or circuit work — lighting design is safe to plan, but electrical installation is not a DIY task.
Export this guide
Related Guides — Deep-dive reading
Lighting Controls & Dimming Design: Zones, Scenes & Switches (2026)
How to plan lighting control so an Indian home's light is flexible — split each room's layers onto separate switches, choose dimmers that actually work with LEDs, add two-way switching where you need it, and layer scenes on top. The design decisions you must settle before the electrician wires.
LightingSecurity Lighting Energy Use in India (2026): Keeping Your Home Lit and Safe Without Running Up the Bill
The honest answer to "won't security lighting cost a fortune to run?" It does not have to. Done well, with efficient LEDs and smart switching, a home stays well protected on a fraction of the energy a blazing all-night floodlight burns, and it is safer for it.
SecurityDesigning a Naturally Energy-Efficient Indian Home
Comfort first, gadgets last — passive design, orientation, insulation, ventilation and the climate wisdom that cuts Indian energy bills
SustainabilityRelated Tools — Try Free
Cross-Ventilation Analyzer
Estimate airflow and air changes per hour (ACH) from room size, window areas, layout, and local wind — with NBC 2016 Part 8 compliance check.
Ventilation CalculatorWindow Cleaning Cost Calculator
Estimate professional window cleaning cost per visit and per year by access and frequency.
Window CalculatorBrise-Soleil Visualizer
Interactive horizontal-louvre cut-off angle calculator — sun altitude, louvre depth, and spacing inputs with a live shadow preview. Computes θ = arctan(spacing/depth) for façade shading, ECBC envelope compliance, hospital daylight design, and tropical sun-control detailing.
Sun Shading Tool