
Dining Room Lighting Design: The Pendant & the Glow (2026)
How to light a dining area the design way — the pendant or chandelier as the hero over the table, warm and dimmable for the meal, layered with soft ambient fill and a buffet accent, and centred on the table (not the room) before the ceiling point is ever wired.
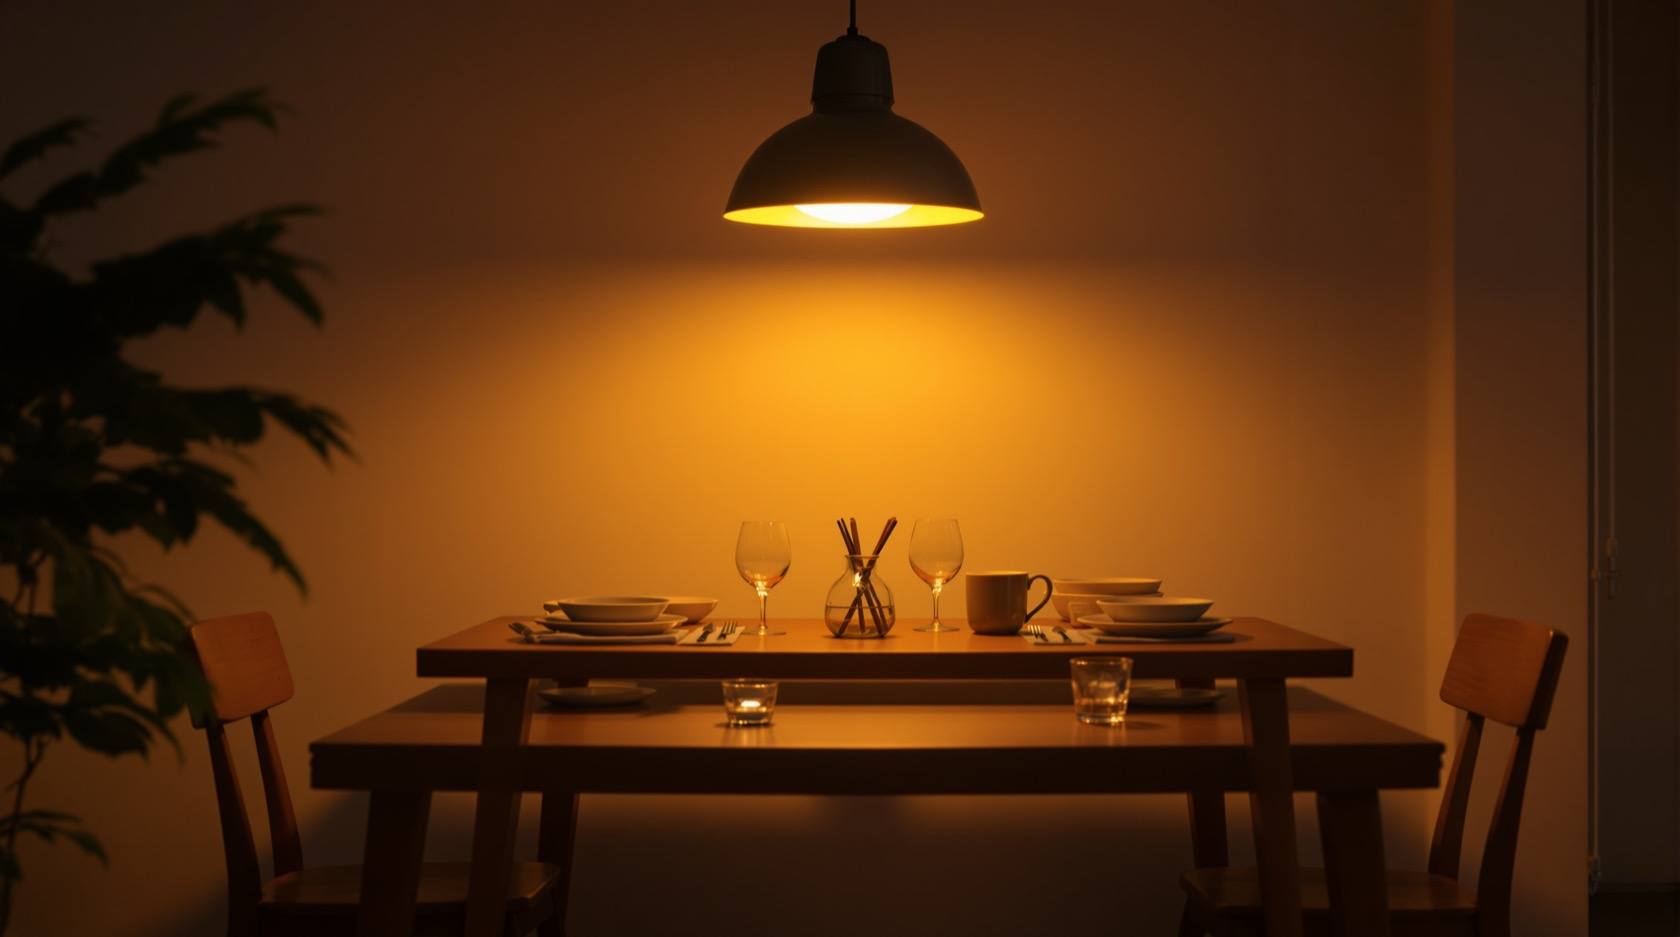
The dining table is the one place in an Indian home where light does real emotional work. It has to make food look true and appetising, make faces across the table look warm and flattering, and pull a family or a table of guests into a single pool of attention. Almost every other room can survive on general light; the dining area cannot. And the fixture that does most of this — the pendant or chandelier hung over the table — is also the single most misplaced fixture in Indian homes, because its ceiling point was wired before anyone knew exactly where the table would sit.
This is the design guide to lighting a dining area. It treats the pendant over the table as the hero, then builds the supporting layers around it, sets the mood with warmth and dimming, and closes with the one decision you must lock before the electrician arrives. It is part of the Studio Matrx Lighting hub and sits beside the living room lighting guide — most Indian dining areas share a room with the living zone, so read the two together.
Scope & how to read this. This is a design and specification guide — how to plan the scheme, pick the fixture, set the mood and place the ceiling point. It is not a wiring guide. All electrical work — the ceiling outlet, the dimmer circuit, load and earthing — is safety-critical and must be designed and installed by a licensed electrician. Every height, size and cost band here is indicative to help you plan and brief; confirm lux levels and fixture safety against IS 3646, NBC (SP 7:2026) and IS 10322 / IEC 60598, and get local quotes for price.
The centrepiece: a pendant or chandelier over the table
Everything about dining lighting starts with one fixture directly over the table. This is the hero — it does the task light for the meal and it is the decorative anchor of the whole zone. Get it right and the rest is fill.
Three numbers govern the hero fixture, and all three are covered in depth in the pendant lighting guide and the chandeliers guide — use those for the exact reasoning; here is the working summary for a dining table.
| Decision | Working rule for a dining table | Why it matters |
|---|---|---|
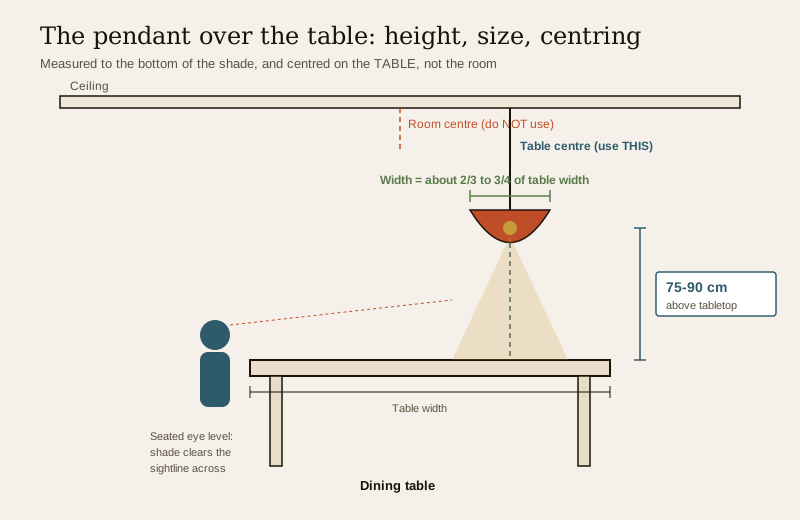
| Hanging height | Bottom of the shade 75-90 cm above the tabletop | Low enough to pool light on the food and feel intimate; high enough to clear sightlines across the table and not blind seated diners |
| Fixture width | About two-thirds to three-quarters of the table's width (its shorter dimension) | A pendant that is too small looks lost; one too wide feels top-heavy and catches heads when people stand |
| Centring | Centred on the table, not the room | The table is what the eye reads; a pendant off-centre from the table looks wrong even if it is dead-centre in the room |
That last rule is the one people get wrong. In an open-plan living-dining room, the table rarely sits in the geometric centre of the space — it is pushed toward the kitchen or a wall. The ceiling point must follow the final table position, not the room's midpoint. Use the fixture quantity calculator and the numbers in the pendant guide to size and place it before anything is wired.
Round table, rectangular table — different fixtures
The table shape decides the fixture shape. Matching them is one of those small moves that reads as "designed".
- Rectangular or oval table — a linear fixture: a long pendant, a row of two or three matched pendants, or a rectangular/oval chandelier. A single round pendant over a long table lights the middle and leaves the ends dim.
- Round or square table — a single round pendant or a round/square chandelier, centred. Its symmetry mirrors the table.
- Very large table (seats 8+) — a run of multiple pendants or a wide chandelier; a single small fixture cannot cover the length. Space a row evenly along the table's centre line.
Warm, dimmable, and true to food
The table fixture must do two things a general room light never has to: flatter people, and tell the truth about food. Both come down to colour temperature, colour rendering (CRI) and dimming.
- Warm colour temperature — 2700K to 3000K. Dining is intimate and relaxed, so the table light should be warm, like candlelight or an incandescent bulb. Cool white (4000K+) makes food look grey and the room feel like a canteen. Reserve cool light for the kitchen worktop, not the table. The reasoning is in colour temperature and CRI, and you can preview warmth with the colour temperature selector.
- High CRI — 90 or above. CRI (colour rendering index) is how faithfully a light shows real colour. Under a low-CRI bulb, tomatoes go dull, greens go grey, gold garnish looks flat. A high-CRI warm LED keeps a thali, a biryani or a dessert looking as good as it tastes — and keeps skin tones healthy. On the dining table it is worth paying for CRI 90+.
- Dimmable — always. One table serves a bright working lunch, a homework session, a slow family dinner and a festive gathering. A single fixed brightness can serve none of them well. A dimmer lets the same pendant go bright and practical or low and intimate. Dimming needs a dimmable LED plus a compatible dimmer, and the dimmer must be specified and wired by your electrician — mismatched dimmers cause flicker and buzz.
| Setting | Table light level | Feel |
|---|---|---|
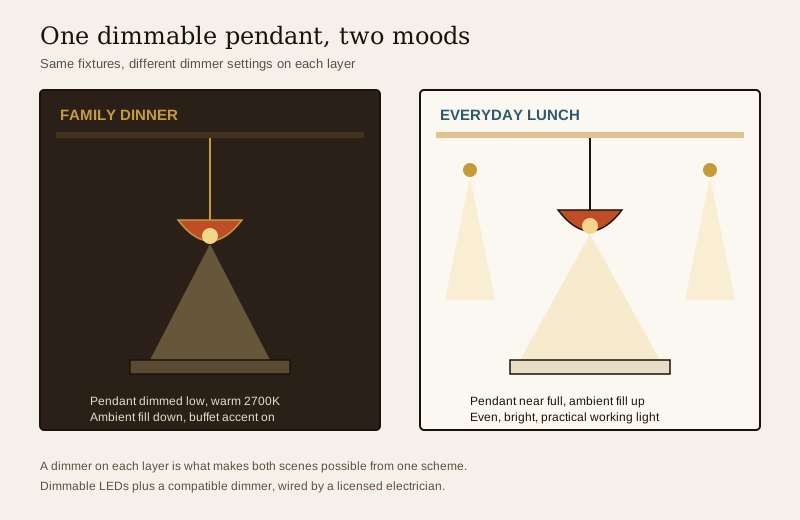
| Everyday lunch, homework, laying the table | Pendant near full, ambient fill up | Bright, practical, task-forward |
| Family dinner | Pendant dimmed to a warm pool | Intimate, gathered, faces lit |
| Guests / festive dinner | Pendant low, buffet accent and candles on | Occasion, warmth, glow |
The layers: pendant, ambient fill, accent
A dining area lit by the pendant alone has a hidden flaw — light falls only from directly above, so it scoops shadows under brows, noses and chins and everyone looks tired. The fix is the same layered approach used everywhere in good lighting design: a hero task-and-decorative layer, a soft ambient fill, and a directed accent. The distinction between the three is set out in function vs ambient vs accent lighting.
| Layer | In the dining area it is | What it does | Typical fixtures |
|---|---|---|---|
| Task + decorative (the hero) | The pendant / chandelier over the table | Lights the food, anchors the zone, sets the style | Pendant, linear pendant, chandelier |
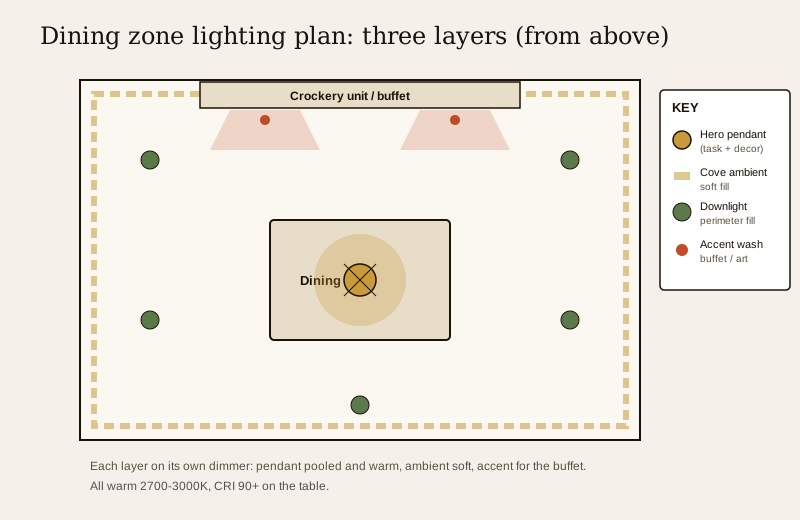
| Ambient fill | Soft general light around the zone | Lifts the room's overall level so faces are not lit only from above, softens the shadows the pendant casts | Cove / indirect light, a few perimeter downlights on a separate dimmer |
| Accent | Directed light on features | Adds depth and a focal glow beyond the table | Wash on a crockery unit or buffet, a picture light on art, a strip light inside a display cabinet |
The ambient fill is the layer most homes skip, and it is what separates a warm dining room from a harsh one. Keep it soft — cove light bouncing off the ceiling edge, or a ring of low-output downlights around the table (never a single glaring downlight on the table). Put it on its own dimmer so you can bring it down for dinner and up for everyday use.
The buffet or sideboard light
Most Indian dining rooms have a crockery unit, sideboard or buffet along one wall — where serving dishes are laid out and the good crockery is displayed. Lighting it does two jobs: it makes serving easy, and it gives the zone a second glow beyond the table so the room does not go dark at its edges. Wash the unit with a downlight or a discreet strip light inside the shelves, on the same warm 2700-3000K as the table and on the accent dimmer. During a festive dinner this becomes the room's second focal point.
Avoiding glare at the table
Glare is the quiet failure of dining lighting — a bare bright bulb or an open-bottomed fixture at eye level across the table ruins the meal. Three moves prevent it:
- Shade or diffuse the source. Choose a pendant with a shade, diffuser or opaque lower housing so no seated diner sees the bare lamp. A clear-glass or open-bottom fixture with a bright LED inside is a glare bomb at the table.
- Get the height right. The 75-90 cm clearance is a glare rule as much as a look rule — hung too low it dazzles, too high it spills into eyes across the table. See the height diagram above.
- Aim accents away from seats. Downlights and wall-washes should graze features (the crockery unit, a wall), never point into a diner's line of sight. This is the classic mistake catalogued in common lighting mistakes.
Open-plan living-dining: let the pendant zone the space
In most modern Indian flats and villas the dining table shares one open room with the living area and often the kitchen. Here the dining pendant earns a second job — it zones the space. A low, warm pendant hanging over the table draws an invisible boundary that says "this is the dining zone" even without a wall. This is why the pendant should hang lower and warmer than anything in the living area, and why it must be centred on the table, which anchors the zone.
Coordinate the dining scheme with the living scheme so the two zones feel related but distinct — the same warm palette, different fixture heights. The full open-plan reasoning is in the living room lighting guide; for the whole home logic, the residential lighting design guide and the lighting design principles tie the zones together. For styling inspiration, browse living-room design ideas.
A dining lighting plan
Pull it together into a simple plan. Each layer on its own switch or dimmer so the scenes above are possible.
| Zone / feature | Layer | Fixture | Colour / control |
|---|---|---|---|
| Over the table | Hero task + decorative | Pendant / linear pendant / chandelier, sized and centred to the table | 2700-3000K, CRI 90+, dimmable |
| Around the zone | Ambient fill | Cove light and/or a few perimeter downlights | 2700-3000K, on its own dimmer |
| Crockery unit / buffet | Accent | Downlight wash or in-shelf strip | 2700-3000K, on the accent dimmer |
| Wall art / feature | Accent | Picture light or discreet spot | Warm, aimed away from seats |
And the pendant quick-reference, drawn from the fixture guides:
| Table | Fixture shape | Width guide | Hang height above table |
|---|---|---|---|
| Round / square | Single round pendant or round chandelier | ~two-thirds of table diameter | 75-90 cm |
| Rectangular / oval | Linear pendant, a row of 2-3, or linear chandelier | ~two-thirds to three-quarters of table width | 75-90 cm |
| Large (8+ seats) | A run of multiple pendants or a wide chandelier | Spread evenly along the centre line | 75-90 cm |
Size and count with the fixture quantity calculator, and set warmth with the colour temperature selector.
Lock the table position before you wire
Here is the decision that saves a re-work: the ceiling point must be centred on the final table position, and that must be decided before the electrician wires it. A dining ceiling point is almost never in the right place by accident, because during construction the table is not there and the electrician centres the point on the room. Then the table arrives, gets pushed toward the kitchen or a wall, and the pendant ends up hanging over an empty stretch of floor.
Decide where the table will sit — its exact centre — and mark that spot on the ceiling before wiring. If the table might move, plan for it: a run of track, a ceiling rose with a swag hook, or a surface conduit gives some tolerance. But the clean solution is to commit to the table position early. And to be clear: you decide the position; a licensed electrician does the wiring, the outlet and the dimmer circuit. Electrical work is safety-critical — never DIY the ceiling point or the dimmer.
How it connects
- Start at the Lighting hub pillar and the layered lighting guide for the master scheme, then read function vs ambient vs accent lighting for why the dining area needs all three layers.
- Get the hero fixture right with the pendant lighting guide and the chandeliers guide — height, size and style in full.
- Set warmth and food-truth with colour temperature and CRI, previewing it in the colour temperature selector.
- Because most dining areas share a room, plan alongside the living room lighting guide and avoid the pitfalls in common lighting mistakes.
- Size and count fixtures with the fixture quantity calculator, and browse living-room design ideas for open-plan styling.
Key takeaways
- The pendant or chandelier over the table is the hero — hang the shade 75-90 cm above the tabletop, size it to about two-thirds to three-quarters of the table's width, and centre it on the table, not the room.
- Make the table light warm (2700-3000K), high-CRI (90+) and dimmable — for flattering faces, true food colour, and one fixture that serves lunch, dinner and a festive gathering.
- Match the fixture shape to the table — linear for rectangular, round for round, a run of pendants for a big table.
- Layer it: pendant (task + decorative) plus soft ambient fill so faces are not lit only from above, plus an accent on the crockery unit or buffet — each on its own dimmer.
- Kill glare with a shaded or diffused fixture at the right height, and aim accents away from diners' eyes.
- In open-plan living-dining, a low warm pendant zones the dining area; coordinate it with the living scheme.
- Lock the exact table position and centre the ceiling point on it before wiring — the classic misalignment mistake. You decide the spot; a licensed electrician does all wiring and the dimmer circuit.
References
- IS 3646 — code of practice for interior illumination; recommended lux levels for dining and residential spaces (named generally).
- National Building Code of India, NBC (SP 7:2026), Bureau of Indian Standards — general illumination and lighting provisions.
- IS 10322 / IEC 60598 — luminaire safety (pendants, chandeliers and fittings; named generally).
- IS 16107 — performance requirements for LED luminaires; CRI and colour temperature basis (named generally).
- Licensed electrician — ceiling outlet position, dimmer selection, load, earthing and all wiring (safety-critical work).
All heights, sizes, colour temperatures, CRI figures and cost bands here are indicative design and planning aids only; confirm lux and safety requirements against IS 3646, NBC (SP 7:2026) and IS 10322 / IEC 60598, and have all electrical work — the ceiling point, dimmer and circuit — designed and installed by a licensed electrician.
Export this guide
Related Guides — Deep-dive reading
The Complete Guide to Home Lighting Design in India (2026)
The start-here master guide to designing light for an Indian home — what good lighting really does, the layered-design mindset that replaces the single ceiling tubelight, the decision sequence from tasks to budget, and where the design work hands off to a licensed electrician.
LightingLighting Controls & Dimming Design: Zones, Scenes & Switches (2026)
How to plan lighting control so an Indian home's light is flexible — split each room's layers onto separate switches, choose dimmers that actually work with LEDs, add two-way switching where you need it, and layer scenes on top. The design decisions you must settle before the electrician wires.
LightingLighting Design Principles: The Rules Good Schemes Follow (2026)
The design rules that separate a room that feels considered from one that feels like a floodlit hall — layering on separate controls, glare control, colour-temperature discipline, direction and shadow, lighting at different heights, and washing the walls — written for the Indian home.
LightingRelated Tools — Try Free
Circadian Light Meter
Patient-centric circadian lighting visualizer for Indian healthcare design — time-of-day × intensity → CCT, melanopic lux (EML / mEDI), melatonin suppression, and an alertness curve. Calibrated against WELL v2 L03 Circadian Lighting Design, CIE S 026:2018, Brainard 2001, and Lucas et al. 2014.
Circadian ToolElectrical Safety & Load Audit
Home electrical audit — 10 categories, 65+ checkpoints across earthing, RCCB, MCB, wiring, switchboards, appliance circuits, DG/inverter backup.
Safety AuditHome Colour Studio
Colour every room — living, bedroom, dining, kitchen, bathroom — surface by surface in any HEX/RGB/CMYK colour, or from 80+ curated Indian shades.
Colour Studio