
Door Painting Guide for Indian Homes (2026): Prep, Paint, Coats & Cost
How to paint a door the right way — remove hardware, clean, sand, fill and prime, then choose enamel, PU or acrylic for wood, flush, metal or WPC doors, brush vs roller vs spray, the correct panel-door painting order, coats and monsoon drying caveats, with ₹ for a DIY repaint vs a painter.
A well-painted door looks crisp for years; a rushed one shows brush marks, peels at the panel grooves within a monsoon or two, and gums up around the hinges. The difference is almost never the paint — it is the preparation and the order of work. This guide walks through painting a door at home in India step by step: stripping hardware, cleaning, sanding, filling and priming, then picking the right paint for your door material, choosing brush, roller or spray, painting panels and frames in the sequence that hides laps, and getting the coats and drying right in our humid weather. It pairs with the colour-led door colour ideas guide and, for natural-wood finishes, with door polishing and refinishing.
Paint or polish? Decide before you buy anything
Paint is an opaque film that hides the grain and gives you any colour. Polish or PU clear (melamine, Italian PU, varnish) is translucent and shows the wood — that is a different job covered in door polishing and refinishing. Choose paint when the door is flush, WPC, metal, MDF or a tired teak door you want to colour over; choose a clear finish when the timber is good and you want to keep the grain. Painting over an existing polish is fine as long as you sand it dull and prime — paint will not bond to glossy, untouched varnish.
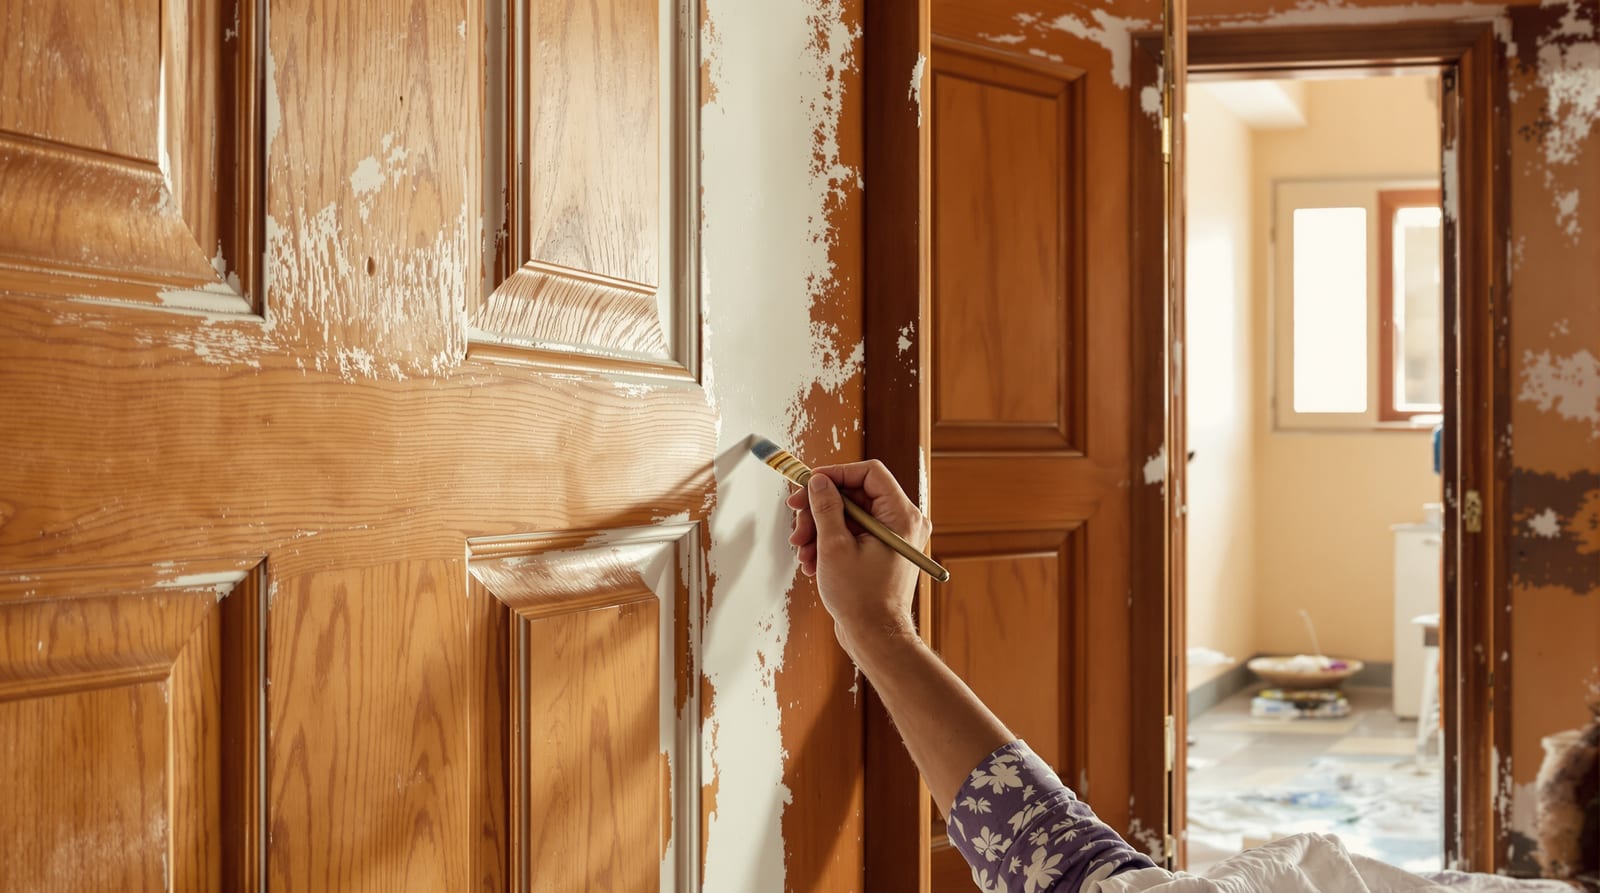
Step 1 — Remove hardware (or mask it well)
Take off the handle, mortise lock or door knob, tower bolt, aluminium door viewer, name plate and any magnetic catch keeper. Lifting the leaf off its hinges and laying it flat on two trestles is the professional way — paint self-levels horizontally with no runs, and you can reach the top and bottom edges. If that is impractical (heavy teak, single-handed work), paint it hung and mask the hinges, the lock escutcheon and the closer bracket with painter's tape. Number the hinge screws so the leaf goes back the same way. Bag every screw and the lock cylinder; losing the wafer key during a repaint is a classic mistake.
Step 2 — Clean, then sand, then fill
Years of hand grime, oil and old wax will reject paint. Wash the leaf with a mild detergent solution, then wipe with a cloth dampened in mineral turpentine or a sugar-soap substitute to cut grease around the handle zone. Let it dry fully.
Sanding does two jobs: it keys (roughens) the old surface so paint grips, and it flattens defects. Use 120-grit to knock back old gloss and lift grain, then 180–220-grit to smooth. Sand along the grain on wood; circular scratches show through gloss paint. For metal doors, sand or wire-brush any rust back to bright steel and treat with a rust converter or red-oxide primer the same day. After sanding, vacuum and tack-wipe — dust is the enemy of a smooth top coat.
Fill dents, nail holes, old hinge mortises you are abandoning, and open panel-joint gaps with a wood filler (Fevicol Wudfin / Trumix type) on timber, or a two-part epoxy filler on metal and exterior wood. Press it slightly proud, let it cure, then sand flush. Caulk hairline gaps between panel and frame on interior doors with paintable acrylic sealant so the line stays crisp.
Step 3 — Prime
Primer is not optional, and the right primer depends on the door:
- Wood / flush / MDF / plywood: a wood primer (solvent-based pink/white primer, or a water-based acrylic primer). Knot-heavy or oily timber like teak needs an extra knot sealer or shellac/aluminium-wood primer or the resin will bleed yellow through white top coats.
- Metal / steel: red-oxide metal primer or a zinc-phosphate primer over bare, de-rusted steel.
- WPC / PVC / FRP: these are factory-smooth and non-porous. Scuff-sand to dull the surface and use an adhesion-promoting primer (a multi-surface or plastic primer); ordinary wood primer can peel off WPC in sheets.
Apply one even primer coat, let it dry per the can (usually 4–8 hours), then lightly sand with 220-grit and tack-wipe. Spot-prime any filler you sanded through.
Choosing the paint: enamel vs PU vs acrylic, by door material
| Door material | Recommended paint | Primer | Coats (over primer) | Notes |
|---|---|---|---|---|
| Solid wood / teak (painted over) | Solvent enamel (synthetic enamel) or PU enamel | Wood primer + knot sealer | 2 (3 for deep colour) | PU enamel is harder and yellows less; enamel is cheaper and easy to recoat. |
| Flush door (ply/laminated) | Acrylic enamel or water-based enamel | Wood/acrylic primer | 2 | Large flat face — roller-friendly; low-VOC water enamel is near odourless. |
| MDF / plywood | Acrylic enamel | MDF/wood primer | 2 | Seal raw MDF edges well — they drink paint. |
| Metal / steel | Synthetic enamel or PU enamel | Red-oxide / zinc-phosphate | 2 | Exterior steel: choose a UV-stable enamel; recoat before rust starts. |
| WPC / PVC / FRP | Acrylic / PU with plastic primer | Adhesion-promoting primer | 2 | Most WPC comes pre-laminated — you usually do not need to paint; if you do, prep is everything. |
| Exterior main door (any) | Exterior-grade PU or weatherproof enamel | Material-appropriate + exterior primer | 2–3 | Must take sun, monsoon rain and coastal salt — do not use interior emulsion. |
Quick translation of the jargon: "synthetic enamel" is the classic oil/solvent gloss (Asian Paints Apcolite, Berger Luxol, Nerolac Synthetic) — durable, glossy, strong smell, slow dry, thin with turpentine. "PU" (polyurethane) enamel is a tougher, more scratch- and yellow-resistant top coat, dearer, available in solvent and water forms. "Acrylic" / water-based enamel cleans up with water, dries fast, very low odour and barely yellows, now genuinely durable for interior doors. For an interior bedroom or bathroom door, water-based acrylic enamel is the easiest DIY choice; for an exterior main door that bakes and gets rained on, go solvent or PU enamel rated for exterior. Never use wall emulsion on a door — it has no scuff or moisture resistance.
Brush vs roller vs spray
| Method | Best for | Finish | Speed | Skill / kit |
|---|---|---|---|---|
| Brush | Panel grooves, mouldings, edges, cut-in | Good if you tip-off; can show marks | Slow | Low — a good 50 mm synthetic brush |
| Foam / mohair roller | Flat flush-door faces, stiles, rails | Very smooth, slight orange-peel | Fast | Low–medium |
| Spray (HVLP) | Whole leaf, factory-smooth result | Best, mark-free | Fast once set up | High — masking, thinning, overspray control |
For most homeowners the winning combination is roller-plus-brush: lay the flat areas with a 4-inch foam or mohair roller for an even film, then immediately tip-off (lightly drag) with a soft brush to remove roller stipple and cut in the grooves a roller cannot reach. Reserve spraying for when the leaf is off, laid flat, and you can mask the room — overspray drifts onto everything. Whatever you use, do not overload it; two thin coats beat one thick coat that sags.
Step 4 — The order of painting a panel door
Painting a panel door in the wrong order leaves visible overlap ("lap marks") where a half-dry edge gets painted over. The rule is: paint the recessed parts first and the largest flat faces last, working so each fresh edge meets a wet edge, not a drying one. The diagram below shows the sequence for a typical four/six-panel door.
Sequence in words:
1. Panels first. Paint inside each recessed panel and its moulding, brushing the grooves then the field, while everything around is still bare. Do not let paint pool in the corners.
2. Horizontal rails next — the top, middle (lock) and bottom rails. Stop your brush cleanly where the rail meets the stile.
3. Vertical stiles last. Run the full height in one pass so the long strokes are unbroken; this is the most visible part of the door, so finish with light, even tip-off strokes top to bottom.
4. Edges. Paint the top edge, the lock edge and the latch edge. By convention the hinge edge and top edge are painted to match the room the door opens into. Keep edges thin so the door does not bind when closed.
A flush door is simpler: roll the face in slightly overlapping vertical bands, tip-off top to bottom, then do the edges. Always work from a wet edge to a dry one and finish a whole face before stopping for chai — picking up a part-dry face causes laps.
Step 5 — Coats, drying and the monsoon caveat
Two top coats over primer is the norm; deep colours or bare-to-white changes may need three. Apply thin coats. Between coats, let the paint dry to the can's recoat time — typically 6–8 hours for solvent enamel and 4–6 hours for water-based acrylic in dry weather — then scuff lightly with 320-grit, tack-wipe and recoat. Light sanding between coats is the single biggest upgrade to a smooth final finish.
Humidity is the Indian trap. Solvent enamels dry by oxidation and high humidity slows them dramatically; a coat that should be hard overnight can stay tacky for days in peak monsoon, trapping dust and fingerprints. During the rains: paint on a dry, breezy morning, run a fan (not blowing dust onto the wet film), keep windows open for cross-ventilation, and stretch recoat times — wait until the previous coat is genuinely hard, not just touch-dry. Coastal homes face salt-laden air; an exterior main door there benefits from an extra coat and earlier recoating cycles. Avoid painting late evening when dew settles. Do not rehang a leaf or fit weatherseals until the paint is fully cured (a few days for enamel), or it will print and stick.
Finishing the edges and rehanging
Sand the final coat lightly only if you want a satin feel; otherwise leave it. Refit hardware once cured — never screw a lock back through a tacky lock edge. Wax or lubricate the hinges before rehanging so the door does not squeak, and check it does not sag or bind on the fresh paint; a too-thick edge coat is a common cause of sticking. Wipe the lock cylinder clean and refit. For ongoing care — cleaning, touch-ups, and when to recoat — see the door maintenance guide.
What it costs: DIY repaint vs hiring a painter
Indicative 2026 ranges, varies by city, brand and door size; paint is sold by litre and a single interior door takes roughly 0.3–0.5 litre across coats.
| Item | DIY | Painter (labour + material) |
|---|---|---|
| Enamel / acrylic paint (per litre) | ₹350–900 | included |
| Primer (per litre) | ₹250–600 | included |
| Sandpaper, filler, brush/roller, tape, turpentine | ₹400–1,200 (reusable kit) | included |
| Labour | your time (half to full day) | ₹400–1,500 per door |
| Typical single interior door, repaint | ₹600–1,500 in materials | ₹1,200–3,000 all-in |
| Exterior main door (PU / weatherproof, 2–3 coats) | ₹1,000–2,500 in materials | ₹2,500–6,000+ all-in |
DIY pays off if you have several doors and basic patience; the kit cost is amortised across them. Hire a painter for a large carved traditional door, a heavy teak leaf you cannot lift, or when a sprayed factory-smooth finish matters. Add 18% GST on professional invoices, and confirm whether the painter's quote includes paint or only labour. For broader door budgeting, the door cost calculator helps you compare repaint against replacement.
Frequently asked questions
Can I paint over an old varnished or polished door without sanding?
No. Paint will not grip glossy varnish or wax. Sand it dull with 120–180-grit, clean, then prime with a wood primer (plus a knot/stain sealer on teak) before top-coating. Skipping this is the usual reason paint peels in strips later.
Do I need to remove the door from its hinges to paint it?
It is the best way — laid flat the paint self-levels with no runs and you can reach all edges. But you can paint a hung door well if you mask the hardware, work in good light, and keep coats thin. Heavy teak leaves are often safer painted in place.
How long should I wait between coats in the monsoon?
Longer than the can says. Water-based acrylic needs about 4–6 hours in dry weather but solvent enamel can stay tacky for a day or more in high humidity. Wait until the previous coat is genuinely hard, run a fan for airflow, and never recoat a sticky surface.
Which paint is best for an exterior main door in India?
An exterior-grade PU enamel or a weatherproof synthetic enamel over the right primer, two to three coats. It must resist sun, monsoon rain and, on the coast, salt. Do not use interior wall emulsion outdoors. See door colour ideas for shade choices that hide dust and heat.
Can I paint a WPC or laminated door?
You can, but most WPC and laminated doors are pre-finished and rarely need it. If you must, scuff-sand the smooth surface, use an adhesion-promoting (plastic/multi-surface) primer, and acrylic or PU top coats — ordinary wood primer peels off non-porous WPC. Read more in the WPC doors guide.
Export this guide
Related Guides — Deep-dive reading
Door Installation Cost in India 2026: Fitting Labour ₹ Per Door + Hardware, City Variance & GST
A focused 2026 guide to what it actually costs to fit a door in India — carpenter labour per door for flush, panel, heavy main and sliding shutters, plus hinges, mortise lock, tower bolt and closer hardware ₹ ranges, with worked bedroom and main-door totals.
Home Doors & EntrancesDoor Maintenance Guide India: A Seasonal Care Routine to Keep Doors Smooth for Decades
Oil the hinges, tighten the screws, lube the lock, check the seals and re-coat the finish — a simple seasonal calendar that stops Indian doors from binding in the monsoon, sagging, tarnishing on the coast or falling to termites.
Home Doors & EntrancesDoor Polishing & Refinishing in India: Melamine, PU, Duco & Oil Finishes Compared
What melamine, PU, Duco and traditional oil-wax finishes look like, how long they last, and how to strip, sand and re-polish a tired wooden or veneer door — plus indicative ₹ per door.
Home Doors & EntrancesRelated Tools — Try Free
Door Cost Calculator
Estimate the all-in cost of a door — leaf, frame, hardware, fitting and GST — by type, material and size.
Door CalculatorPainting Prep & Quality Checklist
Painting audit — 10 categories, 65+ checkpoints across surface prep, putty, primer, emulsion coats, enamel, external, ceilings, defects, final QC.
Painting QCCross-Ventilation Analyzer
Estimate airflow and air changes per hour (ACH) from room size, window areas, layout, and local wind — with NBC 2016 Part 8 compliance check.
Ventilation Calculator