
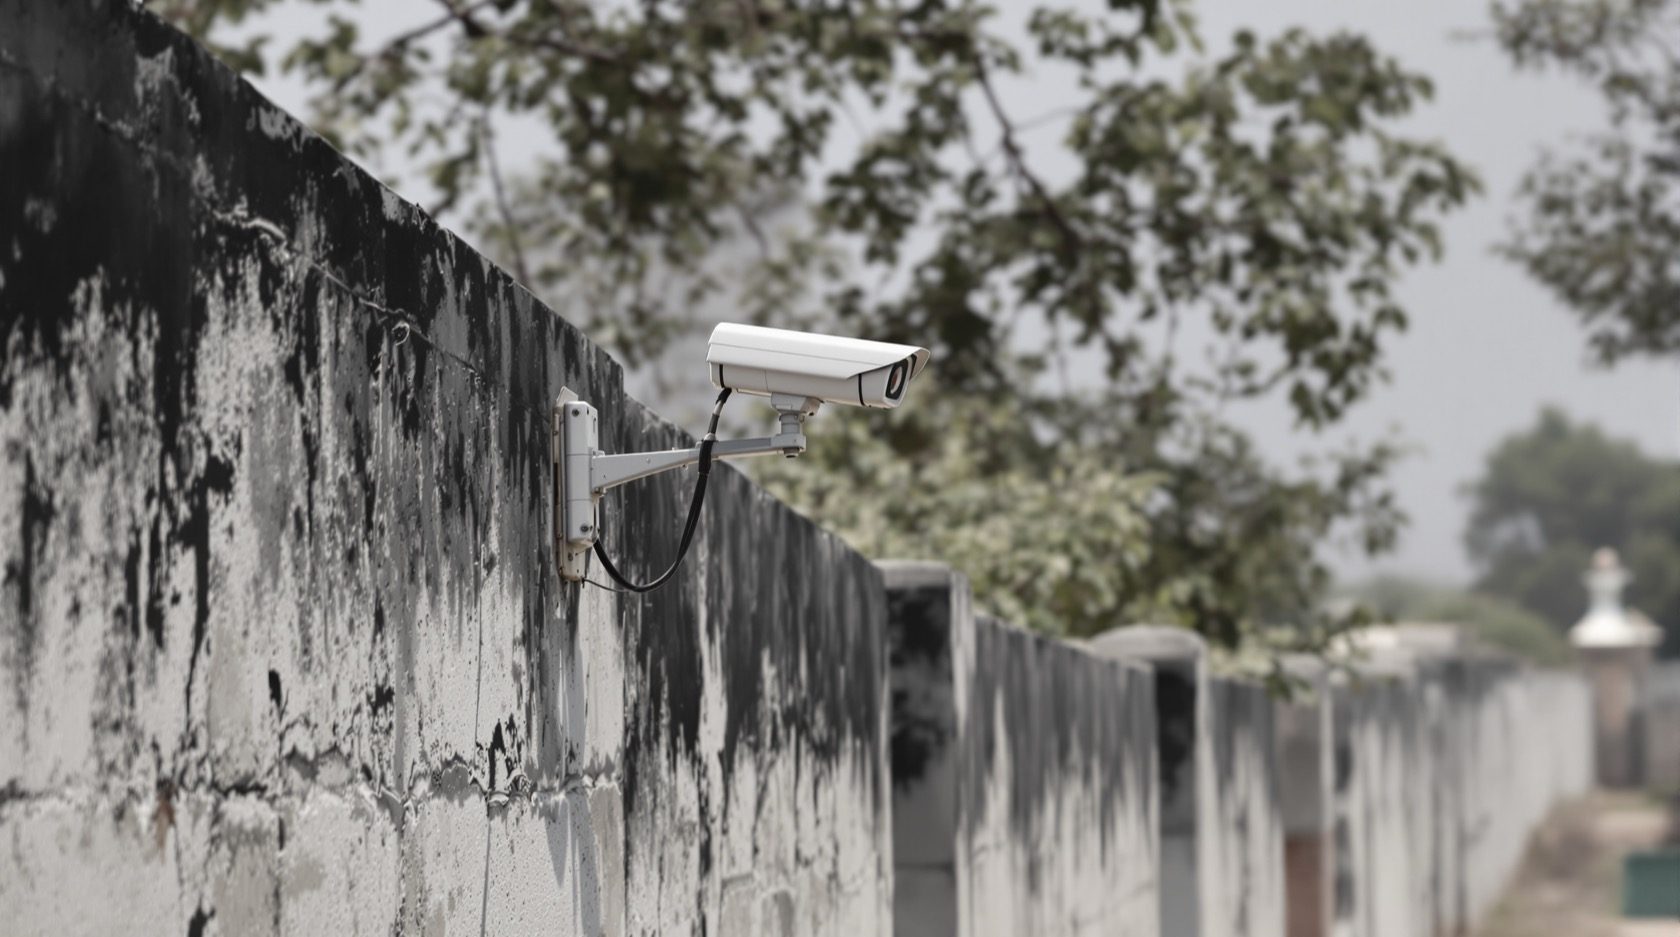
CCTV Placement Perimeter and Compound Wall in India (2026): Watch the Line
How to position cameras ALONG your boundary wall at a grazing angle so you catch anyone approaching or climbing it, pair the view with line-crossing detection, light the line, cover corners and gates, and keep every camera on your own side.
The perimeter is where an intruder makes their first decision. Long before anyone reaches your front door, they weigh up your compound wall — its height, its dark corners, whether anything is watching the stretch they mean to climb. Getting cctv placement perimeter-side right means the boundary itself becomes the thing that discourages them, because the whole line is lit, watched, and set up to raise an alert the moment someone crosses it.
This guide covers ONE zone: the boundary wall and compound line of an Indian plot — independent house, villa or the outer wall of a gated society. It sits inside Studio Matrx's CCTV hub. The gate itself, the driveway, the terrace and the corridors are their own zones with their own guides; here we stay on the line between them.
Scope & safety. This guide helps you plan positions and brief an installer. Mounting at height on a boundary wall or a pole, running cabling, and any mains-electrical or lighting work belong to licensed professionals. Cameras belong only on your own property and legitimately shared areas — never aimed into a neighbour's home, windows or yard, and never into a public road beyond your boundary. Position everything in the spirit of the Digital Personal Data Protection (DPDP) Act, 2023. This is educational, not legal advice.
The one rule that changes everything: graze, do not stare across
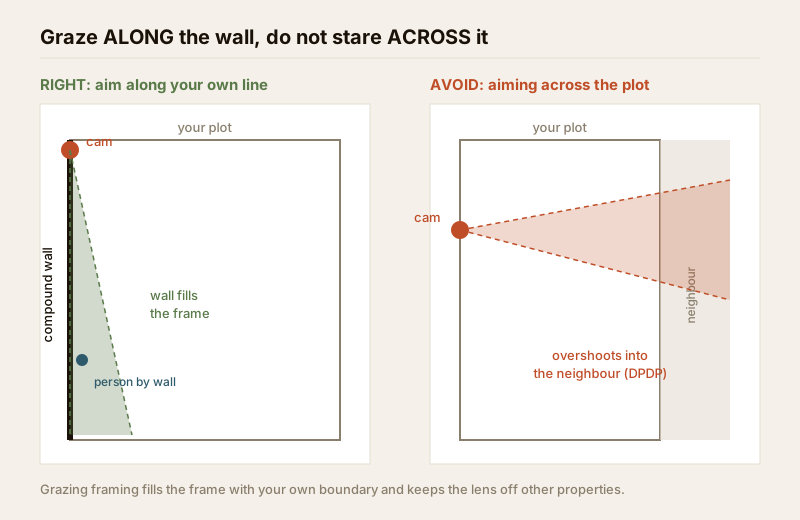
The instinct is to put a camera on one wall and point it straight across the plot at the opposite wall. Resist it. A camera aimed across your boundary sees the far wall as a thin strip at the top of the frame, wastes most of its pixels on the ground in between, and — the real problem — looks straight into whatever is on the other side: your neighbour's window, their terrace, the public road. That is exactly the framing the DPDP Act is concerned with, and it is poor security into the bargain.
Instead, mount the camera at one end of a wall and aim it along the wall — a grazing angle that runs the coverage cone down the length of your own boundary line. Now the wall fills the frame from near to far; anyone walking beside it, loitering against it, or climbing over it moves across your view where the camera reads them best; and the lens looks down your own line, not into anyone else's life.
Camera height and angle for the boundary line
The perimeter is an outdoor line, so the camera shape that suits it is the bullet — a long body, a strong IR reach, and a sun-shield, aimed at one direction from a height. On the corners of a large plot a turret works too, and for a very large compound a single PTZ on a mast can sweep, though most homes are better served by several fixed cameras that each own a stretch.
| Placement spec | Recommendation | Why |
|---|---|---|
| Camera type | Bullet (varifocal for long runs); turret on corners | Long, aimed, strong IR for the run of wall |
| Mounting height | ~3–4 m — on the house corner, a raised pillar or a pole | Out of reach; grazing angle down the line |
| Aim | ALONG the wall, ~10–15° down, near-to-far down the line | Fills the frame with your own boundary |
| Lens / field | Narrow-to-medium; varifocal dialled to reach the far corner | Detail down a long stretch, not a wide splash |
| Weatherproofing | IP66 minimum; weatherproof junction box for the joint | Boundary cameras take the full monsoon and dust |
| What to capture | The wall face, the approach beside it, the top line of the wall | Approach, loiter and the act of climbing over |
Aim so the top of the wall sits across the upper third of the frame. That way you capture both the approach along the ground and the moment a leg or a hand comes over the top — the single most useful thing a perimeter camera records. For the general logic behind these numbers, see camera height and angle and the mounting height and angle calculator.
Pair the view with line-crossing detection
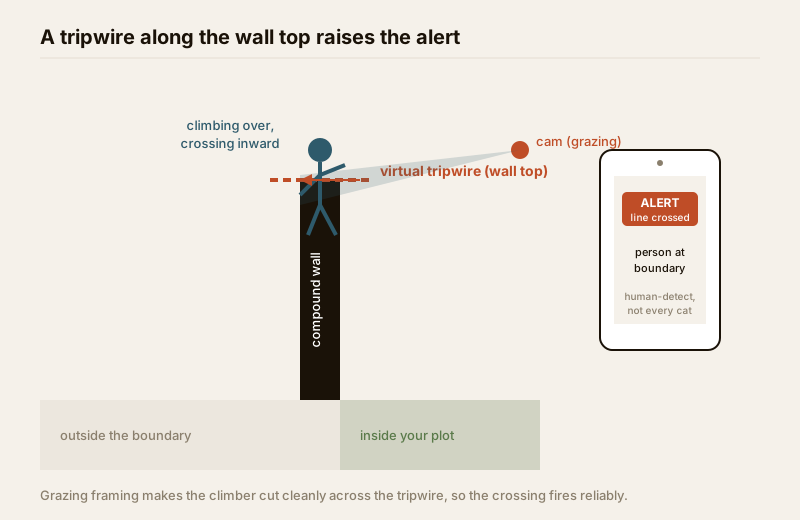
A perimeter camera earns its keep not by recording footage you watch later, but by raising an alert the instant someone crosses the line. This is what line-crossing detection is built for: you draw a virtual tripwire along the top of your wall or a metre inside it, set a direction (inward), and the camera pings your phone only when a person actually crosses it — not for every passing cat, swaying branch or headlight.
The grazing-angle framing above is exactly what makes line-crossing reliable. Because an intruder crosses your view sideways as they move along or over the wall, they pass cleanly through a tripwire drawn across the frame. A camera staring across the plot, by contrast, has people moving toward or away from it — the worst geometry for a tripwire, and a recipe for missed events. Plan the camera angle and the tripwire together, not one after the other. Prefer human-detection (AI) filtering over raw pixel motion detection to cut the monsoon-night false alarms that make people switch alerts off.
Cover the corners and close the gaps
A perimeter is only as strong as its darkest metre. Two things break a boundary scheme: corners and gaps between camera runs.
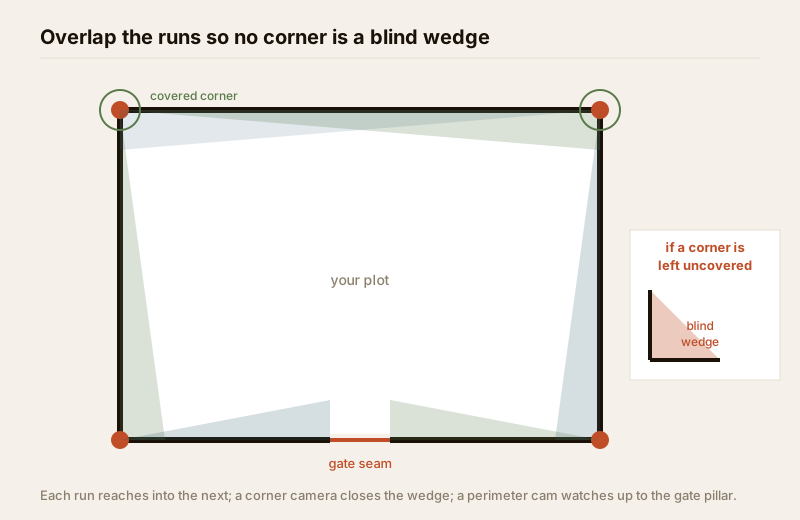
- Corners are the natural climb point. The junction of two walls gives a foothold and is furthest from most cameras. Put a camera on the corner looking back along one or both walls, or arrange two runs so their cones overlap at the corner and no one can stand in a wedge that neither sees.
- Overlap the runs. On a large plot one bullet cannot own a whole side. Break the boundary into runs — gate stretch, side wall, rear wall — and place cameras so each run's cone reaches into the next, leaving no dark segment. The far end of one camera's view should sit comfortably inside where the next camera starts.
- The gate is a seam, not a separate island. Where the boundary meets the main gate, make sure a perimeter camera watches the wall right up to the gate pillar, so the point where wall meets gate has no blind wedge. The gate's own face-capture cameras are covered in that sibling guide — here, just close the seam.
For the whole-boundary logic — fences, gates, lighting and layered detection together — read the perimeter vulnerability assessment, and lay every camera out visually with the CCTV placement planner.
Light the line, or the cameras are half-blind
An unlit boundary at night is an invitation, and IR only reaches so far down a long wall. Light the line. Warm, even lighting along the compound wall does three jobs at once: it deters (a lit approach feels watched), it lets a camera capture real colour and detail instead of a grey IR smear, and it extends the useful range of every camera on the run. Motion-triggered lights add a startle effect and save power during India's frequent night power cuts — but pair them with a UPS or inverter on the recorder and cameras so a power cut does not blind the whole perimeter at the worst moment. See the lighting and visibility security assessment for laying out boundary lighting properly, and avoid pointing a bright light straight back at a camera, which blooms the image.
Do this, avoid that — perimeter camera placement
| Do | Avoid |
|---|---|
| Aim ALONG your own wall at a grazing angle | Aiming ACROSS the plot into a neighbour or road |
| Mount at 3–4 m, out of reach on a corner or pillar | Low mounts a person can reach up and twist away |
| Frame the top of the wall in the upper third | Pointing flat at the ground and missing the climb |
| Draw a line-crossing tripwire along the wall top | Relying on raw motion that fires all monsoon night |
| Overlap runs and cover every corner | One camera trying to own a whole large-plot side |
| Light the boundary evenly; UPS-back the recorder | Dark stretches and cameras that die in a power cut |
| Privacy-mask any sliver of a neighbour's window | Recording into other homes, terraces or the street |
| Use IP66 cameras and a weatherproof junction box | Taped cable joints on an exposed boundary wall |
Privacy: stay strictly on your own side
The perimeter is the zone where camera placement most often strays onto someone else's property, so it deserves the most care. Aim to capture your wall, your approach and the line itself — nothing beyond. Where a camera at a corner unavoidably catches a sliver of a neighbour's window, gate or the public footpath, use the recorder's privacy masking to black that region out permanently. In a gated society, the outer boundary is common property: get RWA / society consent and a documented purpose before fixing cameras to the compound wall, and keep them off residents' private balconies and windows. Put up clear CCTV signage at the gate and along the boundary — it is both a courtesy and a deterrent. All of this is the DPDP Act, 2023 in practice; it is also simply how you keep neighbours on your side.
When to bring in a professional. Decide the camera positions, angles, corner overlaps and tripwire lines yourself — then hand the mounting at height on the wall or a pole, cable pulling along the boundary, weatherproof terminations, boundary lighting circuits and recorder commissioning to a licensed installer. Anything at the mains board or a new lighting circuit is a licensed electrician's job; see the electrical hub. A boundary camera that is well-aimed, well-lit, out of reach and properly sealed is worth ten cheap ones bolted on in the wrong places.
Key takeaways
- Aim perimeter cameras ALONG your own compound wall at a grazing angle, never across the plot into a neighbour or the road — the wall should fill the frame from near to far.
- Mount at 3–4 m, out of reach, on a corner, pillar or pole, tilted down so the top of the wall sits in the upper third to catch anyone climbing over.
- Pair the view with line-crossing detection — grazing framing is exactly the geometry that makes a boundary tripwire fire cleanly and cut false alarms.
- Cover every corner and overlap the runs so no dark wedge is left, and close the seam where the wall meets the gate.
- Light the boundary, UPS-back the recorder, use IP66 gear, and stay strictly on your own side with privacy masking and society consent under the DPDP Act. Lay it all out in the CCTV placement planner.
References
- Digital Personal Data Protection Act, 2023 — position boundary cameras to cover only your own property and legitimately shared areas; mask or avoid capturing neighbours' private spaces and the public beyond your line.
- Ingress Protection (IP) ratings — verify IP66 or higher on the manufacturer's specification sheet for any camera mounted on an exposed compound wall before ordering.
- National Building Code of India (SP 7), Bureau of Indian Standards, and local municipal bye-laws for any structural, electrical, boundary-wall or lighting aspect of an install; verify the current edition via the BIS catalogue: https://www.services.bis.gov.in/
This is an educational overview. Mounting at height, cabling, boundary lighting and any electrical work are qualified professional tasks — engage licensed installers and verify any standard's current status via the BIS catalogue before relying on it.
Export this guide
Related Guides — Deep-dive reading
How to Choose a CCTV Camera (2026): The Homeowner's Decision Guide for India
Cut through the spec-sheet noise and choose the right CCTV camera for each spot around an Indian home. What actually matters — sensor and low-light performance, lens and field of view, form factor, IP and IK ratings, honest smart features — and the marketing claims to ignore.
SecurityPerimeter CCTV in India (2026): Watching the Boundary and Verifying the Alarm
How cameras earn their place on the perimeter — watching along the fence and wall line, and letting a human confirm a real intruder before response — designed for Indian darkness, weather and neighbour privacy.
SecurityCCTV Camera Placement in India (2026): The Principles Behind Every Good Position
The universal rules that decide whether a camera earns its keep — cover the choke points first, face the flow not a blank wall, keep the sun out of frame, mount out of reach, give each camera one job, overlap so there are no gaps, and respect your neighbours.
SecurityRelated Tools — Try Free
CCTV Camera Overlap Calculator
The overlap or blind gap between two adjacent cameras, from coverage width and spacing, plus the spacing for a target overlap.
OverlapCCTV Mounting Height & Angle Calculator
Height, target distance and lens angle to the downward tilt, the blind dead-zone below and where coverage begins and ends.
Height & AngleCCTV Placement Planner
Pick your property and zones to get a prioritised, zone-by-zone checklist of which camera goes where and how to mount it.
Placement Planner