
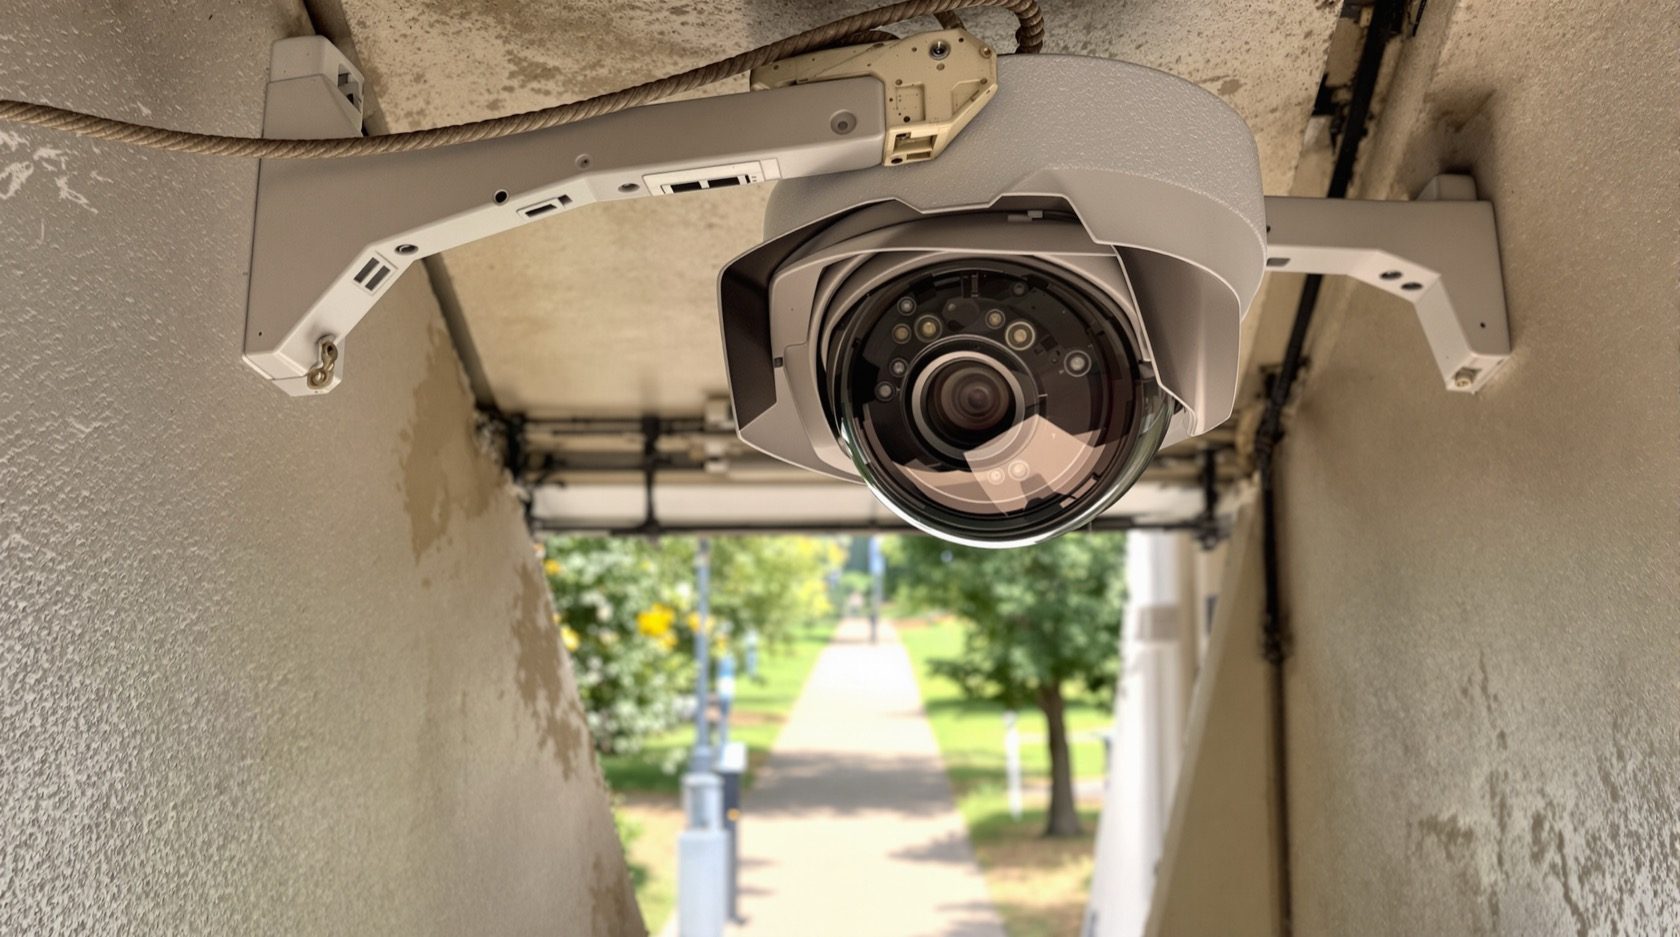
CCTV Camera Height and Angle in India (2026): Mount It Where It Actually Sees
The mounting geometry that decides whether a camera reads a face or just films the sky: how high to fix it, how far to tilt it down, the dead zone under it, and keeping backlight and IR wash out of frame.
Two cameras of the exact same model, wired the same way, can give you completely different footage. One reads a clear face at the gate; the other films a bright grey sky with a dark silhouette walking under it. The difference is almost never the camera. It is the cctv camera height and the angle it was screwed on at. Get the geometry right and a modest camera earns its keep. Get it wrong and a premium one is wasted.
This guide is the mounting-geometry explainer in Studio Matrx's CCTV sub-hub. It sits alongside the camera placement principles (which decides where a camera points) and the coverage planning guide (which decides how many and how they overlap). This one is narrower and more physical: given a spot, how high and at what tilt do you fix the camera so it actually sees what you need.
Scope & safety. This guide helps you plan and brief. Working at height on a ladder or parapet, drilling into walls, running cabling and any mains-electrical work belong to a licensed installer and electrician - decide the height and angle here, then have them do the fixing safely. A camera must never block a window, a fire-escape route or fire-fighting access, and it belongs only on your own property and shared areas - never bathrooms, bedrooms or changing areas - positioned to respect neighbours and the spirit of the DPDP Act, 2023. Not legal advice.
The two decisions: how high, how tilted
Every mount is really two numbers working together.
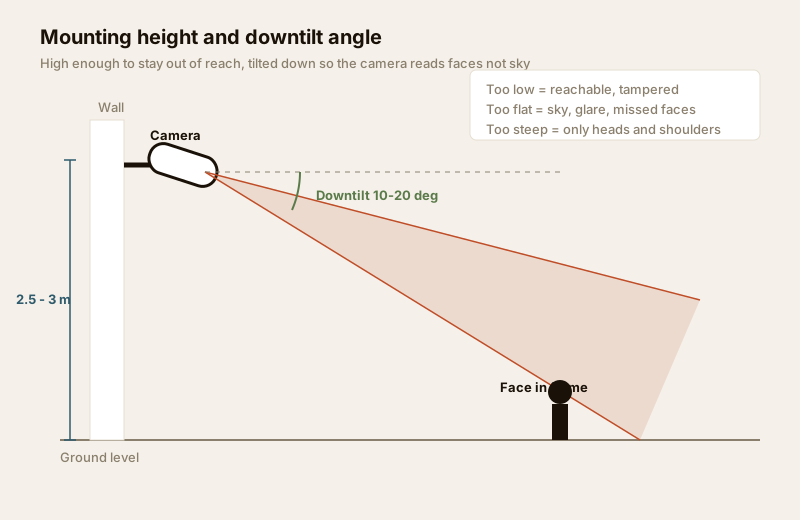
- Height sets how far the camera is from reaching hands and how much it looks down onto a scene. Higher is safer from tampering and gives a wider ground view, but the steeper the look-down, the more you see the tops of heads instead of faces.
- Downtilt angle is how far you rotate the lens below horizontal. Too flat and the camera catches sky, sun and glare and misses faces near the ground. Too steep and it only sees scalps and shoulders in a small patch right below it.
The whole craft is balancing the two so the useful part of the frame lands on the useful part of the scene - the path a person walks, the gate they open, the face you would need to recognise them by.
How high to mount: the working numbers
There is no single correct height, but there are sensible bands for Indian homes and small shops. Treat these as starting points to mark on your survey sketch, then confirm on site.
| Position | Typical height | Why | Watch out for |
|---|---|---|---|
| General outdoor overview (gate corner, driveway, compound) | 2.5 - 3 m | Out of easy reach; wide look-down over the plot | Faces get small at distance - pair with an ID camera |
| Perimeter / boundary wall run | 2.7 - 3.5 m | Sees over the wall along its length | Steeper tilt means shorter usable range |
| Porch / parking under a slab | 2.4 - 3 m (ceiling permitting) | Covers the car and the approach | Low slab can force a near-flat, glare-prone angle |
| Single door or gate for identification | ~1.5 - 1.7 m (eye level) | Captures a clear frontal face, not a scalp | Only for one choke point; more reachable, so choose a tamper-resistant camera |
| Indoor room overview | 2.2 - 2.7 m (near ceiling) | Wide corner-to-corner view | Very high ceilings push faces too far down |
The tension in that table is the important lesson. Higher and out of reach is the default for deterrence and durability - roughly 2.5-3 m keeps a camera beyond a casual grab and gives a commanding view. But a single dedicated camera near eye level is the trick for identification at one important point, because a face photographed from above is far weaker evidence than one taken square-on.
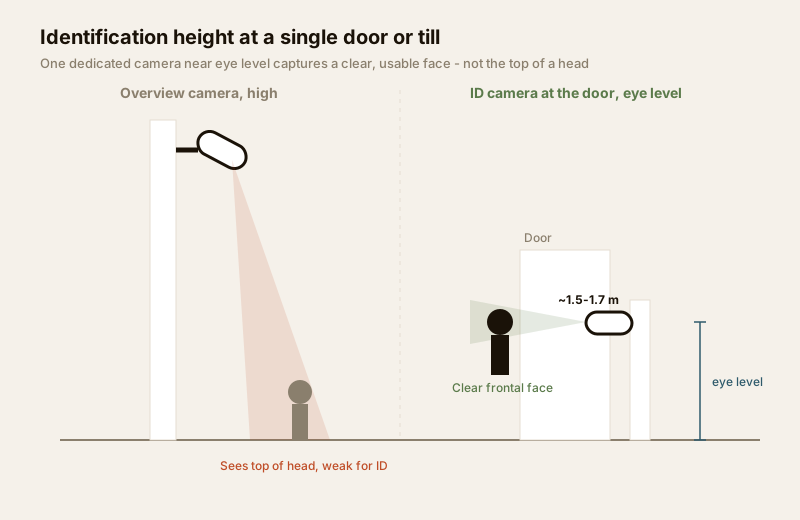
So a common home pattern is a mix: an out-of-reach overview camera watching the whole gate-and-driveway scene for what happened, plus one lower, eye-level camera right at the door or entry gate for who it was. The placement principles guide develops this "one camera, one job" idea; here the point is simply that the height you pick follows the job.
The downtilt angle
Once the height is fixed, the tilt does the fine aiming. A useful rule of thumb for a general overview camera is a downtilt of about 10 to 20 degrees below horizontal - enough that the top of the frame sits at or just below the horizon so you are not filming empty sky, while the bottom of the frame reaches the near ground you care about.
- Too flat (near 0 degrees): the camera stares at the horizon. Outdoors this means sky, the setting sun, passing headlights and washed-out faces. It also tends to overshoot the near ground, leaving a gap right in front.
- Too steep (past ~35-40 degrees): the camera looks almost straight down. You get a small patch of ground and the tops of heads - fine for a doormat, useless for recognising a person walking up.
- The sweet spot: tilt so a person standing where you expect them fills a good part of the frame with their face visible, and the horizon sits near the top edge. Set it while watching the live view, not by eye from the ground.
A practical way to land the right combination of height and tilt for a given spot is the CCTV mounting height and angle calculator - put in the mounting height, the distance to the area you want to watch and the camera's field of view, and it shows the tilt and the near/far coverage so you can brief the installer with numbers rather than guesswork. For the lens and field-of-view side of the same question, the lens field-of-view calculator is the companion tool.
The dead zone directly below
Here is the trade-off nobody mentions when they sell you a camera: a tilted camera cannot see the ground at its own base. The more you tilt down and the higher you mount, the larger the blind patch directly below and behind the camera. Someone hugging the wall under the camera is often the one spot it never sees.
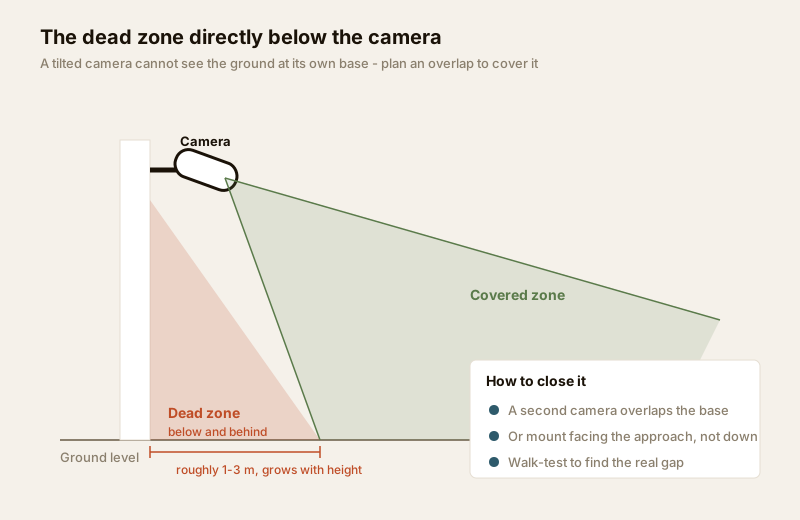
You close the dead zone the same way you close any gap - with a second angle, not a better single camera:
- Overlap from another camera. Position a nearby camera so its view sweeps across the first camera's base. This is the core idea of the coverage planning guide - every camera should be watched by another.
- Aim along the approach, not straight down. If a spot only matters as a path people walk, mount the camera to look down the path so bodies cross the frame, rather than perching it overhead.
- Walk-test it. Walk the base of every camera while someone watches the live feed, and note where you vanish. Finding your own dead zones is exactly the defensive discipline in the blind spots guide - this is about mapping your gaps so you can close them, never about anyone else's system.
Light: the enemy that height and angle control
Half of "bad footage" in India is a lighting problem that the mounting geometry either causes or cures.
- Keep bright sky and sun out of the frame. A camera pointed even slightly upward, or across an open sky, will expose for the bright area and turn everyone in front into a black silhouette. Tilt down so the sky is above the frame, and never aim a camera into the low morning or evening sun. If a camera must face a bright doorway or a west wall at sunset, choose one with strong Wide Dynamic Range - see the image-quality guide - but geometry first: angle away from the glare where you can.
- Avoid backlit entrances. A person walking in from a bright compound into a shaded porch is backlit; the camera should be positioned to face with the light falling on them, not into the bright background behind them.
- Beware IR wash off nearby walls and ceilings. At night the camera's own infrared LEDs light the scene. If the camera sits too close to a side wall, a porch ceiling, a pillar or the underside of a sun-shield, the IR bounces straight back and floods the lens - the whole image goes milky white and near objects glare out. Mount the camera so nothing bright and close sits inside its cone: pull it a little away from adjacent walls, angle it so the IR travels out into the scene, and keep parapets and eaves out of the near field. This is often why a camera that looks fine by day is useless at night.
Survey and set-up checklist
Take this to the site before anything is drilled. Decide the numbers, mark them, then hand the physical work over.
| Step | What to check | Good outcome |
|---|---|---|
| 1. Confirm the job | Is this camera for overview or identification? | Height band chosen to match (2.5-3 m vs ~eye level) |
| 2. Pick the height | Out of easy reach, over any wall, under any slab | Beyond a casual grab; commanding but not so high faces vanish |
| 3. Set the tilt | Horizon near the top of frame, target well-lit | ~10-20 deg downtilt for overview; face fills usable frame |
| 4. Check the dead zone | Walk the camera's own base on the live view | Base covered by a second camera or a wall-facing mount |
| 5. Fight the light | Where is the sun morning and evening? Any IR wash? | No sky/sun in frame; no bright wall inside the night cone |
| 6. Respect neighbours | Does the frame stray into a neighbour's home or window? | Aim adjusted or privacy-masked - see below |
| 7. Fix it safely | Height, drilling, cabling, mains | Handed to a licensed installer and electrician |
For the neighbour point, the privacy masking guide covers blocking out any part of the frame that overlooks someone else's property, and the whole-plot survey that feeds these decisions is the installation planning guide.
Common India realities to plan around
- Parapet and compound-wall mounts. A camera on a parapet is high and safe but easily ends up near-flat and glare-prone; add downtilt and check the near-ground gap. A compound-wall mount is easy to reach - go higher or pick a vandal-resistant body.
- Gate pillars. Great for an eye-level ID shot of anyone at the gate, but low and reachable - accept that trade for the ID benefit and choose a tough camera.
- Porch slabs. A low slab forces a shallow angle; sometimes a wall bracket that drops the camera and lets it look outward beats a flush ceiling mount.
- Monsoon and dust. The sun-shield only works if the camera is tilted down; a flat camera lets rain sit on the glass. Angle down and you shed water and cut glare in one move.
- Power cuts. None of this matters if the recorder is dark during an outage - plan a UPS for the recorder and network, as covered in the building security systems guide.
When to bring in a professional. Decide the height, tilt and count yourself - then hand the ladder and at-height work, wall drilling, cable pulling, weatherproof terminations and recorder commissioning to a licensed installer, and anything at the mains board to a licensed electrician (see the electrical hub). Working on a parapet or roof edge is exactly where DIY goes wrong; brief the geometry, supervise the result, but let a trained person do the climbing and wiring.
Key takeaways
- Height and tilt, not the camera model, decide whether you get a usable face or a silhouette against the sky.
- Mount general overview cameras out of easy reach at about 2.5-3 m, tilted down roughly 10-20 degrees so the horizon sits near the top of the frame.
- For identification at one door or gate, add a dedicated camera near eye level (~1.5-1.7 m) - a face square-on beats a scalp from above.
- Every tilted camera has a dead zone at its own base; close it with an overlapping second angle and a walk-test, never a single "better" camera.
- Keep sky and sun out of frame and prevent IR wash off nearby walls, ceilings and parapets - much bad night footage is a mounting-geometry problem.
- Set height and tilt with the mounting height and angle calculator, then route all at-height, cabling and mains work to a licensed professional.
References
- Digital Personal Data Protection Act, 2023 - position and angle cameras to cover only your own property and shared areas for a legitimate purpose; mask or re-aim any view that captures a neighbour's private space.
- Manufacturer installation and field-of-view specifications - verify a camera's lens angle, IR range and recommended mounting height on the maker's datasheet before deciding the geometry.
- National Building Code of India (SP 7), Bureau of Indian Standards, and local municipal bye-laws for any structural, electrical, working-at-height or life-safety aspect of an install; verify the current edition via the BIS catalogue: https://www.services.bis.gov.in/
This is an educational overview and not legal advice. Working at height, drilling, cabling and any electrical work are qualified professional tasks - engage licensed installers and verify any standard's current status via the BIS catalogue before relying on it.
Export this guide
Related Guides — Deep-dive reading
CCTV Camera Placement in India (2026): The Principles Behind Every Good Position
The universal rules that decide whether a camera earns its keep — cover the choke points first, face the flow not a blank wall, keep the sun out of frame, mount out of reach, give each camera one job, overlap so there are no gaps, and respect your neighbours.
SecurityCCTV Installation Planning in India (2026): From Site Survey to a Camera Plan
The measure-twice, install-once master guide: walk your plot, list what you are protecting, sketch a plan, mark every camera position, then size power, network, permissions and budget before a single bracket is drilled.
SecurityVideo Door Phone Placement in India (2026): Where to Mount the Door Station and Indoor Monitor
The single most-skipped step: where the outdoor door station and the indoor monitor actually go. Camera height, latch-side siting, rain-hoods, backlight, neighbour privacy, and a second monitor so you never miss the door.
SecurityRelated Tools — Try Free
CCTV Mounting Height & Angle Calculator
Height, target distance and lens angle to the downward tilt, the blind dead-zone below and where coverage begins and ends.
Height & AngleCCTV Blind-Spot Checker
The dead zone under a wall- or pole-mounted camera, from mounting height, downward tilt and vertical field of view.
Blind SpotCCTV Camera Overlap Calculator
The overlap or blind gap between two adjacent cameras, from coverage width and spacing, plus the spacing for a target overlap.
Overlap