
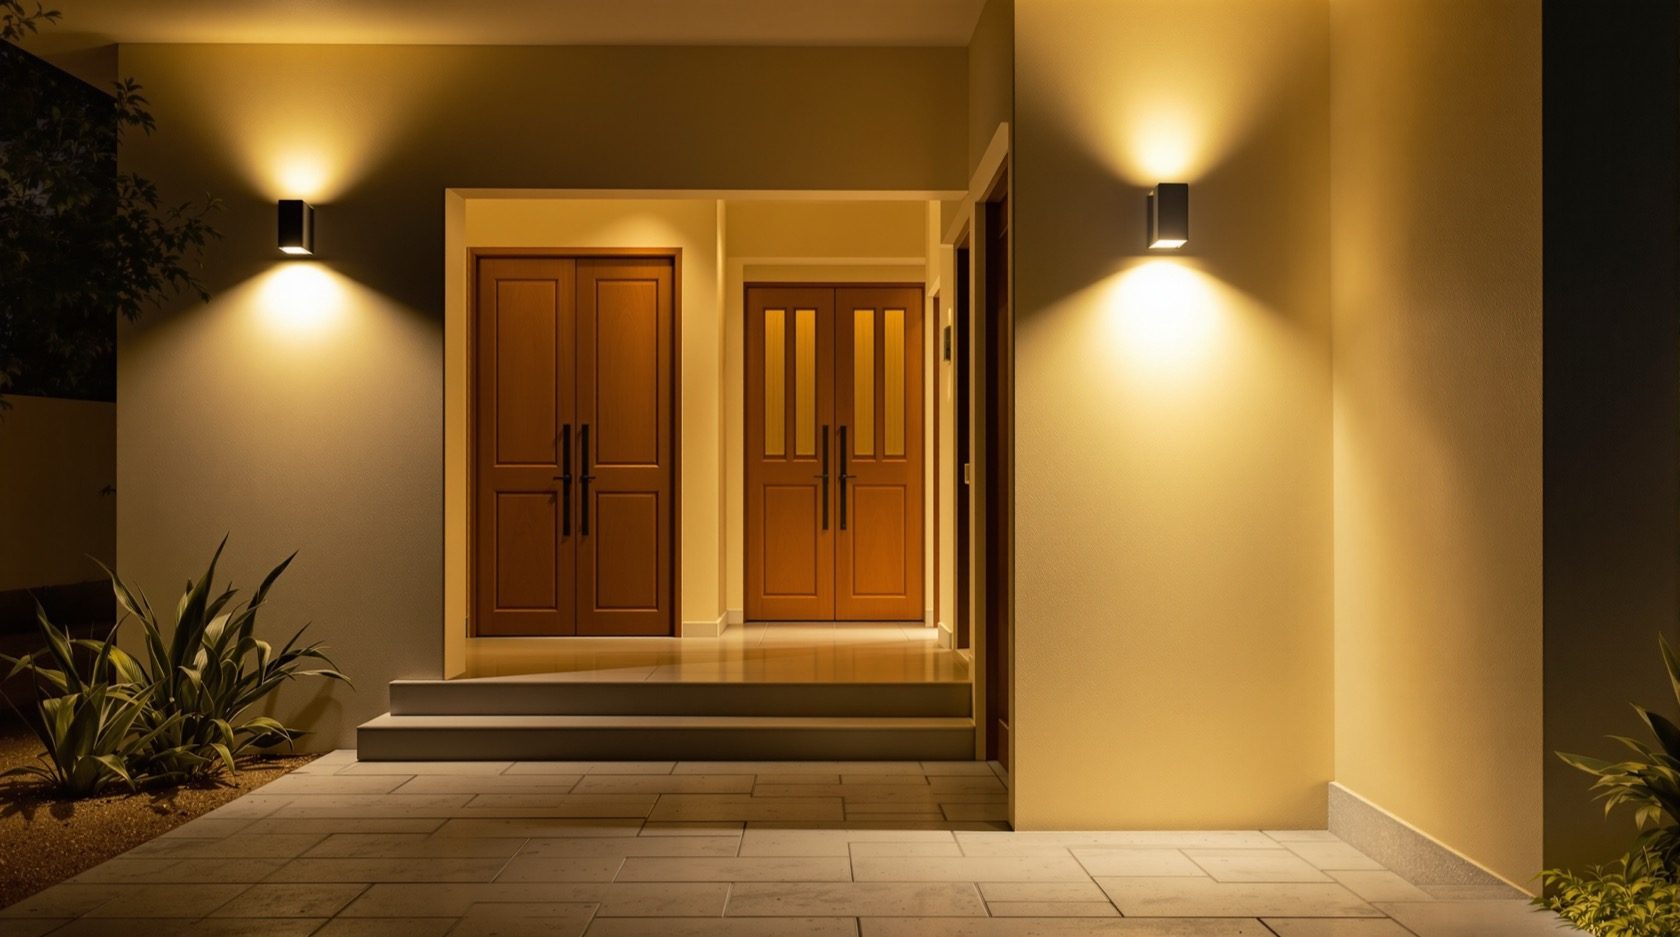
Home Lighting and Visibility Security Assessment for Indian Homes
How to assess your home's security lighting after dark — checking every entry, path and boundary for coverage, uniformity and glare, testing what each camera can actually see at night, and turning the findings into a simple lighting plan.
Good security lighting is quietly one of the cheapest, highest-value fixes a home can make — and one of the most often done wrong. A single bright bulb over the gate feels reassuring, yet it can leave the rest of the compound in deeper shadow than before and even blind your own camera. Lighting only helps when it is assessed as a system: how much of the property is covered, how evenly, and whether the light reveals people or hides them. This guide teaches you to walk your home after dark and judge exactly that, then turn what you find into a plan.
It is a companion to the home security risk assessment guide, which frames your whole risk picture, and it pairs closely with blind-spot identification, because a dark zone and a camera blind spot are usually the same place. Where those guides map where you cannot see, this one is about whether you can see there at all once the sun goes down.
Scope & safety. This is a defensive planning guide. It helps you find and fix visibility weaknesses in your own home — never how to defeat any measure. Mains-wired fixtures, new circuits and any work near the meter or distribution board are qualified electrical work: specify what you want, then have a licensed electrician install and certify it. Never let a light fixture, conduit or its switch block a fire-escape route or a window used for egress.
What good security lighting actually does
Security lighting has three honest jobs. Judge every fixture against them:
- Deter. A well-lit approach tells an opportunist that they will be seen. Most casual intrusion is discouraged by the simple prospect of visibility.
- Reveal. Lighting lets you, a neighbour or a guard actually see a person at the gate, along the boundary or at a door — early, and clearly enough to react.
- Support your cameras. A camera is only as good as the light it is given. Lighting that lets a CCTV camera render a recognisable face at night is worth far more than raw lux.
Notice what is missing: brightness for its own sake. A light that dazzles, that pools brilliance in one spot and blackness beside it, or that a camera cannot cope with, is failing all three jobs no matter how many watts it draws.
The common failures to look for
Walk your property expecting to find these — they are the usual suspects in Indian homes:
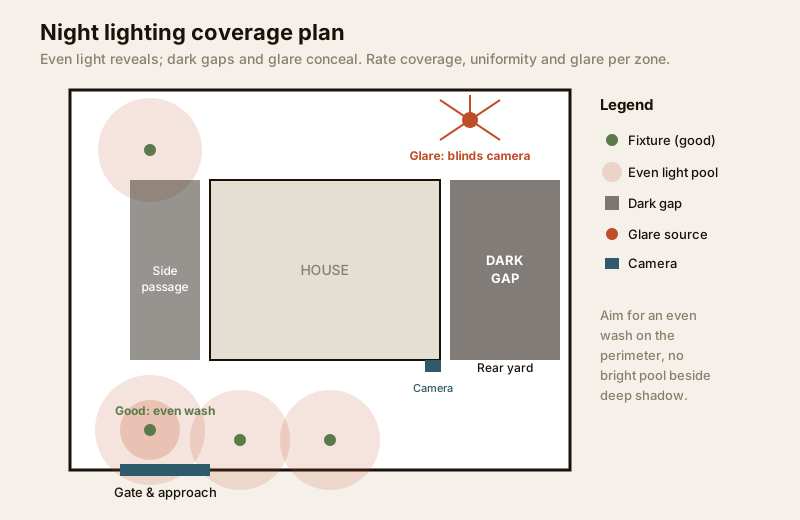
- Dark corners. The rear service yard, the side passage between house and boundary wall, the space behind the water tank or car — the very places least overlooked are the ones most often left unlit.
- Uneven pools with deep shadow between. A few bright fixtures with long dark stretches in between are worse than a modest, even wash. The eye adapts to the bright pool and is blind to the shadow beside it, where someone can stand unseen a metre away.
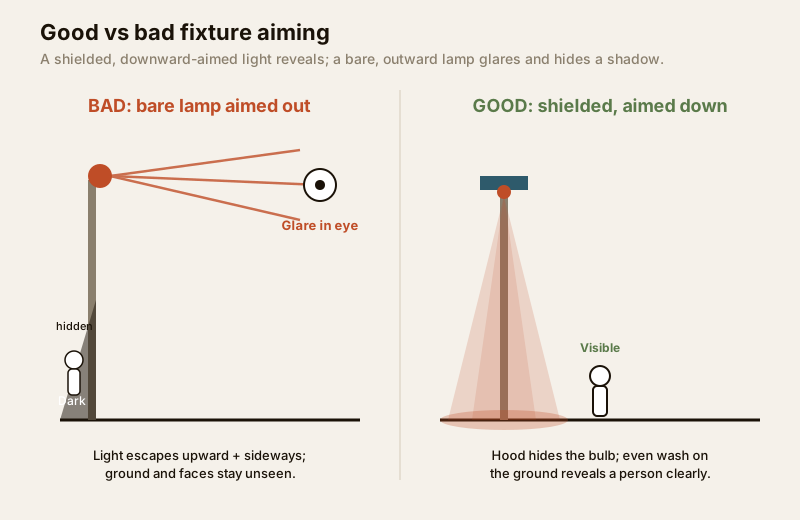
- Glare that blinds the viewer or camera. A bare, bright lamp aimed outward or sideways throws light into the eyes of anyone looking — you, a guard, a camera — and casts a black shadow behind itself. Glare does not reveal an intruder; it conceals one. This is the single most common and most counter-productive mistake.
- Lights aimed wrong. Fixtures pointed at the sky, at a wall, or across the boundary into a neighbour's window light up everything except the ground and faces you need to see.
- Easily defeated fixtures. A lamp mounted low enough to unscrew or unplug by hand, or one wired to a single easily reached switch, is a light that can be removed before it is needed.
- Fails in a power cut. In India this matters more than anywhere. A mains-only lighting scheme goes dark exactly when the grid does — often at night, often for hours. If your lighting and cameras die together in an outage, you have no night security at all. Read this alongside the electrical backup assessment for security.
The assessment method: walk it after dark
You cannot assess security lighting in daylight. Do the walk twice if you can — once at dusk as lights switch on, once in full dark — and pick a moonless, ordinary night, not a festival evening when extra lights are up. Carry your phone: use it to photograph each zone, and use its camera as a rough stand-in for what your own cameras must cope with.
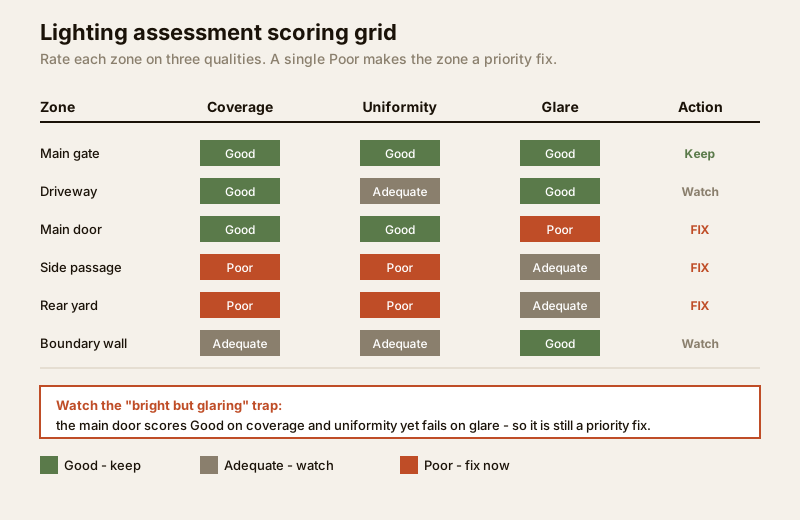
At every entry, path and boundary stretch, rate three things:
1. Coverage — is the zone lit at all? Can you see the ground and a person's face and hands there?
2. Uniformity — is the light even, or is it a bright pool beside a dark gap? Walk slowly through it; note every step where you disappear into shadow.
3. Glare — stand where a viewer or camera stands and look toward the light. If it hurts to look or you cannot see past it, that fixture is working against you.
Rate each as Good / Adequate / Poor, and photograph the poor ones. Do the boundary and gate first, then the approach and driveway, then each door, then the truly dark service zones last. This is the same defender's-lap discipline used in the site security assessment and perimeter vulnerability assessment — you are simply doing it with the lights on.
Check what each camera can actually see at night
A lighting assessment is incomplete until you check it through your cameras, because the camera's night reality is not your eye's. Open each camera's live view on your phone during the dark walk and look, honestly, at:
- IR versus ambient. Many cameras switch to infra-red (night mode) in the dark. IR gives you a grey image over a limited range — often a few metres — and reflects harshly off nearby walls, grilles and rain. Beyond its range the frame is simply black. Ambient light from a good fixture usually gives a far more useful, and colour, image.
- Glare and wash-out. Point a camera near a bright bare lamp and its night image blooms into white; a face in front of the light becomes a black silhouette. The same glare that blinds you blinds the lens.
- The actual recognisable range. Have a family member walk the zone while you watch the feed. At what distance can you recognise who it is, not merely that someone is there? That distance — not the brochure spec — is your real night coverage. The CCTV coverage calculator helps you plan camera placement; this walk tells you whether the light supports it.
The lighting and visibility assessment checklist
Use this table on your dark walk. Rate each zone Good / Adequate / Poor for the three qualities, then act on any zone that scores Poor on even one. A zone can be brightly lit (coverage Good) and still fail on glare — all three must pass.
| Zone | Coverage | Uniformity | Glare | Overall rating & action |
|---|---|---|---|---|
| Main gate & approach | Face visible at gate? | |||
| Driveway / car parking | Whole length lit? | Even or patchy? | Headlight-height glare? | |
| Main door | Lamp in visitor's eyes? | |||
| Back / service door | Often the darkest | |||
| Side passage(s) | Usually a dark gap | |||
| Rear yard / utility area | Water tank, wash area | |||
| Boundary wall line | Walk its full length | |||
| Ground-floor windows | Reachable ones lit? | |||
| Balconies / terrace access | ||||
| Blind corners | Cross-check blind-spot map |
Anything you rate Poor becomes a line in your lighting plan below. The zones that end up dark here should match the ones flagged in your blind-spot identification walk — if they do not, one of the two walks missed something.
Lighting types and controls
Fixing a Poor zone is not always about more light — usually it is about the right light, aimed and controlled well. Understand the choices before you buy.
Control — when the light comes on:
- Dusk-to-dawn (photocell). Stays on all night automatically. Best for zones that must always be visible — the gate, the main approach, a camera's field of view. Predictable, but higher running cost and, on its own, no "something moved" signal.
- Motion-sensor (PIR). Lights up only when movement is detected. Excellent for the deter-and-alert job in side and rear zones: the sudden light itself is a warning, and it saves power. The trade-off is nuisance triggers (cats, branches) and a camera that sits in darkness until motion starts — so the first second of footage may be dark.
- Timer / smart-scheduled. Useful for presence simulation when you are away, but not a substitute for the two above on the security perimeter.
A common, effective pattern: dusk-to-dawn on the zones your cameras must always see, motion-sensor on the dark peripheral zones, so the periphery both alerts and saves energy.
Colour temperature — warm versus cool. Very cool, blue-white light can feel "brighter" but often worsens glare and harsh shadows. A neutral-to-warm white (roughly 3000–4000K) is usually kinder to the eye and to camera colour rendering while still revealing detail. Match neighbouring fixtures so the boundary reads as one even wash, not a patchwork.
Fixture type — shielded, aimed, tamper-resistant. Choose fixtures that are shielded (the bulb is recessed or hooded so you see the pool of light, not the bare lamp) and mounted high enough to aim downward and out of easy reach. A shielded, downward-aimed fixture cures glare and dark-shadow-behind-the-lamp in one move — see the aiming diagram above.
Power resilience. In an Indian home, plan for the outage. Options range from a few solar motion lights on the boundary (independent of the grid) to putting key security fixtures and cameras on your inverter or UPS circuit. Decide this deliberately during the assessment; the electrical backup assessment for security and the electrical guide cover the wiring side.
| Zone type | Best control | Suggested colour | Fixture & note |
|---|---|---|---|
| Gate & main approach | Dusk-to-dawn | Neutral 4000K | Shielded, downward; camera-critical |
| Driveway / parking | Dusk-to-dawn or motion | Neutral 4000K | Aim down; avoid low glare into camera |
| Side / rear passages | Motion-sensor (PIR) | Warm-neutral 3500K | Deters + alerts; saves power |
| Boundary wall line | Motion or solar | Warm-neutral | Solar = grid-independent backup |
| Doors (main / service) | Motion-sensor | Warm 3000K | Shielded, no lamp in face |
| Camera field of view | Dusk-to-dawn | Neutral 4000K | Never point camera at a bare lamp |
| When away (any) | Timer / smart | — | Presence simulation only |
Turning findings into a lighting plan
Your assessment now gives you a photographed list of Poor zones and why they failed. Convert it into a short, ranked plan:
1. List every Poor zone and its failure mode — dark gap, glare, wrong aim, mains-only, easily reached.
2. Prefer aiming and shielding fixes first. Re-aiming a fixture downward, adding a shield, or moving a lamp out of a camera's frame often fixes glare and shadow at almost no cost — do these before buying anything.
3. Fill genuine dark gaps with the right control — motion-sensor on peripheral dark zones, dusk-to-dawn where a camera must always see. Aim for even coverage over raw brightness.
4. Add a power-cut layer — at least a few grid-independent (solar or inverter-backed) lights so the perimeter is not fully dark in an outage.
5. Re-walk to verify. After changes, repeat the dark walk and re-rate the same zones through your cameras. Uniformity and glare, not wattage, tell you if it worked.
Sequence the spend from the top of that list down, and fold it into your wider plan from the home security risk assessment. Rough Indian ranges: a solar motion light, roughly Rs 800–2,500 each; a shielded mains PIR fixture, about Rs 1,500–4,000 installed; wiring key lights onto an inverter circuit, a few thousand upward. Aiming and shielding fixes are often free.
When to bring in a professional
Do the dark walk and the scoring yourself — you know your home. But hand the wiring to qualified people: any new mains circuit, fixture near the meter or distribution board, or work putting security lighting and cameras onto an inverter or UPS is licensed electrical work. Specify the zones, controls and resilience you want from your assessment, then let a licensed electrician size, install and certify it. For a whole-property scheme, or an apartment block's common areas, a one-off professional lighting or security survey is worth it — and coordinate common-area lighting through your RWA. See the building security systems guide for how lighting fits with cameras and alarms.
Re-assess periodically
Lighting drifts out of true. Bulbs dim and fail, a motion sensor's angle gets knocked, a new car or a grown shrub creates a fresh shadow, a camera's night range degrades. Re-run the dark walk at least once a year, after any planting or building change, and after any nearby incident. It takes twenty minutes and it is the cheapest security check you own.
Key takeaways
- Security lighting has three jobs — deter, reveal, support your cameras. Brightness for its own sake is not one of them.
- Assess after dark, rating every zone on coverage, uniformity and glare. A brightly lit zone can still fail on glare and hide an intruder.
- Glare is the number-one mistake — a bare, outward-aimed lamp blinds the viewer and the camera and casts a shadow that conceals. Shield it and aim it down.
- Check every camera at night — IR range is short and ambient light usually reveals more; walk the zone and find the real recognisable distance.
- Plan for the power cut — add at least a grid-independent layer so the perimeter is not dark in an outage, and route all wiring to a licensed electrician.
Start with the home security risk assessment guide, cross-check your dark zones against blind-spot identification, and browse the full security guides collection to plan each fix in depth.
This is an educational planning guide. It is strictly defensive and does not describe how to defeat any security measure. Mains electrical, inverter/UPS and fixed-wiring work is qualified professional work — engage a licensed electrician, never let lighting or its wiring block a fire-escape route, and verify any applicable National Building Code or municipal bye-law requirement for your project.
Export this guide
Related Guides — Deep-dive reading
How to Choose a CCTV Camera (2026): The Homeowner's Decision Guide for India
Cut through the spec-sheet noise and choose the right CCTV camera for each spot around an Indian home. What actually matters — sensor and low-light performance, lens and field of view, form factor, IP and IK ratings, honest smart features — and the marketing claims to ignore.
SecurityBlind Spot Identification for Home Security in India
A defender's method to find and close the blind spots around an Indian home — the corners no camera, light or neighbour can see. Walk it by day and after dark, map each coverage gap, and fix it by re-aiming cameras, adding light, trimming planting and opening sightlines.
SecurityHow to Choose Security Lighting in India (2026): The Right Light, Not More Light
A homeowner's guide to selecting outdoor security lighting that actually deters and lets cameras work — picking the right fixture type, the right brightness and colour, the right control (motion, dusk-to-dawn or timer) and the right placement, without over-lighting, glaring your camera or annoying your neighbours.
SecurityRelated Tools — Try Free
Security Backup Power Calculator
Size a UPS/inverter and battery to keep CCTV, NVR, router and alarm running through a power cut — load, Ah, VA and cost.
Backup PowerSite & Perimeter Security Assessment
Rate your site across five areas — site, neighbourhood, perimeter, entry/exit and lighting — for a readiness score and prioritised fixes.
Site AssessmentCCTV Camera Coverage & Count Calculator
Estimate how many CCTV cameras you need, the NVR channels, storage in TB for your retention period, and an indicative all-in cost with GST.
CCTV Calculator