
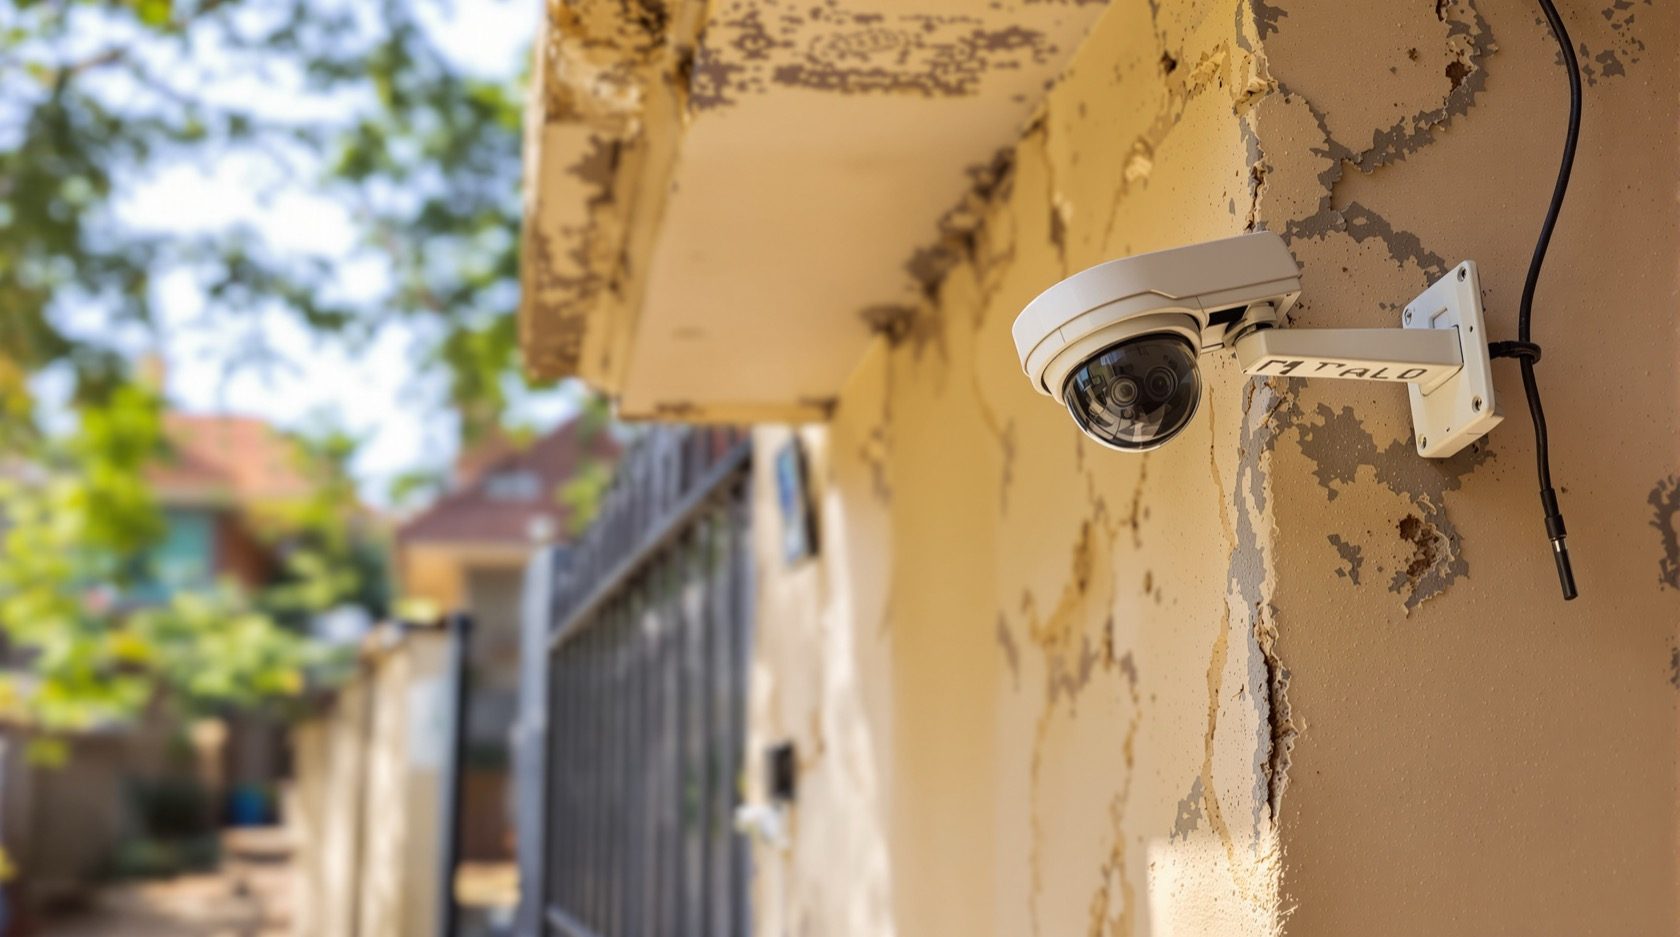
CCTV Camera Placement in India (2026): The Principles Behind Every Good Position
The universal rules that decide whether a camera earns its keep — cover the choke points first, face the flow not a blank wall, keep the sun out of frame, mount out of reach, give each camera one job, overlap so there are no gaps, and respect your neighbours.
Two homes buy the exact same four cameras. One owner ends up with clear, usable footage of every face that comes through the gate. The other ends up with four grainy views of walls, glare and the tops of people's heads walking away. The difference is not the hardware — it is cctv camera placement. A camera is only ever as good as the spot it points from.
This guide is the principle-level companion in Studio Matrx's CCTV hub. It is not a zone-by-zone list of "where to put the gate camera" — those room- and area-specific guides come next, and they all apply the rules laid out here. Think of this as the seven questions every single camera position on your plot has to pass before you fix a bracket to the wall. Get these right once and every later decision gets easier.
Scope & safety. This guide helps you plan and position cameras and then brief a professional. Mounting at height, ladder and roof work, running structured cabling and anything at the mains board belong to licensed installers and electricians — plan the positions yourself, but have them fitted safely. A camera must never block a window, door, fire-escape route or fire-fighting access. Cameras belong only on your own property and shared areas — never bathrooms, bedrooms or changing areas — and must be positioned to respect neighbours and the spirit of the Digital Personal Data Protection Act, 2023. This is general guidance, not legal advice.
Placement beats hardware
Owners tend to shop for cameras — megapixels, night vision, brand — and treat where they go as an afterthought on install day. Reverse that. A modest 4MP camera in exactly the right spot beats an 8MP camera aimed at nothing. Plan the positions first, on a sketch, the way the installation planning guide walks you through, then buy the cameras those positions call for. Everything below is about making each position count.
Principle 1 — Cover the choke points first
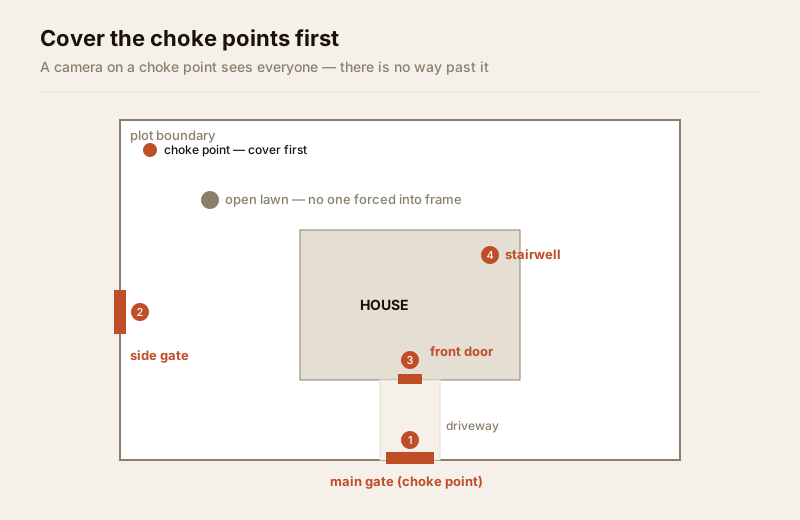
Not every metre of your plot is equal. A person entering your property has to pass through a few choke points — narrow places everyone funnels through no matter which way they came: the main gate, the front door, the driveway mouth, a side gate, the stairwell, the porch. Cover those first. A camera on a choke point sees everyone, because there is no way past it.
The opposite mistake is spreading cameras evenly across open ground — the middle of the lawn, a blank stretch of wall — where nothing forces a person into frame. Spend your first cameras on the pinch points, then fill outward.
- Rank every entry and pass-through by how many people must cross it. Gate and front door top the list.
- One good camera on a true choke point is worth two on open ground.
- Only once the choke points are covered do you move to area views (the parked car, the lawn, the terrace).
Principle 2 — Face the flow, not a blank wall
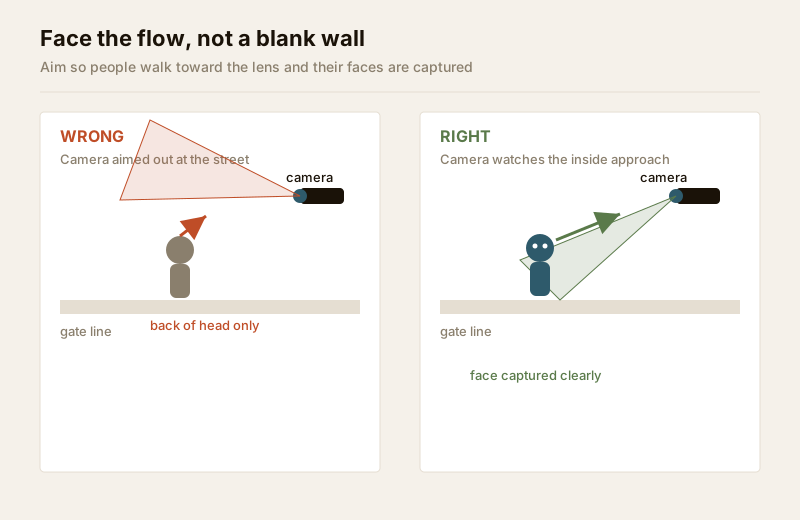
A camera should look at people as they approach — into the direction they walk from — so it captures faces, not backs of heads. The classic error is mounting a gate camera facing outward down the street or aiming it so people are already walking away by the time they are in frame. You get the back of a head and no identification.
Instead, aim so the natural line of movement comes toward the lens. At a gate, that means the camera watches the inside approach where a person turns to face the house. On a driveway, it looks back up the drive at arriving vehicles and their number plates, not at their tail-lights leaving.
- Watch the approach, so faces and plates come toward the camera.
- Do not aim at a blank wall or an empty corner "just to cover it" — cover movement.
- At a single important door, a camera at roughly eye level reads faces best for identification — the camera height & angle guide covers exactly how high and how steep.
Principle 3 — Keep the sun (and bright sky) out of frame
India's harsh, low morning and evening sun is the single biggest wrecker of outdoor footage. Point a camera into the sunrise or sunset and the sensor exposes for the bright sky — everything you actually care about, the person in the foreground, turns into a black silhouette. Bright sky filling the top of the frame does the same thing.
The rule: aim with the light behind or beside the camera, not into it, and tilt down so the frame is filled with ground and faces, not sky. Watch how the sun travels across that view through the day and across seasons — a spot that is fine at noon can be blinded at 6 p.m.
- Never aim east at sunrise or west at sunset across an open approach — check the view at those hours, not just midday.
- Tilt down so bright sky is out of the top of the frame.
- A sun-shield / hood helps with glare and monsoon rain but does not fix aiming straight into the sun.
- Backlight from a bright doorway or window behind a subject causes the same silhouette indoors — put the light behind the camera where you can.
Principle 4 — Mount out of easy reach
A camera you can reach is a camera that can be turned away, covered, sprayed or knocked out of alignment in seconds. Mounting high and out of reach — typically around 2.5 to 3 metres — keeps it working and keeps it a visible deterrent. Below head height on a low wall or beside a gate at arm's length, it is vulnerable.
There is a trade-off: too high and steep and you look down at the tops of heads and lose faces. The sweet spot is high enough to be out of reach but angled down only moderately, so it still reads faces. The camera height & angle guide has the exact geometry, including the dead zone directly below a high camera that you must not forget.
- Out of reach (~2.5–3 m) for perimeter and general cover.
- Lower, near eye level only at a single controlled door where identification is the one job.
- Choose a vandal-resistant housing where a camera is unavoidably reachable — see vandal-proof IK ratings.
- Getting to these heights safely is at-height work — a professional installer's job, not a wobbly ladder on a Sunday.
Principle 5 — One camera, one job
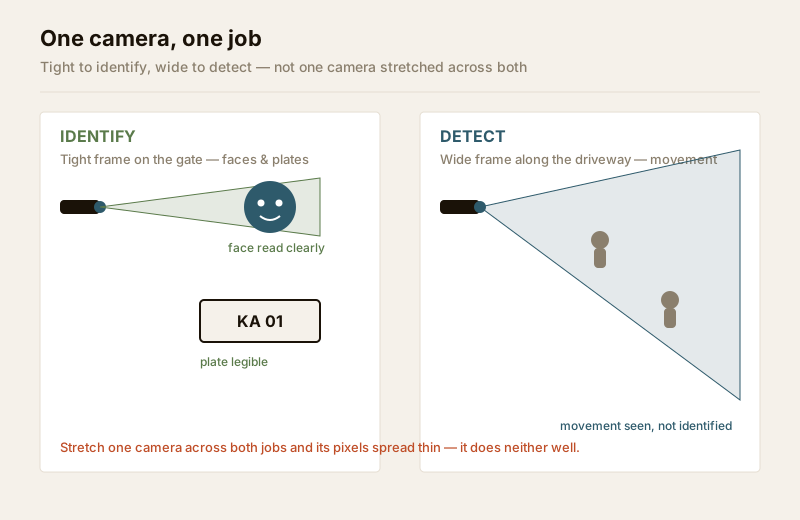
The commonest waste is asking a single camera to do too much — read faces at the gate and watch the whole driveway and cover the car. Stretched across a wide field of view, its pixels spread thin and it does none of those jobs well enough to identify anyone.
Give each camera one clear job and frame it for that job. A gate camera's job is faces and plates — frame it tight on the gate. A driveway camera's job is the length of the drive — let it be wider. Deciding the job first tells you the lens, the field of view and the exact aim.
- Name the one job of each position before you choose the camera — "identify faces at the front door", "watch the length of the side wall".
- A detect job (something is moving there) can be wide; an identify job (who is that) must be tight and close. This detect-versus-identify trade-off is the heart of the coverage planning guide and the coverage calculator.
- Do not buy fewer cameras by widening each one's job — you end up with footage too soft to use.
Principle 6 — Overlap so there are no gaps
Cameras placed as isolated islands leave gaps between them — and every gap is a blind spot someone can move through unseen. The fix is deliberate overlap: position cameras so each one's edge is seen by the next, and ideally so every camera is itself watched by another. Then no one can approach and disable a camera without a second camera recording them doing it, and a person crossing your plot is handed from one view to the next with no gap.
There will always be gaps you did not expect — directly below a high camera, behind it, past a pillar or a parapet, or where foliage has grown across a view. Find them deliberately with a walk-test: have someone walk every route onto and across your property while you watch the live footage for the moments they vanish. The blind-spots guide is the full method for finding your own gaps and closing them with a second angle.
- Overlap the edges so coverage is continuous from entry to exit.
- Let cameras watch each other so none can be quietly disabled.
- Walk-test after install to find the gaps you did not predict, then add an angle to close them.
Principle 7 — Respect neighbours and private spaces
A camera's legitimate view is your property and the shared areas you are responsible for — never into a neighbour's home, windows, courtyard or garden, and never sweeping the public street beyond what your own entrance needs. This is both good manners and a duty: the DPDP Act, 2023 expects you to have a genuine purpose and to minimise what you capture of other people's private space.
Where your only good angle unavoidably clips a neighbour's window or gate, use the camera's privacy masking to black out that part of the frame permanently — the privacy-masking guide shows exactly how. And cameras must never cover bathrooms, bedrooms, changing areas or the inside of a neighbour's home under any circumstances.
- Aim within your boundary — your plot and shared areas, not a neighbour's private space or the open street.
- Mask any part of a frame that unavoidably overlooks a neighbour.
- In flats and gated layouts, coordinate shared-area cameras with the RWA / society — the gated-communities security guide covers who decides what.
- Pair placement with clear CCTV signage at entries — signage is both a deterrent and a transparency duty.
A quick placement checklist
Run every proposed position through these before you commit to it.
| # | Ask of each position | Pass looks like |
|---|---|---|
| 1 | Is it on a choke point or a real approach? | Everyone entering must cross this view |
| 2 | Does movement come toward the lens? | Faces and plates, not backs of heads |
| 3 | Is the sun / bright sky out of frame? | No silhouettes at sunrise or sunset |
| 4 | Is it out of easy reach? | ~2.5–3 m, can't be turned or covered |
| 5 | Does it have one clear job? | You can name what it must capture |
| 6 | Is it overlapped and walk-tested? | No gap between it and the next camera |
| 7 | Does it respect neighbours? | Only your property; private views masked |
Common placement mistakes to avoid
| Avoid this | Do this instead |
|---|---|
| Spreading cameras evenly over open ground | Cover choke points (gate, door, drive) first |
| Aiming a gate camera out at the street | Watch the inside approach so faces come toward it |
| Pointing into sunrise / sunset | Aim with light behind the camera; tilt down |
| Mounting low, within arm's reach | Out of reach (~2.5–3 m); vandal-housing if not |
| One camera trying to cover everything | One job per camera; tight for identify, wide for detect |
| Isolated cameras with gaps between | Overlap edges; let cameras watch each other; walk-test |
| Angling into a neighbour's window | Stay within your boundary; privacy-mask any spillover |
When to bring in a professional
You can — and should — survey your plot, mark the positions and decide the job of each camera yourself. Hand the physical install to people licensed to do it. Mounting at 2.5–3 m and any roof or parapet work is at-height work with real fall risk; structured cabling and the run back to the recorder should be pulled and terminated properly against India's dust and monsoon; and anything at the mains board is a licensed electrician's job — see the electrical hub. Brief the installer with your marked sketch and the job of each camera, then supervise the aiming on site. A well-aimed camera in the right spot is worth far more than an expensive one screwed on wherever the ladder happened to reach.
For the full system picture around these principles, the installation planning guide is the master survey-to-plan walkthrough, coverage planning turns positions into continuous coverage, and the residential CCTV guide puts it all together for a home.
Key takeaways
- Placement beats hardware — plan positions first, then buy the cameras those positions call for.
- Cover choke points first (gate, door, driveway), then face the flow so faces and plates come toward the lens.
- Keep the sun and bright sky out of frame, and mount out of easy reach (~2.5–3 m) so a camera can't be turned or covered.
- Give each camera one clear job, overlap so there are no gaps, and walk-test to find your own blind spots.
- Respect neighbours — stay within your boundary, privacy-mask any spillover, never cover private spaces, and put up clear signage.
- Do the surveying and positioning yourself; route at-height mounting, cabling and mains work to licensed professionals.
References
- Digital Personal Data Protection Act, 2023 — position cameras for a legitimate purpose, covering only your own property and shared areas, and minimise capture of neighbours' private spaces; this is general guidance, not legal advice.
- Ingress Protection (IP) and impact (IK) ratings — verify a camera's weatherproofing and vandal-resistance on the manufacturer's specification sheet before ordering for reachable or exposed positions.
- National Building Code of India (SP 7), Bureau of Indian Standards, and local municipal bye-laws for any structural, electrical or life-safety aspect of an install; verify the current edition via the BIS catalogue: https://www.services.bis.gov.in/
This is an educational overview, not legal advice. Mounting at height, cabling and any electrical work are qualified professional tasks — engage licensed installers and verify any standard's current status via the BIS catalogue before relying on it.
Export this guide
Related Guides — Deep-dive reading
CCTV Installation Planning in India (2026): From Site Survey to a Camera Plan
The measure-twice, install-once master guide: walk your plot, list what you are protecting, sketch a plan, mark every camera position, then size power, network, permissions and budget before a single bracket is drilled.
SecurityCCTV Blind Spots in India (2026): Finding and Closing the Gaps in Your Coverage
How coverage gaps form on a real Indian plot, how to find your own blind spots with a walk-test and a footage review, and how to close them with overlap, a second angle, a wider lens or one more camera.
SecurityCCTV Coverage Planning in India (2026): Think in Coverage, Not Cameras
Plan a home CCTV scheme by the coverage it produces, not the number of cameras you buy: map choke points, overlap so every camera is watched by another, keep entry-to-exit continuity, and set the pixels-per-metre each zone actually needs.
SecurityRelated Tools — Try Free
CCTV Mounting Height & Angle Calculator
Height, target distance and lens angle to the downward tilt, the blind dead-zone below and where coverage begins and ends.
Height & AngleCCTV Blind-Spot Checker
The dead zone under a wall- or pole-mounted camera, from mounting height, downward tilt and vertical field of view.
Blind SpotCCTV Camera Overlap Calculator
The overlap or blind gap between two adjacent cameras, from coverage width and spacing, plus the spacing for a target overlap.
Overlap