
CCTV Installation Planning in India (2026): From Site Survey to a Camera Plan
The measure-twice, install-once master guide: walk your plot, list what you are protecting, sketch a plan, mark every camera position, then size power, network, permissions and budget before a single bracket is drilled.
Most disappointing CCTV systems were never planned — they were bought. A box of four cameras turns up, an installer screws them wherever a wall is handy, and six months later you discover the one incident you cared about happened in a corner no camera could see. CCTV installation planning is the cure: you decide what you are protecting, where the cameras must look, and how power and cabling will reach them before anyone drills a bracket. Measure twice, install once.
This is the master planning guide in Studio Matrx's CCTV hub. It walks the whole survey-to-plan process end to end. The detailed rules for where each camera points live in the camera placement principles guide, how to think in coverage rather than cameras lives in coverage planning, and mounting height and downtilt live in camera height and angle. Read this one first — it is the skeleton the others hang on.
Scope & safety. This guide helps you survey, plan and mark positions. Mains-electrical work, structured cabling, and any working at height (ladders, parapets, roofs) belong to licensed professionals — plan here, but have a qualified installer execute. Security hardware must never block a door, window, fire-escape route or fire-fighting access. Cameras belong only on your own property and shared areas — never bathrooms, bedrooms or changing areas — positioned to respect neighbours and the spirit of the Digital Personal Data Protection Act, 2023. This is educational information, not legal advice.
Step 1 — Walk the property and see it as a stranger would
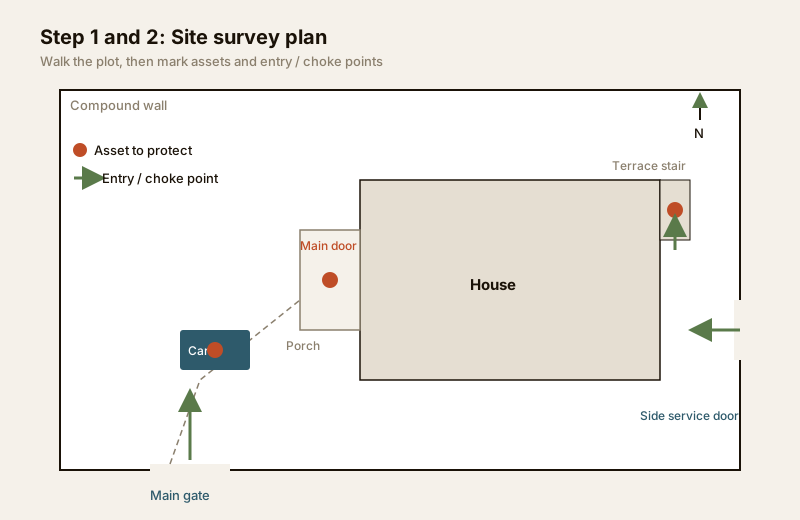
Planning starts on your feet, not on a website. Take a clipboard (or your phone), walk your entire plot slowly, and look at it the way an opportunist would: where would I get in, and where could I move without being seen?
Do the walk twice — once in daylight and once after dark — because the plot changes completely at night. A corner that feels overlooked at noon can be pitch black at 9 pm, and harsh backlight from a neighbour's security light or the setting sun will wash out a camera you place carelessly. Note every existing light and every dark patch. For the lighting side of the survey, the lighting and visibility assessment is the companion read.
As you walk, jot down three things at every point:
- What is here worth protecting (the car, the gate, the main door, the meter, the terrace access).
- How someone would reach it (over the compound wall, through the gate, up the drainpipe).
- What a camera here could and could not see (the wall it faces, the glare it would catch, whether it is within arm's reach).
Step 2 — List your assets and your entry and choke points
Now turn the walk into two lists. This is where planning beats guessing.
Assets are what you are actually protecting — not "the house" in the abstract, but specific things: the parked car, the main entrance, the back service door, the terrace/roof access, the electricity meter and DB, children's play area, the shop shutter. Rank them; you will spend your first cameras on the top of this list.
Entry and choke points are the few places everyone must pass through. A plot has many square metres but only a handful of real gateways — the main gate, the wicket door, the one gap in the boundary wall, the single staircase to the terrace, the porch that funnels to the front door. These choke points are gold: one well-placed camera on a choke point does the work of three cameras spread across open ground. The whole discipline of coverage planning is built on covering choke points first, and finding the gaps between them is the job of the blind-spot walk-test.
Step 3 — Sketch a plan and mark camera positions
You do not need a CAD drawing. A hand sketch of the plot to rough scale — the boundary, the building footprint, the gate, the drive, doors and the porch — is enough. Mark north, and mark where the sun rises and sets; you will thank yourself when you avoid aiming a camera into the morning glare.
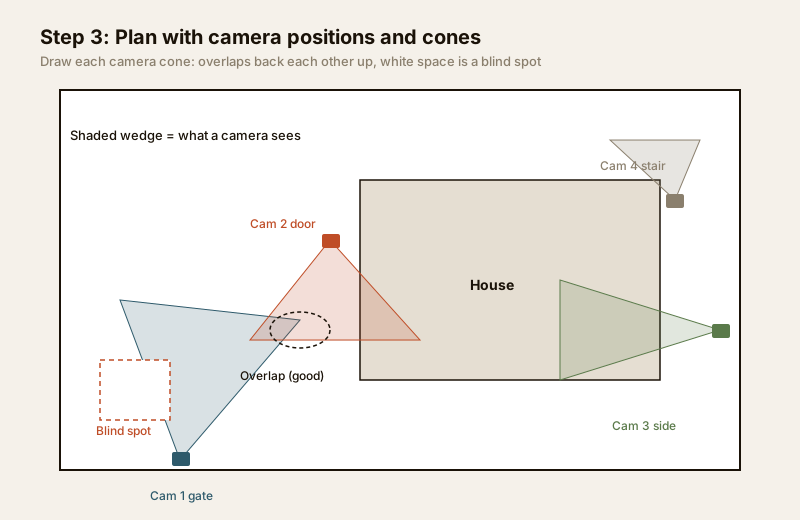
On that sketch, place a marker for each proposed camera and draw its coverage cone — the wedge it can actually see. Now the plan does your thinking for you: overlaps show where cameras back each other up, and white space between cones shows the blind spots you have not covered yet. The goal is entry-to-exit continuity — a stranger crossing your plot should never travel far without being in some camera's cone, and ideally each camera is itself watched by another so no one can approach a camera unseen.
The camera placement principles guide gives you the rules for aiming each cone (face the flow, not the wall; mount out of reach; one camera, one job). To turn a rough cone into a real field of view for a given lens and distance, use the CCTV camera coverage calculator and the lens and field-of-view calculator.
Step 4 — Decide the count and type for each spot
Only now — with positions marked — do you decide how many and what kind. Count follows coverage, not the other way round. A common mistake is buying a "4-camera kit" and then forcing four cameras to fit; instead let the plan tell you the number, then buy to match.
For each marked position, decide the camera type by the job that spot does:
| Position / job | Typical choice | Why |
|---|---|---|
| Main gate / driveway (long, one direction) | Bullet, longer lens | Visible deterrent, long reach, easy to aim down a line |
| Porch / front door (identify faces) | Dome or turret at door height | Close, wide, discreet; near eye-level for a clean face shot |
| Wide junction / open yard | Dome or turret, wide lens | One camera covers a broad angle where paths meet |
| Large compound / parking to sweep | PTZ | Motorised pan-zoom for big areas — usually not a small home |
| Any outdoor position | IP66-rated, weatherproof body | India's dust and monsoon demand it — see below |
Let the coverage decide the count with the coverage calculator, and let the type follow the spot with the CCTV camera type selector. Weatherproofing matters more here than most people expect: for anything outdoors insist on at least an IP66 rating so dust and driving monsoon rain stay out, per the weatherproof IP-rating guide.
Step 5 — Plan the power and the network
A camera plan that ignores power and cabling is only half a plan — and this is the half that most needs a professional.
- Where the recorder lives. Pick a secure, ventilated, indoor spot for the NVR/DVR and the router — not the porch, not a damp utility box. It should be hard to reach and tamper with, because taking the recorder takes the evidence.
- Cable routes. For each camera, trace the cable back to the recorder on your sketch. Wired (PoE) is the reliable default for a fixed home system; plan conduits and drops before any plaster or flooring is finished. See the wired CCTV guide.
- Power and backup. India runs on power cuts. A system that dies with the evening outage is not a security system — plan a UPS for the recorder and router so recording survives a cut. Any connection at the mains board is a licensed electrician's job; see the electrical hub.
- Storage. Decide recording days (7–30 is typical for homes) up front — it sets the hard-disk size. More cameras and higher resolution eat storage fast.
Step 6 — Get RWA / society permission and respect neighbours
In apartments, gated layouts and many colonies, cameras on shared walls, lobbies, staircases, lift areas or the building exterior need the RWA's or society's written approval — and often a resolution. Sort this before you buy, not after an installer is standing on the landing. The gated-community security guide covers the approvals and shared-area etiquette.
Two lines you must not cross, whatever the approval:
- Never aim into a neighbour's home, windows, balcony or private space, and never cover the public street beyond your legitimate boundary. Use privacy masking to black out anything outside your remit — see the privacy-masking guide and the security and privacy assessment.
- Put up clear signage. A visible "CCTV in operation" notice at the entrance is both a deterrent and a transparency duty under the DPDP Act, 2023 — see the CCTV signage guide.
Step 7 — Budget and phase the rollout
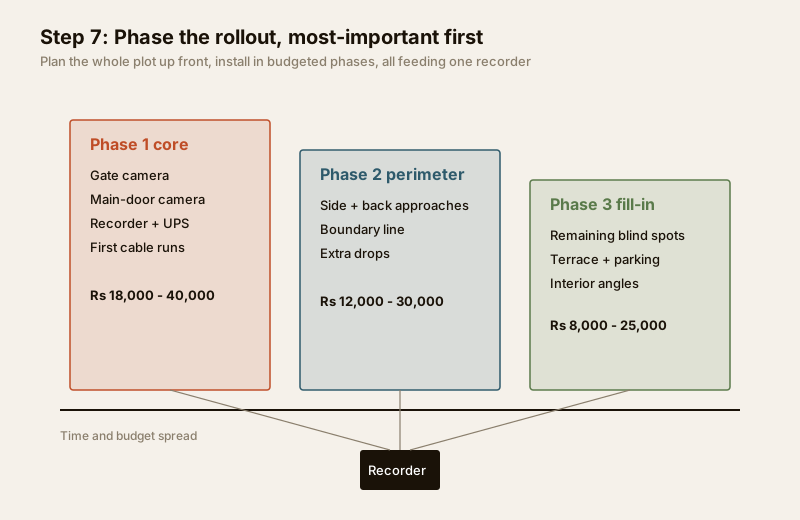
You do not have to do it all at once. A good plan covers the whole property but is installed in phases, most-important first, so the budget spreads and you learn from phase one before committing phase two.
Phase by asset priority: the gate and main door first, the perimeter and secondary entries next, and interior or nice-to-have angles last. Because the whole plan is drawn up front, every phase slots into a coherent system instead of becoming a patchwork.
| Phase | Typical scope | Indicative cost (₹) |
|---|---|---|
| Phase 1 — core | Gate + main door, recorder, UPS, first cable runs | ₹18,000 – ₹40,000 |
| Phase 2 — perimeter | Side/back approaches, boundary line, extra drops | ₹12,000 – ₹30,000 |
| Phase 3 — fill-in | Remaining blind spots, terrace, parking, interior | ₹8,000 – ₹25,000 |
| Ongoing | Storage top-up, maintenance, wipe-downs | ₹1,000 – ₹4,000 / yr |
These are indicative bands to sanity-check a quote, not fixed rates — brand, resolution, camera count and cable lengths move them a lot. Use them alongside a proper estimate.
A survey-to-plan checklist you can print
| Step | Done when you have... |
|---|---|
| Walk the plot (day + night) | Notes on lights, dark patches, backlight and reach at every point |
| List assets | A ranked list of specific things to protect |
| List entry / choke points | Every gate, door, gap and staircase marked |
| Sketch the plan | A rough-scale drawing with north and sun direction |
| Mark positions + cones | A camera and coverage cone at each spot, overlaps and gaps visible |
| Decide count + type | The right camera type chosen per spot, IP66 for outdoors |
| Plan power + network | Recorder location, cable routes, UPS and storage days set |
| Get permissions | RWA/society sign-off; neighbours respected; masking planned |
| Signage | A CCTV notice planned at every entrance |
| Budget + phase it | A phased plan, most-important first, with a per-phase budget |
Do and avoid
| Do | Avoid |
|---|---|
| Plan the whole plot, install in phases | Buying a "kit" and forcing cameras to fit it |
| Cover choke points first | Spraying cameras across open ground |
| Walk the site by day and night | Planning only in daylight |
| Put the recorder indoors, secured, on UPS | Leaving the recorder in a reachable porch box |
| Mask out and steer clear of neighbours' space | Aiming at a neighbour's window or the street |
| Get RWA/society approval up front | Drilling shared walls first, asking later |
| Route mains, cabling and height work to a pro | DIY ladder work and mains connections |
When to bring in a professional. Do the survey, the plan and the position-marking yourself — that is where an owner adds the most value. Then hand the cable pulling and terminations, mounting at height, weatherproof junctions, recorder commissioning and anything at the mains board to a licensed installer and electrician. Working at height and mains-electrical work are genuinely hazardous and are qualified-professional tasks. A well-surveyed plan installed properly beats an expensive kit screwed on in the wrong places every time.
Key takeaways
- CCTV installation planning is a survey-to-plan process you do before buying: it turns a random box of cameras into a system that actually covers what matters.
- Walk the plot day and night, list your assets and your entry/choke points, then sketch a plan and mark each camera with its coverage cone so overlaps and blind spots are visible.
- Count follows coverage — let the plan set the number, then pick the camera type per spot (bullet for lines, dome/turret for doors and junctions), IP66 for outdoors.
- Plan power, cabling, a secured recorder, UPS and storage — and route mains, cabling and at-height work to a licensed professional.
- Get RWA/society permission, respect neighbours with privacy masking, put up signage, and phase the budget most-important first. Feed the plan into the placement, coverage and height and angle guides and the coverage calculator.
References
- Digital Personal Data Protection Act, 2023 — plan cameras to cover only your own property and shared areas with a legitimate purpose, avoid capturing neighbours' private spaces, and provide clear notice of recording.
- Ingress Protection (IP) ratings — verify a camera's weatherproofing (IP66 or higher for outdoors) on the manufacturer's specification sheet before ordering.
- National Building Code of India (SP 7), Bureau of Indian Standards, and local municipal bye-laws for any structural, electrical or life-safety aspect of an install; verify the current edition via the BIS catalogue: https://www.services.bis.gov.in/
This is an educational overview, not legal advice. Site surveying and planning are owner tasks; mounting at height, cabling and any electrical work are qualified-professional tasks — engage licensed installers and verify any standard's current status via the BIS catalogue before relying on it.
Export this guide
Related Guides — Deep-dive reading
CCTV Camera Placement in India (2026): The Principles Behind Every Good Position
The universal rules that decide whether a camera earns its keep — cover the choke points first, face the flow not a blank wall, keep the sun out of frame, mount out of reach, give each camera one job, overlap so there are no gaps, and respect your neighbours.
SecurityHow to Choose a CCTV Camera (2026): The Homeowner's Decision Guide for India
Cut through the spec-sheet noise and choose the right CCTV camera for each spot around an Indian home. What actually matters — sensor and low-light performance, lens and field of view, form factor, IP and IK ratings, honest smart features — and the marketing claims to ignore.
SecurityCCTV Placement Perimeter and Compound Wall in India (2026): Watch the Line
How to position cameras ALONG your boundary wall at a grazing angle so you catch anyone approaching or climbing it, pair the view with line-crossing detection, light the line, cover corners and gates, and keep every camera on your own side.
SecurityRelated Tools — Try Free
CCTV Camera Coverage & Count Calculator
Estimate how many CCTV cameras you need, the NVR channels, storage in TB for your retention period, and an indicative all-in cost with GST.
CCTV CalculatorCCTV Camera Type Selector
Answer five questions and get the right camera form factor — dome, vandal dome, bullet, turret or PTZ — with reasons.
Camera SelectorCCTV Mounting Height & Angle Calculator
Height, target distance and lens angle to the downward tilt, the blind dead-zone below and where coverage begins and ends.
Height & Angle