
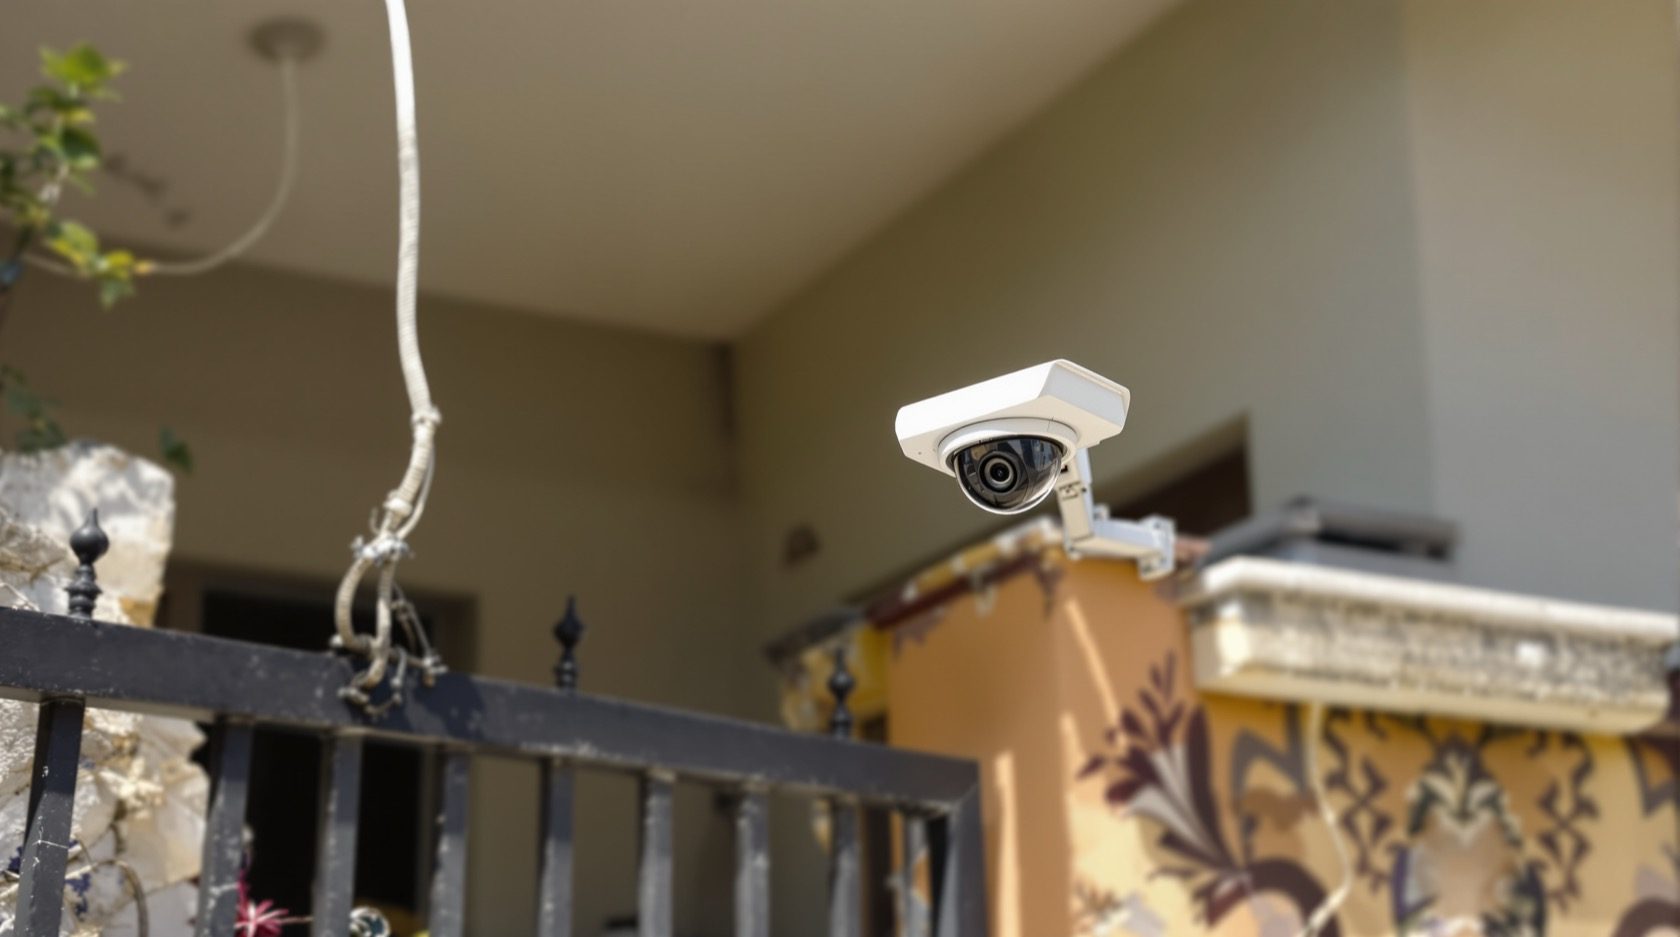
CCTV Placement at the Entrance and Gate in India (2026): Capturing Every Visitor
The gate is the #1 priority zone. How to face arriving visitors instead of the road, capture identifiable faces with an ID camera at eye level plus an overview, beat street backlight, and add a video doorbell — planned for an Indian home.
If you can afford only one good camera on your whole plot, put it at the entrance and main gate. Every legitimate visitor, delivery, guest — and anyone with bad intent — passes through this one pinch-point on foot or in a vehicle. Get the gate right and you own the single most useful piece of footage a home can have: a clear, identifiable face of everyone who came to your door.
This guide is the entrance-and-gate chapter of Studio Matrx's CCTV placement series. It applies the general rules from the camera placement principles guide to this one zone. The other zones — parking and driveway, staircase, lobby, terrace, perimeter — have their own guides; stay with the gate here and cross to those for the rest of the plot.
Scope & safety. This guide helps you decide and position. Mounting at height on a pillar or wall, running the cable back to the recorder, and any mains-electrical work are jobs for a licensed installer and electrician — plan the spots here, have them fitted professionally. Point cameras only at your own gate, approach and property. Aiming into the public road, a neighbour's gate or their windows is both poor security and a privacy problem — cite the spirit of the DPDP Act, 2023 and keep the frame on your side of the boundary. This is educational guidance, not legal advice.
Why the gate is the #1 priority zone
Cameras deeper inside the plot see people who are already in. The gate sees them at the moment of decision and identification — pausing, reaching for the latch, looking at the house, face up and lit. That is the frame the police and you actually want. A porch camera that only catches the back of a departing head is worth a fraction of a gate camera that caught the face on the way in.
Two jobs, and they conflict just enough that one camera rarely does both well:
- Identification (ID). A tight, near-level view that fills the frame with a face you could recognise or a number plate you could read.
- Overview (context). A wider view that shows the whole scene — how many people, which vehicle, what they carried, which way they went.
The professional answer at a busy gate is two cameras, one tuned for each job. On a tight budget, a single well-placed camera at the gate leaning toward the ID job is the right first buy.
Face the visitor, not the road
This is the mistake almost everyone makes: they bolt a camera to the pillar and aim it outward down the street, thinking "cover the approach." What that captures is the backs of heads as people walk in, plus a wide sweep of public road and the neighbour's gate you have no business recording.
Aim the gate camera inward and slightly down, back toward the gate opening, so a person walking up to your gate is walking toward the lens with their face up. The moment they stop at the gate is the moment you get the cleanest identifiable shot.
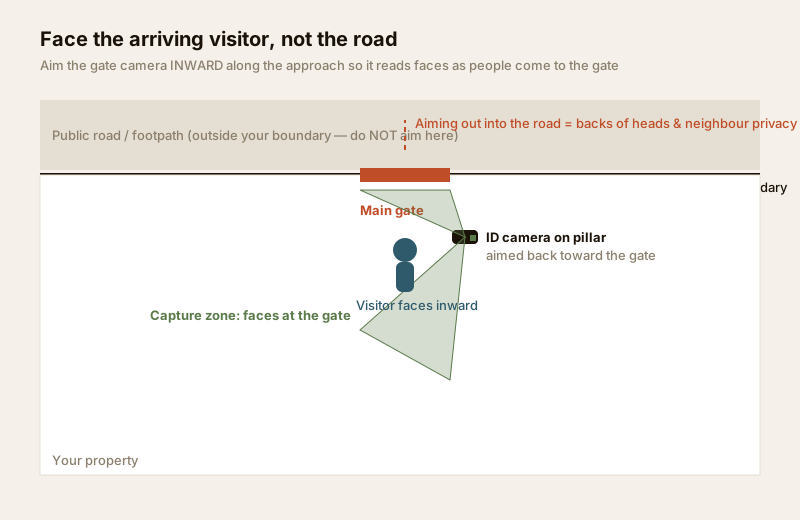
Keep the public road and the neighbour's property out of the frame, or masked. If your only sensible angle unavoidably clips a slice of pavement, use the camera's privacy masking to black it out — see the privacy masking guide. The goal is your gate, your approach, your visitors — nothing beyond your legitimate boundary.
The ID camera: near eye level, tight and level
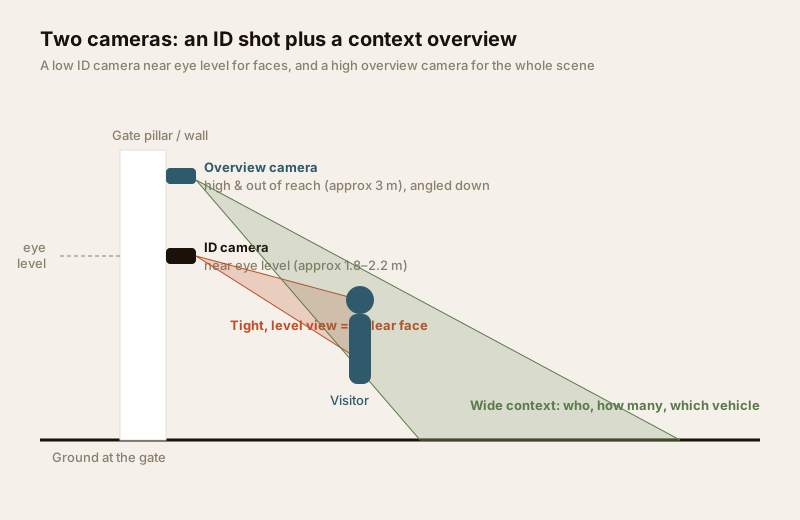
The camera doing the identification job wants to see a face the way another person would — roughly level with it, not steeply down from a rooftop. A camera mounted too high looks down at hats, hair and shoulders and misses the face entirely.
Mount the ID camera at the gate at around 1.8 to 2.2 metres — above easy reach but low enough that its line of sight meets an adult's face near eye level as they stand at the gate. Angle it only gently downward. A bullet or turret camera on the inner face of the gate pillar is the classic fit; see the bullet camera guide and turret guide. Use a lens and distance that make a face fill a good part of the frame at the gate line — the mounting height and angle calculator helps you pick the exact height and tilt, and the deeper reasoning is in the camera height and angle guide.
The overview camera: high, wide and out of reach
The second camera does the opposite job. Mount it high — around 3 metres or more, out of arm's reach — on the pillar top, the compound wall or the house corner, angled down to take in the whole gate area: the full width of the opening, the approach, and any vehicle pulling up. This is the frame that tells the story — one person or three, on foot or in an auto, carrying what.
Because it is high and wide, it also protects the ID camera: if someone reaches up to cover or twist the low ID unit, the overview camera above catches them doing it.
Camera choice for the gate
| Role | Camera type | Why it fits the gate |
|---|---|---|
| ID (faces) | 4MP+ bullet or turret, fixed or varifocal lens | Tight, level view at the gate line; varifocal lets you dial the exact face-filling zoom on site |
| Overview (context) | 4MP+ wide bullet or dome, high mount | Takes in the full gate width, approach and vehicle from above, out of reach |
| Doorbell (the door) | Wired/battery video doorbell | Face and two-way audio right at the door; the last few feet the gate camera cannot see |
| Optional plate capture | Dedicated long-lens / varifocal bullet | Only if you specifically need number plates of vehicles at the gate |
For anything outdoors here, insist on a weatherproof rating of at least IP66 so India's dust and monsoon stay out — see the weatherproofing and IP rating guide. If the gate camera is within any reach, an IK-rated vandal-resistant body is worth it. And because the gate is your deterrent shop-window, pair the cameras with clear CCTV signage — a visible "CCTV in operation" sign at the gate both warns off the opportunist and supports the lawful, transparent purpose the DPDP Act expects.
Beating the street backlight
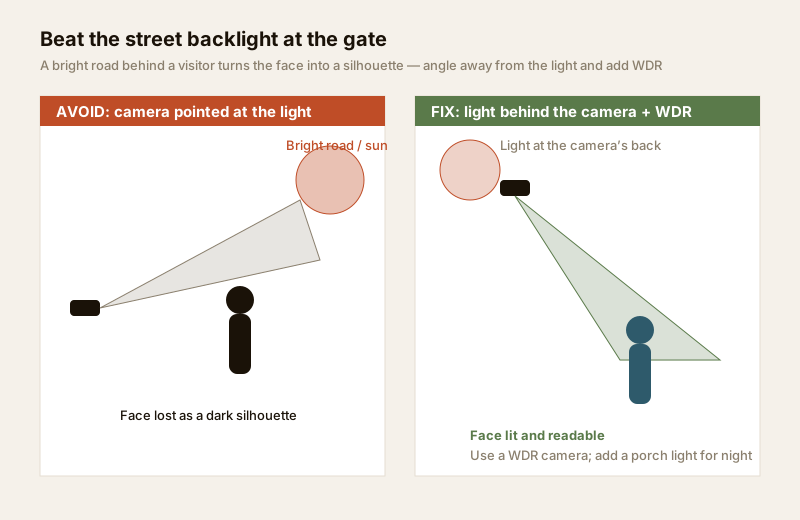
The gate is the hardest lighting spot on the whole plot, because behind an arriving visitor is often a bright street, open sky or the low morning/evening sun. A camera metering on all that brightness turns the face in front of it into a black silhouette — you get a shape, not a person.
Three fixes, in order of effort:
- Angle away from the light. Position the camera so the bright road or sky is behind the camera, not behind the visitor's head. Aiming inward (as above) usually does this for free.
- Use a WDR camera. Wide Dynamic Range lets the sensor hold both the bright background and the shaded face in one exposure. For a gate that faces east or west, treat WDR as non-negotiable.
- Light the near side. A modest porch or gate light on the visitor's face — or a camera with good IR / a built-in spotlight — rescues night and dusk shots. Pair this with the wider lighting and visibility assessment.
Add a video doorbell at the door
The gate cameras own the boundary; a video doorbell owns the door. It catches the face, at eye level, of anyone who walks up to the door itself — the last few metres inside the gate that a pillar camera may not cover — and adds two-way audio so you can answer or turn away a caller from your phone whether you are inside or away. For an Indian home with deliveries, domestic help and guests arriving through the day, a doorbell camera plus the gate ID camera is a genuinely strong front-of-house pair. The full picture — wired vs battery, chime, storage — is in the doorbell cameras guide.
Mounting and setup at a glance
| What | Recommendation for the gate |
|---|---|
| ID camera height | Approx 1.8 – 2.2 m; line of sight near an adult's eye level at the gate |
| Overview camera height | Approx 3 m or more, out of reach, angled down |
| Aim | Inward toward the gate/approach — face the visitor, never the public road |
| Backlight | WDR camera + light behind the camera + a porch/gate light for night |
| Weather | IP66 or higher body; weatherproof junction box for the cable joint |
| Power / cut-through | Recorder + router on a UPS so a power cut does not blind the gate |
| Privacy | Mask any pavement, neighbour gate or window that clips the frame |
| Signage | A visible "CCTV in operation" sign at the gate |
Do this / avoid this
| Do | Avoid |
|---|---|
| Aim inward so visitors face the lens | Pointing the camera out down the public road |
| Split the job into an ID camera + an overview | Expecting one high, wide camera to also read faces |
| Keep the ID camera near eye level | Mounting the ID camera on the roof, looking down at hats |
| Use WDR and light the near side | Letting the bright street silhouette every face |
| Keep the frame on your property | Recording the neighbour's gate, door or windows |
| Add a doorbell for the door itself | Assuming the gate camera also covers the porch step |
When to bring in a professional. Choose the positions, heights and camera types yourself — then hand the mounting on the pillar or wall at height, the cable run back to the recorder, the weatherproof terminations, and any work at the mains board to a licensed installer and electrician; see the electrical hub. For a whole-plot plan that gets the gate, parking and perimeter working together, the CCTV placement planner walks you through each zone, and the parking and driveway placement guide is the natural next zone once the gate is covered.
Key takeaways
- The entrance and gate is the #1 priority zone — it catches every visitor at the moment of identification; spend your best camera here first.
- Face the visitor, not the road. Aim inward toward the gate so faces come to the lens; keep the public road and neighbours out of frame, and mask what you cannot avoid.
- Use two cameras where you can: an ID camera near eye level (approx 1.8 – 2.2 m) for faces, and a high overview (approx 3 m+, out of reach) for the whole scene.
- Beat the backlight — angle away from the bright street, use a WDR camera, and light the near side; add a video doorbell for the door itself.
- Route mounting at height, cabling and mains work to a licensed professional, and plan the rest of the plot with the placement planner and the camera placement principles guide.
References
- Digital Personal Data Protection Act, 2023 — record only your own gate, approach and property for a legitimate purpose; avoid capturing the public road, neighbours' gates and windows, and use privacy masking where the frame is unavoidable.
- Ingress Protection (IP) ratings — verify a gate camera's weatherproofing (IP66 or higher for outdoors) on the manufacturer's specification sheet before ordering.
- National Building Code of India (SP 7), Bureau of Indian Standards, and local municipal bye-laws for any structural, electrical or life-safety aspect of an install; verify the current edition via the BIS catalogue: https://www.services.bis.gov.in/
This is an educational overview, not legal advice. Mounting at height, cabling and any electrical work are qualified professional tasks — engage licensed installers and verify any standard's current status via the BIS catalogue before relying on it.
Export this guide
Related Guides — Deep-dive reading
How to Choose a CCTV Camera (2026): The Homeowner's Decision Guide for India
Cut through the spec-sheet noise and choose the right CCTV camera for each spot around an Indian home. What actually matters — sensor and low-light performance, lens and field of view, form factor, IP and IK ratings, honest smart features — and the marketing claims to ignore.
SecurityParking Security Lighting in India (2026): Lighting Basement, Stilt and Open Parking So Nothing Hides in the Dark
How to light apartment and commercial parking so vehicles, people and number plates are clearly seen, cameras can actually read the scene, and the space stops being a soft spot for theft and lurking, without ever compromising the emergency lighting on the escape route.
SecurityPublic Footpath Camera Restrictions in India (2026): Your Camera, the Public's Street
You can put a camera on your own gate, but the footpath and road outside are public space full of people who never agreed to be filmed. Here is how to point your camera fairly, capture the least public space you need, and stay a good neighbour.
SecurityRelated Tools — Try Free
CCTV Blind-Spot Checker
The dead zone under a wall- or pole-mounted camera, from mounting height, downward tilt and vertical field of view.
Blind SpotCCTV Placement Compliance Checker
A quick DPDP-grounded privacy and safety self-check for where a camera is pointed — flags the items to fix.
ComplianceSecurity Backup Power Calculator
Size a UPS/inverter and battery to keep CCTV, NVR, router and alarm running through a power cut — load, Ah, VA and cost.
Backup Power