
CCTV Coverage Planning in India (2026): Think in Coverage, Not Cameras
Plan a home CCTV scheme by the coverage it produces, not the number of cameras you buy: map choke points, overlap so every camera is watched by another, keep entry-to-exit continuity, and set the pixels-per-metre each zone actually needs.
Most people plan a home CCTV system by asking the wrong question: how many cameras do I need? That number is an output, not an input. Buy four cameras and scatter them one-per-wall and you can still end up with a system that watches a lot of empty ground, misses the one path an intruder actually walks, and gives you a blurry shape instead of a face at the moment that matters.
CCTV coverage planning flips it. You start from the coverage you want — which patches of ground must be seen, at what level of detail, with no gap between them — and let the camera count, type and lens fall out of that. This is the master planning discipline in Studio Matrx's CCTV hub. It sits alongside installation planning (the full survey-to-quote process) and camera placement principles (the universal positioning rules); this guide is specifically about thinking in coverage.
Scope & safety. This guide helps you plan and decide. Mounting at height, structured cabling and any mains-electrical work belong to licensed professionals — you produce the coverage plan, they install it. Cameras belong only on your own property and shared areas: never bathrooms, bedrooms or changing areas, never aimed into a neighbour's home, windows or the public street beyond your legitimate boundary. Use privacy masking where a view unavoidably clips a neighbour, position in the spirit of the Digital Personal Data Protection Act, 2023, and treat clear signage as a duty, not an afterthought. This is educational guidance, not legal advice.
Coverage, not cameras: the mindset shift
A camera is not coverage. Coverage is the area of ground, at a usable detail level, that is actually on somebody's recording. Two systems with the same four cameras can produce wildly different coverage depending on where they point and how much they overlap.
So plan in three layers, in this order:
1. What must be covered — the choke points and assets, ranked by priority.
2. At what detail — the pixels-per-metre each zone needs (DORI, below).
3. How the coverage joins up — overlap and entry-to-exit continuity so there are no seams.
Only after those three do you count cameras and pick lenses. Do it the other way round — buy a kit, then find spots for the cameras — and gaps are guaranteed.
Start with choke points, not walls
An intruder does not float over your plot; they move through it along a small number of routes. A boundary wall is long, but the ways through it are few: the main gate, a side gate, the spot where the wall is lowest or a tree overhangs it, the point where the compound meets a neighbour's. These pinch points — choke points — are where every path narrows, and a camera on a choke point earns far more than one staring at open lawn.
List your choke points first:
- The main gate — everyone entering passes here; the highest-value single view on most plots.
- Any secondary access — side gate, service gate, back door, terrace stair, the low stretch of wall.
- The path from each entry to each door — the funnel a mover has to follow.
- Where valuables live — the car in the porch, the two-wheeler, the main door, a shop shutter.
Cover the choke points to a good detail level before you spend a camera on a wide "nice to have" garden view. A plan that owns the gate, the porch and the front door completely beats one that thinly covers everything and reads nothing.
Overlap so every camera watches another
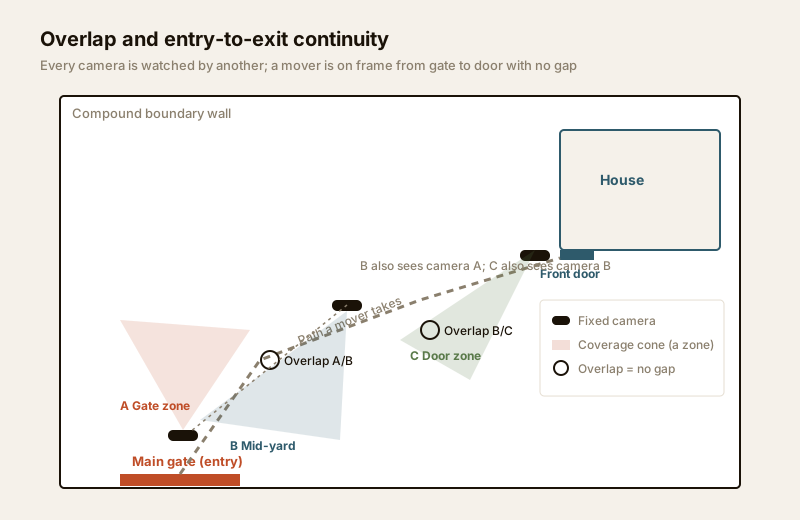
The single most valuable habit in coverage planning: make coverage cones overlap so each camera falls within another camera's view. This does two jobs at once.
- No seams. Where one camera's cone ends, the next begins — a mover crossing from zone A to zone B is never off-screen in the handover. Gaps between cones are exactly where footage goes dark at the worst moment; closing them is the whole subject of the blind-spots guide.
- Cameras cover each other. If someone tries to cover, turn or tamper with camera A, they do it inside camera B's view. A lone camera can be neutralised off-screen; a camera that is itself watched cannot.
You do not need total overlap everywhere — that wastes pixels. You need overlap at the joins: the point where a mover crosses from one zone to the next, and near each camera so it is not blind to its own attacker.
Entry-to-exit continuity: follow the mover
Now join the zones into a story. Trace the route a person takes from entry to exit — gate, up the drive, across the yard, onto the porch, to the front door — and check that they are on some camera at every step of that route. This is continuity: an unbroken chain of coverage along the path that matters, not four disconnected islands.
Continuity is what turns clips into evidence. A single frame of a stranger at your gate tells you little; a continuous track of that person from the gate, across the yard, to the door, and back out with your two-wheeler is a complete account. Plan the chain, not the snapshots.
A quick way to test continuity on paper: draw the entry-to-exit path as a line, then shade the stretch each camera covers. Any un-shaded segment is a break in the chain — fix it by widening a cone, re-aiming, or adding one camera exactly there.
DORI: give each zone the pixels-per-metre it needs
Coverage is not just seen — it is seen well enough for the job. The industry shorthand is DORI: the four detail levels a scene can give you, each defined by roughly how many pixels land on a person per metre of scene width (pixels-per-metre, px/m). More px/m means more detail but a narrower view; fewer px/m means a wider view but less to read.
| DORI level | What you get | Rough pixels-per-metre | Best-fit zone |
|---|---|---|---|
| Detect | Something/someone is present | ~25 px/m | Far boundary, large yard |
| Observe | Clothing, direction, behaviour | ~62 px/m | Mid-yard, driveway approach |
| Recognise | A person you already know | ~125 px/m | Porch, inner gate, parking |
| Identify | A stranger, court-grade detail | ~250 px/m | Main gate, front door, shutter |
The planning move is to assign a DORI target to each zone, then choose the camera and lens that hit it at the distance involved. Aim for Identify at the pinch points — the gate and the front door, where you most need a usable face — and settle for Detect or Observe on the wide, low-value edges. A single 4MP camera trying to both watch the whole yard and identify a face at the gate will do neither; two cameras, each with its own DORI job, will.
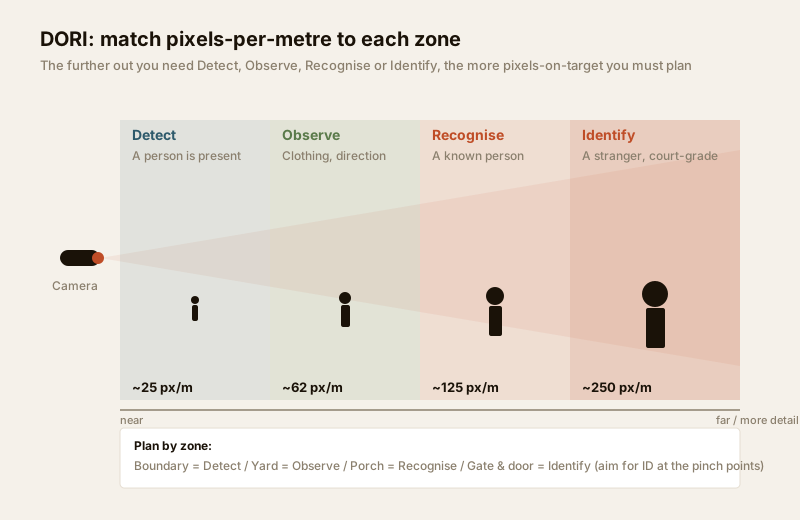
Resolution alone does not decide this — a high-megapixel camera spread over a wide angle still starves the far edge of pixels. It is resolution and field of view together that set px/m at a given distance. For the resolution half of that equation, see the CCTV resolution guide; for how sharp the image actually renders, the image-quality guide.
Count vs field of view: the core trade-off
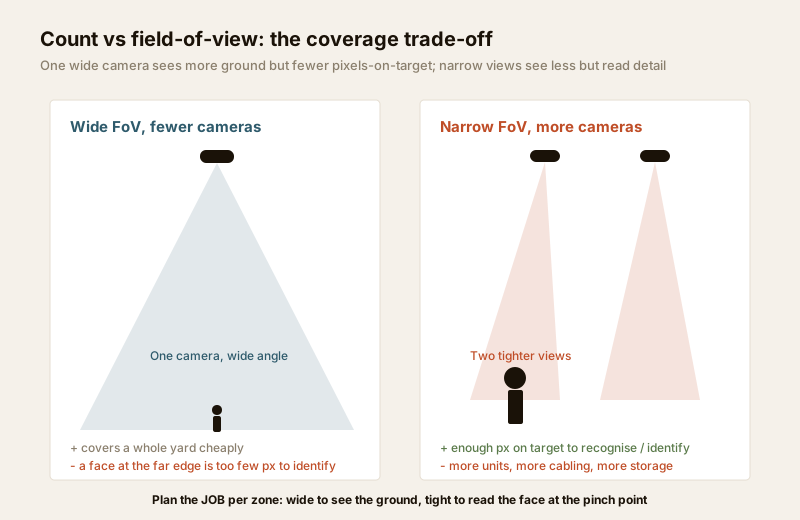
Every zone forces one decision: wide field of view with fewer cameras, or narrow field of view with more.
- Wide FoV, fewer cameras. One camera sweeps a big area — cheap, less cabling, fewer recorder channels. But the pixels spread thin, so detail at the edges drops to Detect-only. Good for situational coverage of open ground.
- Narrow FoV, more cameras. Tighter views concentrate pixels on target, so you get Recognise or Identify — at the cost of more units, cabling and storage. Right for the pinch points where a face must be readable.
Neither is "correct"; you mix them per zone by the DORI target. Wide to see the ground, tight to read the face where it counts. A varifocal lens lets you dial the exact field of view on site, which is why it is worth the extra cost at the one or two zones where getting px/m right is critical.
Turn the trade-off into numbers before you buy. The CCTV camera coverage calculator shows how many cameras a given area needs at a chosen detail level, and the CCTV lens field-of-view calculator tells you the angle and px/m a given lens produces at a given distance — so you can size the lens to the DORI target instead of guessing.
A coverage-planning worksheet
Walk the plot once with this table in hand. Fill a row per zone; the camera count writes itself.
| Zone / choke point | Priority | DORI target | Distance | FoV choice | Overlaps with |
|---|---|---|---|---|---|
| Main gate | Highest | Identify | Short | Narrow / varifocal | Driveway cam |
| Driveway / approach | High | Observe | Medium | Medium | Gate + porch cam |
| Front door / porch | Highest | Identify | Short | Narrow | Driveway cam |
| Car / two-wheeler park | High | Recognise | Medium | Medium | Porch cam |
| Side gate / low wall | Medium | Recognise | Short | Medium | Yard cam |
| Rear yard / garden edge | Low | Detect | Long | Wide | (situational) |
Then sanity-check the whole plan against these do / avoid rules.
| Do | Avoid |
|---|---|
| Cover choke points to Identify first | Spreading cameras evenly "one per wall" |
| Overlap cones at every join | Leaving a dark seam between two cones |
| Trace entry-to-exit continuity on a sketch | Four disconnected island views |
| Aim tight lenses where a face must read | One wide camera doing every job |
| Keep each camera inside another camera view | A lone camera no one else watches |
| Mask any unavoidable neighbour / street sliver | Aiming across the boundary into others' homes |
India-specific coverage realities
A coverage plan drawn on graph paper meets the messier realities of an Indian plot and climate:
- Backlight and glare. A gate camera facing the low morning or evening sun is a silhouette, not an Identify shot. Plan the aim across the light, not into it — coverage that washes out at 6 pm is not coverage.
- Monsoon and dust. Rain streaks and dust on the housing quietly shrink real coverage. Build a wipe-down into the plan, and prefer positions under an eave where practical.
- Power cuts. A camera whose recorder dies with the evening cut has zero coverage exactly when it is needed. Plan a UPS for the recorder and network — coverage on paper means nothing if the box is off.
- Foliage growth. A cone that is clear in summer can be half-blocked by a grown hedge by the next monsoon. Plan around mature planting, not today's.
- RWA / society approval. In a gated layout or apartment, any camera whose coverage extends into shared corridors, lifts or common areas usually needs society or RWA sign-off — clear it before you install. See the gated-communities security guide.
From coverage plan to install
The coverage plan is the brief you hand your installer — it decides positions, types and lenses. Turning it into a working system is a licensed job.
When to bring in a professional. You produce the coverage plan; a qualified installer executes it. Hand them the mounting at height, structured cabling, weatherproof terminations and recorder commissioning — and anything at the mains board is a licensed electrician's task (see the electrical hub). Security hardware must never block a window, door, fire-escape route or fire-fighting access. Once installed, walk-test the coverage on the live feed against your sketch, and close any gap you find with a second angle. For the full survey-to-quote workflow that surrounds this, use the installation-planning guide.
Key takeaways
- Plan coverage, not camera count. Camera number is an output of the coverage you decide you need — start from the ground, not the kit.
- Choke points first. Own the gate, porch and door completely before spending a camera on open lawn.
- Overlap at the joins so there are no seams and every camera falls inside another camera's view.
- Trace entry-to-exit continuity on a sketch — an unbroken chain of coverage along the path that matters turns clips into evidence.
- Set a DORI target per zone and size lens plus resolution to hit that pixels-per-metre at the distance involved; aim for Identify at the pinch points.
- Trade count against field of view per zone, and size it with the coverage calculator and lens field-of-view calculator before you buy. Hand mounting, cabling and mains work to a licensed professional.
References
- Digital Personal Data Protection Act, 2023 — plan coverage to cover only your own property and shared areas with a legitimate purpose; mask or avoid capturing neighbours' private spaces and the public street beyond your boundary.
- IEC 62676-4 (application guidelines for video surveillance systems) defines the DORI detail categories and their pixels-per-metre criteria; verify current figures against the manufacturer's specification and the standard before relying on them.
- National Building Code of India (SP 7), Bureau of Indian Standards, and local municipal bye-laws for any structural, electrical or life-safety aspect of an install; verify the current edition via the BIS catalogue: https://www.services.bis.gov.in/
This is an educational overview, not legal advice. Mounting at height, cabling and any electrical work are qualified professional tasks — engage licensed installers and verify any standard's current status via the BIS catalogue before relying on it.
Export this guide
Related Guides — Deep-dive reading
CCTV Installation Planning in India (2026): From Site Survey to a Camera Plan
The measure-twice, install-once master guide: walk your plot, list what you are protecting, sketch a plan, mark every camera position, then size power, network, permissions and budget before a single bracket is drilled.
SecurityCCTV Camera Placement in India (2026): The Principles Behind Every Good Position
The universal rules that decide whether a camera earns its keep — cover the choke points first, face the flow not a blank wall, keep the sun out of frame, mount out of reach, give each camera one job, overlap so there are no gaps, and respect your neighbours.
SecurityBlind Spot Identification for Home Security in India
A defender's method to find and close the blind spots around an Indian home — the corners no camera, light or neighbour can see. Walk it by day and after dark, map each coverage gap, and fix it by re-aiming cameras, adding light, trimming planting and opening sightlines.
SecurityRelated Tools — Try Free
CCTV Camera Coverage & Count Calculator
Estimate how many CCTV cameras you need, the NVR channels, storage in TB for your retention period, and an indicative all-in cost with GST.
CCTV CalculatorCCTV Lens & Field-of-View Calculator
Focal length, sensor and resolution to field-of-view angle, scene width and DORI detect/observe/recognise/identify distances.
Lens & FoVCCTV Camera Overlap Calculator
The overlap or blind gap between two adjacent cameras, from coverage width and spacing, plus the spacing for a target overlap.
Overlap