
CCTV Blind Spots in India (2026): Finding and Closing the Gaps in Your Coverage
How coverage gaps form on a real Indian plot, how to find your own blind spots with a walk-test and a footage review, and how to close them with overlap, a second angle, a wider lens or one more camera.
Every camera you own has a blind spot. That is not a flaw in your kit — it is geometry. A single lens sees a cone in one direction, and everything outside that cone, behind a solid object, or washed out by glare simply does not get recorded. The difference between a system that protects you and one that only looks like it does is whether you know where those gaps are and have closed the ones that matter.
This guide is the focused, defensive explainer on finding and fixing cctv blind spots in your own system, part of Studio Matrx's CCTV hub. It is strictly about auditing your coverage on your property — walking your plot, reviewing your own footage, and adding overlap so nothing important is unseen. It is not, and will never be, about probing anyone else's system. For a whole-property assessment beyond cameras — lighting, sightlines and physical vulnerabilities — pair this with the broader companion guide, blind-spot identification for security. This guide stays camera-specific.
Scope & safety. This guide helps you survey and plan. Walking your plot and reviewing footage is homeowner work; mounting cameras at height, running cabling and any mains-electrical work belong to licensed professionals. Cameras belong only on your own property and shared areas — never bathrooms, bedrooms or changing areas — and must be aimed to respect neighbours and the spirit of the Digital Personal Data Protection Act, 2023. This is educational, not legal advice.
How coverage gaps form
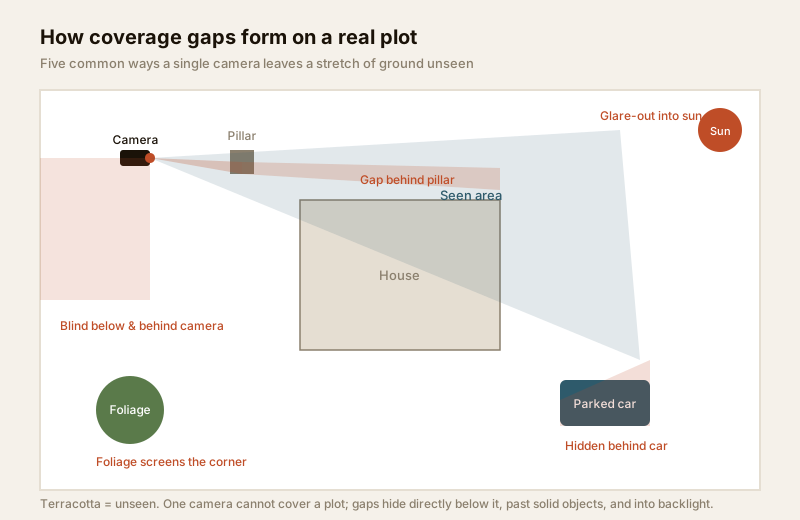
Blind spots are not random. They form in a handful of predictable ways, and once you can name them you will start spotting them on your own plot immediately.
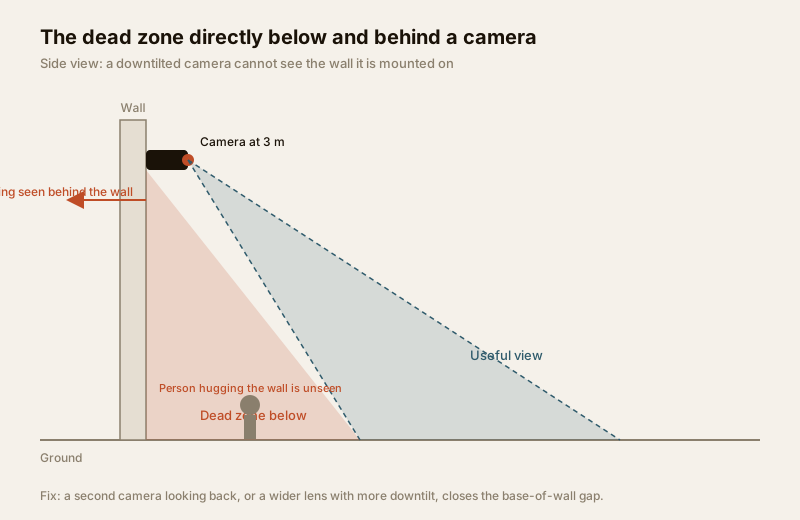
- Directly below and behind the camera. A downtilted camera sees the ground in front of it. The wall it is bolted to, and the strip of ground at the base of that wall, are dead. Someone standing flat against your compound wall, right under the camera, is often completely unseen.
- Past a solid object. A boundary pillar, a gate post, a water tank, a staircase, or a parked vehicle casts a "shadow" the camera cannot see through. On Indian plots the parked two-wheeler or car is the single most common culprit — it moves, and the gap behind it moves with it.
- Glare-outs into the sun. Aim a camera east and it is blinded at sunrise; aim it west and the evening sun washes the image to white. Backlight from a bright sky behind a subject turns a face into a black silhouette. India's harsh, low-angle sun makes this worse than most climates.
- Foliage that grows. A camera aimed cleanly over a hedge in April can be looking straight into leaves by August. Monsoon growth, a creeper on the gate, or a potted plant nudged into frame quietly eats coverage.
- Doorways and choke points just out of frame. A camera set to watch the driveway can miss the pedestrian gate beside it by a metre. The gap is small on the plan and total in reality.
The dead zone directly below a camera deserves its own picture, because it surprises people. The higher and the more steeply you tilt a camera for tamper-resistance, the larger the unseen wedge at its own base becomes.
Finding your own blind spots
You cannot fix a gap you have not found. Three methods, used together, will surface almost every blind spot on a normal home or shop.
1. Walk the property with a plan
Take a rough sketch of your plot — the same one from your installation planning survey — and mark every camera and the direction it faces. Then physically walk every route an unwelcome visitor could take: over the gate, along each boundary wall, behind the car, up the side passage, to every door and window. At each step ask a single question: would a camera see me right now? Where the answer is no, put a cross on the sketch. Those crosses are your blind spots.
2. Review your actual footage
The plan tells you where cameras should see; the recording tells you what they actually see. Open your recorder and, for each camera, watch real clips — ideally at the times of day that matter (dawn, dusk, night). Have someone walk the routes while you watch the live view. You will discover things a plan never shows: the streetlight that flares the lens at 7 pm, the neighbour's tree that fills a third of the frame, the number plate that is unreadable because the camera is too high and too far. Reviewing footage is also how you verify image quality is good enough to be useful — see the image quality guide and the resolution guide.
3. Test at every time of day
A camera that is perfect at noon can be blind at 6 am and at 6 pm. Check each view at sunrise, midday, dusk and full dark. Glare and backlight shift with the sun; IR night vision reveals a whole new set of problems, like a nearby wall washing out in IR bloom. Confirm motion detection actually triggers on the routes that matter and is not smothered by a swaying plant.
| Survey step | What you are checking | Common India finding |
|---|---|---|
| Walk every entry route | Is each door, gate and window in frame? | Pedestrian gate beside the main gate is missed |
| Stand under each camera | Is the base-of-wall dead zone exploitable? | Someone flat against the wall is unseen |
| Walk behind parked vehicles | Does the car create a moving gap? | Two-wheeler hides the side passage |
| Review footage at dawn/dusk | Glare, backlight, silhouetting | East-facing camera blinded at sunrise |
| Review footage at night | IR reach, IR bloom, dark corners | Far end of compound too dark to identify |
| Check after monsoon growth | Foliage encroaching on frame | Creeper on gate blocks the number-plate view |
Closing the gaps
Finding a blind spot gives you a choice of fixes, roughly in order of cost. Try the cheap ones first — a great many gaps close for nothing.
- Re-aim or re-tilt the camera. The commonest gap is a camera looking slightly wrong. A few degrees of pan or downtilt often recovers the doorway or the base of the wall for free. Get the geometry right with the camera height and angle guide and the mounting height and angle calculator.
- Cut the foliage. Trim the hedge, move the pot, prune the creeper. The cheapest fix of all, and one to repeat every monsoon.
- Move what casts the shadow. If a parked vehicle always sits in the same spot, park it where it does not block the camera — or camera the spot it will sit in.
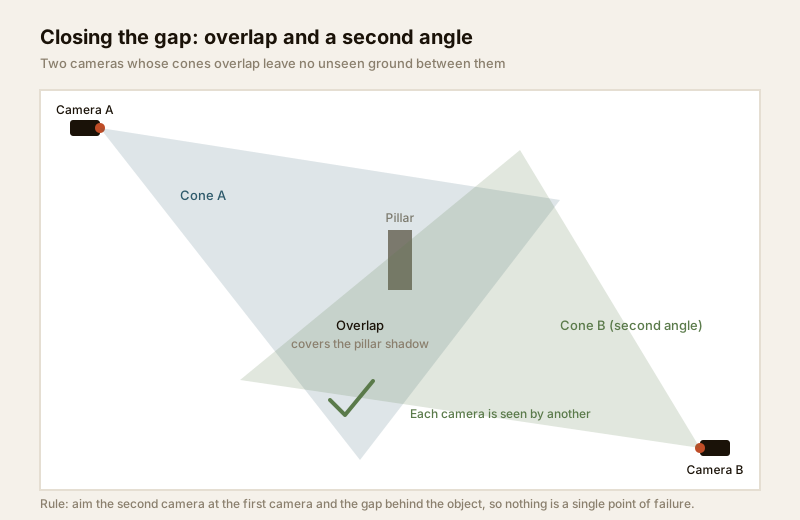
- Add overlap with a second angle. The core principle: every camera should be watched by another camera, and every solid object should be seen from two sides so its shadow is covered. Two cones that overlap leave no unseen ground between them, and neither camera can be quietly blinded without the other seeing it. This is the heart of good coverage planning.
- Widen the lens. A wider field of view (or a varifocal lens dialled wider) can swallow a small gap at the edge of frame — at the cost of detail at distance. It is a trade-off; the coverage planning guide covers the detail-versus-width balance.
- Add one more camera. When re-aiming and overlap cannot reach it, a gap simply needs its own camera. Size the addition with the camera coverage calculator and the lens field-of-view calculator.
For glare and backlight specifically, the fix is usually to re-aim across the scene rather than into the sun, choose a camera with strong wide-dynamic-range, and use the sun-shield hood — see the image quality guide. Where a camera must look toward a boundary, use privacy masking to black out any neighbour's window that falls in frame; that is both courtesy and a DPDP duty, covered in the privacy masking guide.
A blind-spot fix table
| Blind spot | First (cheap) fix | If that is not enough |
|---|---|---|
| Base of wall / directly below | Add downtilt; lower the camera slightly | Second camera looking back along the wall |
| Behind a pillar or tank | Re-aim to see past it | Second angle from the other side |
| Behind a parked vehicle | Change where the vehicle parks | Dedicated camera on the passage |
| Glare / backlight | Re-aim across, not into, the sun | WDR camera; reposition entirely |
| Foliage in frame | Trim / move the plant | Relocate the camera above growth |
| Doorway just out of frame | Pan a few degrees | Wider lens or a door-specific camera |
| Dark corner at night | Add lighting; check IR reach | Low-light or dedicated IR camera |
Adding lighting is often the highest-value fix of all, because a well-lit scene helps every camera at once — see the lighting and visibility assessment.
When to bring in a professional
Surveying, sketching and reviewing footage are yours to do — that is the point of this guide. But closing a gap frequently means new mounting, new cabling or a power feed, and those cross into professional territory:
- Working at height. Anything on a parapet, a first-floor wall or a roof edge needs proper ladder or scaffold safety — a licensed installer's job, not a homeowner on a wobbly ladder.
- Cabling and power. A new camera needs a data run and a power source; a mains feed or anything at the distribution board is a licensed electrician's work — see the electrical hub.
- Never block egress. No camera, bracket or cable run may obstruct a door, window, staircase or fire-fighting access. Life safety outranks the camera every time.
Do the survey, mark the gaps, decide the fixes — then hand the mounting, cabling and commissioning to a qualified installer.
Key takeaways
- Every camera has a blind spot — behind and directly below it, past pillars and parked vehicles, in glare, and where foliage grows. This is geometry, not a fault.
- Find your own gaps three ways: walk the plot with a plan, review your actual footage, and test at dawn, dusk and night. Never probe anyone else's system.
- Close gaps cheapest-first: re-aim, trim foliage, move the shadow-caster — then add overlap and a second angle so every camera is watched by another.
- A wider lens or one more camera is the answer only when re-aiming and overlap cannot reach the gap; size it with the coverage calculator.
- Pair this with the broader blind-spot identification guide, get the geometry right with the camera placement principles, and route mounting, cabling and mains work to a licensed professional.
References
- Digital Personal Data Protection Act, 2023 — audit coverage so cameras record only your own property and shared areas; use privacy masking to avoid capturing neighbours' private spaces.
- DORI (Detect, Observe, Recognise, Identify) coverage principles — verify that a "covered" zone actually delivers usable detail, not just presence, on the manufacturer's field-of-view charts.
- National Building Code of India (SP 7), Bureau of Indian Standards, and local municipal bye-laws for any structural, electrical or life-safety aspect of an install; verify the current edition via the BIS catalogue: https://www.services.bis.gov.in/
This is an educational overview. Surveying and footage review are homeowner tasks; mounting at height, cabling and any electrical work are qualified professional jobs — engage licensed installers and verify any standard's current status via the BIS catalogue before relying on it.
Export this guide
Related Guides — Deep-dive reading
Home Lighting and Visibility Security Assessment for Indian Homes
How to assess your home's security lighting after dark — checking every entry, path and boundary for coverage, uniformity and glare, testing what each camera can actually see at night, and turning the findings into a simple lighting plan.
SecurityBlind Spot Identification for Home Security in India
A defender's method to find and close the blind spots around an Indian home — the corners no camera, light or neighbour can see. Walk it by day and after dark, map each coverage gap, and fix it by re-aiming cameras, adding light, trimming planting and opening sightlines.
SecurityParking Security Lighting in India (2026): Lighting Basement, Stilt and Open Parking So Nothing Hides in the Dark
How to light apartment and commercial parking so vehicles, people and number plates are clearly seen, cameras can actually read the scene, and the space stops being a soft spot for theft and lurking, without ever compromising the emergency lighting on the escape route.
SecurityRelated Tools — Try Free
CCTV Mounting Height & Angle Calculator
Height, target distance and lens angle to the downward tilt, the blind dead-zone below and where coverage begins and ends.
Height & AngleCCTV Blind-Spot Checker
The dead zone under a wall- or pole-mounted camera, from mounting height, downward tilt and vertical field of view.
Blind SpotCCTV Identification-Distance Calculator
How far a camera can still identify a face or number plate (DORI 250 px/m), from resolution, lens and sensor.
Identify Distance