
CCTV-Compatible Lighting for Indian Homes (2026): How to Light a Scene So the Camera Actually Sees It
The bridge between your lighting and your cameras — why a scene that looks fine to your eye can still be useless footage, and how uniformity, no light in the lens, the right white and flicker-free drivers make the difference.
You spent good money on cameras. You added a bright floodlight so they would see at night. Then the theft happened, you pulled up the recording, and the figure at your gate was a black silhouette against a white glare — unidentifiable. The light you bought to help the camera was pointing straight into it. This is the single most common security-lighting mistake in India, and it comes from a simple misunderstanding: a scene that looks perfectly clear to your eye can still be useless footage. Your eye and your camera do not see the same way, and lighting designed for one can actively blind the other.
CCTV-compatible lighting is the discipline of lighting a scene so the camera — not just the human standing in it — records something you can actually use: a face you can describe, a number plate you can read, a sequence of events you can follow. It sits between two libraries on Studio Matrx. The security lighting design guide is the whole plan for lighting your property; the camera-hardware guides — low-light CCTV cameras and CCTV low-light performance — are about what the camera's own sensor can do in the dark. This guide is the bridge: how to light the scene so a camera sees well. Get the two designed together and the whole system works; design them apart and you get expensive cameras staring at footage nobody can use.
Scope & safety. You plan, choose and coordinate here — how even the light is, which way the fixtures point relative to the camera, what white the lamp is, whether the drivers are flicker-free, and that the whole thing survives a power cut. A licensed electrician installs the mains wiring, circuits and any fixture mounted at height, to the wiring rules. This guidance is strictly defensive: how to make your own cameras see your own property, never how to defeat anyone else's system. Never let a light or its wiring block an escape route, an exit door or a stair egress. Treat any lux, wattage or colour-temperature figure as something a lighting designer sets to the applicable code — verify every standard's current edition and your local municipal bye-laws before relying on it. Educational guidance, not legal or engineering advice.
The camera and the eye want different things
The reason good-looking scenes make bad footage is that your eye is a far better instrument than any home camera, in two specific ways.
Dynamic range. Your eye handles a huge span of brightness in one glance — you can look at a shaded doorway and a bright wall beside it and read detail in both at once, because your eye and brain constantly adjust across the frame. A camera cannot. It sets one exposure for the whole scene. If part of the frame is very bright and part is very dark, the camera must choose: expose for the bright part and the shadows go pure black (detail blocked up), or expose for the dark part and the bright part goes pure white (detail blown out). Either way, information is gone — and it is gone in the recording forever, unlike your eye which simply re-adjusts. The narrower the camera, the more a scene of extreme contrast defeats it.
Adaptation and glare. Your eye squints, shifts and recovers from a bright light in the field of view. A camera just takes the hit: a lamp shining toward the lens throws flare across the image, drops an automatic iris, and silhouettes everything in front of it. What your eye shrugs off, the camera cannot.
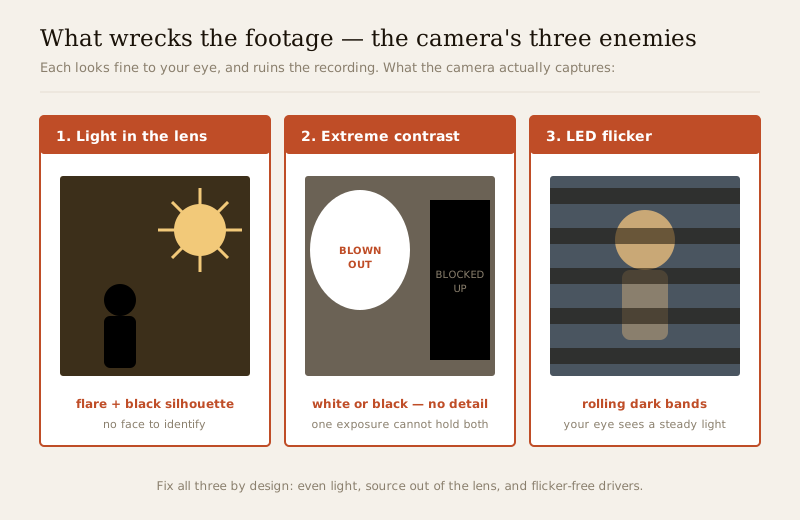
So the goal of CCTV-compatible lighting is not more light. It is light arranged the way the camera needs it: even, in front of the subject, out of the lens, the right colour, and steady. Take those one at a time.
Uniformity: even light beats bright-and-patchy
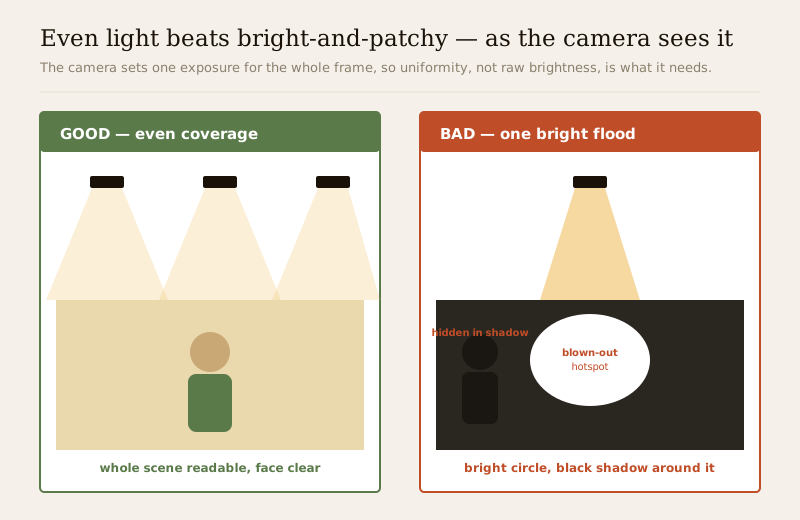
Because the camera has to pick one exposure for the whole frame, the enemy is contrast within the frame, not darkness as such. A moderately lit scene that is even all over gives the camera a single exposure that works everywhere. A scene with one blazing pool of floodlight next to deep unlit shadow forces the camera to blow out the pool or block up the shadow — and an intruder simply stands in the dark patch the bright light created.
This is the counter-intuitive heart of it: a single powerful floodlight often makes footage worse, not better. It lights one bright circle and, by contrast, deepens every shadow around it — and the human iris and the camera iris both close down against the hotspot, so the surrounding dark reads even darker. Several modest, well-spread fixtures that wash the whole approach evenly beat one bright lamp every time, for the camera above all. Aim for gentle, overlapping coverage with no hotspots and no black gaps — the uniformity the National Lighting Code frames as a design target, set by a lighting designer to the scene. The companion subject — keeping that light from dazzling anyone, including the camera — is worked through in full in the glare-free security lighting guide; read the two together, because uniformity and glare control are the same job from two sides.
No light in the lens: the commonest, costliest mistake
If you fix only one thing, fix this. No light source should be visible to the camera, and no light should shine toward it. A lamp in or near the frame — your own floodlight opposite the camera, a bright bulkhead beside it, a decorative light behind the subject — does three destructive things at once: it throws flare and haze across the whole image; it drives the camera's automatic exposure down to cope with the bright source, so everything else goes dark; and it puts the subject in silhouette, a black outline you can never turn into a face.
The classic Indian version is the floodlight mounted to light the gate that ends up pointing back at the camera watching the gate — the very fixture bought to help the camera is the thing blinding it. Backlight is the enemy. Never place a light behind what you want to see, from the camera's point of view; the subject must be lit from the camera's side, with the light source itself out of frame and shielded so its glare never reaches the lens. This is the same shielding discipline as the glare-free guide — a cut-off, shielded fixture that puts light on the ground and not into eyes or lenses is exactly what the camera wants too.
Placement: light what the camera watches, from beside or above it
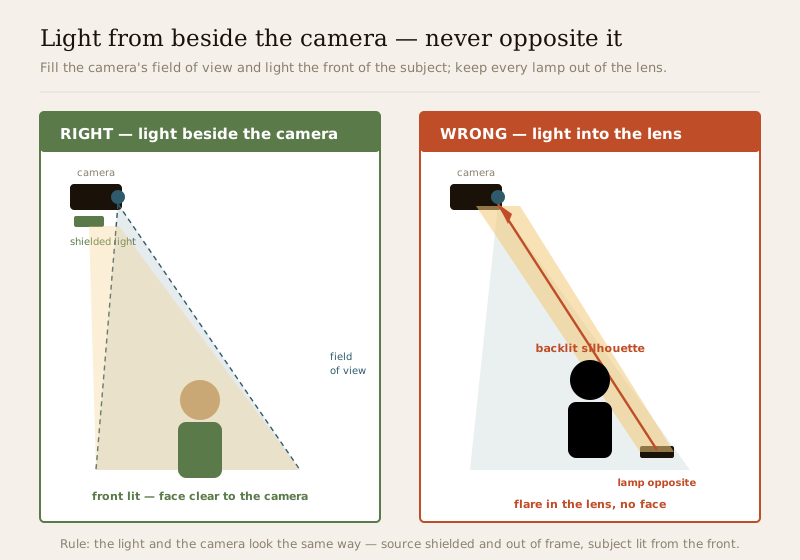
Uniformity and no-glare come together in one placement rule: light the scene the camera is watching, with the light coming from beside or above the camera — never from opposite it, into the lens.
Picture the camera's field of view as a cone reaching out to the gate or driveway. You want that cone filled with even light, and you want the light to fall on the front of anyone in it — the face, the plate, the hands — as the camera sees them. That means the fixtures sit roughly with the camera or above and to the side, pouring light down the same direction the camera looks, so faces are lit and the lamp stays behind or beside the lens, out of shot. A light on the far side, facing the camera, does the opposite: it backlights the subject and dazzles the lens.
A few working consequences of the rule:
- Design the light and the camera together, on one drawing — not the camera first and a floodlight bolted on later. The perimeter CCTV and outdoor CCTV guides plan the camera side; bring the lighting to the same plan.
- Fill the whole field of view, not a spot in the middle of it. A pool of light in the centre of a wide FoV leaves the edges — where someone enters — unlit.
- Watch what the light bounces off. A white wall, a car bonnet or a wet floor right in front of the camera can bounce a bright fixture straight into the lens even when the lamp itself is out of frame.
Colour: neutral white reads best, blue-heavy reads harshly
For a colour camera to record colour you can describe — a red shirt, a blue car, a skin tone — the light has to contain those colours to begin with. Two qualities matter, and both can be handled without any fabricated number.
Colour temperature (the warmth or coolness of the white). A warm-to-neutral white generally reads most naturally to a colour camera and is kinder to faces and skin tones, which matters when the whole point is describing a person. Avoid very cool, blue-heavy light, which many cameras render harshly — a cold, slightly unnatural cast that flattens skin tones and can make colours read wrong. Neutral white is the safe middle for security cameras; treat the exact figure as something a lighting designer sets, not a number to chase off a box.
Colour rendering (how truthfully the lamp shows colours). A lamp with poor colour rendering can make a maroon car look brown or a green shirt look grey — and a witness statement or a description to the police lives or dies on getting that right. Choose lamps that render colour faithfully rather than the cheapest bulb on the shelf. Again, treat the specific rendering figure as a designer's specification, not a marketing claim — the point you can act on is qualitative: warm-to-neutral, faithful colour, no harsh blue cast. The broader treatment of colour temperature and rendering lives in the architectural lighting design guide; for security, remember only that the camera and the eyewitness both want honest, neutral-to-warm colour.
Day/night mode: the camera goes monochrome in the dark
Here is the reality that reshapes everything above once the sun is down. Most CCTV cameras switch to a night mode in low light — they drop colour and record in black-and-white (monochrome), and many switch on infra-red (IR) illumination the human eye cannot see, so the camera lights its own scene invisibly. In this mode your careful colour work stops mattering: the camera is no longer recording colour at all.
That changes the job in two ways:
- At night, colour description is off the table — you are recording shapes, movement, plates and monochrome detail. Even coverage and no-glare matter more, not less, because now the whole value is a clean, evenly-lit monochrome frame.
- How you illuminate the dark scene — the camera's own IR versus white light you add — is a real decision with real trade-offs (IR is invisible but flat and range-limited; added white light deters and keeps colour but is visible and can glare). That decision is its own subject: the low-light camera illumination guide works through IR-versus-white-light in full, and the low-light CCTV camera and CCTV low-light performance guides cover what the sensor itself can do. This guide's job is only to make sure that whatever light is on the scene — yours or the camera's IR — is even, in front of the subject and out of the lens.
One practical link to the switching design: a camera left staring at a black yard until a motion light snaps on is caught mid-adjustment for the crucial first second. A low steady base from dusk-to-dawn lighting, lifted by a motion boost, gives the camera a stable scene to expose for all night — camera-compatible lighting and camera-compatible switching are the same goal.
Flicker: why cheap LED drivers put bands across your footage
A problem that catches people out because the eye never sees it: some cheap LED lamps flicker. The light pulses on and off faster than your eye can notice — but a camera samples the scene many times a second, and when the lamp's flicker and the camera's sampling do not line up, the recording shows rolling dark bands sliding across the frame, or a shimmer that ruins detail exactly when you need it. Your eye sees a steady light; the camera sees a strobe.
The cause is almost always the lamp's driver — the cheap electronics that feed the LED. The fix is a design choice at purchase: specify flicker-free (well-regulated, constant-current) drivers for any fixture a camera will watch. It costs a little more and it is invisible until you see the footage, so it is easy to skimp on — and it is one of the frustrating faults where the light looks perfect to you and the camera quietly records banding every night. If existing footage shows bands, suspect the driver of a nearby lamp before you blame the camera.
| The problem | How your eye sees it | How the camera sees it | The fix |
|---|---|---|---|
| Extreme contrast | Reads both bright and dark fine | Blows out the bright or blocks up the dark | Even, uniform light — no hotspots |
| Light in the lens | Squints, shrugs it off | Flare, dark exposure, silhouette | Light from the camera's side, source out of frame |
| Blue-heavy white | Looks a bit cold | Harsh cast, wrong colours | Warm-to-neutral white, faithful rendering |
| Flickering LED | Sees a steady light | Rolling dark bands across footage | Flicker-free, well-regulated drivers |
| Darkness at night | Adapts, sees shapes | Grain, noise, or nothing | Even base light or the camera's IR |
WDR and backlight compensation help — but do not replace good lighting
Cameras have features built to fight exactly these problems. Wide Dynamic Range (WDR) helps a camera cope with a scene that has both bright and dark areas, pulling some detail back into both. Backlight compensation (BLC) and highlight suppression try to stop a bright source from silhouetting the subject. Good cameras with strong WDR genuinely help in a difficult scene.
But be clear about what they are: damage control, not a substitute for lighting the scene right. WDR can rescue some detail from a high-contrast frame; it cannot invent a face that a floodlight blew to pure white or a shadow swallowed to pure black. Backlight compensation can lift a mildly backlit subject; it cannot turn a hard silhouette into an identifiable person. The camera feature is the seatbelt, not the reason to drive badly. Get the lighting even and out of the lens first, and let WDR handle the residue — not the other way round. Relying on WDR to fix a fundamentally badly-lit scene is how people end up with expensive cameras and unusable recordings.
The scenes that matter most: the gate, the plate and the face
Not every square metre needs camera-grade light. Concentrate the effort where identification actually happens:
- The entry / gate scene, where you want to read a number plate and see a face. Plates and faces have exacting light needs — even, front-lit, glare-free, at the right level — and a plate under headlight glare or a face in gate-shadow is the classic failure. The dedicated lighting for facial identification guide works through getting a usable face; treat the gate as the priority scene where CCTV-compatible lighting earns its keep.
- The approach the camera covers, evenly lit so movement is clear from the edge of the frame inward.
- Choke points — the one path to the door, the stair, the parking entry — over the open areas nobody has to cross.
The mistake is to light the middle of a wide view brightly and leave the entry edges — where someone actually crosses the boundary — dark. Light where the action enters the frame, not where it is most convenient to mount a lamp.
Power-cut backup: do not leave the camera in the dark
The sharpest India-specific point undoes all of the above if ignored. Light wired mains-only goes dark in a power cut — and often the camera and recorder die in the same instant. A grid failure, or one arranged by someone who does not want to be recorded, takes the scene light, the camera and the router together, and the footage you designed so carefully simply is not captured. A camera in the dark records nothing; a lit scene with a dead recorder catches nothing.
Plan for the outage:
- Put the security base light and the cameras on the same backed-up circuit — an inverter or UPS sized to hold the low base and the cameras through a typical cut. A low, even base is easy to back up precisely because it is low-wattage.
- Confirm the recorder and the network are backed up too, not just the camera — all three have to survive together.
- Honestly-sized solar can keep a boundary base independent of the grid, provided it is sized for the worst month, not the best — the dusk-to-dawn and pillar guides cover this.
The egress side of a power failure — keeping an escape route visible during an outage or evacuation — is a separate life-safety subject that belongs to the emergency lighting guide and must never be conflated with, or obstructed by, the security lighting here.
Bringing in the professionals
Own the decisions on this page — that the light is even, out of the lens, the right white, flicker-free, and backed up — and hand over the qualified craft:
- A licensed electrician for all mains wiring, circuits, load and earthing, weatherproofing, the inverter tie-in and any fixture at height — route it through the electrical hub. Outdoor security wiring is not DIY.
- A lighting designer to set the actual illuminance, uniformity, colour temperature and glare control to the code, and to specify flicker-free drivers and shielded optics.
- A security integrator to design the lighting and the perimeter CCTV / outdoor CCTV on one drawing, so the light the camera needs and the camera itself are planned together.
To find where your own plot goes dark, where a camera is fighting glare, and where camera-grade light would matter most, run the home security risk scorecard tool.
Key takeaways
- A scene that looks fine to your eye can be useless footage. The camera has far narrower dynamic range and no adaptation — it sets one exposure and takes glare head-on. Light for the camera, not for your eye standing in the scene.
- Even beats bright. A single powerful floodlight blows out its own pool and deepens every shadow around it; several modest fixtures washing the scene evenly give the camera one exposure that works everywhere.
- No light in the lens — the commonest, costliest mistake. Never backlight the subject or point a fixture at the camera; light from the camera's side, source shielded and out of frame, or you record silhouettes and flare.
- Neutral-to-warm white, faithful colour, flicker-free drivers. Blue-heavy light renders harshly; poor colour rendering wrecks a description; cheap LED drivers put dark bands across footage the eye never sees. At night the camera goes monochrome and IR anyway — so uniformity matters even more.
- WDR helps but does not replace good lighting, and mains-only light dies in a power cut. Get the scene lit right first and let camera features handle the residue; put the base light and the cameras on backup so they are not blind exactly when it matters.
Where to go next
- The camera side — low-light CCTV cameras and CCTV low-light performance (what the sensor can do), and low-light camera illumination (IR versus white light).
- The scene you must get right — lighting for facial identification at the gate.
- The two sides of the same job — glare-free security lighting and the security lighting design guide.
- The switching pair — dusk-to-dawn for the steady base and motion-activated security lighting for the boost.
- The wider picture — the boundary lighting spoke, the lighting sub-hub, the security hub, and the home security risk scorecard tool.
References
- SP 72 : 2025 — National Lighting Code of India (Bureau of Indian Standards) — the primary reference for illuminance, uniformity and glare control across indoor and outdoor lighting; treat the actual levels, colour temperature and uniformity targets for camera scenes as figures a qualified lighting designer sets to this code. Verify the current edition via the BIS catalogue: https://www.services.bis.gov.in/
- IS 3646 (Part 1) : 2025 — Code of Practice for Interior Illumination (Bureau of Indian Standards) — for lobbies, corridors and covered entries where amenity and camera lighting overlap. Verify current status; do not rely on the withdrawn Parts 2 and 3.
- National Building Code of India, SP 7 : 2026, Part 8 Section 1 (Lighting & Ventilation) — for the lighting and electrical provisions of the building and its services, read with local municipal bye-laws and any light-nuisance provisions. Verify the current edition via the BIS catalogue: https://www.services.bis.gov.in/
- Digital Personal Data Protection Act, 2023 — footage of people, and of a neighbouring property or public road that camera-friendly lighting helps you record, is personal data; agree access, storage and privacy handling, and keep credentials private.
This is an educational overview, not legal or engineering advice. It is strictly about lighting your own property so your own cameras can see it defensively, never about defeating any security measure. Mains wiring, inverter tie-ins and any fixture mounted at height are qualified professional tasks — engage a licensed electrician and a lighting designer, never block an egress route, and verify any standard's current edition via the BIS catalogue before relying on it.
Export this guide
Related Guides — Deep-dive reading
Parking Security Lighting in India (2026): Lighting Basement, Stilt and Open Parking So Nothing Hides in the Dark
How to light apartment and commercial parking so vehicles, people and number plates are clearly seen, cameras can actually read the scene, and the space stops being a soft spot for theft and lurking, without ever compromising the emergency lighting on the escape route.
SecuritySecurity Lighting in India (2026): Lighting the Boundary Without Dazzling the Camera or the Neighbour
How to use light as a security layer that deters intruders and lets your cameras see, done well with uniform shielded downlight, no glare, no neighbour trespass and a power-cut backup.
SecurityStaircase and Corridor Security Lighting in India (2026): Even Light, No Dark Half-Landings, Never Switched Off Mid-Flight
How to light the shared stairs, lobbies, corridors and passages of an apartment building so they are safe to move through and never a place someone can wait unseen, without ever compromising the code emergency lighting on the escape stair.
SecurityRelated Tools — Try Free
CCTV Camera Coverage & Count Calculator
Estimate how many CCTV cameras you need, the NVR channels, storage in TB for your retention period, and an indicative all-in cost with GST.
CCTV CalculatorCCTV Camera Overlap Calculator
The overlap or blind gap between two adjacent cameras, from coverage width and spacing, plus the spacing for a target overlap.
OverlapSecurity Backup Power Calculator
Size a UPS/inverter and battery to keep CCTV, NVR, router and alarm running through a power cut — load, Ah, VA and cost.
Backup Power