
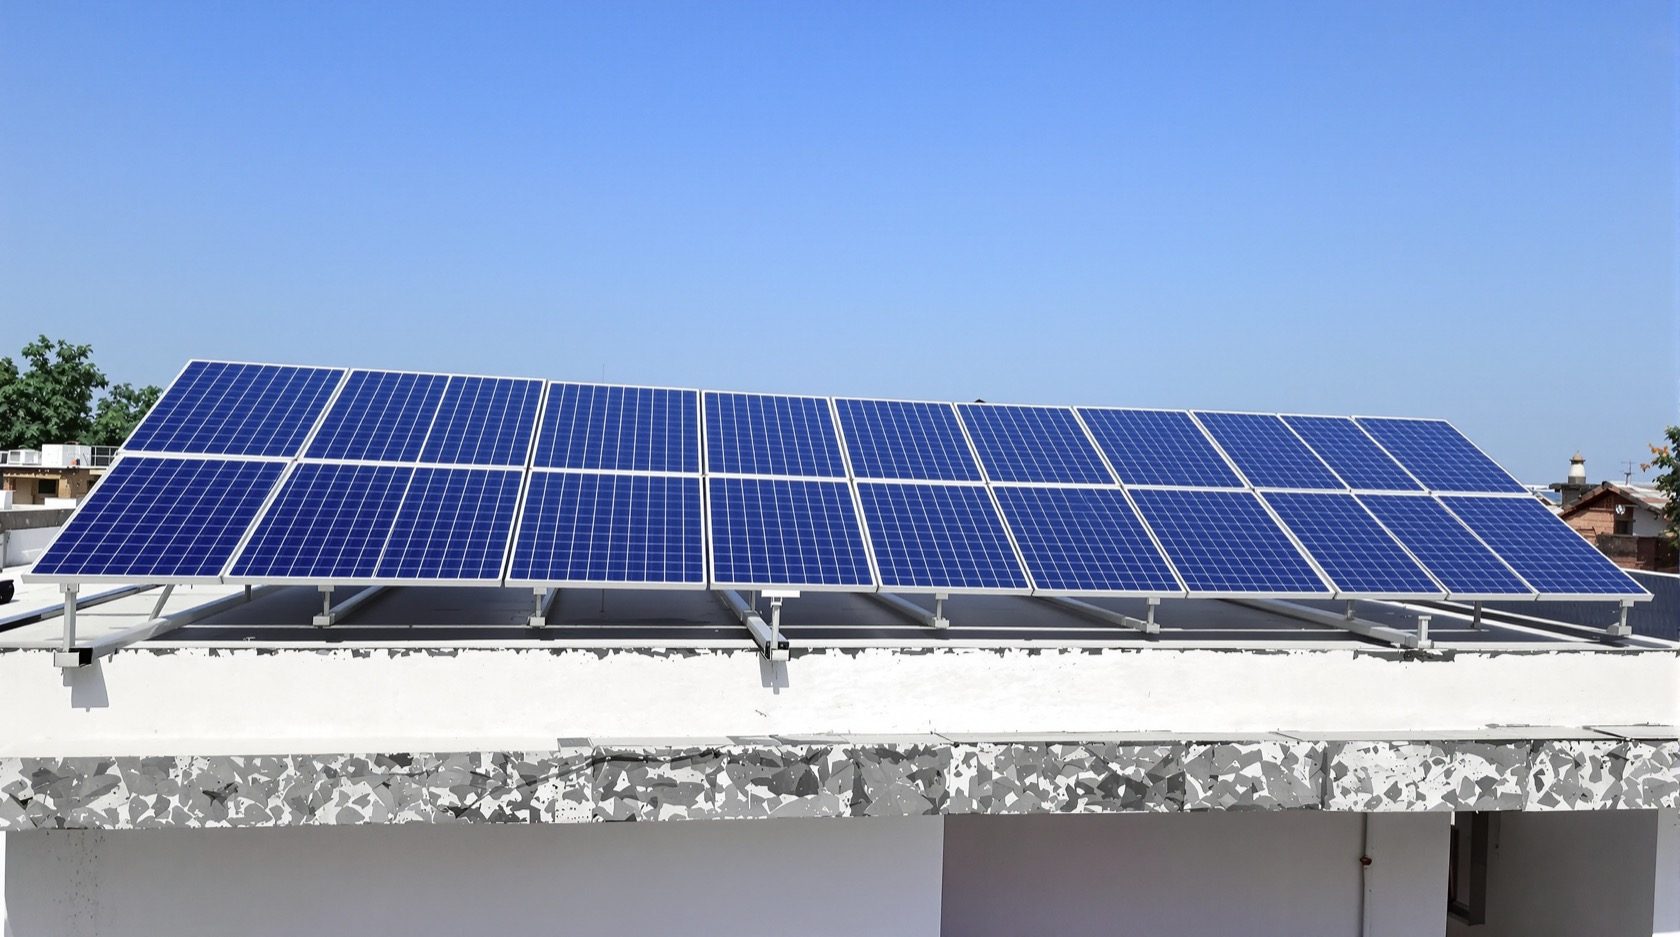
The Solar Roof Guide
Putting rooftop solar on an Indian home, made clear — the system types (grid-connected, off-grid and hybrid, plus BIPV and solar tiles), how to judge whether your roof is ready (area, orientation, tilt, shading, structure and age), how panels are mounted and waterproofed, the electrical and fire-safety essentials, cleaning and access, indicative cost and payback, and the permissions, net-metering and subsidy path. Plain language, India-grounded.
A generation ago, solar panels on a house were a curiosity. Today they are mainstream: prices have fallen far, the grid buys back what you do not use, and a well-placed Indian roof soaks up some of the best sunlight in the world. Rooftop solar has quietly become one of the most sensible things you can put on a roof — a plant that pays you back for twenty-five years. But it is also an electrical installation bolted onto your waterproofing, and getting either part wrong turns an asset into a headache.
This is the rooftop-solar deep-dive of the Roofing Knowledge Hub and a companion to The Ultimate Guide to Roofing Systems, which flags a modern roof as a power station as much as a shelter. It explains the three system types and where BIPV and solar tiles fit; how to judge whether your roof is actually ready — area, orientation, tilt, shading, structure and, crucially, its age; how panels are mounted and, above all, how the mounts are waterproofed; the electrical, earthing and fire-safety essentials; cleaning and safe access; indicative cost, savings and payback; and the part that trips everyone up — the permissions, net-metering and subsidy path. It will not teach you to wire an inverter or work at the roof edge; that is licensed work. But it will let you understand, plan, choose and judge a rooftop-solar project with confidence.
Scope & safety. This guide helps you understand and specify rooftop solar. Sizing the array, designing the mounting and its structural load, waterproofing every roof penetration, and all electrical wiring, earthing, DC work and any working-at-height are qualified work for a structural engineer, a licensed roofing/waterproofing contractor and a licensed solar installer or electrical contractor (MEP). DC solar voltages are lethal and persist in daylight even when the grid is off. Nothing here is a substitute for a site-specific design, a DISCOM-approved installer, or an on-site professional.
The three system types — and where the roof fits
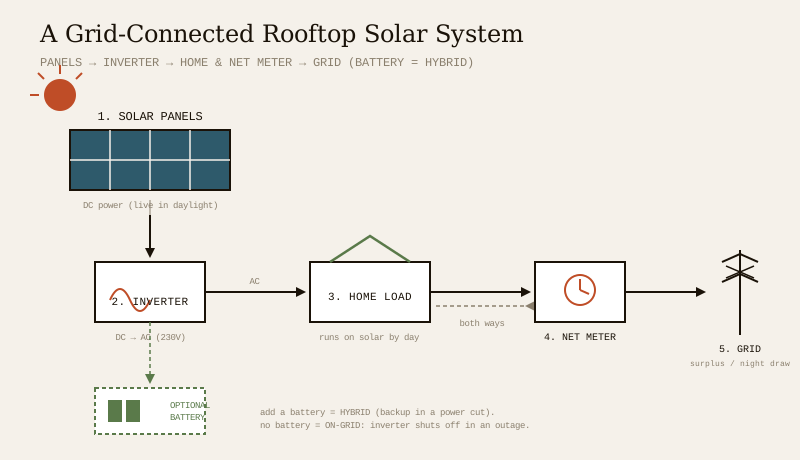
Almost every home solar setup is one of three architectures. The choice is really about what happens when the grid is down and how much you are willing to spend on batteries.
- Grid-connected (on-grid). Panels feed an inverter that syncs with the grid. By day you run your home on solar and push any surplus back to the grid; by night you draw from the grid. There is no battery, so it is the cheapest, simplest and most efficient option — and the mainstream choice for Indian homes. Its one catch: for safety, a standard on-grid inverter shuts off during a power cut (it must not "island" and back-feed a dead line), so it gives you savings, not backup.
- Off-grid (stand-alone). Panels charge a battery bank that runs the house, with no grid connection at all. Essential where there is no reliable grid — a farm, a remote hill home — but batteries are expensive, wear out and add maintenance, so off-grid is chosen from necessity, not for a city home with a working connection.
- Hybrid. Grid-connected plus a battery. You get net-metering savings and backup power that keeps essential circuits alive during an outage. It is the most capable and the most expensive, and it makes most sense where power cuts are frequent enough to justify the battery cost.
| System | Battery? | Works in a power cut? | Relative cost | Best for |
|---|---|---|---|---|
| Grid-connected (on-grid) | No | No (inverter shuts off) | Lowest | City homes with a reliable grid — savings via net-metering |
| Off-grid | Yes (essential) | Yes (runs off battery) | High | No grid / unreliable remote sites |
| Hybrid | Yes | Yes (backup circuits) | Highest | Frequent outages; savings + backup wanted |
BIPV and solar tiles are a different idea again: instead of panels on the roof, the solar cells are the roof — building-integrated photovoltaics as glazing, facade or roofing, and solar "tiles" or "shingles" that look like a conventional roof covering. They are elegant and space-saving, but far costlier per unit of power and less efficient than standard panels, so on Indian homes they remain a premium, architect-led choice rather than the default. For most homes, conventional framed panels on a mounting structure give the most power for the money.
Whatever the type, the roof's job is the same: give the panels a sound, sunny, well-anchored and watertight place to sit for a quarter of a century.
Is your roof ready? — the six-point assessment
The single most important step happens before any panel is bought: an honest look at the roof. Six things decide whether your roof is a good solar host.
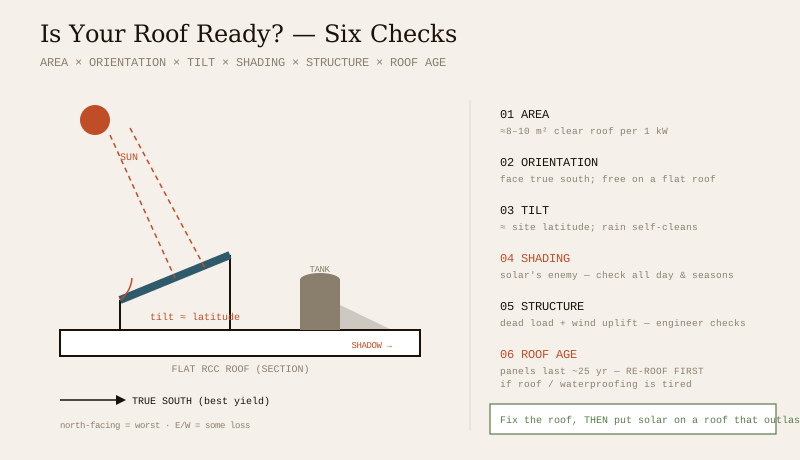
1. Area. As a rough rule of thumb, 1 kW of panels needs about 8–10 m² of clear, shade-free roof (metric varies with panel efficiency). A typical 3 kW home system therefore wants roughly 25–30 m² free of tanks, ducts and shadows. Measure the genuinely usable area, not the whole terrace.
2. Orientation. In the northern hemisphere, panels produce most facing true south (not magnetic south). East or west costs some yield but is often fine; a north-facing slope is the worst. On a flat roof orientation is free — you simply tilt the frame to face south.
3. Tilt. Panels generate best tilted at roughly the site's latitude (about 13° in Chennai, 28° in Delhi), which also helps rain rinse them clean. On a sloping roof you largely inherit the roof's pitch; on a flat roof the mounting frame sets the tilt.
4. Shading. Solar's great enemy. A single shadow — from a water tank, parapet, chimney, a neighbour's wall or a growing tree — falling across even part of a string can slash the output of several panels, not just the shaded one. Assess shadows across the whole day and across the seasons (the winter sun is low and throws long shadows). Keep the array clear of the shadow path.
5. Structural capacity. Panels, frames and ballast add real dead load, and the array catches wind uplift in a storm. The roof structure and its anchorage must be checked by a structural engineer — especially on older buildings, cantilevered slabs or lightweight metal roofs.
6. Roof age — the one people forget. Solar panels last ~25 years; your waterproofing or roof covering may not. If the roof or its waterproofing is near the end of its life, re-roof or re-waterproof it before mounting solar. Taking a whole array down to fix a leak under it, then re-installing, is expensive and avoidable. Fix the roof first, then put solar on a roof that will outlast it. See roof renovation & replacement.
If the assessment is marginal — too little clear area, heavy shading, a tired roof — it is far better to know now than after the panels are up.
Mounting — and waterproofing the mounts
How the array is fixed down is where roofing and solar meet, and where a good installer earns their fee. Two broad approaches, chosen by roof type:
- Ballasted (non-penetrating) mounts. The frame is held down by weight — concrete blocks or ballast pans — rather than by drilling into the roof. Common on flat RCC terraces because it avoids piercing the waterproofing entirely, which is a big plus. The trade-offs: it adds dead load (the structure must take it) and relies on enough ballast to resist wind uplift, so it needs an engineer's check in windy or coastal zones.
- Penetrating (anchored) mounts. The frame is bolted through the roof into the structure — unavoidable on sloping tile and metal roofs, and sometimes used on flat roofs for high-wind security. It gives the strongest anchorage, but every bolt is a hole through your weatherproofing, and every hole is a potential leak.
That leads to the single most important sentence in this guide: on a penetrating mount, the waterproofing of each roof penetration decides whether your roof leaks. A solar array can add dozens of fixings; each must be sealed properly, not smeared with a bead of silicone that fails in two summers.
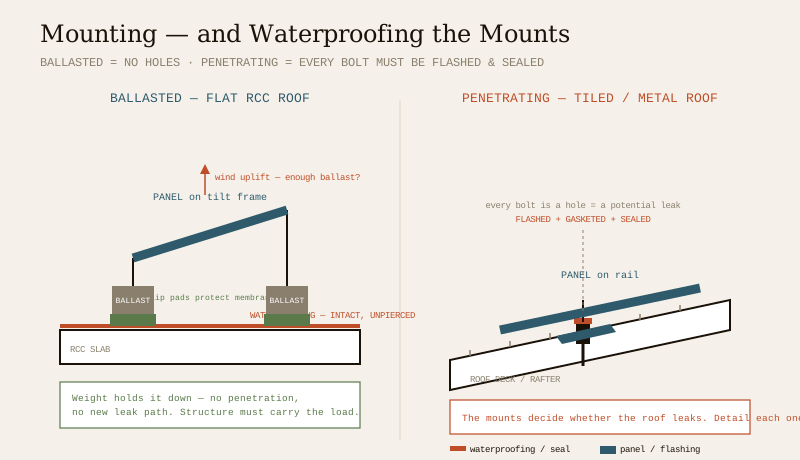
Good mounting practice, in plain terms:
- Prefer ballasted mounts on a sound flat roof — no holes, no new leak paths — provided the structure can carry the extra weight.
- Where you must penetrate, each bracket needs a proper flashed and gasketed detail: a base sealed to the deck, a flashing that sheds water over the fixing (on tiles/metal), and a compatible sealant — a system designed for the job, not improvised.
- Protect the membrane under a ballasted frame with pads or slip sheets so feet, blocks and edges do not abrade the waterproofing.
- Keep the array off the roof surface on standoffs so water and debris can drain and the panels stay cool (hot panels lose efficiency).
- Coordinate with the waterproofing warranty. New penetrations can void an existing waterproofing guarantee; involve the waterproofing contractor so the two systems, and their warranties, work together.
If your roof is due for waterproofing anyway, doing it before solar — and casting in any sleeves or anchors while the roof is open — is far cheaper than retrofitting around a finished array.
Electrical, earthing and fire safety
Solar is generating electricity on your roof, so the electrical side is not an optional extra — it is the heart of the system, and strictly licensed work.
- DC is live in daylight. The panels and DC cabling carry high, lethal DC voltage whenever the sun shines, even when the grid is off and the inverter is down. This is why panel wiring, connectors and DC work belong to a trained solar electrician, never a DIY afternoon.
- Earthing and lightning. The mounting structure and array must be properly earthed, and a roof-mounted metal array raises the case for lightning/surge protection — a dedicated earthing system and surge protective devices (SPDs) on the DC and AC sides. Bond the array into the building's earthing scheme; see general home electrical safety principles.
- Isolation and labelling. The system needs clearly labelled DC and AC isolators so it can be shut down safely for maintenance or by emergency services, and a means to isolate the array from the inverter.
- Fire and access. Fire-safety guidance increasingly asks for walkway and access margins around and between arrays so firefighters and maintenance crews can move on the roof and reach a shutdown. Do not carpet the entire roof edge-to-edge in panels; leave clear paths.
- Cable management. DC cables must be UV-resistant, secured and routed so they do not chafe on the roof or the frame — a common cause of faults and, occasionally, fires. Neat cabling is a mark of a good installer.
Insist on a licensed installer who does the earthing, isolation, labelling and surge protection properly, and who hands you a wiring diagram and a commissioning report. This is the part you cannot see once it works — and the part that keeps the installation safe.
Cleaning, access and maintenance
Solar is famously low-maintenance, but "low" is not "none," and in India dust is the main enemy.
- Cleaning. Dust, bird droppings and pollen build a film that quietly cuts output; in dusty regions and dry seasons this can be a noticeable loss. Panels usually need periodic gentle cleaning with water and a soft brush — more often in dusty or industrial areas, less where rain rinses them. A tilt close to the latitude helps rain self-clean.
- Safe access. Cleaning and inspection mean someone on the roof, so plan safe access and walkways — the same fire/maintenance margins above. Cleaning a slippery, edge-to-edge array on a parapet-less terrace is a real fall risk; keep gangways and, where needed, anchor points.
- Inspection. Have the system checked periodically — connectors, cable condition, mounting tightness, inverter health and, importantly, the roof penetrations and waterproofing under and around the array. Catch a weeping mount before it stains a ceiling.
- Monitoring. Most modern inverters report output to an app. A sudden drop flags a shaded, dirty or faulted string early — your cheapest diagnostic.
Route the at-height cleaning and any electrical inspection to people equipped for it; a garden hose and a plastic chair is how roof falls happen.
Cost, savings and payback — indicative, not fixed
Rooftop solar is an investment that pays back and then runs largely free for years, but the exact numbers move with panel prices, your state's tariffs, subsidies and how much daytime power you use — so treat everything here as the shape of the maths, not a quotation.
- What drives cost. System size (kW), on-grid vs hybrid (batteries add a lot), panel and inverter quality, mounting type and roof access, and the balance-of-system (cabling, isolators, earthing, meter).
- What drives savings. How much of your generation you use during the day (self-consumption is worth more than exported units under most net-metering rules), your electricity tariff and slab, and the net-metering terms your DISCOM offers.
- Payback. For a typical grid-connected home system in India, simple payback commonly lands in the rough range of a handful of years, after which the system keeps producing for its remaining 25-year life — but your payback depends on your tariff, subsidy, sunlight and usage. Ask installers for a payback estimate built on your bill, and compare two or three.
| Cost / benefit driver | Pushes cost UP / payback LONGER | Pushes cost DOWN / payback SHORTER |
|---|---|---|
| System type | Hybrid / off-grid (batteries) | Grid-connected (no battery) |
| Self-consumption | Exporting most units | Using most generation by day |
| Electricity tariff | Low tariff (less to save) | High tariff / high slab |
| Roof & access | Difficult access, penetrating mounts | Easy flat roof, ballasted mounts |
| Subsidy & net-metering | Not availed / unfavourable terms | Availed / favourable state terms |
Because subsidies and tariffs vary so much, the honest advice is: get itemised quotes, ask each installer to model payback on your actual bill, and confirm the current subsidy and net-metering terms yourself (next section) before signing.
The permissions, net-metering and subsidy path
Here is the part that changes most often and varies most by where you live — so this section deliberately tells you where to look, not fixed figures. Procedures, subsidy amounts and net-metering rules differ by state and DISCOM and change from year to year. Always confirm the current position from the official sources below before you plan around any number.
The broad path for a grid-connected home system is usually:
1. Choose an eligible/empanelled installer. Subsidy and net-metering schemes typically require the work be done by a DISCOM-empanelled or scheme-registered vendor using approved equipment. The empanelled-vendor list and equipment rules are published by the programme/DISCOM and are updated regularly — check the current list, do not rely on an old one.
2. Apply to your DISCOM for net-metering. Grid-connected solar needs a bi-directional (net) meter and the utility's approval to connect. You (or the installer on your behalf) apply to the local electricity distribution company (DISCOM); they review feasibility, sanction the connection and install/replace the meter. The application steps, forms and fees are DISCOM-specific.
3. Install, inspect and commission. The system is installed to spec, then inspected and approved by the DISCOM/electrical inspector before the net meter is energised. Only then does export officially count.
4. Claim any subsidy. Central and/or state subsidy for residential grid-connected rooftop solar is administered through official programmes (currently via a national portal and the DISCOMs). Eligibility, the subsidy amount, the system-size caps and the claim process are set by those programmes and change periodically — verify the current scheme, amounts and portal before counting on any figure.
Where to confirm the current rules (do this, don't trust a fixed number in any article, including this one):
- The Ministry of New and Renewable Energy (MNRE) grid-connected rooftop solar programme — the national policy, current subsidy structure and the official application portal for residential rooftop solar.
- Your state's electricity distribution company (DISCOM) and the State Electricity Regulatory Commission (SERC) — the net-metering regulations, application procedure, banking/settlement terms and any state-level incentive that apply to you.
Because these move, treat any subsidy figure or step you read (here or elsewhere) as possibly out of date, and confirm it at the source before budgeting. A good empanelled installer will know the current local process — but the responsibility to check is yours.
Who does the work — and what stays with you
Rooftop solar sits across three trades and one clear homeowner role. Understanding the system, judging your roof's readiness, choosing on-grid vs hybrid, comparing quotes and confirming the current subsidy/net-metering rules are yours. Sizing and wiring the array, all DC and AC electrical work, earthing and surge protection, the mounting design and its structural load, and waterproofing every penetration belong to a licensed solar installer / electrical contractor, a structural engineer and a roofing/waterproofing contractor — ideally coordinated so the electrical, structural and waterproofing warranties all hold. Your job as the informed client is to fix the roof first if it is tired, insist on ballasted mounts or properly flashed penetrations, demand proper earthing and isolation, leave access walkways, and verify the permissions path at the source. Do that, and a rooftop-solar system is one of the best things you will ever put on a roof.
The one-line answer
A solar roof turns your roof into a small power station, and for most Indian homes the mainstream choice is a grid-connected (on-grid) system — cheapest and simplest, saving money via net-metering but shutting off in a power cut — with off-grid for places without a reliable grid and hybrid where you want backup too (BIPV and solar tiles are a premium niche). Before buying anything, judge the roof honestly on area, orientation, tilt, shading, structure and age — and re-roof or re-waterproof before mounting solar if the roof is tired. Prefer ballasted mounts that do not pierce a sound flat roof; where you must penetrate, every fixing must be flashed and sealed, because the mounts decide whether the roof leaks. Treat the electrical side (lethal DC, earthing, isolation, fire-access walkways) as strictly licensed work, keep the panels clean and safely accessible, and remember cost and payback are indicative and move with tariffs and subsidies. Above all, the permissions, net-metering and subsidy path varies by state and DISCOM and changes — confirm it from the current MNRE rooftop solar programme and your state DISCOM before you plan around any figure.
Where to go next
- The whole subject in one map: The Ultimate Guide to Roofing Systems.
- The slab most arrays sit on: The RCC Roof Guide · Flat Roof Design Guide.
- Keep the roof under the panels dry: Roof Waterproofing Guide.
- Beat the heat alongside the power: Cool Roof Guide · Green Roof Guide.
- Fix a tired roof first: Roof Renovation & Replacement Guide.
- The whole library: Roofing Knowledge Hub.
References
- Ministry of New and Renewable Energy (MNRE) — Grid-Connected Rooftop Solar Programme: current policy, residential subsidy structure and the official application portal; procedures and subsidy amounts change — verify the current scheme at the source.
- Your State Electricity Distribution Company (DISCOM) and State Electricity Regulatory Commission (SERC) — net-metering regulations, application procedure and any state incentive; these vary by state and are revised periodically — confirm the current rules for your utility.
- IS/IEC 61215: Terrestrial Photovoltaic (PV) Modules — Design Qualification and Type Approval — verify the current part/edition via the BIS catalogue: https://www.services.bis.gov.in/
- IS/IEC 61730 (Parts 1 & 2): Photovoltaic (PV) Module Safety Qualification — Bureau of Indian Standards; verify the current edition.
- National Building Code of India (SP 7), Bureau of Indian Standards — Part 8 (Building Services) and general provisions on roof loads and electrical installations; verify the current edition. IS 875 (Part 3): wind loads, for array uplift.
This is an educational overview. Sizing and wiring a solar array, all electrical and DC work, earthing and surge protection, mounting design and structural load, and waterproofing every roof penetration and any work at height are qualified professional work — engage a licensed solar installer / electrical contractor, a structural engineer and a roofing/waterproofing contractor for your project. Rooftop-solar subsidies, net-metering rules and DISCOM procedures vary by state and change over time — verify the current position with the MNRE rooftop solar programme and your state DISCOM, and any standard's current status via the BIS catalogue, before relying on it.
Export this guide
Related Guides — Deep-dive reading
Rooftop Solar Approvals & Net Metering in India: The Permissions You Actually Need
The approvals side of putting solar on an Indian roof — not how solar works, but the permissions: the DISCOM net-metering application and feasibility, an empanelled installer, the structural load check, the electrical safety inspection, the PM Surya Ghar subsidy, and metering and commissioning. These are DISCOM, state and MNRE rules — not one national IS code — so amounts and caps change; always confirm the current rule locally.
RoofingRoof Access & Walkways
Someone will need to get onto your roof several times a year — to clear a drain, service the tank, wash the solar panels, check the waterproofing. Access designed into the house is far safer and cheaper than a ladder propped against a wall. This guide covers the ways up (mumty stairs, fixed ladders, hatches, loft ladders), the ways around (walkways and duckboards over fragile or waterproofed surfaces), and the guardrails and anchor points that make maintenance safe.
RoofingResidential Electrical Systems: The Complete Guide for Indian Homes
How the electricity in an Indian home actually works — from the utility supply and meter through the distribution board, circuits, wiring, earthing and protection, to lighting, safety, energy efficiency, smart controls, solar and backup — written so a homeowner can understand, plan and judge it, and know exactly where a licensed electrician must take over.
Electrical & WiringRelated Tools — Try Free
Brise-Soleil Visualizer
Interactive horizontal-louvre cut-off angle calculator — sun altitude, louvre depth, and spacing inputs with a live shadow preview. Computes θ = arctan(spacing/depth) for façade shading, ECBC envelope compliance, hospital daylight design, and tropical sun-control detailing.
Sun Shading ToolElectrical Safety & Load Audit
Home electrical audit — 10 categories, 65+ checkpoints across earthing, RCCB, MCB, wiring, switchboards, appliance circuits, DG/inverter backup.
Safety AuditRainwater Tank Sizer
How big should your rainwater tank be? Computes annual harvest, recommended tank capacity in litres, water-bill savings, and payback — for 10 Indian cities.
RWH Calculator