
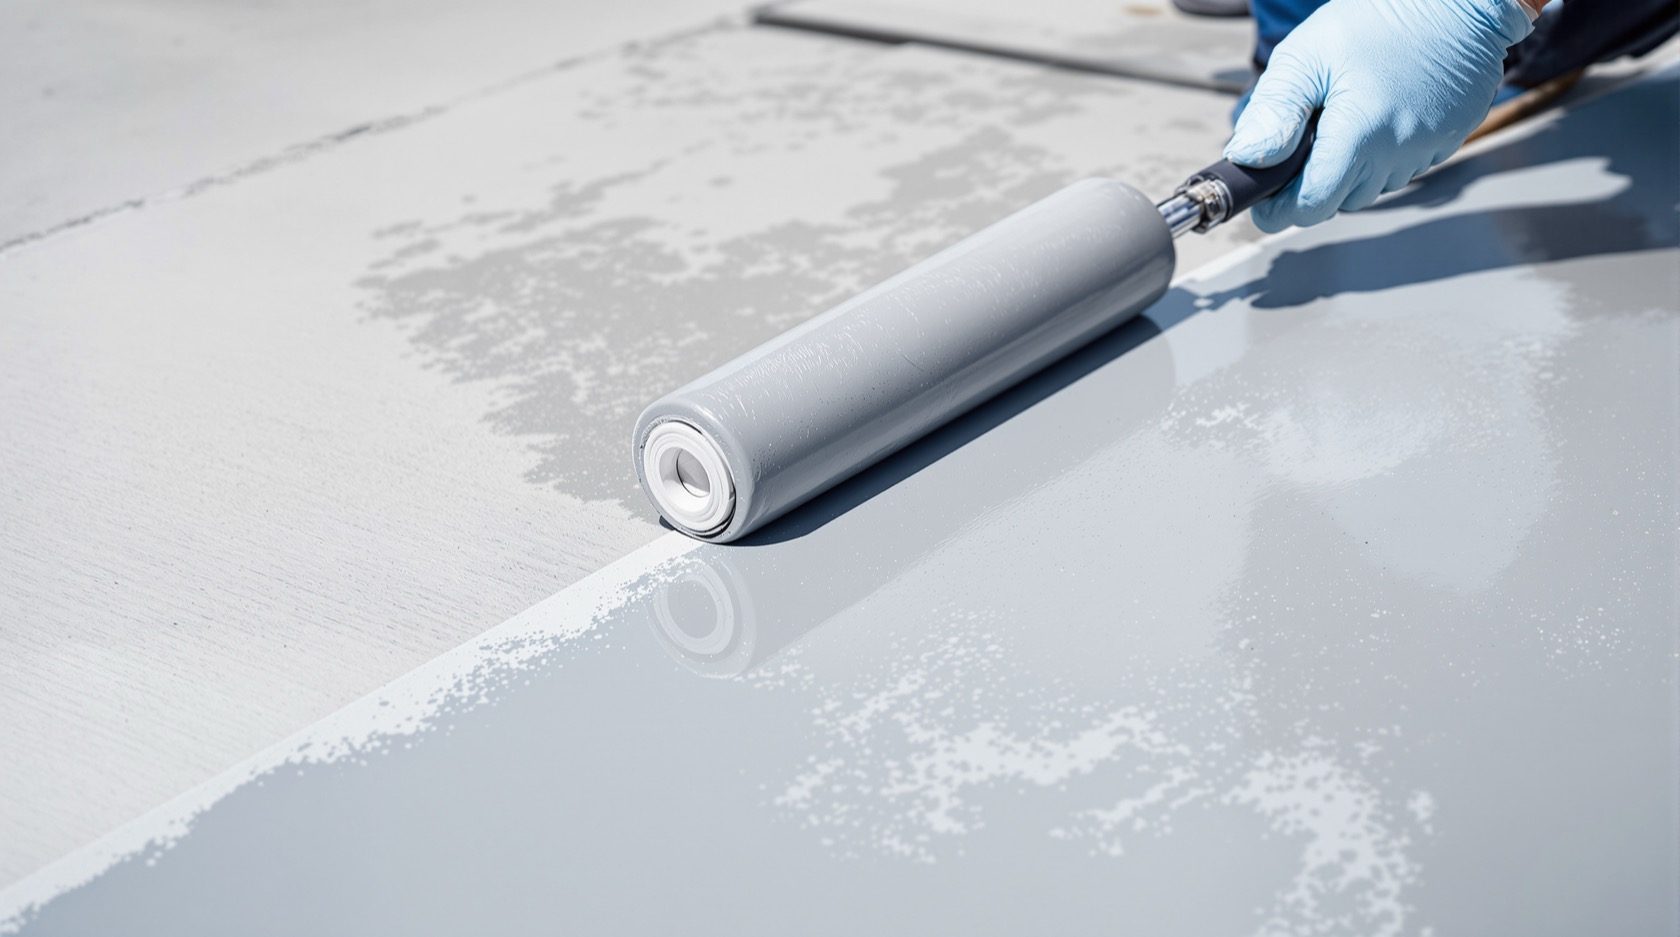
The Roof Waterproofing Guide
The master guide to keeping water out of an Indian roof — the single most important roofing job. What waterproofing actually is, the systems compared (cementitious and crystalline, integral admixtures, acrylic and polyurethane coatings, APP/SBS membranes, EPDM/TPO/PVC sheets, brick-bat coba and china mosaic), the critical details that decide success or failure, surface prep and flood testing, and new-roof versus existing-roof strategies. Plain language, India-grounded.
Ask any Indian homeowner what goes wrong with a roof and the answer is almost always the same word: leaks. The stains that bloom on a bedroom ceiling after the first big monsoon, the drip into a bucket in the corner, the paint that bubbles and peels along a wall — these are the visible end of a single hidden failure. The roof stopped keeping water out. Of the five jobs a roof does, shedding water is the first and the most unforgiving, and waterproofing is the layer that does it. It is the most important thing you will ever spend money on above your head, and the thing most often skimped to save a little.
This is the waterproofing deep-dive of the Roofing Knowledge Hub and a companion to The Ultimate Guide to Roofing Systems. It explains why roofs leak and why concrete alone cannot be trusted; the main waterproofing systems on the Indian market, with honest pros and cons; the critical details at parapets, drains and pipe penetrations where most failures actually happen; how surfaces must be prepared and how a finished job is proved with a flood test; and how the strategy differs between a brand-new roof and an existing one that has started to leak. It will not teach you to apply a membrane — that is specialist, work-at-height contractor work — but it will let you understand, plan, choose and judge the job, and spend the money where it counts.
Scope & safety. This guide helps you understand and specify roof waterproofing. Designing a roof's structure, calculating its loads and, above all, the application of any waterproofing system and all work at height are qualified professional work for a structural engineer and a licensed waterproofing or roofing contractor. Membranes, primers, torches and chemicals carry real hazards, and a botched application is worse than none. Nothing here replaces a site-specific specification or an on-site professional.
Why roofs leak — and why concrete is not enough
Start with an uncomfortable fact many homeowners never hear: concrete is not waterproof. A cast RCC slab is porous. Given standing water and time, moisture wicks straight through the matrix by capillary action, and any crack — shrinkage, thermal or structural — becomes an open channel. A flat roof, which by nature has very little slope, gives water every chance to sit, seep and find its way down. This is why a bare RCC terrace with no maintained waterproofing is not a question of if it leaks, but when.
Water attacks a roof by several routes at once, and understanding them tells you where the defences must go:
- Through the field — the flat expanse of the roof, where a porous surface or a failed membrane lets water soak in over the whole area.
- Through cracks — hairline shrinkage cracks and wider movement cracks that open a direct path.
- At the junctions — where the flat roof meets a parapet, a wall, a drain, a pipe or an expansion joint. These edges are where the vast majority of real leaks begin.
- By ponding — water that stands because the roof has no fall (slope) to the drains, giving every weakness above the maximum time and pressure to fail.
There is a second, slower enemy behind the visible leak. Once water reaches the reinforcement steel inside the slab, it rusts, swells and spalls the concrete off — the commonest way an old RCC roof fails structurally. So waterproofing is not a cosmetic finish to stop stains; it is a structural-protection system that keeps water off the steel and salt out of the concrete. That is why it is never the place to save money.
What waterproofing actually is — a system, not a coat of paint
The biggest mental upgrade is to stop thinking of waterproofing as "a coat of something" and start thinking of it as a layered system built to move water away and stop what remains. On a typical Indian terrace that system is:
1. Slope (the fall) — a screed laid to a gentle gradient (commonly around 1 in 100 or a little more) so water runs to the outlets instead of ponding. No membrane survives standing water forever; the fall is the first line of defence and the most commonly forgotten.
2. Surface preparation — a sound, clean, crack-repaired, primed substrate. More jobs fail here than anywhere else.
3. The waterproofing layer — the membrane or coating that actually stops water: cementitious, integral, liquid-applied, sheet membrane, or a traditional system like brick-bat coba.
4. Protection / wearing course — tiles, screed or china mosaic that shields the membrane from foot traffic and, crucially, from the sun's ultraviolet, which ages most membranes faster than water does.
5. Drainage — outlets, gutters and downpipes sized for peak rainfall to carry the water off the building; see the roof drainage guide.
Get any one layer wrong — no fall, a dirty substrate, a good membrane left bare to the sun, a blocked outlet — and the whole system fails, no matter how expensive the middle layer was. Judge a waterproofing quotation by whether it addresses all five, not by the brand name on the bucket.
The waterproofing systems compared
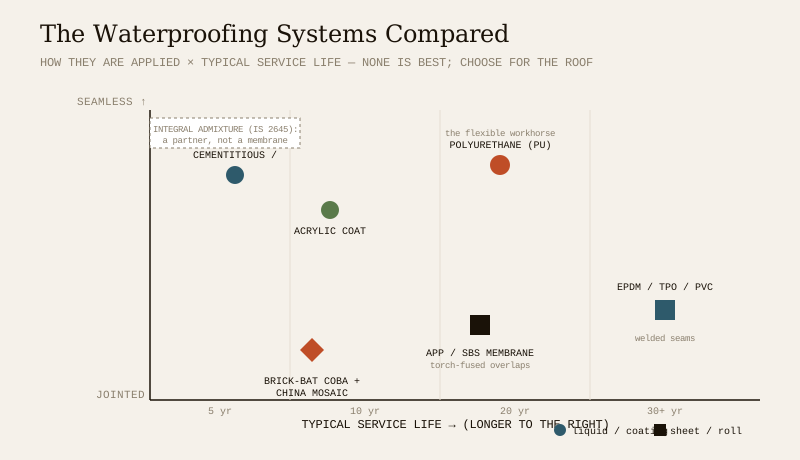
There is no single "best" waterproofing. The right system depends on the roof, the budget, the traffic it will take and who is applying it. The main families on the Indian market:
- Cementitious & crystalline coatings. Cement-based slurries (often polymer-modified) brushed onto the concrete. Crystalline products go further — their chemicals react with moisture and lime in the concrete to grow crystals that block the pores from within, becoming part of the slab. Cheap, easy, breathable and forgiving on damp substrates, but relatively rigid, so they resist standing water better than they bridge a moving crack.
- Integral (admixture) waterproofing. Chemicals added to the concrete or plaster at the mixing stage (governed by IS 2645) that reduce its permeability from the inside. Not a standalone roof membrane — think of it as making the concrete itself less thirsty, a useful first line to combine with a surface system, not replace it.
- Acrylic & polyurethane (PU) liquid coatings. Liquid-applied membranes rolled or sprayed on to cure into a seamless, elastic skin. Acrylics are water-based, reflective (many double as cool-roof coatings) and homeowner-friendly but thinner-lived; polyurethane is tougher, highly elastic (it bridges cracks as the roof moves) and long-lasting, and is the workhorse of modern terrace waterproofing. Their great virtue is being seamless — no joints to fail — and their weakness is that film thickness depends entirely on honest application.
- APP / SBS bituminous membranes. Factory-made rolls of modified bitumen (APP is plastic-modified for heat resistance; SBS is rubber-modified for flexibility and cold climates) torch-fused or bonded onto the primed deck. Thick, robust, proven over decades and good value for large terraces — but they are only as good as their overlap joints, need skilled torching, and must be protected from UV.
- EPDM / TPO / PVC sheet membranes. Single-ply synthetic sheets — EPDM is a rubber, TPO and PVC are thermoplastics — laid out and seamed (EPDM with tape/adhesive, TPO and PVC hot-air welded). Long-lived, light, and excellent for large or complex roofs; the welded thermoplastics give some of the most reliable seams available. More specialised to install and less common on small homes.
- Traditional: brick-bat coba & china mosaic. The old Indian terrace system: broken brick set in lime or cement mortar laid to a fall (brick-bat coba), often finished with a mosaic of broken glazed tiles (china mosaic) that is reflective, walkable and handsome. Time-tested and repairable, it also insulates and keeps the terrace cool — but it is heavy, thick, labour-intensive and depends heavily on the mason's skill.
| System | How it is applied | Seamless? | Typical life* | Best for |
|---|---|---|---|---|
| Cementitious / crystalline | Brushed / slurried onto concrete | Yes | 5–10 yr | Damp substrates, sunk slabs, budget jobs, a base coat |
| Integral admixture | Added to the concrete mix (IS 2645) | n/a | Life of concrete | Reducing concrete permeability — a partner, not a membrane |
| Acrylic coating | Rolled / sprayed liquid | Yes | 5–10 yr | Reflective cool-roof coat, light-traffic terraces, DIY-friendly |
| Polyurethane (PU) coating | Rolled / sprayed liquid | Yes | 10–20 yr | Modern terraces, crack-prone slabs, the flexible workhorse |
| APP / SBS membrane | Torch-fused / bonded rolls | No (overlaps) | 10–20 yr | Large terraces, good value, proven robustness |
| EPDM / TPO / PVC sheet | Laid & taped / hot-air welded | No (welds) | 20–30+ yr | Large / complex / commercial roofs, best seams |
| Brick-bat coba + china mosaic | Laid in mortar by masons | Monolithic | 15–25 yr | Traditional terraces, insulation + waterproofing in one |
*Indicative service life with correct detailing, protection from UV and normal maintenance — real life depends on substrate, workmanship and upkeep.
A common, sensible strategy on a new Indian home is a layered combination: integral admixture in the slab, a cementitious base coat, a liquid PU or a bituminous membrane as the main waterproofing, then a protective screed, tiles or china mosaic on top. Belt and braces, because the cost of getting it wrong is a lifetime of leaks. The dedicated flat-roof waterproofing guide works these choices through for the flat terrace specifically.
Box vs inverted — where the membrane sits in the sandwich
Two arrangements decide where the waterproofing layer sits relative to the insulation, and it is worth knowing the terms your contractor uses.
- Conventional / "box" system — waterproofing goes down first on the deck, insulation (if any) and the protective screed on top. The membrane is protected by everything above it but, in a warm roof, sits below the insulation.
- Inverted (or "upside-down" / protected-membrane) system — the waterproofing goes directly on the structural deck and the insulation is laid on top of it, held down by ballast, pavers or a screed. The membrane is now shielded from ultraviolet, foot traffic and the daily thermal swing that ages it, so it tends to last longer — at the cost of using water-resistant insulation and heavier ballast.
For most Indian terraces the practical takeaway is simple: whatever the system, the membrane must be protected from the sun and from feet. A bare black membrane baking in Chennai will fail years before the same membrane under tiles or china mosaic. Protection is not optional decoration; it is part of the waterproofing.
The critical details — where roofs actually leak
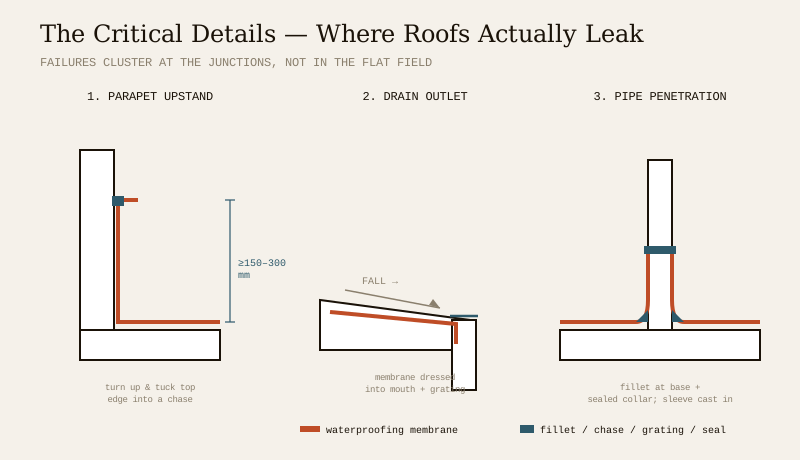
Here is the single most useful thing in this guide: most roofs do not leak in the middle. They leak at the edges. The flat field of a well-laid membrane rarely fails first. Failures cluster at the junctions — every place the flat roof meets something vertical, turns a corner, or is pierced. Waterproofing is, above all, a detailing craft, and a cheap membrane detailed well will outlast an expensive one detailed badly.
The junctions that decide a roof's fate:
- Roof-to-wall and parapet junctions. Where the roof meets a rising wall or the parapet, the membrane must be turned up the vertical face to form an upstand — typically at least 150–300 mm above the finished roof level, well above the deepest water can pond — and its top edge tucked into a groove (chase) cut in the wall and sealed, or protected by a flashing, so water cannot get behind it. A membrane that stops at floor level, or is simply stuck to the wall face with a raw top edge, is an invitation to leak.
- Drain outlets. The lowest, wettest point of the roof and therefore the most demanding. The surrounding screed must fall towards the outlet, and the membrane must be dressed down into the mouth of the drain and clamped, so water enters the pipe, not the slab around it. A proper outlet has a grating (leaf guard) to stop blockage. See the roof drainage guide.
- Pipe and service penetrations. Every vent pipe, plumbing stack, railing post, conduit or AC line that pierces the roof is a potential leak. Each needs a fillet (cove) at its base and a collar of membrane sealed tightly around it. Group services and cast sleeves before the slab wherever possible; every hole drilled afterwards is a future leak.
- Expansion / movement joints. Large roofs move with temperature. Where a designed joint runs across the roof, it needs a special flexible detail (a raised kerb with a loop of membrane or a proprietary joint cover) that can stretch and close without tearing — never a rigid patch across a moving gap.
| Junction | The failure if skipped | The correct detail |
|---|---|---|
| Parapet / wall | Water tracks behind the membrane and down the wall | Upstand ≥150–300 mm, top edge in a chase or under flashing |
| Drain outlet | Water bypasses the drain and soaks the slab | Fall to the outlet; membrane dressed into the mouth & clamped; grating |
| Pipe penetration | Seepage around the pipe root | Fillet at the base + sealed collar; sleeves cast in, not drilled |
| Expansion joint | Membrane tears as the roof moves | Raised, flexible loop or proprietary movement-joint cover |
| Internal corners | Membrane bridges the corner and splits | Fillet (cove) fillets at all internal angles |
If you take one thing from this section: judge a waterproofing job by its edges. Ask the contractor how they will detail the parapet upstand, the drain and every penetration — and watch those points during the work. That is where your money is either well spent or wasted.
Surface preparation and flood testing — the boring steps that decide everything
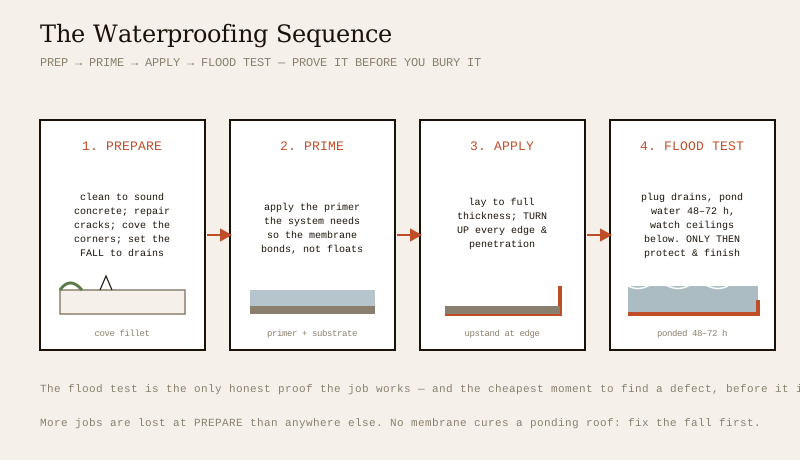
The best membrane in the world will fail on a bad surface. Surface preparation is where more waterproofing jobs are lost than any other stage, and it is invisible in the finished roof, which is exactly why it is skimped. Done properly it runs:
1. Clean. Strip the surface back to sound concrete — remove old failed coatings, laitance, oil, dust and loose material, usually by grinding, water-jetting or wire-brushing. A membrane sticks to the substrate, not to the dirt on it.
2. Repair. Rout out and fill cracks; treat honeycombed patches; make good the surface. Round off all internal corners with a fillet (cove) so the membrane can turn the angle without a sharp fold that will split.
3. Set the fall. Lay or check the slope screed so every part of the roof drains to an outlet. No membrane cures a ponding roof; fix the fall first.
4. Prime. Apply the primer the system specifies, so the waterproofing bonds properly to the substrate.
5. Apply. Lay the waterproofing to the specified thickness or number of coats, respecting overlaps and, above all, turning it up at every edge and around every penetration as detailed above. Let each coat cure as specified.
6. Flood test. Before any protective screed or tile goes down, prove the job. Plug the outlets, flood the roof with water to a depth of an inch or two and leave it for 48–72 hours, checking the ceilings and walls below for any sign of damp. A flood test is the only honest proof that the waterproofing works — and the only cheap moment to find and fix a defect, before it is buried under the finish.
7. Protect. Only once the flood test passes, lay the protective wearing course — screed, tiles or china mosaic — to shield the membrane from feet and sun.
Insist on the flood test in writing. A contractor confident in the work will not object; one who resists is telling you something. It is the homeowner's single best quality check on the whole job.
New roof vs existing roof — two different problems
Waterproofing a roof you are building and rescuing one that has started to leak are related but genuinely different jobs.
A new roof is the easy case, done right. You have a clean slab, full access, and the chance to build the whole system in the correct order — integral admixture in the concrete, the fall built into the screed, a full membrane with properly detailed upstands, a flood test, and a protective course — before anything is buried. Waterproofing a new roof well is far cheaper than repairing an old one, and it is the moment to over-invest, not economise. Plan it into the build from the roof planning stage.
An existing, leaking roof is harder, because the first job is not waterproofing at all — it is diagnosis. Water travels: the drip inside is often nowhere near the entry point above. You must find where water actually gets in (a cracked field, a failed parapet upstand, a blocked drain, a pierced penetration) before choosing a fix, which is a craft of its own — see the roof leakage diagnosis & repair guide. Then the choice is between a localised repair (patching a known, isolated failure) and a full re-do (stripping back and re-waterproofing the whole roof), which is the honest answer for a roof that has failed in several places or whose original system has simply aged out. Layering new waterproofing over old, failed, damp material without proper preparation is the classic false economy that leaks again within a season.
| New roof | Existing / leaking roof | |
|---|---|---|
| First step | Design the system into the build | Diagnose where water actually enters |
| Access | Full — clean, open slab | Constrained; finishes already down |
| Typical approach | Full layered system + flood test | Localised repair or a full strip-and-redo |
| Cost | Lowest — done once, done right | Higher — and higher still if patched repeatedly |
| The trap | Skimping to save on the build budget | Coating over old, damp, failed material |
Who does the work — and what stays with you
Waterproofing sits on a clear line. Understanding, planning, choosing the system and judging the work are yours. Specifying the exact system, detailing the junctions, and every bit of the application — torching membranes, mixing chemicals, working at the edge of a roof — belong to a licensed waterproofing or roofing contractor, ideally one offering a meaningful warranty and named-product system. The structural questions behind a leaking roof (are those cracks structural? is the steel corroding?) belong to a structural engineer. Your job as the informed client is to specify the whole system (not just a product), insist on surface preparation and a flood test, watch the detailing at the edges, and refuse the false economy of the cheapest membrane badly applied. That is where a roof that stays dry is actually won.
The one-line answer
Roof waterproofing is the layer — and really the whole system — that keeps water out of a roof, the single most important job it does, because concrete is porous and a flat roof gives water every chance to sit and seep. The main systems are cementitious and crystalline coatings, integral admixtures, acrylic and polyurethane liquid coatings, APP/SBS bituminous membranes, EPDM/TPO/PVC sheet membranes, and traditional brick-bat coba with china mosaic — each with its place, and often best combined in layers. But the membrane is only half the story: most roofs leak not in the middle but at the details — parapet upstands, drain outlets, pipe penetrations and movement joints — so waterproofing is above all a detailing craft, proved by surface preparation and a flood test before the finish goes down. Do it right on a new roof (cheapest, done once); diagnose before you repair an old one; and hand the specification and every bit of the application to a licensed contractor and, for structural doubts, a structural engineer.
Where to go next
- The whole subject in one map: The Ultimate Guide to Roofing Systems.
- The slab it protects: The RCC Roof Guide.
- The flat terrace in detail: Flat Roof Waterproofing Guide.
- Move the water off: Roof Drainage Guide · Roof Gutters & Downpipes Guide.
- When it already leaks: Roof Leakage Diagnosis & Repair.
- The whole library: Roofing Knowledge Hub.
References
- National Building Code of India (SP 7), Bureau of Indian Standards — Part 9 (Plumbing Services, including roof drainage) and provisions on rainwater; verify the current edition via the BIS catalogue.
- IS 2645: Integral Waterproofing Compounds for Cement Mortar and Concrete — Specification (admixture waterproofing) — Bureau of Indian Standards.
- IS 3067: Code of Practice for General Design Details and Preparatory Work for Damp-Proofing and Waterproofing of Buildings — Bureau of Indian Standards.
- IS 1346: Code of Practice for Waterproofing of Roofs with Bitumen Felts — Bureau of Indian Standards.
- IS 7198 / IS 13182 (bitumen felts and reinforced membranes) — verify current status via the BIS catalogue: https://www.services.bis.gov.in/
This is an educational overview. Specifying a waterproofing system, detailing its junctions, and all application and work at height are qualified professional work — engage a licensed waterproofing or roofing contractor (and a structural engineer for any structural doubt) for your project, and verify any standard's current status via the BIS catalogue before relying on it.
Export this guide
Related Guides — Deep-dive reading
Flat Roof & Terrace Waterproofing
The flat RCC terrace is India's most common roof and its most common leak — because water barely slopes off it. This guide explains why flat roofs are the hardest to keep dry, the traditional methods (brick-bat coba, mud-phuska, lime terracing, china-mosaic) versus the modern ones (liquid membranes, torch-applied felts, inverted systems), the fall-to-drain and layered build-up that actually stop leaks, and how to re-do a leaking old terrace. Plain language, India-grounded.
RoofingWaterproofing Failures Explained: Why Systems Fail and How to Spot It
Why waterproofing so often leaks again within a year or two — the weak links in the system, the junctions that really fail, the flood test everyone skips, and how to tell a real repair from a cosmetic patch.
Structural SafetyRoof Detailing That Doesn't Leak: The Critical Junctions
Roofs almost never fail in the open field. They fail at junctions. A professional's guide to the details that make or break a roof in India: parapet upstands and terminations, penetrations, outlets, expansion joints, abutment flashings, box gutters and valleys, falls, and the tile-roof and metal-roof details that keep water out.
RoofingRelated Tools — Try Free
Monsoon-Readiness Checklist
Pre-rain home audit across 9 categories — terrace, drains, waterproofing, electrical, HVAC, pest, vehicles, documents.
Seasonal AuditRainwater Tank Sizer
How big should your rainwater tank be? Computes annual harvest, recommended tank capacity in litres, water-bill savings, and payback — for 10 Indian cities.
RWH CalculatorPlumbing Pressure-Test & Leak Checklist
Pre-closure pressure and leak test — 9 categories, 60+ checkpoints across water supply, drainage, fixtures, waterproofing, hot water, tanks.
Pre-Closure Test