
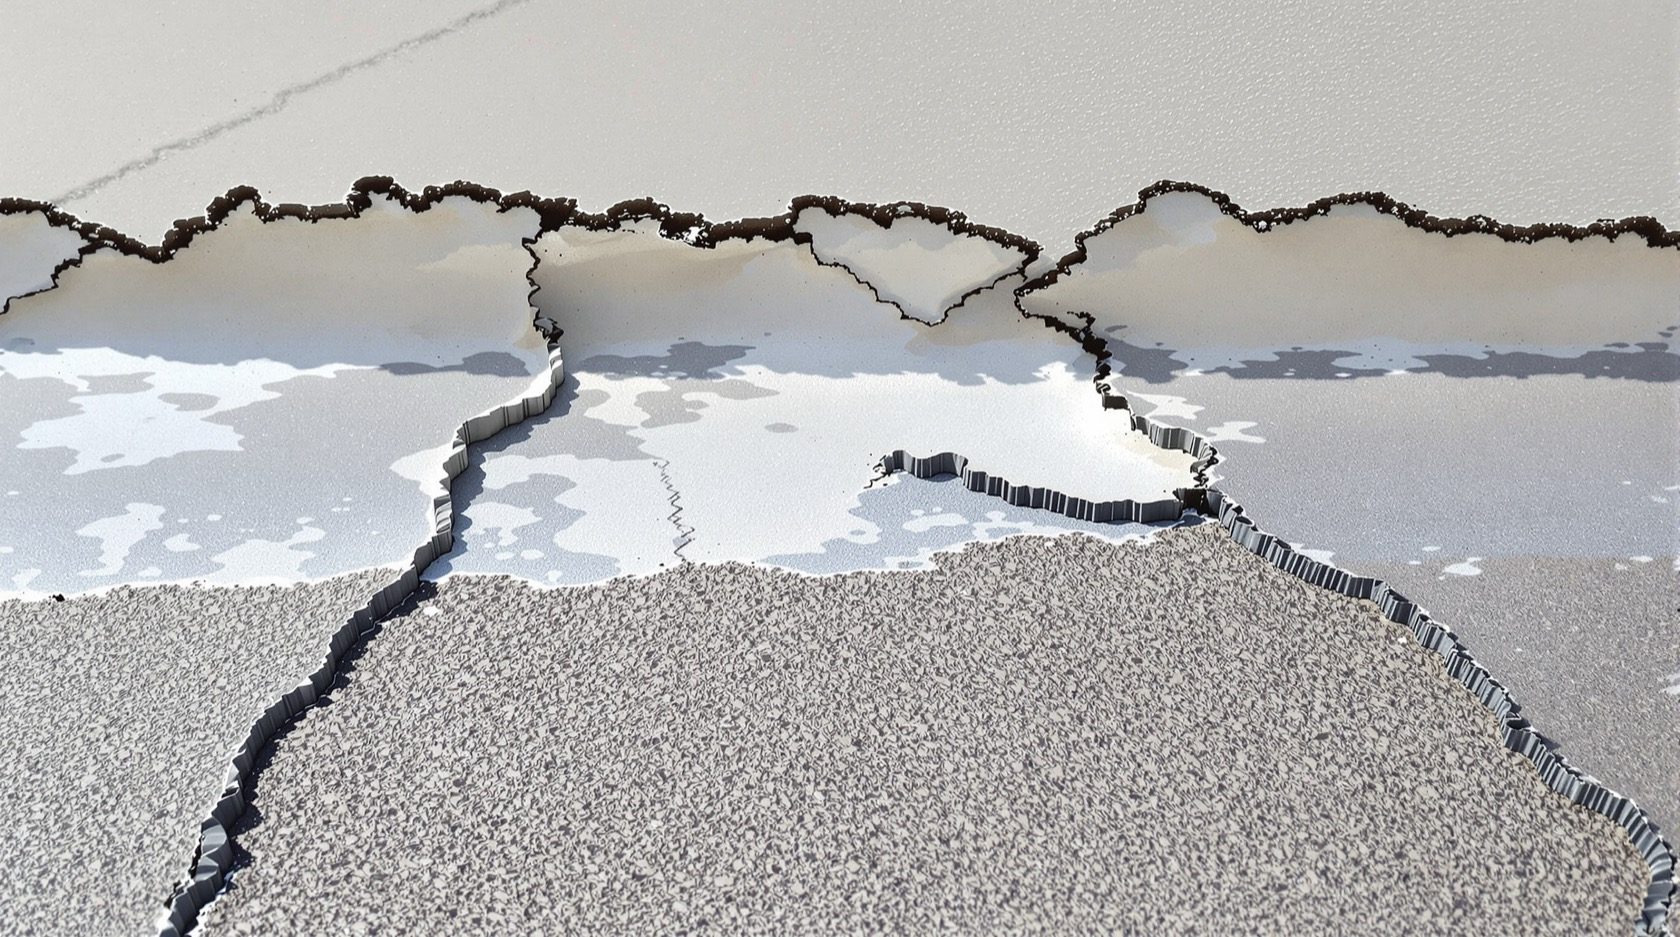
When Waterproofing Blisters, Peels or Cracks: Reading a Failing Roof Coating
How to recognise the ways a terrace waterproofing layer fails — blisters and bubbles, alligatoring and surface crazing, peeling and de-bonding, pinholes, open membrane laps — what each one reveals about the root cause, and the honest recoat-versus-full-re-waterproof decision. Read it from a safe vantage; the assessment and every bit of the work belong to a licensed waterproofing contractor.
Walk out onto an older Indian terrace after a couple of hot summers and the waterproofing layer often tells its own story before anyone mentions a leak. In one patch it has swollen into soft, raised bubbles. Across the sun-baked field it has cracked into a fine web that looks exactly like alligator skin. In a corner near the parapet it has lifted and curled away from the wall like an old sticker. Each of these is a distinct failure mode, and each one points to a different root cause — which is why learning to read them is worth far more than a vague sense that "the waterproofing has gone".
This is a diagnosis guide in the Roofing Knowledge Hub, sitting alongside The Ultimate Guide to Roofing Systems. It is not the how-to-apply guide — that is the Roof Waterproofing Guide and, for terraces specifically, the Flat Roof Waterproofing Guide. Here the question is narrower and more useful to a homeowner: the waterproofing itself is failing — what is it telling me, how serious is it, and do I recoat a patch or re-do the whole roof? You can answer the first two from a safe vantage. The third is a judgement call a professional confirms, and every bit of the actual repair is qualified work.
Scope & safety. Recognising and describing a waterproofing failure — from the ground, a window, or standing safely on your own terrace behind a proper parapet — is homeowner-safe and genuinely useful. Assessing whether it is a spot repair or a full re-waterproof, preparing the surface, and applying any coating or membrane are qualified work for a licensed waterproofing contractor. Never lean over a parapet, walk a wet or sloping roof, or climb onto a roof with a low or missing edge to "have a proper look". Surface preparation is roughly 80% of a waterproofing result, and it is skilled work — this guide helps you brief the right person, not do their job.
What "waterproofing failure" actually means
The waterproofing layer is the thin skin — a liquid-applied coating or a rolled membrane — whose only job is to stop water reaching the concrete below. When people say a roof is "leaking", the underlying event is almost always that this skin has been breached, un-bonded, or worn out. The concrete slab does not become waterproof on its own; the coating does that, and coatings age, crack and let go.
The vital distinction this guide draws is between a localised fault in an otherwise healthy layer and a system that has reached the end of its life. A single blister on a five-year-old acrylic coat is a spot to repair. Fine cracking across an entire terrace that has baked bare in the sun for a decade is a layer telling you it is done. The failure modes below let you tell which is which — and that distinction is the whole ball game, because it decides whether you are looking at a modest recoat or a proper re-waterproofing job.
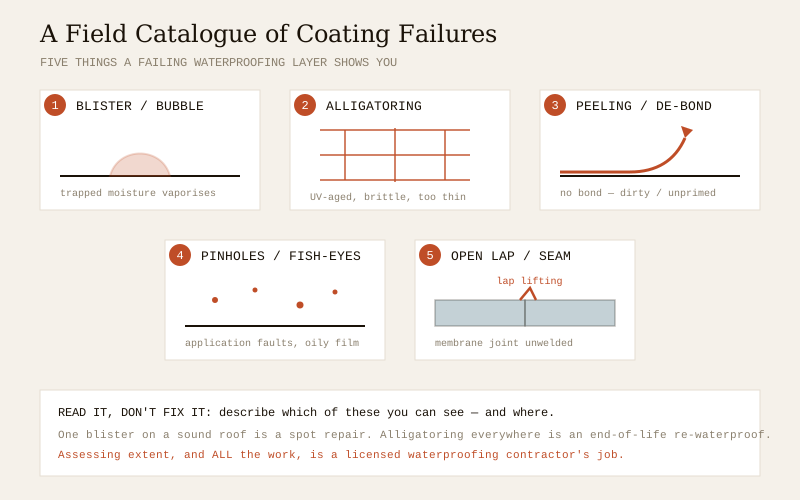
The failure modes — and what each one reveals
Below are the failures you will actually see on Indian terraces, from the most common to the sneakiest. Read them like symptoms: the look is the clue, and the clue points at a cause.
Blisters and bubbles
Raised, soft domes under the coating — from coin-sized to dinner-plate. Press one (gently, from a safe standing position) and it gives. Blisters are almost always about something trapped underneath: moisture in a damp substrate, or air, that the sun then heats until it expands and lifts the film off the concrete. They are the classic sign that the coating went on over a roof that was not properly dry, not clean, or not primed — the layer never truly bonded, so the first hot afternoon pushed it up.
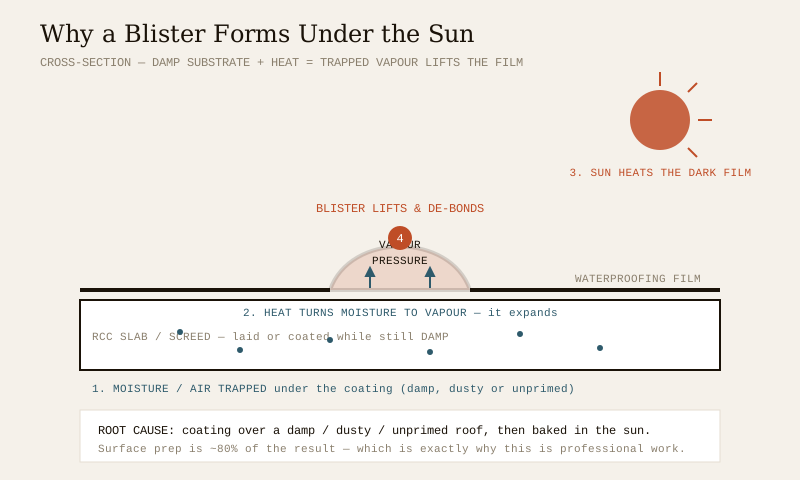
A blister is a warning even before it bursts: the bond is gone locally, and once it splits (foot traffic, hail, or just more sun) it becomes an open door for water. Blistering that is confined to one damp patch is a spot repair; blistering scattered widely usually means the whole layer went down on a damp or dirty roof.
Alligatoring and surface crazing
A network of fine, interlinked cracks across the coating, uncannily like the skin of an alligator, sometimes with tiny lifting flakes. This is the signature of an aged, UV-embrittled film: the coating has lost its flexibility, gone brittle, and cracked as it and the slab expand and contract each day. It is strongly associated with exposed waterproofing that was left bare in the sun — no protective screed, tiles or reflective top — and with films that were applied too thin or in too few coats to last. Crazing rarely leaks on day one, but it is the beginning of the end: the cracks deepen, water gets in, and the film eventually lets go.
Peeling and de-bonding (de-lamination)
The coating or membrane lifts, curls, or comes away from the concrete — often starting at an edge, a parapet upstand, or a drain. This is a straight adhesion failure: the layer is no longer stuck down. Causes cluster around the substrate at the moment of application — a dirty, dusty, damp or laitance-covered surface, a skipped or wrong primer, or a coating rolled over an incompatible old layer. Movement and thermal cycling then peel it back like a label. Peeling at upstands and junctions is especially common and especially serious, because those are exactly where water enters.
Pinholes and fish-eyes
Tiny holes or small circular craters (fish-eyes) in an otherwise continuous film. These are application faults: air bubbles in a curing liquid coating burst and leave a pinhole; oil, grease or dust on the substrate makes the coating "crawl" away and leave a fish-eye crater. Individually minute, they are still full-thickness gaps in your only waterproof layer, and on a ponding roof they leak.
Open laps and seams (membranes)
On rolled membranes — APP/torch-applied bitumen felt, or self-adhesive sheets — the overlap joints between sheets open up: the lap lifts, the weld or adhesive fails, and a gap yawns along the seam. This is the membrane equivalent of peeling, and it is where sheet systems most often fail. A poorly torched or under-lapped seam can open within a season or two.
Ponding-accelerated breakdown
Not a failure mode on its own, but the great accelerant. Where the roof does not drain and water stands for days (ponding), every one of the failures above happens faster: constant saturation feeds blisters, softens bitumen, and works into every craze crack and pinhole. A tell-tale "tide-line" of dirt marks where water habitually stands. Fixing the coating without fixing the fall means paying twice — see the Roof Drainage Guide.
Failure mode to fix — the triage table
Here is the whole catalogue as a working table: what you see, what it usually means, the likely fix, and who does it. Use it to describe the problem precisely; leave the confirming diagnosis to a contractor on site.
| Failure mode | What it looks like | Likely root cause | Likely fix | Who does it |
|---|---|---|---|---|
| Blister / bubble | Soft raised domes; gives when pressed | Moisture or air trapped under film on a damp / dusty / unprimed substrate, heated by sun | Spot repair if isolated; recoat if widespread | Waterproofing contractor |
| Alligatoring / crazing | Fine interlinked crack web, like alligator skin | Coating UV-aged & brittle; too thin / too few coats; left bare in sun | Clean & recoat if young; re-WP if aged | Waterproofing contractor |
| Peeling / de-bonding | Film lifts & curls from slab, often at edges | Adhesion failure — dirty/damp substrate, skipped or wrong primer, movement | Re-prep & recoat the zone; re-WP if extensive | Waterproofing contractor |
| Pinholes / fish-eyes | Tiny holes or circular craters | Application faults — air bubbles, oil/dust on surface | Local touch-up / re-topcoat | Waterproofing contractor |
| Open lap / seam | Membrane joint lifted, weld failed | Poorly torched / under-lapped membrane seam | Re-weld / re-seal lap; re-WP if many | Membrane specialist |
| Junction / upstand failure | Coating split or peeled at parapet, drain, pipe | Weak detailing at the hardest-to-seal spot | Re-detail the junction | Waterproofing contractor |
| Ponding breakdown | Softened, blistered, salt-marked low area | Water stands & does not drain | Fix the fall & drainage, then re-WP | Contractor + drainage |
The pattern worth internalising: junctions, edges and ponding zones fail first; the open field fails last. Parapet upstands, drain mouths and pipe penetrations are where an experienced eye looks before it looks anywhere else — the same map as the Roof Leak Diagnosis & Repair Guide.
The common root causes, plainly
Strip away the symptoms and nearly every waterproofing failure traces to one of a short list of causes — and most of them are about how and when the layer was applied, not bad luck.
- Applied over a damp or ponding roof. Waterproofing must bond to a dry, sound surface. Coat a roof that is still holding monsoon moisture and you seal the water in — blisters and de-bonding follow.
- Skipped or rushed surface prep. Dust, laitance, oil, old flaking coating, or no primer: the layer has nothing to grip. Prep is roughly 80% of the result, and it is the corner most often cut on a cheap quote.
- Too thin, too few coats. Waterproofing works at a specified dry-film thickness across a set number of coats. One thin coat to save cost crazes and wears through years early.
- Left bare in the sun. An exposed membrane or coating with no protective screed, tiles or reflective top bakes under Indian UV and heat, embrittles, and alligatoral much sooner than one that is protected. This is why a cool-roof or tiled top layer buys years.
- Thermal movement. Roofs expand and contract daily; a brittle or badly detailed layer cracks at the moving joints — especially at upstands and junctions.
- Plain age & end of life. Every system has a service life. Past it, failure is not a defect — it is the layer wearing out on schedule, and the answer is planned renewal, not blame.
Every system has a service life
This is the fact that reframes the whole problem: waterproofing is a consumable, not a permanent part of the building. It has an indicative service life, after which it is meant to be renewed. Ponding, sun exposure, foot traffic and poor prep all shorten it; protection and good detailing lengthen it. Treat the ranges below as planning figures, not guarantees — and always get a local assessment.
| System | What it is | Indicative service life | Notes |
|---|---|---|---|
| Acrylic coating | Water-based liquid coating, often reflective | ~3–7 years | Cheapest; shortest life; recoat-friendly; needs protection from ponding |
| Cementitious coating | Polymer-modified cement slurry | ~5–10 years | Rigid; good on sound concrete; can craze with movement |
| PU (polyurethane) coating | Tough, flexible liquid membrane | ~7–12 years | Handles movement well; seamless; needs skilled application |
| APP / torch-applied membrane | Rolled bitumen felt, heat-welded | ~10–15 years | Robust; fails at seams & laps; best under a screed |
| Brickbat coba (traditional) | Lime/brick-bat lightweight screed with fall | ~15–25+ years | Long-lived if built & maintained well; heavy; skilled trade |
The practical use of this table: if your coating is near or past its indicative life and failing across the roof, you are not looking at a defect to patch — you are looking at planned renewal, which is exactly what the Roof Maintenance Guide and Roof Renovation & Replacement Guide budget for.
Recoat or full re-waterproof? The decision logic
Once a contractor has assessed the roof, the real question is spot repair versus recoat versus full re-waterproof. It turns on three things: how much of the roof is failing, how old the system is, and whether the roof can drain.
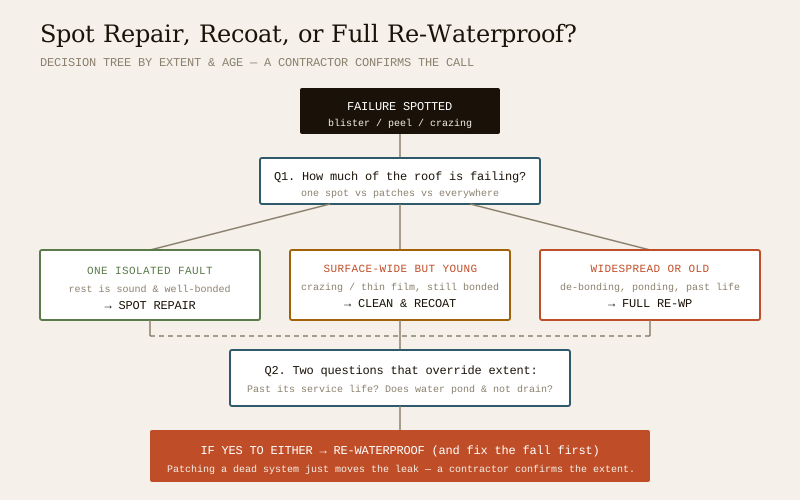
- A spot repair makes sense when the layer is otherwise sound and well-bonded and the failure is a single, definable fault — one blister, one open lap, one peeled upstand. Prep the zone, repair, re-test, done.
- A clean-and-recoat makes sense when the failure is surface-wide but the system is still young and bonded — general crazing or a tired topcoat on a coating that is still stuck down. A fresh coat (or two) over a properly cleaned, sound layer buys years.
- A full re-waterproof makes sense when the layer is de-bonding across the roof, when it is near or past its service life, when there are multiple failures in several places, or when ponding shows the fall itself is wrong. At that point, patching a dead system just moves the leak to next season.
Two questions override the extent, though. Is the system past its indicative life? and does water pond and fail to drain? If yes to either, favour re-waterproofing — and fix the fall and drainage first, because a new coat over a roof that still holds water will fail exactly like the last one. A useful one-liner: if the waterproofing is failing in more than one place, or the roof cannot drain, the problem is the system, not the spot.
What a re-waterproof costs — indicative ranges
Costs vary hugely with system, roof condition, access, the amount of surface prep needed, and city. Treat these as 2026 planning ranges only and always get local quotes — the Roof Cost Calculator and Waterproofing Material Calculator help you sanity-check a quote and estimate materials.
| System | Indicative supplied-and-applied range | Typical use |
|---|---|---|
| Acrylic coating | ₹40–90 per sq ft | Budget recoats; reflective terrace top |
| Cementitious coating | ₹60–120 per sq ft | Sound concrete; wet areas; basements |
| PU coating | ₹110–220 per sq ft | Exposed terraces needing flexibility |
| APP / torch-applied membrane | ₹90–180 per sq ft | Robust flat-roof systems, usually screeded |
| Brickbat coba | ₹120–250+ per sq ft | Traditional insulated terrace with fall |
Prices exclude major surface repair, re-screeding to correct the fall, or structural work, which are quoted separately. Be wary of a quote that is cheap because it skips prep or coats — that is precisely the false economy that produces the blisters and crazing in the first place.
When to call a professional — and the red flags
The whole of this topic sits on one side of a bright line: you read it, a licensed waterproofing contractor works on it. Beyond that, a few findings mean stop looking and call for help now.
- Any need to go near a roof edge, a wet surface, or a sloping/fragile roof to inspect. Do not. Falls from roofs are among the commonest serious home-repair injuries. Look from the ground, a window, or safely within a proper parapet.
- Widespread de-bonding or a system past its life. This is a re-waterproofing decision — get a contractor to assess and quote the roof as a whole.
- Cracks in the concrete itself, not just the coating — especially cracks that are growing, or a slab that looks to be sagging or deflecting. A crack through the structure, or damp with efflorescence, mould and spreading stains below, can be structural. That is a structural engineer's call, referenced against IS 456 — not a waterproofing patch. See the Roof Defects Guide and Roof Cracks Guide.
- A sagging, water-heavy false ceiling below the leak. Keep people clear; it can fall. Get it released safely by a professional.
When in doubt, stay on the ground, photograph and describe what you see, and hand it to a licensed contractor — the Roofing Contractor Guide helps you choose one and read a quote.
A homeowner-safe checklist (ground and terrace level only)
- Look, don't lean. Inspect from a window, the ground, or standing safely behind a proper parapet on your own terrace. Never approach a low or missing edge.
- Name the failure. Blister, crazing, peeling, pinhole, open lap? Note which and roughly how much of the roof shows it.
- Note where it clusters. Especially at parapet upstands, drain mouths and pipe penetrations — the usual entry points.
- Look for a ponding tide-line. A ring of dirt where water stands tells you drainage is part of the problem.
- Check the age. Roughly how old is the current waterproofing, and against which system's life? Past its life reframes everything.
- Keep drains clear from a safe reach. A choked outlet that you can clear from the ground buys the roof time.
- Photograph everything and write down when leaks appear (rain only, or also dry spells). This brief lets a contractor quote precisely.
- Do not apply coating, prise a blister, torch a seam, or walk a wet/sloping roof. That is the contractor's job, and prep is 80% of it.
Pair this with the Pre-Monsoon Roof Inspection Guide and the Roof Safety Guide so the checking itself stays safe.
The one-line answer
A failing waterproofing layer speaks in distinct signs: blistering means moisture was trapped under a coating laid on a damp or unprimed roof; alligatoring means the film is UV-aged, brittle or too thin; peeling and de-bonding mean the bond failed on a dirty or unprepared surface; pinholes and open laps are application faults; and ponding makes all of them worse. You can recognise and describe every one of these from a safe vantage — but assessing whether it is a spot repair, a recoat, or a full re-waterproof, and doing any of the work, is a licensed waterproofing contractor's job, because surface prep is most of the result. Every system has a service life; when the layer is failing across the roof or is past that life, stop patching and re-waterproof the system — fixing the fall first — because that, not another coat over a dying skin, is the money well spent.
Where to go next
- How the layer is meant to go on: Roof Waterproofing Guide · on a terrace specifically: Flat Roof Waterproofing Guide.
- Chasing the leak the failure caused: Roof Leak Diagnosis & Repair Guide.
- The wider family of faults: Roof Defects Guide · Roof Cracks Guide · Ceiling Damp, Efflorescence & Mould.
- Why water must not stand: Flat-Roof Ponding Water Guide · Roof Drainage Guide.
- Planning the renewal: Roof Maintenance Guide · Roof Renovation & Replacement Guide.
- Choosing who does the work: Roofing Contractor Guide.
- Estimate the job: Roof Cost Calculator · Waterproofing Material Calculator.
- The whole library: Roofing Knowledge Hub · The Ultimate Guide to Roofing Systems.
References
- IS 3067: Code of Practice for General Design Details and Preparatory Work for Damp-Proofing and Waterproofing of Buildings — Bureau of Indian Standards (waterproofing detailing and surface preparation); verify the current edition via the BIS catalogue.
- IS 1346: Code of Practice for Waterproofing of Roofs with Bitumen Felts — Bureau of Indian Standards; verify the current edition via the BIS catalogue.
- IS 13182: Bitumen and Bitumen-based Felts / waterproofing materials — Bureau of Indian Standards; verify the current title and edition via the BIS catalogue.
- IS 2645: Integral Waterproofing Compounds for Cement Mortar and Concrete — Specification — Bureau of Indian Standards; verify the current edition via the BIS catalogue.
- IS 456: Plain and Reinforced Concrete — Code of Practice (cracks, cover and durability of RCC slabs) — Bureau of Indian Standards; verify current status via the BIS catalogue: https://www.services.bis.gov.in/
- National Building Code of India (SP 7), Bureau of Indian Standards — approach to roof waterproofing and durability; verify the current edition via the BIS catalogue.
This is an educational overview to help you recognise and describe a failing waterproofing layer and make good decisions, not a repair manual. Assessing the extent of failure, all surface preparation, and any waterproofing application, along with work at height and any structural repair, are qualified professional work — engage a licensed waterproofing/roofing contractor and, where the structure is involved, a structural engineer, and verify any standard's current status via the BIS catalogue before relying on it.
Export this guide
Related Guides — Deep-dive reading
Roof Defects: A Homeowner's Field Guide (India)
The diagnostic catalog that anchors the whole subject — every common roof defect on Indian homes, pictured and named: cracks, damp and efflorescence, ponding, waterproofing blisters, sagging, spalling and rusting rebar, corrosion, algae and moss, parapet and drain-junction failures, slipped tiles and perished fasteners. For each: what it looks like, what it usually means, how serious it is, and exactly who to call.
RoofingWaterproofing Failures Explained: Why Systems Fail and How to Spot It
Why waterproofing so often leaks again within a year or two — the weak links in the system, the junctions that really fail, the flood test everyone skips, and how to tell a real repair from a cosmetic patch.
Structural SafetyFlat Roof & Terrace Waterproofing
The flat RCC terrace is India's most common roof and its most common leak — because water barely slopes off it. This guide explains why flat roofs are the hardest to keep dry, the traditional methods (brick-bat coba, mud-phuska, lime terracing, china-mosaic) versus the modern ones (liquid membranes, torch-applied felts, inverted systems), the fall-to-drain and layered build-up that actually stop leaks, and how to re-do a leaking old terrace. Plain language, India-grounded.
RoofingRelated Tools — Try Free
Monsoon-Readiness Checklist
Pre-rain home audit across 9 categories — terrace, drains, waterproofing, electrical, HVAC, pest, vehicles, documents.
Seasonal AuditBathroom Waterproofing Calculator
Work out waterproofing material (kg/L) and cost for a bathroom by area, wall band, system type and coats — cementitious, acrylic, PU or SBR.
Bathroom CalculatorFalse Ceiling Cost Estimator
Live ₹/sqft across 8 ceiling types — POP, gypsum, designer, metal, PVC, wooden — with cove and spot lighting for 20 Indian cities.
Cost Calculator