
Waterproofing Failures Explained: Why Systems Fail and How to Spot It
Why waterproofing so often leaks again within a year or two — the weak links in the system, the junctions that really fail, the flood test everyone skips, and how to tell a real repair from a cosmetic patch.
Two years ago, the terrace above Meena's Bengaluru apartment was redone. The contractor stripped the old coating, applied fresh cementitious waterproofing, and assured her the leaking was finished. The first monsoon was dry. The second monsoon — the bedroom ceiling bloomed dark again. The carpenter called it bad luck. The contractor said the rains were unusually heavy. Neither was right.
What happened to Meena's terrace happens in thousands of Indian homes every year. The material used was not inherently defective. The workmanship was not unusually careless. The failure came from something harder to see: the system — every layer and junction that waterproofing depends on — had a weak link. That link broke under the patient, seasonal pressure of Indian monsoon, and no amount of good membrane on the flat surface could compensate.
This guide is about understanding that system, and why it fails. It is the failure-analysis companion to the Waterproofing Guide for Indian Homes, which covers zone-by-zone product selection and application in detail. This guide does not repeat that. It dissects the failure modes: wrong product choice, bad surface prep, junction detailing, missing slope, skipped testing, ageing, and the trap of cosmetic patches. If you want to understand why your waterproofing keeps failing — or why a new system is likely to last — you are in the right place.
Waterproofing fails not because the material is bad but because the system — substrate, slope, membrane, junction detailing, and protection — has a weak link, and that link is almost always invisible once the surface is finished.
1. The Waterproofing System as a Chain
Before diagnosing failure modes, it helps to understand what a complete waterproofing system actually is. Most homeowners think of waterproofing as a coating applied to a surface. Professionals know it is a layered chain, and a chain fails at its weakest link.

The waterproofing system is only as strong as its weakest junction — the flat membrane surface is rarely where leaks originate.
| Layer / Element | What it does | Failure if missing or wrong |
|---|---|---|
| Substrate preparation | Gives membrane something to bond to | Poor bond → delamination, blistering |
| Primer / bonding agent | Locks membrane to substrate | Peeling membrane → water migrates beneath |
| Membrane / coating | Primary barrier | Wrong type, puncture, or lap failure → ingress |
| Junction detailing | Seals corners, upstands, drains, pipes | Entry at all junctions — the #1 source |
| Slope to outlet | Drains water off surface | Ponding → prolonged hydrostatic pressure |
| Protection screed / tiles | Shields membrane from damage | UV degradation, mechanical puncture |
| Drainage outlets (khurras) | Remove standing water | Blockage → persistent pond |
A system that is excellent at six of these seven layers and weak at one will leak. This is why the question "which membrane did you use?" is the wrong starting question. The right question is: where in the chain did the system fail?
For the broader picture of all the paths water takes into a home — cracks, joints, porous masonry, rising damp — the companion guide why buildings leak covers the envelope-ingress view. This guide focuses on why the waterproofing treatment itself fails once applied.
2. Failure Mode 1 — Wrong Product for the Condition
Not all waterproofing membranes are interchangeable. Using the wrong product for the structural and climatic condition is one of the most common — and invisible — causes of failure.
"Rigid waterproofing on a moving substrate is like painting over a live crack — you are coating the symptom, not solving the problem." — A field maxim widely cited by waterproofing applicators in IS 3067 training materials.
| Product type | Best suited for | Fails when used on |
|---|---|---|
| Cementitious coating (rigid) | New concrete tanks, stable basement walls, internal wet areas | Moving substrates, cracked slabs, terraces with thermal cycling |
| Polymer-modified bitumen (APP / SBS membrane) | Terraces, podium slabs, areas expecting movement | Surfaces with standing water without protection screed; exposed without UV cap sheet |
| Elastomeric liquid coatings (acrylic / polyurethane / MS polymer) | Terraces, walls, bathrooms; bridges movement at cracks | Surfaces with active water pressure on negative side |
| Crystalline waterproofing (e.g., Xypex type) | Concrete that has minor porosity; integral treatment | Heavy crack-based ingress; surface-only application on spalled concrete |
| Integral admixtures (IS 2645) | New pours in basements, retaining walls, water tanks | Retrofit — once concrete is cast, integral admixture cannot be added |
| Bituminous cold-applied coatings | Below-ground walls, moderate hydrostatic pressure | Exposed terraces without protection (UV-degradable) |
The typical Indian mistake is applying a cementitious waterproofing compound (often sold in powder form, mixed with cement) over a terrace that has already cracked. Cementitious materials are rigid. The terrace expands in summer heat, contracts in winter, and cycles repeatedly. The coating cracks along exactly the same lines as the slab — sometimes within a single season. It cannot bridge the movement.
The right product for a cracked or moving substrate is a flexible membrane — an elastomeric liquid or a torch-applied modified bitumen sheet — with enough elongation at break to accommodate the substrate movement. IS 3067 (Code of Practice for Laying Damp-proof Treatments Using Bitumen Felts) guides the selection of sheet membranes; IS 2645 covers integral waterproofing admixtures for concrete mixes.
3. Failure Mode 2 — Poor Surface Preparation
Even the best membrane fails if the surface underneath is wrong. Surface preparation is the part of the job that disappears under the membrane — and it is the part most contractors cut corners on when the homeowner is not watching.
The critical surface conditions that cause failure:
Laitance: The weak, powdery surface layer that forms on freshly poured concrete. If not ground or acid-etched off, the membrane bonds to laitance, not concrete. Laitance then separates, taking the membrane with it.
Moisture in the substrate: Applying a solvent-based or polymer membrane over a damp surface traps moisture underneath. As the sun heats the slab, the trapped moisture turns to vapour and pushes the membrane up into blisters. Once a blister forms, the membrane is no longer bonded — it is a tent. Any puncture or seam movement floods the gap below.
Dust and contamination: Oil stains, curing compound residue, paint, algae, or loose mortar all prevent adhesion.
Missing fillets and chamfers at internal corners: Where the floor meets a wall — at parapet bases, drain throats, and wall-slab junctions — the membrane must negotiate a 90° internal corner. A membrane applied directly into a sharp corner cannot bond fully into the tight angle; it bridges the corner and leaves an unbonded pocket. The correct detail is a fillet (a chamfered mortar haunch, typically 75 mm × 75 mm) that rounds the corner and gives the membrane a surface it can actually contact. Skipping this fillet is responsible for a remarkable proportion of parapet-junction leaks.
| Prep step | Correct practice | Failure if skipped |
|---|---|---|
| Remove laitance | Grinding, scarifying, or dilute acid wash + rinse | Membrane bonds to dust layer → peels in sheets |
| Dry substrate | Wait until moisture content acceptable (typically below 6% by weight for polymer coatings) | Blistering, trapped vapour pressure |
| Clean and degrease | Water wash, scrub, dry | Poor adhesion, bond failure |
| Fill cracks and voids | Epoxy or polymer mortar in cracks before membrane | Membrane bridges crack then tears when crack reopens |
| Apply fillets at all corners | Cement-sand haunch, 75 mm leg | Membrane lifts at corner junction → leak path |
| Prime (where specified) | Manufacturer-specified primer; allow to tack-dry | Membrane slides; poor bond; long-term delamination |
4. Failure Mode 3 — Junction Detailing: The Real Killers
Ask an experienced waterproofing contractor where leaks really come from, and you will hear variations of the same answer: the junctions. The flat membrane surface rarely fails first. It is the details — the transitions from one plane to another, from membrane to penetration, from horizontal to vertical — where the system is most stressed and most likely to be done poorly.

A parapet without a proper upstand and fillet is a ticking leak: the most water sits exactly where the worst detail exists.
Parapet upstands: The membrane must be turned up the parapet face a minimum of 150 mm above the finished floor level (NBC 2016, Part 5 guidance). The upstand must terminate under a counter-flashing or be embedded in a chase, not simply stuck to the face and left exposed. Many failures involve membrane that terminates flush with the terrace level — water simply wicks under the edge.
Drain mouths and khurras: The transition between the flat membrane and the pipe socket of the drain is a narrow band of enormous vulnerability. Membrane must lap fully into the mouth of the khurra or wrap the gully throat. If there is a gap between membrane edge and pipe, that gap collects debris and the space is a permanent leak path. The drain flange collar (a metal or pvc sleeve with a membrane bonding flange) is the professional solution; Indian sites often omit it.
Pipe penetrations: Every pipe that passes through a waterproofed slab — plumbing, electrical conduits, drain pipes — must be sealed with a collar and membrane wrap. The annular gap between pipe and slab, even if mortar-filled, is a leak path because the pipe moves thermally while the slab does not.
Construction joints: Where two pours of concrete meet — a common condition in phased construction — a cold joint exists. Unless a waterstop (PVC or rubber) was cast in at the time, the joint is a permanent weakness. Applying a surface membrane over a construction joint without first treating the joint with an injectable resin or polyurethane sealant is a recipe for failure within two to three monsoons.
Sunken bathroom slabs and toilet traps: The sunken slab design common in Indian bathrooms (where the slab is depressed 200–300 mm for pipe runs) concentrates all the plumbing penetrations in a single zone. Each penetration is a potential leak path. The waterproofing here must wrap up from the slab bottom, over the pipe collar, and up the riser — a complex three-dimensional detail that quick-fix contractors often skip.
| Junction type | Common failure | Correct detail | Test method |
|---|---|---|---|
| Parapet base | No fillet, membrane at slab level | 75 mm fillet + 150 mm upstand + counter-flashing | Flood-test to parapet level |
| Drain / khurra | Gap at pipe mouth, blocked outlet | Bonding flange collar, membrane lapped in | Check drainage rate + ponding |
| Pipe penetration | Annular gap, no collar | HDPE collar + elastomeric seal + membrane wrap | Flood-test 24 h |
| Construction joint | Surface-only treatment | Waterstop at pour + polyurethane sealant + membrane | Injection test where accessible |
| Sunken slab toilet area | Pipe penetrations bare | Wrap from slab to 150 mm up riser; flood-test 24–48 h | Flood to 50 mm depth |
| Expansion joints | Rigid filler, membrane bridging | Compressible backer rod + polysulfide sealant | Visual inspection after thermal cycle |
For the full story on how junction failures connect to broader structural cracking and envelope integrity, the guides on what makes buildings crack and the pillar structural safety guide provide the structural context.
5. Failure Mode 4 — No Slope and Ponding
Water is relentless. If it has nowhere to go, it finds its own way — usually downward through the slab.
A terrace must slope to its outlet. The minimum slope specified in practice is 1:100 (1 cm drop per 1 m run), though 1:80 is more reliable in Indian conditions where lightweight screeds tend to settle. Many terraces are laid dead flat, or worse, bowl-shaped at the centre because the peripheral parapet walls are thicker than the central screed.

Even a membrane that is 100% intact will eventually fail under sustained ponding — hydrostatic pressure forces water through the smallest pinhole.
Ponding has two effects. First, sustained hydrostatic pressure forces water through micropores, pinholes, and poorly sealed laps that would otherwise stay dry under normal splash and drain. Second, algae and biofilm grow in standing water; these biologically degrade certain membrane types and accelerate UV-induced embrittlement at the water-line.
Blocked drains compound the problem. A single leaf or construction debris blocking a 100 mm khurra can turn the entire terrace into a pond after a heavy shower. Drain covers should be protected with wire-mesh guards, and outlet sumps should be slightly lower than the surrounding screed to ensure water moves toward them.
6. Failure Mode 5 — Membrane Lap Failures, Punctures, and Blistering
Even on the flat field surface — away from junctions — membranes fail in three characteristic ways.
Lap failures: Sheet membranes (modified bitumen, HDPE) are installed in overlapping rolls. The overlap width must be correct (typically 75–100 mm for modified bitumen per IS 3067 guidance), the laps must be fully fused by heat or solvent, and the direction of laps must run with drainage — the upper sheet lapping over the lower. A lap that runs against drainage, or is only partially fused, allows water to wick under the edge capillarity-style.
Punctures: Membrane is damaged after application — by workers' boots, by dropped tools, by aggregate dragged across it, by rebar tying operations for the protection screed. Once a membrane has a puncture, it is essentially a direct path to the substrate. Membranes should be inspected before the protection screed is poured, and ideally an electrical leak-detection test (EFVM — Electric Field Vector Mapping) should be done on large terraces.
Blistering from trapped moisture: When a membrane is applied over a damp substrate or during humid weather with surface dew, the interstitial moisture vapourises under solar heating and raises the membrane in blisters. Blisters reduce the effective bonded area to zero in the blistered zone. Once blistered, the membrane is unlikely to re-bond and must be cut, dried, and patched — a repair rarely done correctly under schedule pressure.
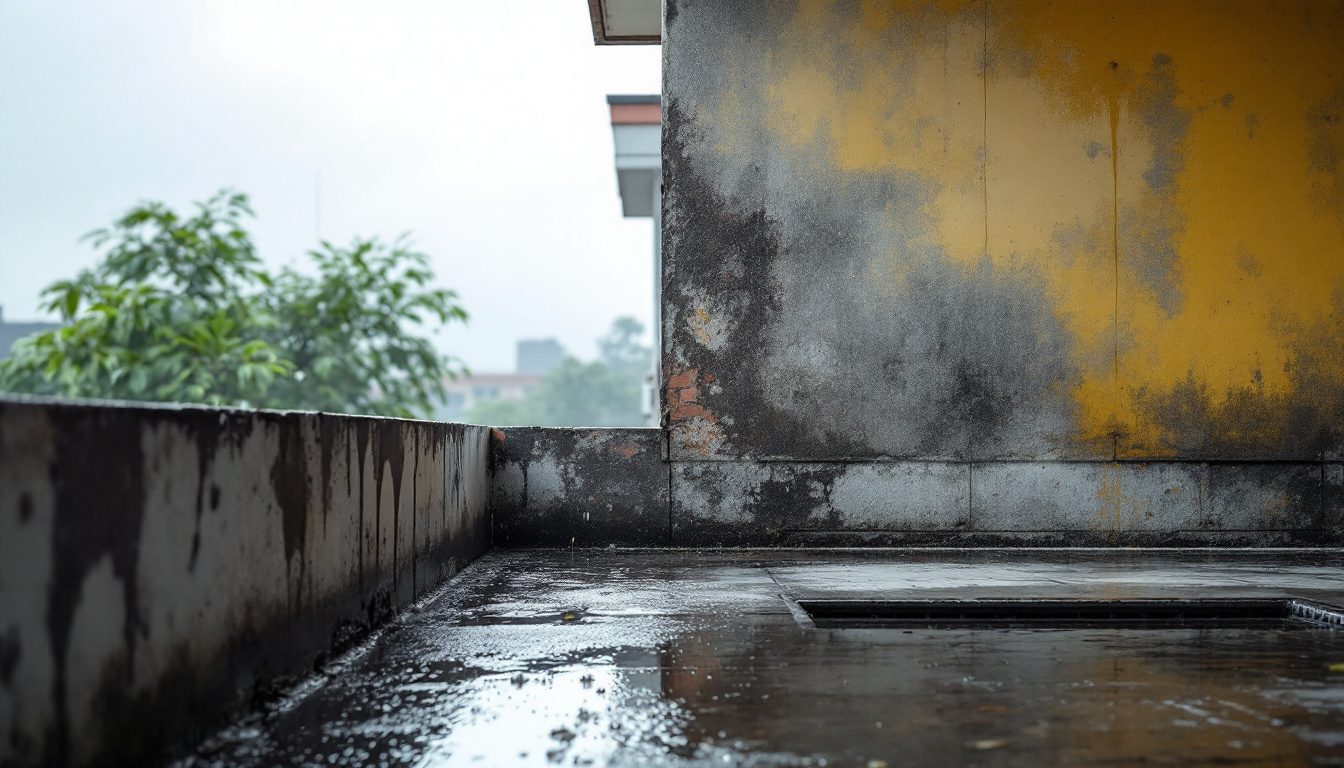
7. Failure Mode 6 — No Protection and UV Degradation
A waterproofing membrane is not a finished surface. It is a component of a system that must be protected from mechanical damage and ultraviolet radiation. Leaving a membrane exposed is one of the most easily avoidable failures.
"A UV-exposed bituminous membrane has a useful life measured in months, not years, in the Indian sun. A protection screed extends that life to decades." — Field guidance widely cited in waterproofing contractor training manuals.
Modified bitumen membranes oxidise rapidly under UV. The surface becomes brittle, develops alligator cracks, and loses flexibility — exactly the flexibility that was the reason for choosing it. An APP torch-on membrane exposed without a protection screed or UV-stable aluminium cap sheet may begin to surface-degrade within one to two years.
The protection screed — typically 50–75 mm of cement-sand mortar over a polythene slip layer — serves multiple functions: shields the membrane from UV, protects against foot traffic, and distributes point loads. It must be laid over a slip membrane (not bonded to the waterproofing membrane below) so the two layers can move independently when the slab flexes thermally.
Tiles, brick bat coba, or stone paving serve the same protective function when bedded correctly. Brick bat coba — the traditional Indian technique of bedding broken clay tile pieces in lime mortar — provides both insulation and protection; when done well, it is a proven system. When done poorly (with cement mortar instead of lime, without slope, without a proper membrane below), it becomes a trap that holds moisture against the slab.
8. Zone-Specific Failure Hotspots
Different zones in a building have different waterproofing vulnerabilities. The failure modes above combine differently in each zone.
| Zone | Most common failures | Red flag symptom | Critical test |
|---|---|---|---|
| Terrace | Parapet junction, ponding, no upstand, UV-exposed membrane | Damp at top of wall below parapet, ceiling stain migrating | Flood-test 24–48 h; check slope with level |
| Sunken bathroom slab | Pipe penetrations, no flood test done, old cementitious over moving substrate | Damp patch at slab soffit below bathroom, musty odour | 24–48 h flood to 50 mm; core sample |
| Basement / raft slab | Negative-side pressure, wrong product (not positive-side), construction joints | Active seepage at joints, efflorescence, rising damp up walls | Hydrostatic injection test; core sample |
| External walls | Porous plaster, no elastomeric coating, cracks unrepaired | Rain-driven damp patch, mottled paint, moss growth | Core sample, moisture meter, hose test |
| Overhead water tank | Old cementitious with cracks, no re-testing after repair | Iron taste, algae growth, exterior seepage | 24 h empty + refill watch; dye test |
| Planter boxes | No drainage layer, membrane pierced by root growth | Damp at underside of planter, root-caused cracks | Drain layer inspection, membrane probe |

The sunken bathroom slab is the most waterproofing-intensive element in a residential building — and the most frequently under-treated.
9. The Flood Test: The One Check That Catches Everything
"If you skip the flood test, you are trusting luck in a monsoon country." — A maxim repeated by quality-conscious waterproofing supervisors across Indian sites.
The flood test (also called the ponding test) is the definitive check for a completed waterproofing system before the protection screed is poured. It is simple, costs nothing, and catches laps, pinholes, junction failures, and drain-mouth gaps that no visual inspection can detect.
How it is done correctly:
| Step | Specification | Common shortcut (wrong) |
|---|---|---|
| Block all outlets | Plug khurra throats with rubber bung or sandbag | Leave outlet open (water drains away before ponding) |
| Fill to test depth | 50 mm minimum above highest point of membrane surface, or at least to parapet upstand level | Only wet the surface; no depth |
| Wait duration | 24 hours minimum; 48 hours for basement slabs and sunken bathroom slabs | "Poured and checked after lunch" |
| Inspect below | Check the ceiling or soffit below for any dampness | Only check the terrace above |
| Document | Mark and photograph any seepage point; do not proceed until dry | Proceed to screed on the same day |
| Repeat after repair | Any repair must pass its own 24 h flood test | Assume the patch is good |
Skipping the flood test and proceeding directly to protection screed is like plastering over a wall crack without filling it — the symptom is hidden but the problem remains. Once the screed is down, diagnosing the exact location of a membrane failure requires destructive investigation (breaking up the screed), which is expensive and disruptive. The flood test is the single easiest quality gate a homeowner can insist on.
10. How to Spot a Failure Early
Water is a traveller. Where damp appears on a ceiling or wall is often not where water is entering. It may have entered through a parapet junction and migrated along the concrete, appearing as a stain two metres away. This travel path is why diagnosis must follow the water backward to its source, not accept the visible stain as the entry point.

Water obeys gravity and capillarity, not floor plans — a stain three metres from the terrace edge may originate at the parapet.
| Symptom | What it usually indicates | Where to investigate |
|---|---|---|
| Efflorescence (white salt deposits on wall) | Prolonged moisture movement through masonry or concrete | Upstream: check terrace, parapet, or external wall source |
| Damp ceiling patch that grows after rain | Active terrace or slab leak | Flood-test the terrace above; check drain throat |
| Paint blistering on interior wall | Moisture trapped behind paint from external source | Check external plaster, terrace edges, sill details |
| Musty odour in bathroom / below bathroom | Sunken slab leak or drain seal failure | 48 h flood-test; inspect drain seals |
| Rust staining on a wall or column | Rebar corrosion from water ingress | Crack map; investigate cover depth; structural assessment |
| Falling or hollow plaster | Moisture cycling behind plaster; adhesion lost | Moisture meter; strip and investigate substrate |
| Damp rising from floor level | Rising dampness (different from waterproofing failure) | Check DPC (damp-proof course) at plinth; review foundation problems guide |
The science of durable buildings explains how concrete porosity, cover depth, and chloride ingress compound waterproofing failures over the long term — especially in coastal zones.
11. Why Re-Doing Keeps Failing: The Patch-on-Patch Trap
The most common reason waterproofing work fails a second time is that the re-do treats the symptom — the wet spot — rather than the system failure. Contractors often apply fresh coating over the damp area without investigating junction details, fixing slope, or removing failed layers that have delaminated beneath.
There are three specific re-do failures that recur in Indian buildings:
Patching over failed layers: A new membrane applied over a delaminated old membrane will bond to the delaminated surface and inherit its bond failure. The correct protocol is to remove all failed material before applying new membrane. Where removal is impractical, mechanical bonding methods (scarification, anchor-points) must be used.
Ignoring the actual entry point: If the damp patch on the ceiling is three metres from the parapet and the contractor patches the parapet only, the patch will appear to work for a short time. When the next rain comes, water re-enters and travels the same path — possibly now finding a new exit point around the patch.
Not fixing slope or cracks first: Applying new waterproofing over an existing ponding terrace or over active cracks without first routing and filling cracks (and correcting slope with screed) leaves the new membrane under the same stresses that destroyed the previous one.
12. Good Repair vs Cosmetic Patch: A Decision Framework
| Situation | What it means | Correct action |
|---|---|---|
| Localised single-point failure (e.g., one pipe penetration) with all other membrane intact and bonded | Targeted repair is appropriate | Grind, clean, collar, membrane patch, flood-test, protect |
| Multiple blistered zones over 20–30% of area, membrane delaminated | System is failing; patch is temporary | Strip membrane (or full field); fresh system with correct prep |
| Membrane intact but junction failure at all parapets | Junction re-detail is sufficient | Grind and re-detail all junctions; apply new upstand; flood-test |
| Flat terrace, no slope, chronic ponding | Slope is the root cause | Lay sloped screed first (filling low spots); then fresh membrane |
| Third or more re-do on the same terrace | All previous layers incompatible; surface uneven | Full strip to concrete; investigate slab for cracks (what makes buildings crack); full system rebuild |
| Basement with hydrostatic pressure | Surface application is negative-side — generally unsuitable | Injection grouting of active leaks; positive-side treatment from outside if accessible; or crystalline treatment into concrete matrix |
A good repair follows a diagnostic sequence: locate the actual entry point (not just the appearance point); investigate the cause (product mismatch, junction failure, slope, crack); fix the cause; apply the correct treatment for the condition; protect it; and flood-test before closing up.
A cosmetic patch skips the first three steps. It looks successful until the next monsoon.
13. Selecting Products and Supervising the Work
Even with the best waterproofing system designed on paper, execution quality determines outcome. Indian sites vary enormously in supervision quality. Here are the checks a homeowner can realistically make:
| Stage | What to ask / check | Why it matters |
|---|---|---|
| Product selection | Is this product rated for my condition (terrace / bathroom / basement)? Does it have BIS certification or IS code compliance? | Ensures it is tested for Indian conditions |
| Before work starts | Is the surface dry and cleaned? Are fillets being made at all corners? | Surface prep determines bond |
| During application | Is the overlap width correct (at least 75 mm for sheets)? Is the upstand height at least 150 mm? | Lap and upstand failures are most common |
| Before screed | Has the flood test been done and passed? Is there a witness record? | Only reliable QC gate before the system is buried |
| Warranty reality | A membrane may carry a 5–10 year material warranty. That warranty typically does not cover workmanship. Ask for a combined material + labour warranty in writing. | Warranty without workmanship coverage is limited protection |
On complex projects — basements, podium slabs, large terraces — a specialist waterproofing consultant or a civil engineer with waterproofing experience is worth the fee. The Studio Matrx DesignAI platform can help you frame the right technical questions before engaging a contractor.
For a parallel view of how general construction quality is monitored and supervised, the construction quality control guide covers the broader checklist for Indian homeowners.
Author's Note
Amogh believed that most building problems reach homeowners as mysteries — a stain here, a smell there — when in fact they have clear, diagnosable causes that any intelligent person can understand with the right vocabulary. Waterproofing failures are among the most emotionally frustrating: expensive to fix, invisible until the damage is done, and easy to attribute to bad luck or bad materials when the real cause is a skipped fillet or an untested junction.
This guide is written so that you, sitting across the table from a contractor, can ask the right questions: Where is the fillet? What is the upstand height? Has the flood test been scheduled? You may not be able to do the work, but you can absolutely supervise it. That shift in knowledge — from passive owner to informed supervisor — is what protects your home.
Disclaimer
This guide is educational and intended to build general technical literacy. It is not a substitute for a site assessment by a licensed civil engineer or a qualified waterproofing specialist. Waterproofing requirements vary significantly with building type, age, structural condition, soil conditions, and local climate. Always engage qualified professionals for diagnosis and remediation of water ingress in your home.
References
1. Bureau of Indian Standards. IS 3067: 1988 — Code of Practice for General Design Details and Preparatory Work for Damp-proofing and Waterproofing of Buildings. BIS, New Delhi.
2. Bureau of Indian Standards. IS 2645: 2003 — Integral Cement Waterproofing Compounds — Specification. BIS, New Delhi.
3. Bureau of Indian Standards. IS 1609: 1991 — Code of Practice for Laying Damp-proof Treatment Using Bitumen Felts. BIS, New Delhi.
4. Bureau of Indian Standards. IS 456: 2000 — Plain and Reinforced Concrete — Code of Practice (clause 8, durability and cover). BIS, New Delhi.
5. Ministry of Housing and Urban Affairs. National Building Code of India 2016, Part 5 — Building Materials; Part 7 — Constructional Practices and Safety. BIS, New Delhi.
6. Bureau of Indian Standards. IS 12118: 1987 — Specification for Two-Part Polysulfide Based Sealants. BIS, New Delhi.
7. Gambhir, M. L. Concrete Technology: Theory and Practice. 5th ed. Tata McGraw-Hill, New Delhi, 2013. (Chapters on mix durability, permeability, and chemical admixtures.)
8. Pillai, S. U., and Menon, D. Reinforced Concrete Design. 3rd ed. Tata McGraw-Hill, New Delhi, 2009. (Durability provisions, cover, corrosion of reinforcement.)
9. Levy, M., and Salvadori, M. Why Buildings Fall Down: How Structures Fail. Norton, New York, 1992. (Chapter on water as a structural agent.)
10. Construction Industry Research and Information Association (CIRIA). Waterproofing of Below-ground Structures (CIRIA Report C717). London, 2012. (Principles of hydrostatic pressure and negative-side limitation — widely referenced by Indian consultants.)
11. Kubal, M. T. Waterproofing the Building Envelope. McGraw-Hill, New York, 2000. (Systematic treatment of junction detailing, flashing, membrane types.)
12. National Waterproofing Association of India (NWAI). Field Practice Guidelines for Residential Waterproofing. (Industry guidance on flood-test protocols and upstand requirements.)
13. Bureau of Indian Standards. IS 13182: 1991 — Recommendations for Bonding of Modified Bitumen Sheets for Waterproofing of Buildings. BIS, New Delhi.
14. Bai, J. (ed.). Advanced Concrete Technology. Butterworth-Heinemann, Oxford, 2003. (Permeability, crystalline admixtures, and secondary waterproofing mechanisms.)
Word count: approximately 3,200 words.
Export this guide
Related Guides — Deep-dive reading
Bathroom Waterproofing Failure in India: Causes, Diagnosis & Fixes (2026)
Why bathroom waterproofing fails in Indian homes — poor surface prep, thin coats, missed junctions, no membrane turn-up, damage during tiling — how to read the symptoms, and whether a surface fix or a full redo is the right remedy.
BathroomsBathroom Leak Prevention India: Detailing the Junctions That Stop Water Reaching the Flat Below
Bathroom leaks almost never come from a broken pipe — they come from a badly detailed junction. Here is how to get the wall-floor corner, pipe penetrations, floor trap, nahani trap and door threshold right, plus the flood test that catches a leak before you tile.
BathroomsWhen Waterproofing Blisters, Peels or Cracks: Reading a Failing Roof Coating
How to recognise the ways a terrace waterproofing layer fails — blisters and bubbles, alligatoring and surface crazing, peeling and de-bonding, pinholes, open membrane laps — what each one reveals about the root cause, and the honest recoat-versus-full-re-waterproof decision. Read it from a safe vantage; the assessment and every bit of the work belong to a licensed waterproofing contractor.
RoofingRelated Tools — Try Free
Monsoon-Readiness Checklist
Pre-rain home audit across 9 categories — terrace, drains, waterproofing, electrical, HVAC, pest, vehicles, documents.
Seasonal AuditPlumbing Pressure-Test & Leak Checklist
Pre-closure pressure and leak test — 9 categories, 60+ checkpoints across water supply, drainage, fixtures, waterproofing, hot water, tanks.
Pre-Closure TestMaterial Schedule Generator
Generate a room-wise finish schedule — walls, floors, ceilings, trim, and joinery by location.
Material Schedule