
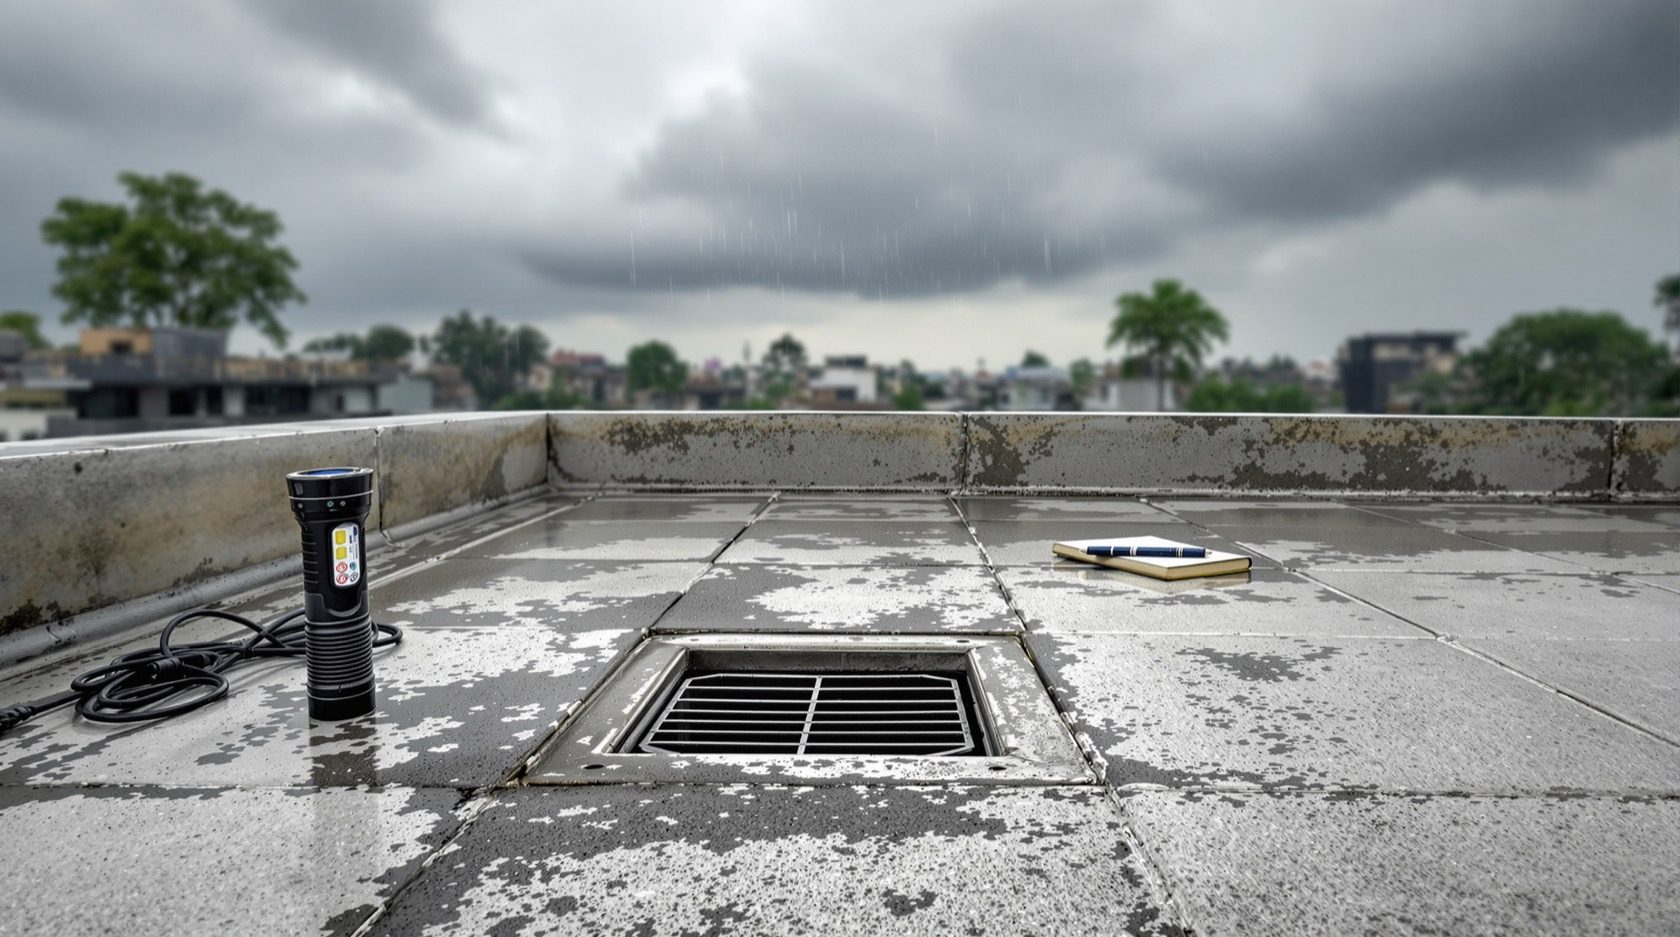
Pre-Monsoon Roof Inspection
The single most valuable seasonal roof task in India — checking and prepping your roof in the dry weeks before the rains so it does not leak when the monsoon arrives. A step-by-step checklist, early warning signs, safe DIY limits, and a post-monsoon check too. India-grounded and reassuring.
There is one roof job that saves more Indian homes from leaks, stains and misery than any other, and it costs almost nothing: walking the roof in the dry weeks before the monsoon and setting it right before the first big downpour. A blocked drain, a hairline in the waterproofing or a slipped tile is a quiet nuisance in April and a flooded ceiling in July. The rains do not create most roof failures — they simply find the weaknesses that were already there, waiting.
This is the seasonal-maintenance guide of the Roofing Knowledge Hub, and a practical companion to the Ultimate Guide to Roofing Systems. It will not turn you into a waterproofing contractor — but it will let you inspect, clear, test and prep your roof with a clear checklist, spot the early warning signs, know which small fixes are safely yours and which to hand to a professional, and understand why doing all this now, in the dry, matters so much.
Scope & safety. This guide helps you understand, plan, inspect and judge your roof's readiness. Structural assessment, waterproofing application and any work at height are qualified professional work for a structural engineer and a licensed roofing contractor. Never walk a wet, mossy, fragile, steeply sloping or sagging roof. Use proper access and never inspect alone or in the rain — read the roof safety guide before you step onto any roof.
Why timing is everything
The whole logic of a pre-monsoon inspection is one idea: fix it in the dry, weeks before the rains. Every reason for doing it early is really a reason not to do it late.
- You can actually see the problem. A cracked membrane, a dry ponding stain, a rusted fastener and a blocked outlet are all visible on a dry roof. In the rain they are hidden under water and spray.
- Repairs need dry, stable conditions. Waterproofing coatings, sealants and mortar need a dry, clean surface and curing time. You cannot re-coat a wet roof mid-monsoon — the repair simply will not bond.
- Contractors are free and materials in stock. In the pre-monsoon window a good roofer can come, quote and do the work unhurried. Once the rains arrive, every leaking house in the city is calling the same people, and you join a long queue with buckets under the drips.
- Safety. A dry roof is a far safer place to work than a wet, slippery one. The single most dangerous time to be on a roof is exactly when you are tempted to rush up in the rain to chase a leak.
Aim to complete the inspection and any small fixes three to four weeks before your region's monsoon onset — that leaves time to call a professional for anything bigger, and time for coatings to cure. Put it in the calendar as a fixed annual ritual, like servicing the car.
The pre-monsoon inspection checklist
Work through the roof methodically, from the drains outward. The figure below maps the check points onto a typical flat RCC terrace; a sloping roof follows the same logic with tiles, sheets and gutters in place of the terrace surface.
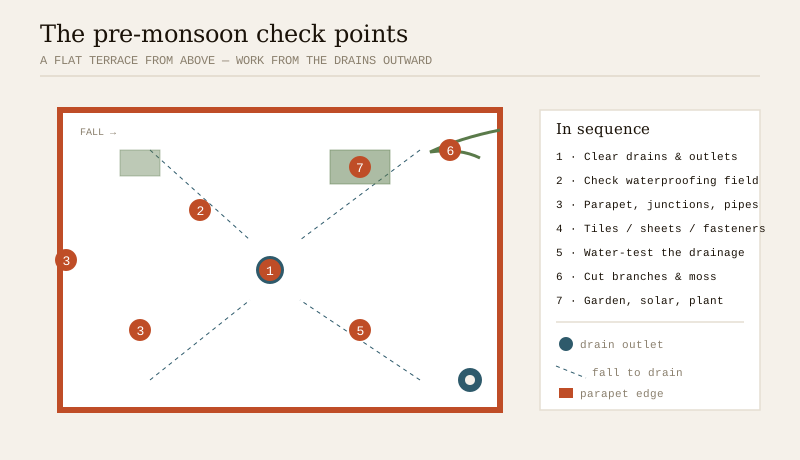
1. Clear every drain, outlet, gutter and downpipe
This is the most important single task, and the one most often skipped. A roof does not leak because rain falls on it — it leaks because the water has nowhere to go and backs up.
- Remove leaves, silt, plastic, bird nests and moss from every drain outlet, gutter and downpipe.
- Check that outlet gratings and leaf guards are in place and not crushed.
- Run water and confirm each downpipe flows freely to the ground — a blocked pipe is invisible until it overflows.
- On a terrace, make sure the surface still falls towards the drains and that nothing (planters, stored junk, a new tile course) has created a dam.
A single blocked outlet can pond an entire terrace and push water over the waterproofing and up under the parapet. See the roof drainage guide for how the whole system should work.
2. Inspect the waterproofing membrane or coating
Walk the whole flat-roof surface and look closely at the waterproofing for the classic failure tells:
- Cracks — hairlines in the coating, and any wider splits, especially where the surface meets a wall or drain.
- Blisters and bubbles — raised, air- or water-filled pockets where the membrane has lifted off the deck.
- Peeling, chalking or brittleness — a coating gone dull, powdery or flaky is at the end of its life.
- Ponding stains — a dark tide-mark or algae ring shows where water sat after the last rain, marking a low spot with no fall.
- Growth — moss, weeds or plants rooted in the surface are both a symptom and a cause of membrane damage.
Small, isolated cracks in a coating can often be over-coated (see safe DIY below); widespread blistering, brittleness or ponding is a whole-surface problem and a job for a contractor — the roof leakage diagnosis & repair guide explains the difference.
3. Check parapets, wall-roof junctions and flashing
Roofs almost never leak in the open middle — they leak at the edges, joints and penetrations. These deserve the closest look:
- Parapet junctions — where the terrace meets the parapet wall, the waterproofing should turn up the wall behind a coving fillet. Look for cracks, gaps or membrane that has slipped down.
- Flashing — the metal or membrane strips that seal around chimneys, vent pipes, skylights and wall abutments. Check they are intact, sealed and not lifted or rusted.
- Cracks in the parapet itself and in the plaster coping on top — water enters here and tracks down inside the wall.
- Pipe and duct penetrations — every pipe through the roof is a potential leak; check the seal around each one.
4. Check the covering — tiles, sheets and fasteners
On a sloping or tiled roof, the covering is the waterproofing, so inspect it from a safe vantage (binoculars from the ground or an upper window are ideal — do not walk a fragile or steep roof):
- Slipped, cracked or missing tiles — and check the ridge and hip tiles and their mortar bedding.
- Loose, rusted or lifted metal sheets — and their overlaps.
- Fasteners — screws, bolts and their rubber washers back out and perish; a loose fastener is a leak and a wind-uplift risk in a storm.
- Daylight from inside — on a clear day, look up from the attic or top-floor ceiling void; any pinpoint of light is a hole for water.
5. Test the drainage with water
Do not wait for the monsoon to test the roof — test it yourself, on a dry day. This is the step that turns a visual check into a proven one. The figure below shows both the drain-clearing and the water-test.
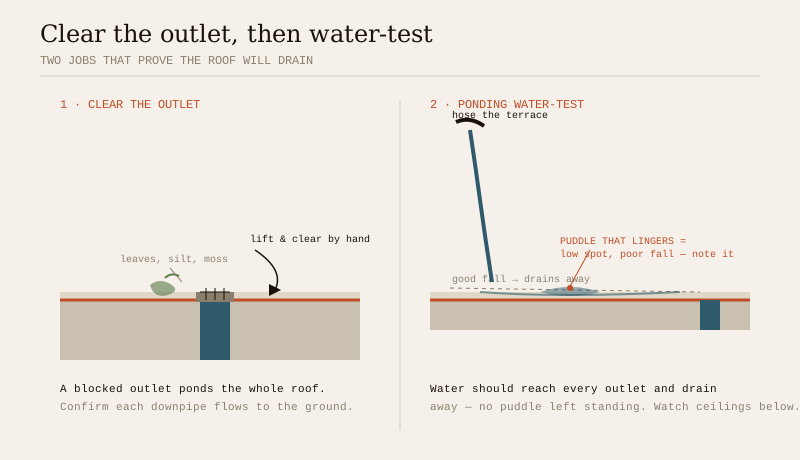
- Run a hose onto the terrace and watch the water travel. It should move steadily to every outlet and drain away, leaving no puddle standing after a few minutes.
- Any spot where water pools and lingers is a low point with poor fall — note it; it is where ponding will happen all monsoon.
- Watch each downpipe discharge at the bottom to confirm nothing is blocked downstream.
- While you flood the roof, have someone check the ceilings of the rooms below for any damp appearing — a mild version of the flood-test a contractor does after waterproofing.
6. Clear overhanging branches, moss and debris
- Cut back tree branches that overhang the roof — they drop leaves that clog drains, hold damp against the surface, and become storm missiles in high wind.
- Scrape or brush off moss, algae and lichen, which trap moisture and slowly break down the surface.
- Remove any stored junk, old planters or building debris that dam water or hide problems.
7. Check terrace gardens, solar mounts and roof-top plant
Anything sitting on the roof is a potential leak or load risk:
- Terrace-garden planters and beds — make sure their drainage is clear and they are not trapping water against the membrane or overloading the slab when saturated.
- Solar mounts, water tanks, AC condensers and dish brackets — check that their fixings and the waterproofing sealed around each penetration are intact.
- Cable and pipe runs — make sure nothing has been laid across the drainage path to dam water.
Spotting the early warning signs
Half the value of a pre-monsoon inspection is catching problems before they become leaks. Many warnings appear inside the house, so this part of the check needs no ladder at all.
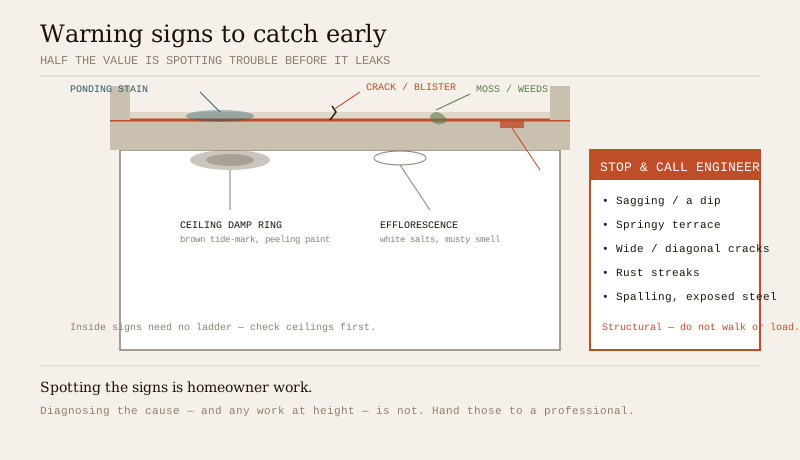
| Warning sign | Where you see it | What it usually means |
|---|---|---|
| Brown rings or tide-marks on the ceiling | Top-floor ceilings, inside | Last year's leak — the waterproofing failed near that point |
| Peeling paint, bubbling plaster, musty smell | Inside walls & ceilings | Slow, ongoing damp coming through the roof or parapet |
| White salty deposits (efflorescence) | Underside of slab / walls | Water soaking through the concrete over an area |
| Dark stain or algae ring on the terrace | On the roof surface | A ponding low-spot with no fall — a future leak |
| Cracks, blisters, chalky brittleness in the coating | On the roof surface | Waterproofing at or past the end of its life |
| Moss, weeds or plants growing on the roof | On the roof surface | Trapped moisture; roots breaking the surface |
| Rust streaks, concrete flaking (spalling) | Slab edges, exposed steel | Structural — water has reached the rebar; call an engineer |
| Sagging, a dip, a springy terrace underfoot | The roof structure | Stop. Structural warning — do not load or walk it; call an engineer |
The honest rule: spotting the signs is homeowner work; diagnosing the cause and any work at height is not. A ceiling stain, efflorescence or a musty smell tells you where to look; a sag, wide diagonal crack or exposed rusted steel tells you to stop and call a professional immediately — the renovation guide covers those structural alarms in depth.
Safe DIY fixes vs when to call a professional
The pre-monsoon window is exactly when the repair-vs-professional line matters, because small jobs done now prevent big ones later. Match the fix to your skill, and never let a small saving tempt you into unsafe height work.
| Safely do-it-yourself (dry, safe, low, with a helper) | Call a professional |
|---|---|
| Clearing drains, outlets, gutters and downpipes | Re-waterproofing a whole terrace |
| Sweeping debris, moss and leaves off an accessible flat roof | Repairing widespread cracking, blistering or brittle membrane |
| Cutting back overhanging branches (from the ground) | Any structural crack, sag, spalling or exposed steel |
| Running the drainage water-test | Fixing a leak whose source you cannot find |
| Over-coating a small, isolated coating crack with the right product | Any work on a fragile, steep, tall or slippery roof |
| Checking ceilings inside for damp and stains | Re-flashing chimneys, skylights and wall junctions |
| Replacing an easily reachable slipped tile (if safe access exists) | Re-bedding ridge tiles, re-fixing sheets, roof-top height work |
Three rules protect you from the most common (and most serious) mistakes:
1. Never work on a wet, mossy, fragile, steep or sagging roof. These are exactly the roofs most likely to give way or send you sliding. Wait for dry conditions, use proper roof access and safety measures, and if in any doubt, do it from the ground or hire a professional.
2. When you cannot find the source of a leak, hire out the diagnosis. Water travels far from its entry point along the slab before it drips; chasing it yourself often means damaging good surface. A contractor traces the real cause — see the leak diagnosis guide.
3. Fix in the dry, and let repairs cure before the rain. A coating or sealant applied to a wet surface, or hours before a downpour, will not bond. If you have run out of dry days, protect the spot temporarily and schedule the proper repair for the next dry window.
For pricing any professional work, remember that roofing rates are indicative ranges that vary by city, quality, brand and scale — always get two or three local quotes and use the Roof Cost Calculator to sanity-check them, rather than trusting a single headline figure.
Do a post-monsoon check too
The inspection has a twin at the other end of the season. Once the rains ease, walk the roof again on a dry day to see how it performed and to catch damage before it worsens over the dry months:
- Look for new stains, damp patches, blisters or cracks that appeared during the rains — these mark exactly where the roof struggled.
- Clear the drains again of everything the monsoon washed down.
- Check for storm damage — slipped tiles, lifted sheets, loose fasteners, a cracked parapet.
- Note any spot that leaked and schedule its repair now, in the dry, rather than forgetting it until next year's pre-monsoon rush.
Two inspections a year — one before the rains and one after — turn roof maintenance from a crisis into a calm, cheap routine, and are the single best thing a homeowner can do to make a roof last its full life.
The one-line answer
The most valuable seasonal roof task in India is a pre-monsoon inspection: in the dry weeks before the rains, clear every drain, outlet, gutter and downpipe; inspect the waterproofing for cracks, blisters, ponding stains and growth; check the parapets, wall junctions, flashing and penetrations where roofs actually leak; look over the tiles, sheets and fasteners; water-test the drainage to prove nothing ponds; cut back branches and moss; and check terrace gardens, solar mounts and roof-top plant. Read the early warning signs — ceiling stains, efflorescence, ponding marks, brittle coating, and the structural alarms (sag, spalling, wide cracks) that stop the job and summon an engineer. Keep the safe DIY (clearing, sweeping, testing, a small over-coat) and hand out anything at height, structural or widespread; fix in the dry so repairs cure before the rain; and check again after the monsoon. Do it every year, and the rains stop being something you dread.
Where to go next
- Start with the whole subject: Ultimate Guide to Roofing Systems.
- The hub map: Roofing Knowledge Hub.
- Before you step onto any roof: Roof Safety Guide.
- When something is already leaking: Roof Leakage Diagnosis & Repair.
- Fix or re-do a tired roof: Roof Renovation & Replacement Guide.
- Keep the water moving: Roof Drainage Guide · Gutters & Downpipes.
References
- National Building Code of India (SP 7), Bureau of Indian Standards — Part 3 (Development Control, Building Services) & Part 6 (Structural Design), relevant to drainage and structural warning signs; verify the current edition via the BIS catalogue.
- IS 875 (Part 2 & Part 3): Design Loads (imposed & wind) for Buildings and Structures — relevant when assessing loads or storm/wind-uplift risk on an ageing roof — Bureau of Indian Standards.
- IS 456: Plain and Reinforced Concrete — Code of Practice (RCC slabs, crack and spalling assessment), Bureau of Indian Standards.
- IS 2645: Integral Cement Water-proofing Compounds — Specification, and related waterproofing good-practice; verify current status via the BIS catalogue.
- Roofing and waterproofing repair prices are market rates that vary by city, quality, brand and scale — get two or three local quotes; verify any standard's current status via the BIS catalogue: https://www.services.bis.gov.in/
This is an educational overview. Structural assessment, waterproofing application and any work at height are qualified professional work — engage a structural engineer and a licensed roofing contractor for your project, never inspect a wet or unsafe roof, and verify any standard's current status via the BIS catalogue before relying on it.
Export this guide
Related Guides — Deep-dive reading
Roof Leak Diagnosis & Repair
The homeowner's most common roofing crisis, calmly explained — how to read the signs (stains, damp, efflorescence, peeling paint, drips, a musty smell), why the leak is almost never right above the stain, where roofs actually leak, how leaks are traced, and the honest line between what you can safely check yourself and what needs a professional. India-grounded, monsoon-tested.
RoofingRoof Defects: A Homeowner's Field Guide (India)
The diagnostic catalog that anchors the whole subject — every common roof defect on Indian homes, pictured and named: cracks, damp and efflorescence, ponding, waterproofing blisters, sagging, spalling and rusting rebar, corrosion, algae and moss, parapet and drain-junction failures, slipped tiles and perished fasteners. For each: what it looks like, what it usually means, how serious it is, and exactly who to call.
RoofingRoof Detailing That Doesn't Leak: The Critical Junctions
Roofs almost never fail in the open field. They fail at junctions. A professional's guide to the details that make or break a roof in India: parapet upstands and terminations, penetrations, outlets, expansion joints, abutment flashings, box gutters and valleys, falls, and the tile-roof and metal-roof details that keep water out.
RoofingRelated Tools — Try Free
Monsoon-Readiness Checklist
Pre-rain home audit across 9 categories — terrace, drains, waterproofing, electrical, HVAC, pest, vehicles, documents.
Seasonal AuditMaterial Schedule Generator
Generate a room-wise finish schedule — walls, floors, ceilings, trim, and joinery by location.
Material ScheduleAnnual Interior Maintenance Checklist
Seasonal maintenance checklist for woodwork, paint, plumbing, electrical, and appliances.
Maintenance