
The Roof Drainage Guide
Getting the rainwater off the roof quickly and completely — the first line of defence against leaks, long before waterproofing. The slope (fall), gravity vs siphonic systems, outlets, scuppers, gutters and downpipes, sizing outlets to India's monsoon rainfall, emergency overflow, and how it all feeds rainwater harvesting. Plain language, India-grounded.
Ask what keeps a roof dry and most people answer "the waterproofing." That is only half right. The membrane is the last line of defence — the goalkeeper. The first line, the one that decides how easy the goalkeeper's job is, is drainage: getting the rainwater off the roof quickly and completely, so it never gets the chance to sit, pool, and find a way in. In a country where a single cloudburst can drop 100 mm of rain in an hour, a roof that cannot shed water fast is a roof that leaks — no matter how good the coating underneath.
This is the drainage deep-dive of the Roofing Knowledge Hub and a companion to The Ultimate Guide to Roofing Systems, where slope, drainage and waterproofing are named as the three water defences in that order. It explains why drainage comes before waterproofing, the slope that starts it all, the two ways water leaves a roof (gravity and siphonic), the components that carry it (outlets, scuppers, gutters, downpipes), how outlets are sized to your rainfall, the emergency overflow that saves the roof when a drain blocks, and how the whole system feeds rainwater harvesting. It will not teach you to size a drainage system — that is engineering, matched to your local rainfall intensity — but it will let you understand, plan, choose and judge one.
Scope & safety. This guide helps you understand and specify roof drainage. Sizing outlets and pipes to a design rainfall intensity, designing the falls, and any work at height on a roof or in a gutter are qualified professional work for a structural or plumbing engineer and a licensed contractor, governed by NBC SP 7 (Part 9, Plumbing) and IS 875 (rainfall/wind data). Nothing here replaces a site-specific design or an on-site professional.
Why drainage is the first line of defence
A waterproofing membrane is designed to keep out water that touches it briefly and runs away. It is not designed to sit under a standing pond for days. Water that cannot drain does three destructive things: it finds the smallest flaw in the membrane and, under the slow pressure of its own depth (hydrostatic head), pushes through it; it adds dead weight the slab was never meant to carry — roughly one kilonewton per square metre for every 100 mm of depth; and it bakes in the sun into a shallow warm pond that degrades the membrane and breeds growth. Ponding is the number-one killer of flat roofs in India.
So the logic is simple and it runs in order. First get the water moving (slope). Then get it off (outlets, gutters, downpipes). Only then does the membrane have an easy, fair job to do. A roof with brilliant waterproofing and bad drainage will still leak; a roof with honest drainage makes ordinary waterproofing last for decades. That is why every serious discussion of a flat roof or an RCC roof treats drainage and waterproofing as one system, not two jobs.
The slope — the fall that starts everything
No roof is truly flat. Even the flattest RCC terrace is built with a deliberate, gentle tilt called the fall (or slope, or gradient) that guides water toward the outlets. Without it, water sits wherever the slab happens to dip, and every construction imperfection becomes a puddle.
The fall is created not by tilting the structural slab but by a screed to slope — a layer of lean mortar or lightweight concrete laid to thicken away from the outlets, so the finished surface tips toward them. It is laid before the waterproofing, and its quality decides whether water actually reaches the drains or strands in low spots.
| Roof type | Typical minimum fall | As a gradient | Notes |
|---|---|---|---|
| Flat RCC roof / terrace | ~1 in 100 (1%) | 10 mm per metre | Common minimum; 1 in 80 or steeper drains faster and resists ponding |
| Exposed terrace, heavy rain | 1 in 60 to 1 in 80 | 12–17 mm per metre | Steeper fall clears intense monsoon bursts sooner |
| Internal gutter / valley | ~1 in 60 or steeper | ≥17 mm per metre | Concentrated flow needs a positive, generous fall |
| Sloping / pitched roof | The pitch itself | 15° and up | Gravity does the work; the covering sheds directly |
The single commonest drainage defect is too little fall, or fall in the wrong direction — water pointed at a parapet corner with no outlet, or a "flat" roof that is genuinely, uselessly flat. A good rule to remember and to check on site: every square metre of the roof must be able to see water run downhill to a drain. If you can imagine rain sitting still anywhere, so can the roof.
Gravity vs siphonic — the two ways water leaves
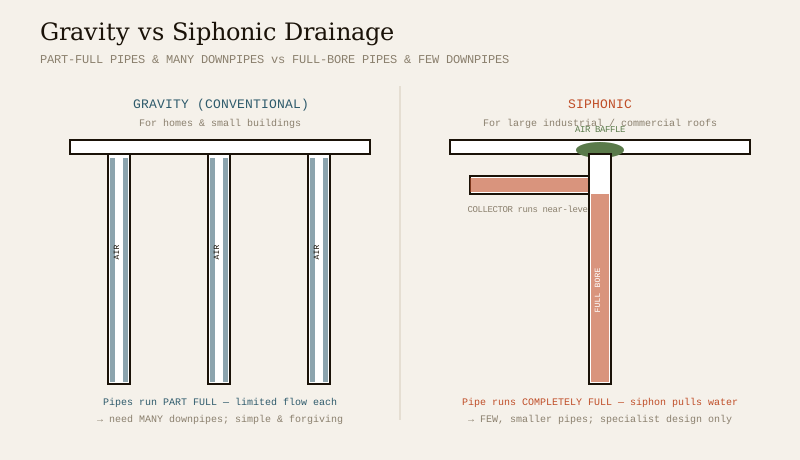
There are two fundamentally different ways to get water down from a roof, and it is worth knowing which you are dealing with.
Gravity (conventional) drainage is what nearly every Indian home uses. Water simply falls down the pipe under its own weight. The pipe runs part full — water clinging to the walls with air up the middle — so each downpipe carries a limited flow, and you need enough of them, generously sized and steeply run. It is simple, robust, forgiving of a blockage in one pipe, and needs no special design. For a house, it is almost always the right choice.
Siphonic drainage is an engineered system for very large roofs — factories, malls, airports, warehouses. A specially designed outlet with an air-excluding baffle lets the pipe fill completely and run full-bore. Once primed, the falling column of water pulls the water behind it by siphon, so a smaller pipe moves far more water, horizontal collector pipes can run nearly level, and one system can drain a huge roof with few downpipes. It is powerful but unforgiving: it must be designed by specialists to the exact roof, and it is overkill — and a liability — on a house.
| Gravity (conventional) | Siphonic | |
|---|---|---|
| Pipe runs | Part full, air in the pipe | Completely full, full-bore |
| Flow per pipe | Limited | Much higher for the same size |
| Downpipes needed | Many | Few |
| Horizontal pipes | Must fall to a gradient | Can run near-level |
| Design | Simple, standard | Specialist engineering |
| Best for | Homes, small buildings | Large industrial / commercial roofs |
For everything a homeowner will build, assume gravity drainage — and the rest of this guide is about doing it well.
The components — outlets, scuppers, gutters, downpipes
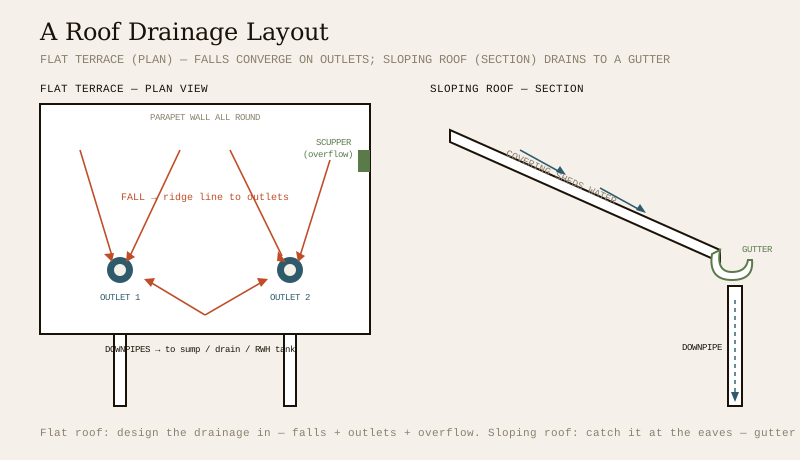
A drainage system is a short chain of parts, each handing water to the next. Know the vocabulary and you can read a drawing or brief a plumber.
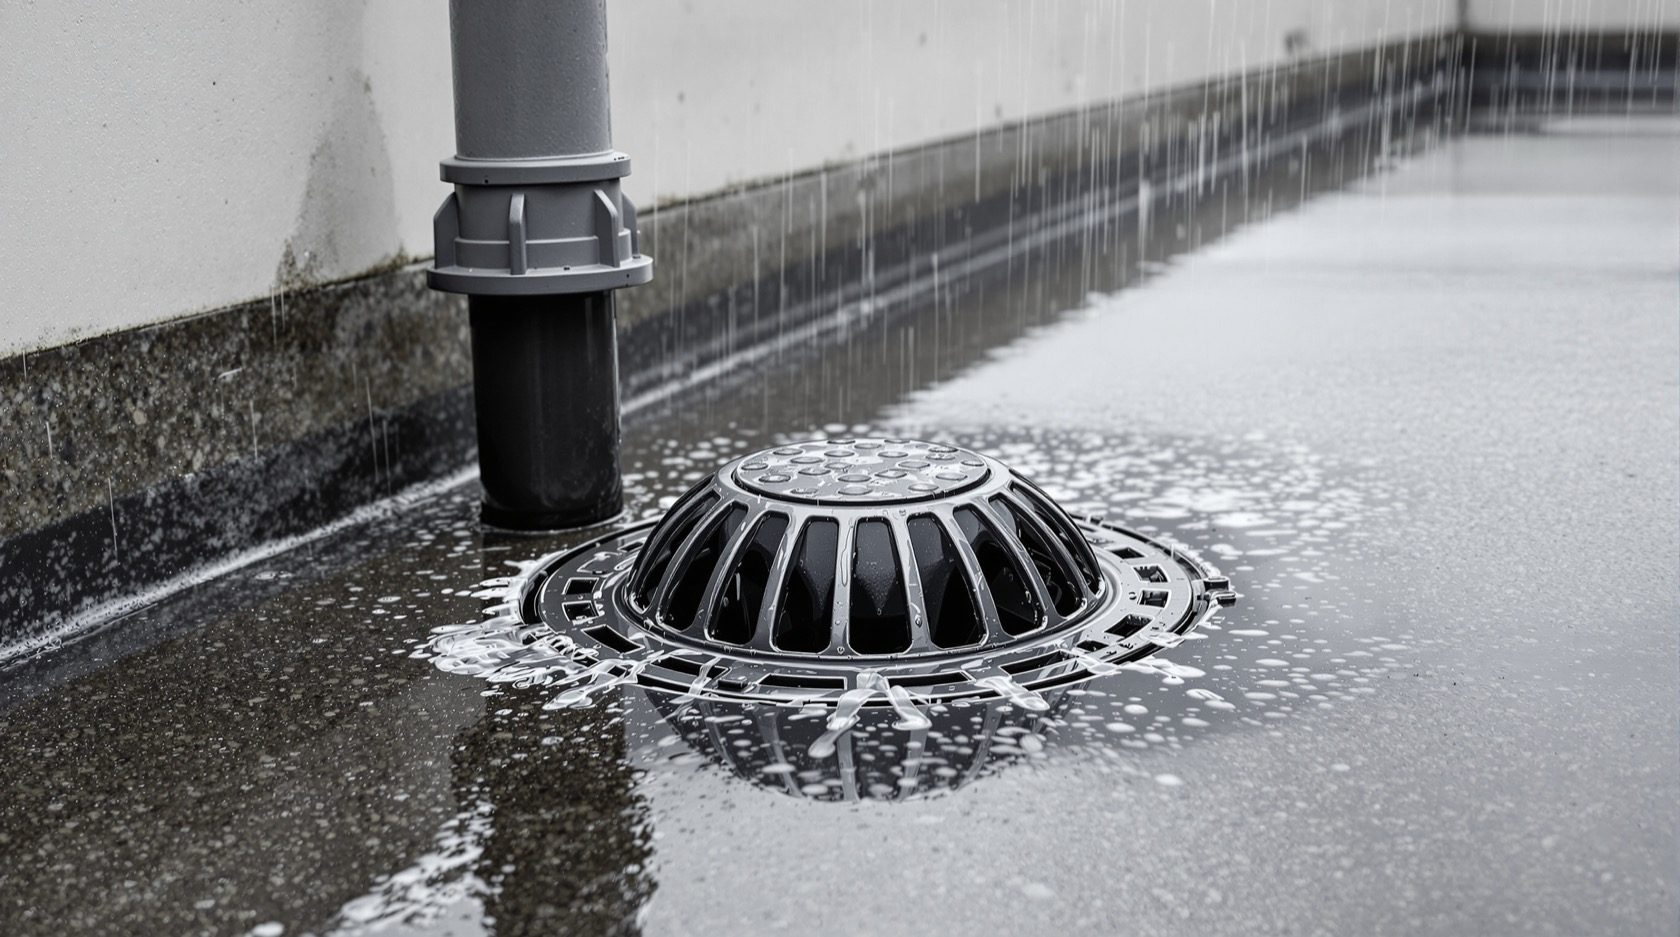
- Roof drain / rainwater outlet. The mouth of the system — the opening in a flat roof, low in the fall, through which water leaves. A good outlet has a domical grating (a dome-shaped strainer) to keep leaves and debris out, a wide throat, and a puddle flange or clamping ring that bonds tightly to the waterproofing so water cannot creep under the membrane at the very point it is most concentrated. Outlets are the commonest leak point on a flat roof; the detail here is everything.
- Scupper. An opening through the parapet wall that lets water escape sideways off the roof edge. Scuppers are simple, hard to block, and superb as an emergency overflow — if the main outlet clogs, the scupper dumps the rising water over the edge before it floods the roof.
- Gutter. A channel that catches water at the eaves of a sloping roof (or in a valley between two slopes) and carries it along to a downpipe. The whole eaves-and-valley subject — sizing, materials, fixing — has its own gutters and downpipes guide.
- Downpipe / rainwater pipe. The vertical pipe (PVC, uPVC, cast iron or metal) that carries water down the wall to the ground, a drain, or a harvesting tank. It must be sized and numbered to the roof area it serves, fixed clear of the wall, and discharged somewhere sensible — never just spilling against the plinth.
- Rainwater sump / collection. At the bottom, water reaches a first-flush device and storage (for harvesting) or a stormwater drain — covered in the last section.
The art is in the detailing, not the parts. An outlet with a sloppy flange, a downpipe that discharges onto a lower roof, a gutter with no fall — each is a small thing that causes a big leak.
The outlet — placement, the detail, and sizing to your rainfall
If drainage has a heart, it is the outlet. Three questions decide whether it works: where it sits, how it is detailed, and how big (and how many) it is.
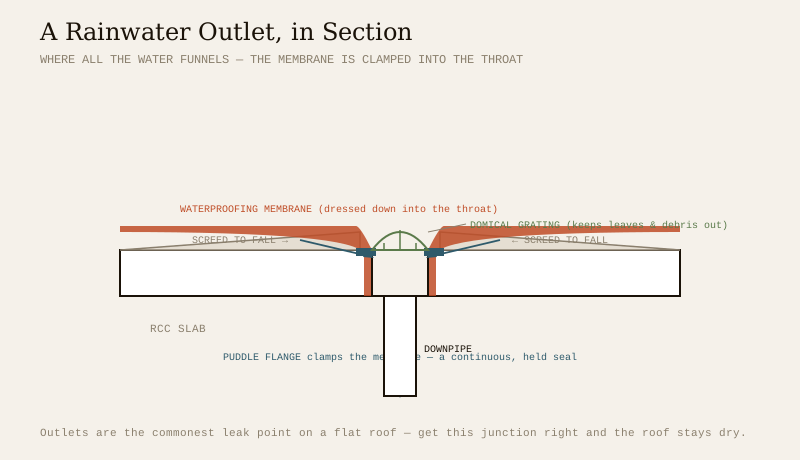
Placement. Outlets go at the low points of the fall — usually near, but not right in, the corners, so water from the whole surface converges on them. A roof needs at least two so that if one blocks, the other still drains (and the design assumes that can happen). They are kept clear of parapet junctions where detailing is already hard, and never placed at a high point where water would have to climb to reach them.
The detail. The outlet is where the waterproofing is most stressed, because all the water funnels through one small hole. The membrane must be dressed down into the throat and clamped by the puddle flange so there is a continuous, mechanically held seal — not just a coating smeared to the pipe. The screed falls right up to the lip so no puddle forms around it. Get this junction right and the roof is dry; get it wrong and it leaks precisely where you cannot see it.
Sizing — and why it is engineering. The number and size of outlets is not a guess; it is a calculation matched to the rainfall intensity for your town — the peak rate of rain the system must clear, taken from IS 875 and local meteorological data, usually a heavy short-duration burst (often expressed in mm per hour). The design works out how much water the roof area sheds at that peak rate, then provides enough outlets and downpipe cross-section to carry it — with margin. India's rainfall varies enormously, so a Chennai or Mumbai roof needs far more drainage capacity than a Delhi one, and a Cherrapunji roof more still.
| Concept | What it means | Who sets it |
|---|---|---|
| Rainfall intensity | Peak rain rate the design must clear (mm/hour) | IS 875 & local IMD data |
| Catchment area | Roof area draining to one outlet | The layout |
| Flow to clear | Intensity × area → litres/second | Engineer's calculation |
| Outlets & pipe size | Enough throat and downpipe to carry it, with margin | NBC SP 7 (Part 9) sizing |
The homeowner's job is not the arithmetic. It is to insist the sizing is done for your actual rainfall, not copied from a generic drawing — and to remember the golden rule of Indian drainage: when in doubt, more and bigger. An undersized system that coped for years will fail catastrophically in the one cloudburst it was never sized for.
Emergency overflow — the safety valve that saves the roof
Every outlet will, one day, block — a bird's nest, a plastic bag, a raft of leaves after a storm. When it does, water on a parapeted flat roof has nowhere to go but up, and it rises fast. A blocked roof can become a swimming pool in an hour, and the weight of that trapped water — far beyond what the slab was designed for — is a genuine structural danger, not just a leak.
The defence is a deliberate, independent emergency overflow: a second path for water that only comes into play when the main system is overwhelmed. Usually it is a scupper cut through the parapet, or an overflow pipe, set at a height a little above the normal water line at the outlet but below the level that would overload the slab or flood the parapet. In normal rain it does nothing; in a blockage it dumps water over the edge with an obvious, visible waterfall down the wall — which doubles as an alarm that your main outlet needs clearing.
The rules of a good overflow are worth stating plainly: it must be separate from the main outlet (a blockage that kills one must not kill the other), sized to carry a serious flow, set at the right height, and positioned to discharge somewhere harmless. On any flat roof with a parapet, an emergency overflow is not a luxury — it is what stands between a blocked drain and a collapsed or flooded roof.
Flat vs sloping — two different drainage jobs
The roof's shape changes the drainage problem completely, which is why flat and sloping roofs drain so differently.
- Flat roofs are the hard case. With almost no natural slope, they depend entirely on a well-built fall, correctly placed outlets, and a maintained system. Water is always tempted to sit. Every defence in this guide — screed to fall, generous outlets, emergency overflow, no ponding — is aimed mostly at flat and terrace roofs, where drainage is a designed system.
- Sloping roofs drain themselves. Gravity pulls water straight down the pitch and off the eaves, so the covering does most of the work. The drainage task shifts to the edge: an eaves gutter to catch the sheet of water leaving the slope and a downpipe to take it down. The risks are different too — water overshooting an undersized gutter in a downpour, or a valley between two slopes concentrating flow. This is the natural roof for high-rainfall regions, precisely because it drains by gravity and cannot pond.
The lesson: on a flat roof, drainage is something you must design in; on a sloping roof, it is mostly something you catch at the edge. Both fail if neglected — but they fail in different ways and are fixed with different parts.
Preventing ponding — the enemy to design out
Ponding — water that stands on a flat roof more than a day or two after rain — deserves its own word because it is both the commonest fault and the most damaging. It concentrates hydrostatic pressure on any membrane flaw, adds unplanned weight, accelerates ageing of the waterproofing, and breeds algae and mosquitoes. A pond is a slow leak waiting to happen.
Ponding is designed out, not mopped up. The cures are all upstream: a generous, correct fall so no area is level; enough outlets, well placed at the true low points; clean detailing at the outlet so water is not held back at the lip; and honest construction so the slab and screed do not sag into unplanned dishes. Where an existing roof already ponds, the fix is to re-screed to a proper fall or add outlets — not to keep re-coating over water that will never leave. If you ever stand on a terrace and see the ghost-rings of dried puddles, the roof is telling you its drainage is failing.
Where it all goes — harvesting and stormwater disposal
Drainage does not end at the bottom of the downpipe; the water has to go somewhere, and in modern India that somewhere increasingly matters. Two honest destinations:
- Rainwater harvesting. Rather than waste clean roof runoff, the downpipes feed a first-flush diverter (which throws away the dirty first wash of the roof) and then a storage tank or a recharge pit that puts water back into the ground. Rooftop rainwater harvesting is mandatory in many Indian cities and states, and a genuine asset in a country of falling water tables. The whole subject — catchment, first flush, filtration, storage and recharge — has its own rooftop rainwater harvesting guide. Plan the drainage layout with harvesting in mind, and the downpipes land where the tank or pit wants them.
- Stormwater disposal. What is not harvested must reach a legitimate stormwater drain, soak pit or public drain — never just spilled onto a neighbour's plot, against your own foundation, or into the sewage line. Discharging clear rainwater into the sewer overloads it and is often against local by-laws; keeping the two separate is both the rule and the sensible thing.
Harvesting rules, first-flush volumes and by-law requirements are set by the Central Ground Water Board (CGWB) and each state's or city's building by-laws, and they change — so verify the current requirement for your location before you design the outfall. The good news is that a well-designed drainage system and a good harvesting system are the same system, planned together from the start.
The one-line answer
Roof drainage is getting rainwater off the roof quickly and completely, and it is the first line of defence against leaks — long before the waterproofing membrane, whose job it makes easy or impossible. It starts with a deliberate fall (about 1 in 100 or steeper on a flat roof) that moves water to outlets placed at the low points, detailed with a clamped puddle flange and a domical grating, and sized to your local rainfall intensity — which is engineering, not a guess, and India's monsoons mean more and bigger when in doubt. Homes use simple gravity drainage (siphonic is for large industrial roofs); flat roofs must have drainage designed in with an independent emergency overflow against blockage, while sloping roofs drain themselves and just need a gutter at the eaves. Design out ponding, feed the downpipes into rainwater harvesting and a legitimate stormwater outfall, and hand the sizing and any work at height to a plumbing engineer and a licensed contractor.
Where to go next
- The whole subject in one map: The Ultimate Guide to Roofing Systems.
- The last line of defence drainage protects: Roof Waterproofing Guide · Flat Roof Waterproofing Guide.
- Catch it at the edge: Roof Gutters & Downpipes Guide.
- Put the water to work: Rooftop Rainwater Harvesting Guide.
- The roofs that need it most: Flat Roof Design Guide · RCC Roof Guide.
- The whole library: Roofing Knowledge Hub.
References
- National Building Code of India (SP 7), Bureau of Indian Standards — Part 9 (Plumbing Services, including roof and surface-water drainage) and Part 11 (Approach to Sustainability, rainwater harvesting); verify the current edition via the BIS catalogue.
- IS 875 (Part 3, wind loads; and associated rainfall/meteorological data): Design Loads for Buildings and Structures — the basis for design rainfall intensity — Bureau of Indian Standards.
- IS 456: Plain and Reinforced Concrete — Code of Practice (the RCC slab and screed the drainage falls are built on) — Bureau of Indian Standards.
- IS 3067: Code of Practice for General Design Details and Preparatory Work for Damp-Proofing and Waterproofing of Buildings (drainage in relation to waterproofing) — verify current status via the BIS catalogue.
- Rainwater harvesting requirements are set by the Central Ground Water Board (CGWB) and by state and municipal building by-laws, which vary by location and change over time — verify the current rule for your city before designing the outfall. Confirm any standard's current status via the BIS catalogue: https://www.services.bis.gov.in/
This is an educational overview. Sizing roof drainage to a design rainfall intensity, designing the falls, specifying outlets and pipes, and any work at height are qualified professional work — engage a plumbing or structural engineer and a licensed contractor for your project, and verify any standard's current status via the BIS catalogue before relying on it.
Export this guide
Related Guides — Deep-dive reading
Stormwater & Surface Drainage in India: Getting Rain Off Your Roof, Paving and Plot
A homeowner's guide to stormwater drainage — sizing roof outlets and downpipes for monsoon rainfall, surface channels and catch basins, grading the plot away from the house, and where the water finally goes, kept firmly separate from your foul drains.
PlumbingRooftop Rainwater Harvesting in India: Catching Rain Off Your Roof for Storage or Recharge
A homeowner's guide to rooftop rainwater harvesting — using the roof as a catchment, sizing gutters and downpipes for your area and rainfall, first-flush and filtration, and where the water finally goes: a storage sump for use or a recharge structure for the ground.
PlumbingRoofing for Heavy Monsoon Areas
Kerala, the Konkan coast, the Western Ghats and the North-East get some of the heaviest rain on earth. A plain-language, India-grounded guide to designing and detailing a roof that sheds it fast, throws it clear of the walls, drains it away and never lets it in.
RoofingRelated Tools — Try Free
Rainwater Tank Sizer
How big should your rainwater tank be? Computes annual harvest, recommended tank capacity in litres, water-bill savings, and payback — for 10 Indian cities.
RWH CalculatorMonsoon-Readiness Checklist
Pre-rain home audit across 9 categories — terrace, drains, waterproofing, electrical, HVAC, pest, vehicles, documents.
Seasonal AuditCross-Ventilation Analyzer
Estimate airflow and air changes per hour (ACH) from room size, window areas, layout, and local wind — with NBC 2016 Part 8 compliance check.
Ventilation Calculator