
Lighting Design Principles: The Rules Good Schemes Follow (2026)
The design rules that separate a room that feels considered from one that feels like a floodlit hall — layering on separate controls, glare control, colour-temperature discipline, direction and shadow, lighting at different heights, and washing the walls — written for the Indian home.
Walk into most Indian homes after dark and you meet the same room twice: one central tubelight or a ring of ceiling downlights blazing at full power, everything evenly bright, every corner the same, no mood anywhere. It is lit, but it is not designed. The difference between that room and one that feels calm, layered and expensive is not the budget or the fixtures — it is a handful of principles that good schemes follow and bad ones ignore.
This guide is the "why" behind a good lighting scheme. It is not a room-by-room plan and it is not a shopping list — it is the set of rules you can hold every room up against, whether you are briefing a designer, checking an electrician's drawing, or deciding which lamp to buy. If you want the room-by-room version, read residential lighting design; for the foundation idea of layers, read layered lighting; and for the whole subject start at the complete guide to lighting.
Scope & how to read this. This is a design guide — it helps you plan the scheme, shield the glare, pick colour temperatures and specify what to buy. It is not a wiring guide. Every point below that involves circuits, switch grouping, dimmer modules, load or fixed wiring is electrician's work — electrical work is safety-critical, so plan the zones here and have a licensed electrician design and install the circuits. Any lux band, ratio or cost note is indicative to help you plan; confirm lux targets against IS 3646 and NBC (SP 7:2026), and get local quotes.
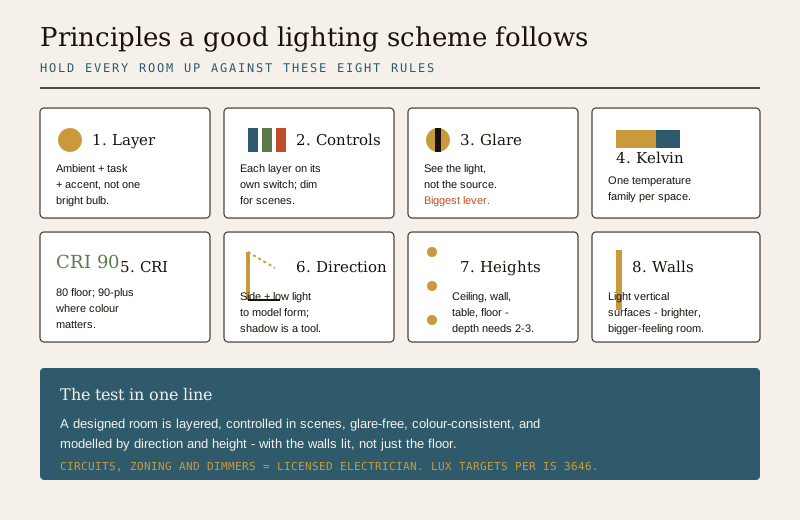
Principle 1 — Layer the light (three jobs, not one bulb)
The first principle underneath everything else: a room needs three kinds of light doing three different jobs, not one bright source trying to do all of them. Ambient light fills the room so you can move safely; task light puts brightness where you actually work — the kitchen counter, the study desk, the mirror; accent light picks out what deserves attention — art, a texture wall, a plant, a pooja niche. One tubelight gives you flat ambient and nothing else, which is exactly why a single-source room feels like an office.
This guide takes layering as the starting assumption. The full treatment — how the three layers stack, typical fixtures for each, and worked room examples — lives in layered lighting and the definitions in functional vs ambient vs accent lighting. Everything that follows assumes you are building in layers.
Principle 2 — Put the layers on separate controls
Layering is wasted if every layer comes on together from one switch. The single biggest upgrade a scheme can have is separate control of each layer — ambient, task and accent on their own switches, and the ones that matter on dimmers — so one room can become several: bright and even for cleaning or a family gathering; ambient plus a table lamp for TV; just accents and a lamp for a quiet evening. Those saved combinations are "scenes", and they are the entire point of designing light rather than just installing it.
- Group by layer, not by fixture count. All the downlights on one control, the cove or ambient on another, the accents on a third, the lamps on their own plug points.
- Dim what sets mood. Ambient and accent layers benefit most from dimming; pure task light you usually want at full.
- Think in scenes. Name the two or three moods each room needs (bright / relax / late-night) and make sure the controls can produce them.
This is where design hands off to the electrician. Which fixtures share a circuit, how the switches are grouped, which modules dim, and the wiring itself are all electrical work — plan the zones and scenes here, then hand a licensed electrician a clear zoning brief. Retro-fitting separate controls after the walls are closed is expensive, so decide the grouping before wiring. Where you want app or voice control, timers and automated scenes, that is the smart lighting layer — but wireless smart bulbs are one workaround only if the circuits were not split at wiring stage.
Principle 3 — Balance and uniformity, then deliberate contrast
Two opposite mistakes, one principle. The first mistake is too much uniformity — the whole room at one even brightness, no focus, nowhere for the eye to rest. The second is random contrast — bright and dark patches with no logic, so the room feels restless. Good schemes are mostly balanced, with contrast placed on purpose.
The tool for contrast is the accent ratio — how much brighter the accent is than the surrounding ambient. Roughly:
| Effect wanted | Accent-to-ambient brightness | Feels like |
|---|---|---|
| Barely noticeable lift | About 2 to 1 | Gentle, easy to miss |
| Comfortable highlight | About 5 to 1 | The everyday "this matters" cue — art, a niche |
| Strong drama | About 10 to 1 or more | Gallery / feature-wall drama; use sparingly |
Uniformity has its place — a kitchen counter, a study, a staircase want even, shadow-free light for safety and work. Living rooms, bedrooms and dining want the opposite: a calm ambient base with a few things lifted out of it. The commonest Indian failing is uniformity everywhere at full blast; the fix is not more light but less even light — dim the base and let a couple of accents do the talking. For the catalogue of these errors, see common lighting mistakes.
Principle 4 — Control glare (the biggest quality lever)
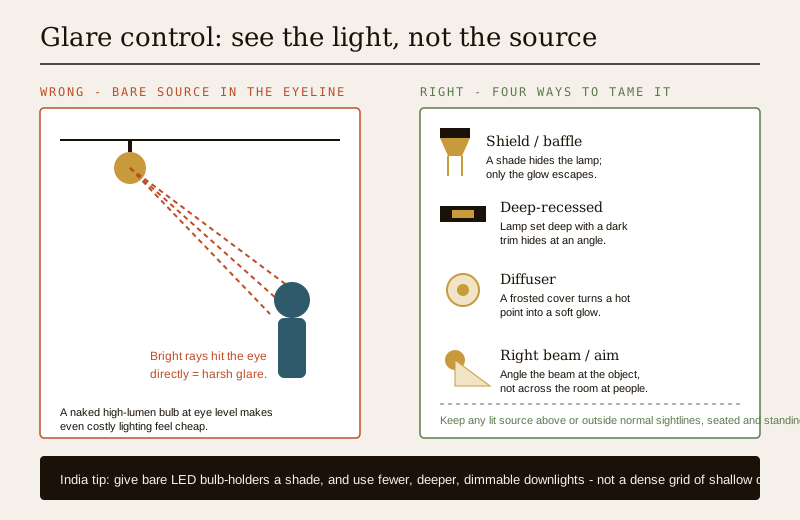
If you change one thing, change this. Glare — a bare, bright source in your field of view — is what makes cheap lighting feel cheap, and killing it is the single move that most separates a designed scheme from a bad one. A modest fixture you never see the lamp of looks better than an expensive one that stabs you in the eye.
The rule is simple: you should see the light, not the source. Some ways to get there:
| Glare fix | What it does | Where it matters most |
|---|---|---|
| Shield the source | A baffle, shade or cove hides the lamp; you see only the light it throws | Coves, under-cabinet, wall lights |
| No bare bulb in the eyeline | Keep the lit source above or outside normal sightlines when seated and standing | Living, bedroom, dining |
| Deep-recessed downlights | A lamp set deep in the housing, or with a dark "anti-glare" trim, hides from angled view | Ceiling downlights everywhere |
| Right beam angle | Narrow beams for accents, wide for wash; a wrong beam spills into eyes or misses the target | Accent and task spots |
| Diffusers and shades | Frosted covers and fabric shades turn a hot point into a soft glow | Lamps, wall lights, bathroom |
| Aim, don't blind | Angle adjustable spots at the object, not across the room at people | Art and feature lighting |
Two India-specific offenders. First, the bare LED "bulb holder" hanging in a bedroom or balcony — a naked high-lumen source at eye height is pure glare; give it a shade. Second, over-bright, over-cool downlights packed too close in a false ceiling, each one a little sun — fewer, deeper, dimmable downlights beat a dense grid of shallow ones. For the ceiling detailing itself, see the false ceiling guide.
Principle 5 — Keep colour temperature consistent within a space
Colour temperature — measured in kelvin (K) — is whether light reads warm and yellow (about 2700K), neutral (about 4000K), or cool and blue-white (5000K and up). The principle is not "warm is right and cool is wrong"; it is do not mix them randomly in one space. A room with a 6500K "cool daylight" tubelight on the ceiling and a warm 3000K lamp in the corner looks broken — one half feels like a hospital, the other like a living room, and the clash is instantly readable even to someone who could never name it.
The Indian default trap is exactly this: a 6500K tubelight or cool downlights over warm-toned walls, wood and upholstery, so the whole scheme fights itself. Decor chosen in warm daylight looks grey and clinical after dark. The discipline:
- Pick one temperature family per space and stick to it across every fixture — ceiling, wall and lamp.
- Warm (2700K–3000K) to relax — living, bedroom, dining. This is what makes a home feel like a home.
- Neutral to cool (3500K–5000K) to work — kitchen counters, study, bathroom mirror, utility — where you want alertness and true detail.
- Transition, don't jar — if a kitchen (cooler) opens into a living room (warm), let them each be internally consistent rather than blending mid-room.
If you want the flexibility of both, tunable-white fixtures shift warm-to-cool on demand, so one room can be cool for cooking and warm for dinner. The full treatment of kelvin, what each temperature suits, and how it pairs with CRI is in colour temperature and CRI.
Principle 6 — Choose high CRI so colours look true
Colour temperature is what colour the light is; CRI (Colour Rendering Index) is how honestly that light shows the colours of everything it lands on, scored out of 100. Cheap LEDs with low CRI make skin look sallow, wood look flat, food look grey and a carefully chosen paint or saree colour look wrong — the surfaces are fine, the light is lying about them. It is an invisible quality that quietly ruins expensive interiors.
The principle: specify CRI 80 as a floor, 90-plus where colour truly matters — the wardrobe and dressing mirror, the kitchen, the dining table, any art or textile you are lighting to show off. It costs a little more and is worth it exactly where people look closely. The deeper explanation and how to read a spec sit in colour temperature and CRI and the buying side in the LED lighting guide.
Principle 7 — Use direction and shadow to model a space
Flat, shadowless light is the reason an over-lit room feels dead: with light coming evenly from everywhere, nothing has form. Shadow is not the enemy of good lighting — it is the tool. The direction light comes from changes how a face, a texture or an object reads.
- Down light (ceiling) is efficient and good for ambient and task, but light straight down casts hard shadows under the brow and nose — unflattering for faces and dining.
- Side light (wall lights, lamps at table height) rakes across surfaces and skin, revealing texture and modelling faces kindly — which is why bedside and dining light works better low and to the side than from a downlight overhead.
- Grazing (light skimming close along a wall) exaggerates texture — brilliant on stone, brick or a textured feature wall, wrong on a wall you want to look flat and smooth.
- Uplight (light thrown up a wall or into a cove) softens a room and lifts the ceiling, adding perceived volume.
The practical rule: do not light everything from the ceiling. Mix downlight for the base with side and low light for the layers, so faces are flattered and surfaces get modelled. A dining table lit only from a ceiling downlight gives everyone raccoon eyes; add a low pendant or the warm glow of side light and the same people look well.
Principle 8 — Layer light at different heights for depth
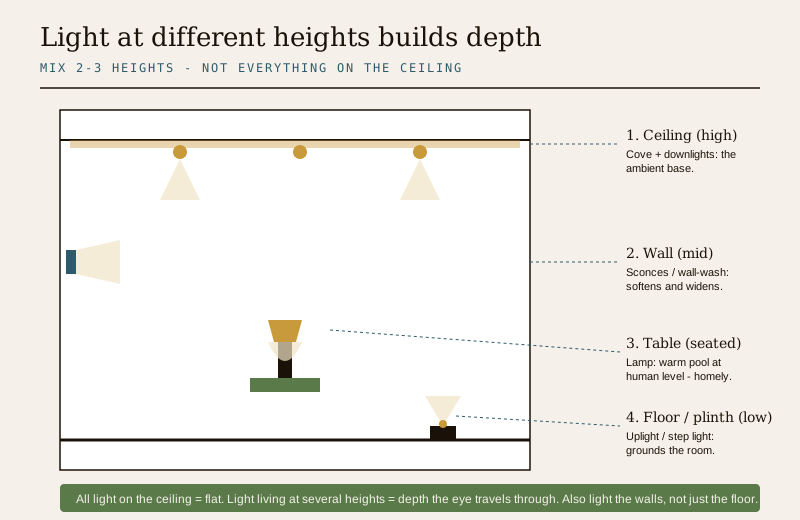
Closely related, and just as neglected: vary the height at which light sits in the room. A scheme where every source is on the ceiling is flat no matter how many fixtures you add. Depth comes from light living at several levels — high, mid and low — so the eye travels through the room instead of scanning one bright plane.
| Height | Typical fixtures | What it adds |
|---|---|---|
| Ceiling (high) | Cove, downlights, pendants | The ambient base and general fill |
| Wall (mid) | Wall lights, sconces, wall-washers | Mid-level glow; softens and widens the room |
| Table / seated | Table and floor lamps | Warm pools at human level; the "homely" layer |
| Floor / plinth (low) | Plinth lights, floor uplights, step lights | Grounds the room and adds a low accent |
You do not need all four in every room, but you want at least two or three heights — a ceiling layer plus a lamp plus a wall light already reads as far richer than six downlights alone. This is what makes hotel lobbies and good living rooms feel deep: light at many heights, not more light at one.
Principle 9 — Light the walls, not just the floor
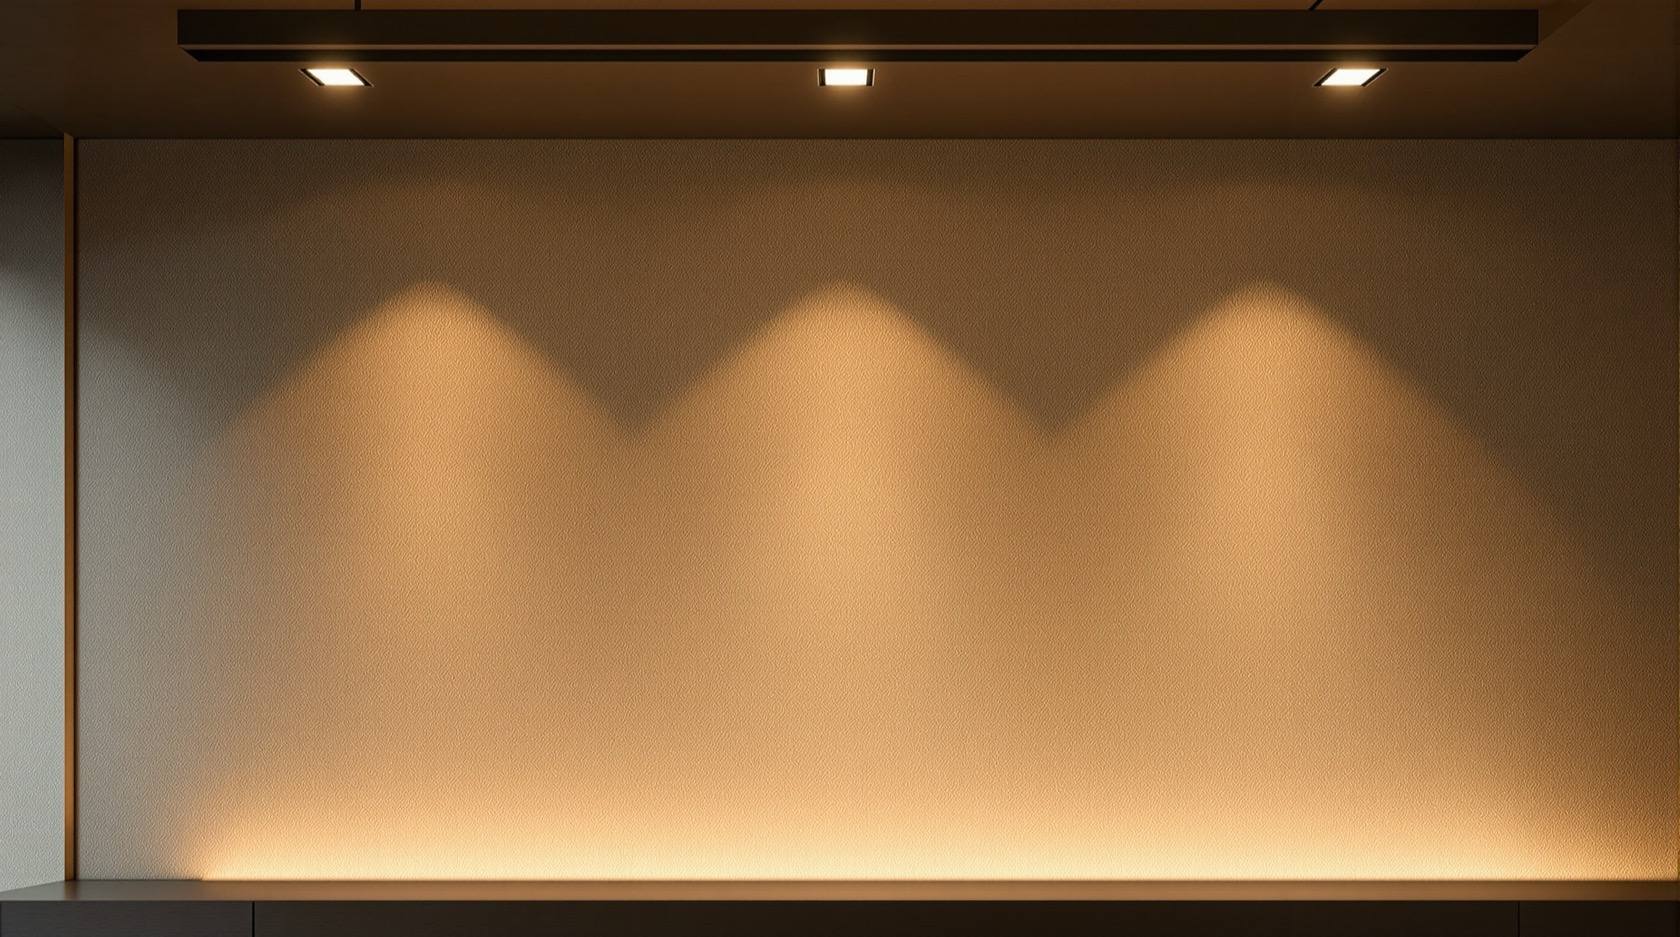
A quiet, powerful trick: a room's perceived brightness comes mostly from its lit vertical surfaces — the walls — not its floor. Downlights pool light on the floor and leave the walls dim, so the room reads as dark and cramped even with plenty of wattage burning. Turn some of that light onto the walls — wall-washing (even, broad light down a wall) or wall-grazing (raking light for texture) — and the same room feels brighter, larger and calmer, often on less total light.
- Wash walls to feel more space and light — a bright wall bounces light back and expands the room; brilliant in small flats and dark corridors.
- Wall-washing beats adding downlights when a room feels dim — redirecting light to the walls does more than piling on more ceiling fixtures.
- Use it on the surfaces that count — the feature wall, the TV wall, a corridor end, a stair wall — to lift the whole space.
This is one of the highest-return moves in the whole guide, and it costs little. For the architectural version — coves, grazing, integrated details — see architectural lighting design.
Principle 10 — Design for flexibility and future-proofing
A scheme you cannot change is a scheme you will outgrow. Rooms change use, families change, tastes change — so build in flexibility now, because the cheap time to do it is at wiring stage:
- Extra switch points and dimmers where you might later want them cost little now and a wall-chase later.
- Spare plug points at lamp locations mean you can add or move table and floor lamps without an electrician.
- Neutral wires at switches future-proof for smart modules later — a request to make to the electrician now.
- Adjustable and tunable fixtures adapt as the room's use or your taste shifts.
Decide the flexibility with the smart lighting guide in mind, then have the electrician provision for it. Retro-fitting is the expensive path; foresight at wiring stage is nearly free.
Principle 11 — Keep energy discipline
More light is not better light, and an over-lit home is both unpleasant and wasteful. The last principle keeps the scheme honest:
- Light to the task, not to the maximum. Match the level to what the space is for — a bedroom does not need a study's lux. The lux level calculator gives sensible targets by room against IS 3646.
- Use efficient LEDs and look at the BEE star rating and lumens-per-watt, not just wattage — the LED lighting guide covers buying.
- Dimming and zoning save energy as well as making scenes — you rarely run every layer at full.
- Let daylight do the day shift — good daytime schemes lean on windows, covered in daylighting design, and switch to layered artificial light only after dark.
For the bigger efficiency picture, energy discipline connects to the sustainability hub and the deep buying technicals in the electrical hub.
The principles checklist
Hold any room up against this list — if it fails several, that is why it feels off:
| Principle | The test | Common India failing |
|---|---|---|
| Layered | Three layers present (ambient / task / accent)? | One tubelight doing everything |
| Separate controls | Each layer on its own switch, moods dimmable? | Everything on one switch, full blast |
| Balance vs contrast | Calm base with purposeful accents? | Uniform brightness everywhere |
| Glare controlled | You see the light, not the bare source? | Naked bulbs and dense cool downlights |
| Colour temperature | One family per space? | 6500K tubelight over warm decor |
| CRI | 80-plus, 90-plus where colour matters? | Cheap low-CRI LEDs dulling colours |
| Direction | Mix of down, side and low light? | Everything lit from the ceiling |
| Heights | Two or three heights of light? | All sources on the ceiling plane |
| Walls lit | Vertical surfaces washed, not just floor? | Downlights pooling only on the floor |
| Flexible | Dimmers, spare points, future-proofed? | Fixed, unchangeable single scene |
| Energy | Lit to the task, efficient LEDs? | Over-bright, wasteful, no daylight use |
How it connects
- Build the foundation with the complete guide to lighting (the pillar), then layered lighting and functional vs ambient vs accent lighting.
- Apply these principles room by room in residential lighting design, and see the errors they prevent in common lighting mistakes.
- Go deep on the technical side you should not duplicate: colour temperature and CRI, the LED lighting guide, and the automation and scene layer in smart lighting.
- Set levels and quantities with the lux level calculator, the lumen requirement calculator and the home lighting planner.
- Hand the circuits, zoning and dimmer wiring to a licensed electrician via the electrical hub; keep energy honest with the sustainability hub and let windows carry the day via daylighting design.
Key takeaways
- Good lighting follows principles, not budget — layering, separate controls, glare control, colour discipline, direction, height and lit walls turn the same fixtures into a considered room.
- Put every layer on its own control and dim the ones that set mood, so one room can become several scenes — but the circuits and dimmers are a licensed electrician's job; plan the zones before wiring.
- Glare control is the biggest quality lever — shield the source, keep bare bulbs out of the eyeline, use deep-recessed trims, diffusers and the right beam angle. You should see the light, not the lamp.
- Keep one colour-temperature family per space — warm to relax, cooler to work — and never mix a 6500K tubelight with warm decor; specify CRI 80-plus, 90-plus where colour matters.
- Use direction, several heights of light, and lit walls to add depth and perceived brightness — do not light everything flatly from the ceiling.
- Future-proof at wiring stage with dimmers, spare points and neutral wires, and keep energy discipline by lighting to the task, not the maximum.
- Every lux band and ratio here is indicative — confirm against IS 3646 and NBC (SP 7:2026), and get local quotes.
References
- IS 3646 — code of practice for interior illumination (recommended lux levels for rooms and tasks; named generally).
- National Building Code of India, NBC (SP 7:2026), Bureau of Indian Standards — general illumination and lighting provisions.
- National Lighting Code and IS 16107 — LED luminaire performance (named generally, no clause numbers cited).
- IS 10322 / IEC 60598 — luminaire safety, and IP ratings per IS/IEC 60529 (IP20 dry, IP44 splash, IP65 wet) — named generally.
- Energy Conservation Building Code (ECBC) and BEE star ratings — lighting power density and LED efficiency (named generally).
- A licensed electrician — circuit grouping, switch zoning, dimmer modules and all fixed wiring for the scenes planned here.
All lux bands, accent ratios, colour-temperature ranges and cost notes here are indicative design aids only; confirm the governing values against IS 3646, NBC (SP 7:2026) and current product specifications, get local quotes, and have a licensed electrician design, install and certify all circuits, switch zoning and dimmer wiring.
Export this guide
Related Guides — Deep-dive reading
Lighting Controls & Dimming Design: Zones, Scenes & Switches (2026)
How to plan lighting control so an Indian home's light is flexible — split each room's layers onto separate switches, choose dimmers that actually work with LEDs, add two-way switching where you need it, and layer scenes on top. The design decisions you must settle before the electrician wires.
LightingThe Complete Guide to Home Lighting Design in India (2026)
The start-here master guide to designing light for an Indian home — what good lighting really does, the layered-design mindset that replaces the single ceiling tubelight, the decision sequence from tasks to budget, and where the design work hands off to a licensed electrician.
LightingBathroom Mirror Lighting India: Shadow-Free Vanity Light, Colour Temp, CRI & Cost (2026)
Why a single ceiling downlight throws ugly shadows on your face, how vertical sconces either side of the mirror beat a light bar above, when a backlit mirror is glow not task light, plus the colour temperature, CRI, mounting height, IP rating and 2026 rupee costs that actually get make-up and shaving right.
BathroomsRelated Tools — Try Free
Circadian Light Meter
Patient-centric circadian lighting visualizer for Indian healthcare design — time-of-day × intensity → CCT, melanopic lux (EML / mEDI), melatonin suppression, and an alertness curve. Calibrated against WELL v2 L03 Circadian Lighting Design, CIE S 026:2018, Brainard 2001, and Lucas et al. 2014.
Circadian ToolCross-Ventilation Analyzer
Estimate airflow and air changes per hour (ACH) from room size, window areas, layout, and local wind — with NBC 2016 Part 8 compliance check.
Ventilation CalculatorBathroom Lighting Calculator
A lux-based bathroom lighting plan — total lumens, number of LED downlights, mirror task lighting and indicative wattage.
Bathroom Calculator