
Recessed Lighting & Downlights: Layout, Spacing & Beam (2026)
The design guide to recessed downlights — the false-ceiling workhorse of the Indian home. How to place them, how far apart, what beam angle to buy, how to kill the bright-dot glare, and how to hand clean positions to your electrician before a single hole is cut.
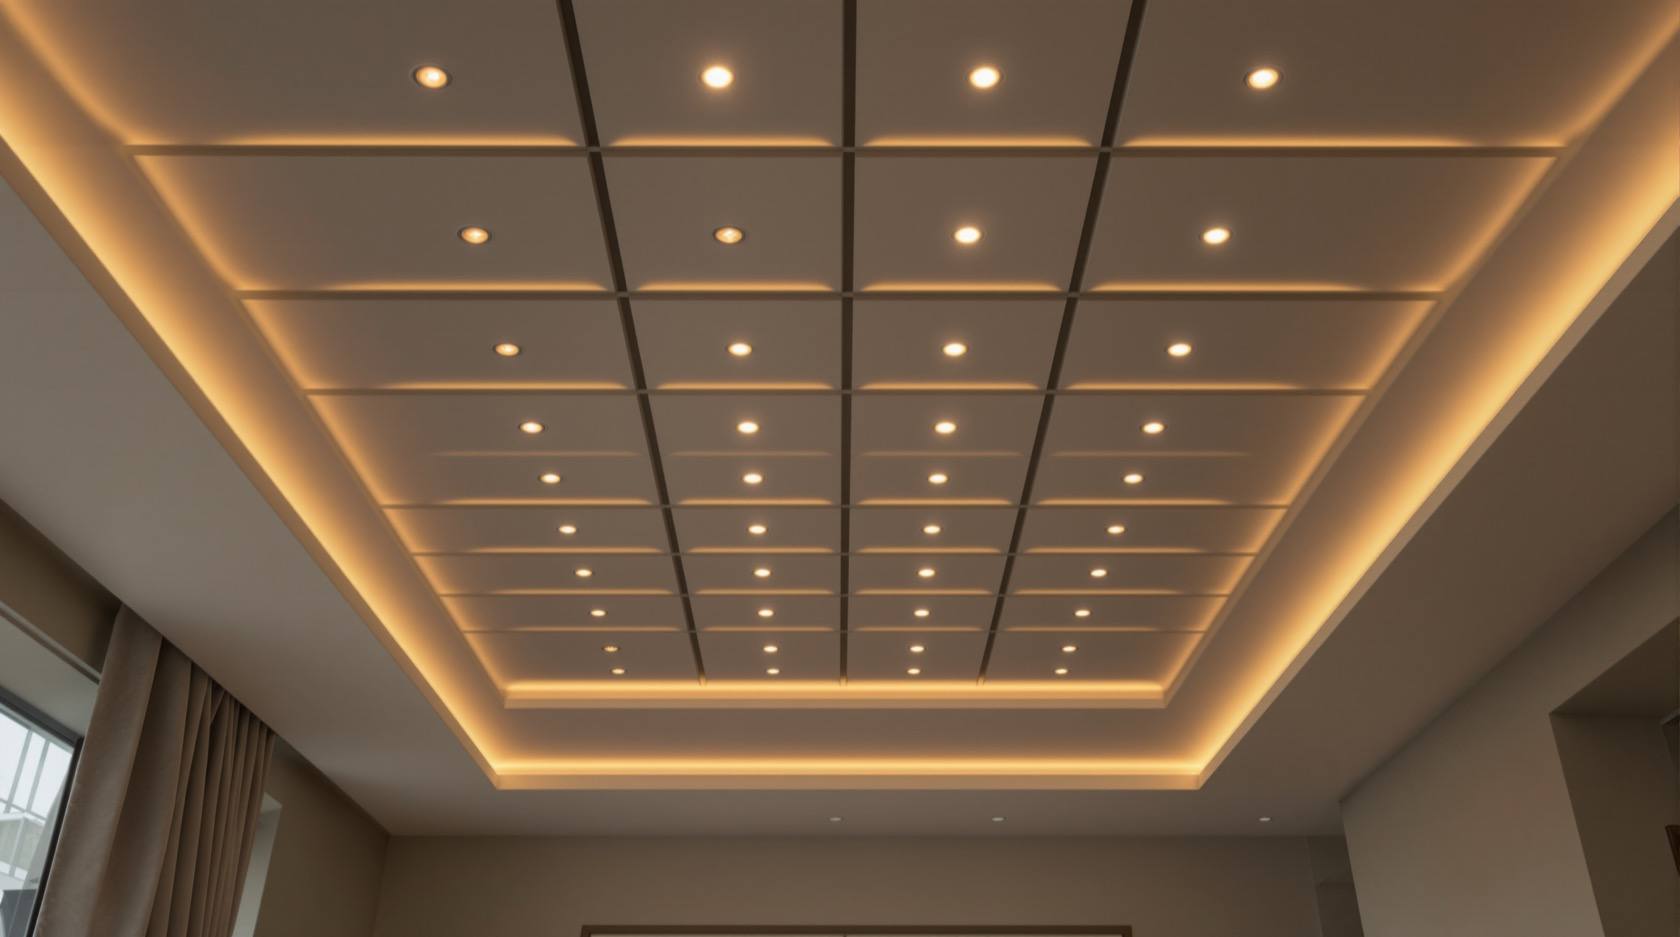
Walk into almost any newly built Indian flat and look up: a false ceiling studded with round recessed downlights. They are the default, the workhorse, the thing the POP contractor punches in by habit — and precisely because they are so easy to add, they are the fixture most often done badly. A room over-peppered with tiny bright dots reads as a "ceiling of holes" or an airport runway; a room with them thoughtfully placed disappears into a soft, even, glare-free wash you never notice. The difference is design, decided before the electrician drills.
This guide is the design side of the recessed downlight — where to put them, how far apart, what beam angle to buy, how deep to recess them, and when to reach for an adjustable head instead. It is a fixture-type sibling in the Lighting hub; start from the complete guide to lighting for the whole scheme, and lean on the layered lighting guide so downlights become one layer, not the only one.
Scope & how to read this. This is a design and specification guide — how to plan the layout and choose the luminaire, not how to wire it. Every spacing figure, beam angle and wattage band is typical and indicative to help you plan and brief; confirm lux targets against IS 3646 (interior illumination) and NBC (SP 7:2026). The actual wiring, circuits, driver load, dimmer and any wet-area electrical work is safety-critical and belongs to a licensed electrician — decide your positions first, then hand them over. Costs are relative bands only; get local quotes.
What a recessed downlight actually is
A recessed downlight is a luminaire set flush into the ceiling so only its trim and the light show, not the fixture body. In an Indian home that ceiling is almost always a POP or gypsum false ceiling with the plenum above it hiding the driver and wiring — which is exactly why downlights and false ceilings grew up together here. The modern version is a fixed LED unit (often a COB — chip-on-board — behind a small lens or a flat panel) that throws light downward in a cone.
Downlights are quiet, flush and architectural — they light without being seen, which is their whole appeal and also their trap. Because they only point down, a room lit by downlights alone gets bright floors and a gloomy ceiling, and every face gets hard top shadows. They are a layer, never the layer.
The three jobs a downlight can do
- Ambient wash — a grid of wide-beam downlights giving general fill so the room is comfortably, evenly lit. This is the most common use and the one most often overdone.
- Task light — downlights placed directly over a work surface: the kitchen counter, a study, a bathroom vanity. Position matters more than count here — a light behind you throws your own shadow onto the task.
- Accent / wall-wash — narrow-beam or angled heads that graze a textured wall, pick out art, or wash a curtain. This is where adjustable (gimbal / eyeball) and dedicated wall-wash trims earn their place.
One fixture family, three very different design intents — and mixing them thoughtlessly is how rooms end up over-lit and flat. Sort your downlights by job first; the functional vs ambient vs accent lighting guide is the framework.
The big decision: spacing
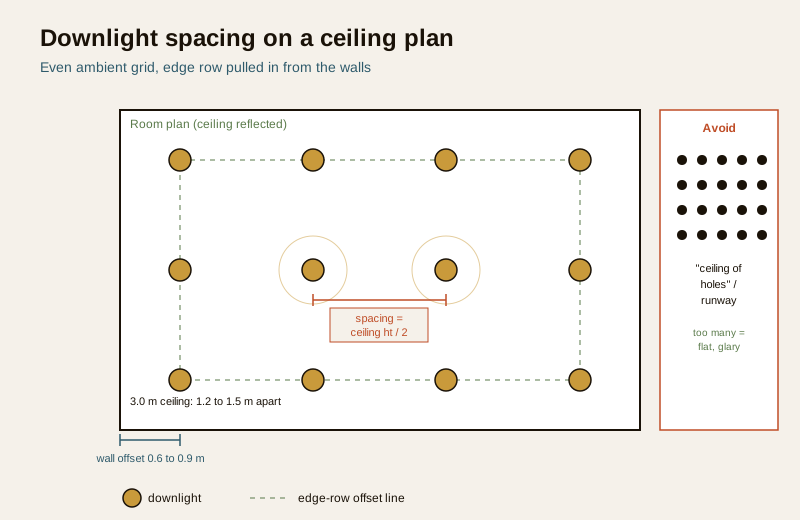
Spacing is where most downlight schemes are won or lost. Too few and you get pools of light with dark gaps between; too many and you get the runway. The goal is even illuminance with no obvious hot-spots for ambient, and deliberate placement for task and accent.
The classic rule of thumb ties spacing to ceiling height: divide the mounting height (floor to ceiling) by two, and that is roughly the spacing between downlights for smooth ambient overlap. A standard Indian room around 3 m (10 ft) floor-to-ceiling therefore wants downlights roughly 1.2–1.5 m apart; a taller 3.6 m ceiling can stretch to nearly 1.8 m. The edge row should sit about 0.6–0.9 m in from the walls — close enough to light the wall, far enough to avoid scalloped glare running down the plaster. Use the lighting spacing calculator to turn your room's dimensions and ceiling height into an actual grid, and the fixture quantity calculator to sanity-check how many you truly need.
| Ceiling height (floor to ceiling) | Purpose | Indicative spacing between downlights | Wall offset |
|---|---|---|---|
| ~2.7 m (9 ft) | Ambient wash | 1.0–1.3 m | 0.6 m |
| ~3.0 m (10 ft) | Ambient wash | 1.2–1.5 m | 0.6–0.9 m |
| ~3.6 m (12 ft) | Ambient wash | 1.5–1.8 m | 0.9 m |
| Any | Task (over counter/desk) | Tight, aligned to the surface — 0.6–0.9 m | Centred over the work zone |
| Any | Accent / wall-wash | Spaced to the object — 0.6–1.0 m off the wall | 0.6–0.9 m from wall face |
Two layout patterns matter. A grid (rows and columns) suits open ambient fill in a regular room. A perimeter run — downlights following the ceiling edge or a wall — is for washing walls and framing the space, and pairs beautifully with a cove or indirect lighting recess doing the soft bounce. The mistake is defaulting to a dense uniform grid everywhere; a big living room usually wants a sparse ambient grid plus a few accents and a cove, not thirty identical holes. When in doubt, fewer, better-placed downlights beating a bright ceiling — the common-lighting-mistakes guide calls this "spotlight-itis," and it is the single most common Indian downlight fault.
The big decision: beam angle
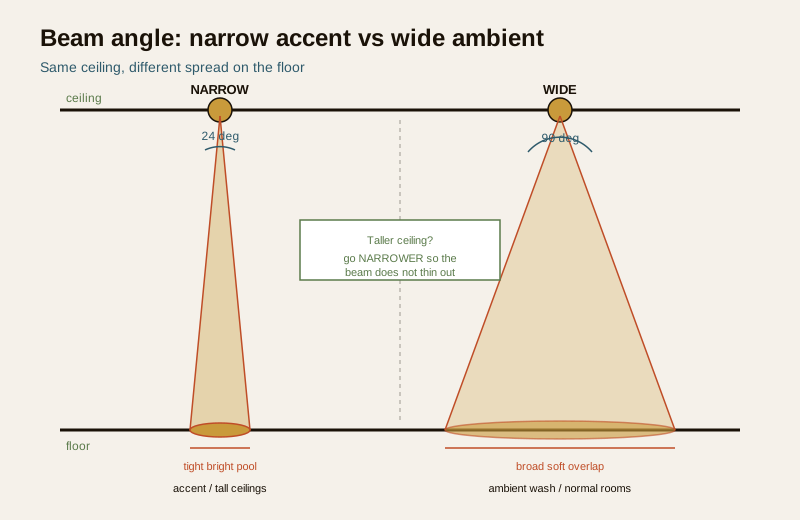
Beam angle is how wide the cone of light spreads — and it is the spec most homeowners never ask about, then regret. A narrow beam is a tight spotlight; a wide beam is a soft flood. The wrong choice gives you either dazzling hot circles on the floor or a weak, patchy wash.
- Narrow (~15–24 deg) — a concentrated spot for accent work, art, a sculpture, or tall/double-height ceilings where the light has a long throw to the floor and would spread too thin if wide.
- Medium (~36–45 deg) — the flexible middle for general task light over a counter or table, and for accent on nearer objects.
- Wide (~60–120 deg) — a broad soft flood for ambient ceiling wash at normal room heights, where you want overlap and no visible edges.
The height interaction is the catch: the higher the ceiling, the more a given beam spreads by the time it reaches the floor, so tall rooms want narrower beams and standard rooms want wider ones. Getting beam and spacing right together is what produces an even floor with no scallops.
| Beam angle | Character | Best for |
|---|---|---|
| 15–24 deg (narrow) | Tight spotlight, long throw | Accent on art/objects; tall or double-height ceilings |
| 36–45 deg (medium) | Focused pool | Task over counters, desks, dining; near-wall accent |
| 60–90 deg (wide) | Soft flood | Ambient wash at 2.7–3.0 m ceilings |
| 90–120 deg (very wide) | Broad even fill | Low ceilings, corridors, uniform general light |
Downlight vs wall-wash vs adjustable
Not every recessed fixture points straight down. Choosing the type of trim is a design decision:
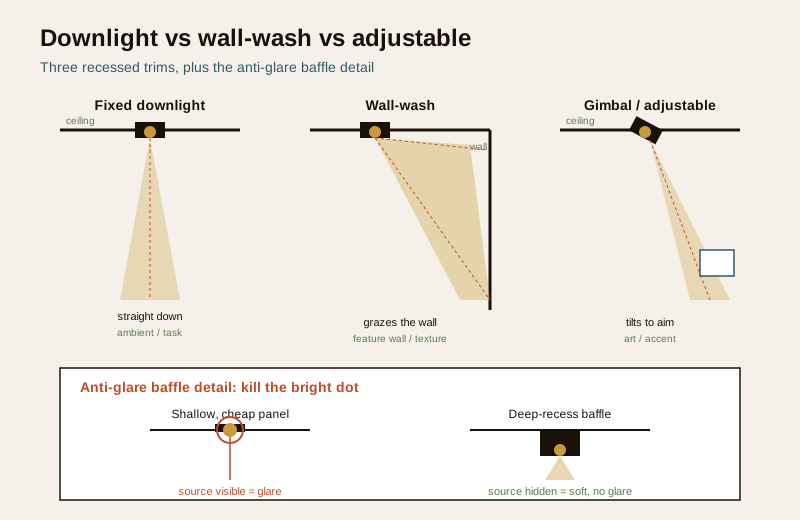
- Fixed downlight — points straight down, flush. The default for ambient and task. Cheapest, cleanest, least flexible.
- Adjustable / gimbal / eyeball — the light module tilts and rotates within the trim, so you can aim it at a wall, a painting or a headboard. Buy these anywhere you want to point light — they cost a little more and are worth it for accent flexibility. Perfect partners for track and spotlight lighting where a wall of changing art wants re-aiming.
- Wall-wash trim — a downlight with an internal reflector/scoop that throws light forward and down onto a nearby wall, grazing it evenly from top to bottom. Set in a perimeter run about 0.6–0.9 m off the wall, these turn a plain wall into a lit surface — the trick behind expensive-looking rooms.
A good scheme mixes them: fixed downlights for the ambient grid, a wall-wash run to light a feature wall, and a few gimbals aimed at art or the dining table.
Depth, baffles and killing the glare
The number-one visual flaw in cheap Indian downlighting is the bright dot — a naked LED source you can see straight into, dazzling and cheap-looking. The fix is recess depth and an anti-glare baffle. A deep-recessed fixture sets the LED further up inside the housing so you only see it when standing directly under it; a dark honeycomb or black baffle absorbs stray light and hides the glare, giving a "black hole" trim where the light appears but the source does not. This one detail — asking for anti-glare, deep-recess COB downlights instead of the flat cheap panels — is the biggest single upgrade to how a room feels, and it barely costs more.
Also mind trim and finish: white trims disappear into a white POP ceiling; black or dark-baffle trims read as deliberate architectural dots; a trimless / plaster-in downlight vanishes into the ceiling entirely for the cleanest luxury look (and needs the false-ceiling detail planned up front). Match the lighting design principles — glare control and layering — rather than chasing brightness.
Wattage, lumens and colour
Downlight power is quoted in watts, but what you actually care about is lumens (light output) and lux (light landing on the surface). A typical residential recessed downlight runs 6–15 W LED, giving roughly 500–1200 lumens each — plenty for ambient fill when spaced right. Don't over-wattage to "make it bright": that is how rooms get glary and flat. Size the room's total lumens with the lumen requirement calculator, then divide across a sensible number of fixtures.
Colour temperature matters as much as quantity: warm white (2700–3000 K) for living, bedrooms and dining; neutral (~4000 K) for kitchens, study and bathrooms. Keep it consistent within a room, and buy a decent CRI (80+, ideally 90+) so skin, food and finishes look true — the deep dive lives in the colour temperature & CRI guide and the broader LED lighting guide. Prefer BEE-star-rated LED for efficiency, and confirm the driver and dimming behaviour with your electrician.
How many, and where — avoiding over-lighting
The strongest instinct to fight is "more is safer." A room lit only by a dense downlight grid is flat, shadowless and tiring — the "over-downlit room" that Indian flats are full of. The design goal is layers, not a blanket of spots: a modest ambient downlight grid, plus wall grazing, plus a pendant or cove for warmth, plus task light where you work, plus lamps for evening. Downlights carry the ambient layer and some task; they should almost never be the only light.
Rules that keep you honest:
- Put downlights where light is needed, not on a reflex grid. A seating zone, the kitchen counter, a wardrobe front — light the activity, leave calm space between.
- Never put a downlight straight over where someone lies or sits for long (bed, sofa) — the top-down glare into the eyes is unpleasant. Offset it, or use a lamp there.
- Pair with dimming. One bright setting for cleaning, a low warm setting for evening — decided with your electrician's dimmable driver choice.
- Kitchen counters need task downlights in front of you, not behind — a light over your back throws your shadow onto the chopping board. See kitchen lighting mistakes.
IP ratings for bathrooms and outdoors
A downlight over a shower or on an open balcony must resist water. This is an IP rating (ingress protection, per IS/IEC 60529): the ordinary dry-room downlight is around IP20 and unsafe over wet zones. For a bathroom ceiling near the shower, specify at least IP44 (splash) and IP65 directly over the shower or on a covered outdoor soffit; anything fully exposed outdoors wants IP65+. This is both a safety and a longevity issue — get the wet-area fixtures and their wiring signed off by your electrician, and see the outdoor & landscape lighting guide for exterior recessed work.
The electrician hand-off
Here is the workflow that separates a good ceiling from a regretted one: you decide the positions on the plan; the electrician wires to them. Once the POP false ceiling is up and the holes are cut, moving a downlight means patching plaster — expensive and ugly. So before wiring:
1. Mark every downlight, wall-wash and gimbal on a reflected ceiling plan — with spacing and wall offsets from the tables above (or straight from the lighting spacing calculator).
2. Decide circuits and switching zones with the electrician — ambient grid on one dimmer, accents on another, task separately.
3. Confirm driver location, load, dimming type and IP rating for wet areas — the electrician's call, and safety-critical.
4. Coordinate cut-out sizes with the false ceiling guide before the POP goes up, so the plenum depth and cut-outs suit your chosen fixtures.
Design is yours; the wiring, load and compliance are the licensed electrician's — that boundary keeps the ceiling safe and your positions intact.
How it connects
- Anchor everything to the complete guide to lighting and treat downlights as one layer of the layered lighting scheme, following the lighting design principles.
- Combine with the other flush/ceiling fixtures: cove & indirect lighting for soft bounce and track & spotlight lighting for re-aimable accent.
- Avoid the classic faults in common lighting mistakes and kitchen lighting mistakes — over-lighting and shadowed counters.
- Get the ceiling itself right with the false ceiling guide, and the LED/colour technicals from the LED lighting guide and colour temperature & CRI guide.
- Size and place with the lumen requirement calculator, the lighting spacing calculator and the fixture quantity calculator.
Key takeaways
- Recessed downlights are the false-ceiling workhorse — flush, quiet, architectural — but they only point down, so they are a layer, never the only layer.
- Spacing follows ceiling height: roughly half the floor-to-ceiling height between fixtures, edge row 0.6–0.9 m off the walls; avoid the dense "ceiling of holes."
- Beam angle matters — narrow (~15–24 deg) for accent and tall ceilings, wide (~60–120 deg) for ambient wash; taller rooms need narrower beams.
- Choose the trim for the job — fixed for ambient, gimbal for aimable accent, wall-wash for grazing a feature wall.
- Kill glare with deep-recess, anti-glare baffle COB fixtures instead of cheap flat panels — the single biggest quality upgrade.
- Don't over-wattage or over-populate; layer downlights with cove, pendants and task light, and never place one straight over a bed or sofa.
- Use IP44/IP65 over wet zones, and decide positions before the electrician wires — moving a downlight after the POP is up means patching plaster.
References
- IS 3646 — code of practice for interior illumination and recommended lux levels (named generally).
- NBC (SP 7:2026), Bureau of Indian Standards — general illumination and lighting provisions.
- National Lighting Code — general guidance on interior lighting practice.
- IS 16107 / IS 10322 / IEC 60598 — LED luminaire performance and luminaire safety (named generally).
- IP ratings per IS/IEC 60529 — ingress protection classes (IP20 dry, IP44 splash, IP65 wet/outdoor).
- ECBC lighting power density and BEE star rating — energy efficiency for LED downlights (named generally).
- A licensed electrician for circuits, driver load, dimming and all wet-area wiring, and a lighting designer for the reflected ceiling plan.
All spacing figures, beam angles, wattages, lux targets and cost bands here are indicative planning aids only; confirm illumination levels against IS 3646 and NBC (SP 7:2026), get local quotes for cost, and have a licensed electrician design, wire and certify all circuits, drivers, dimming and wet-area electrical work.
Export this guide
Related Guides — Deep-dive reading
Bathroom Mirror Lighting India: Shadow-Free Vanity Light, Colour Temp, CRI & Cost (2026)
Why a single ceiling downlight throws ugly shadows on your face, how vertical sconces either side of the mirror beat a light bar above, when a backlit mirror is glow not task light, plus the colour temperature, CRI, mounting height, IP rating and 2026 rupee costs that actually get make-up and shaving right.
BathroomsCommon Home Lighting Mistakes in India (and How to Fix Them) (2026)
The most common lighting mistakes in Indian homes — one bright tubelight per room, everything blue-white, glare, no dimming, dark stairs — and the specific, affordable fix for each, plus the one habit that causes half of them: not planning the scheme before the electrician wires.
LightingCove & Indirect Lighting: The Soft Glow Done Right (2026)
The design guide to cove and indirect lighting for Indian false ceilings — what it really is, why it is so loved and so often botched, and the depth, lip, setback, strip density and colour rules that separate a smooth ceiling wash from a strip of visible dots.
LightingRelated Tools — Try Free
False Ceiling Cost Estimator
Live ₹/sqft across 8 ceiling types — POP, gypsum, designer, metal, PVC, wooden — with cove and spot lighting for 20 Indian cities.
Cost CalculatorBathroom Lighting Calculator
A lux-based bathroom lighting plan — total lumens, number of LED downlights, mirror task lighting and indicative wattage.
Bathroom CalculatorCircadian Light Meter
Patient-centric circadian lighting visualizer for Indian healthcare design — time-of-day × intensity → CCT, melanopic lux (EML / mEDI), melatonin suppression, and an alertness curve. Calibrated against WELL v2 L03 Circadian Lighting Design, CIE S 026:2018, Brainard 2001, and Lucas et al. 2014.
Circadian Tool