
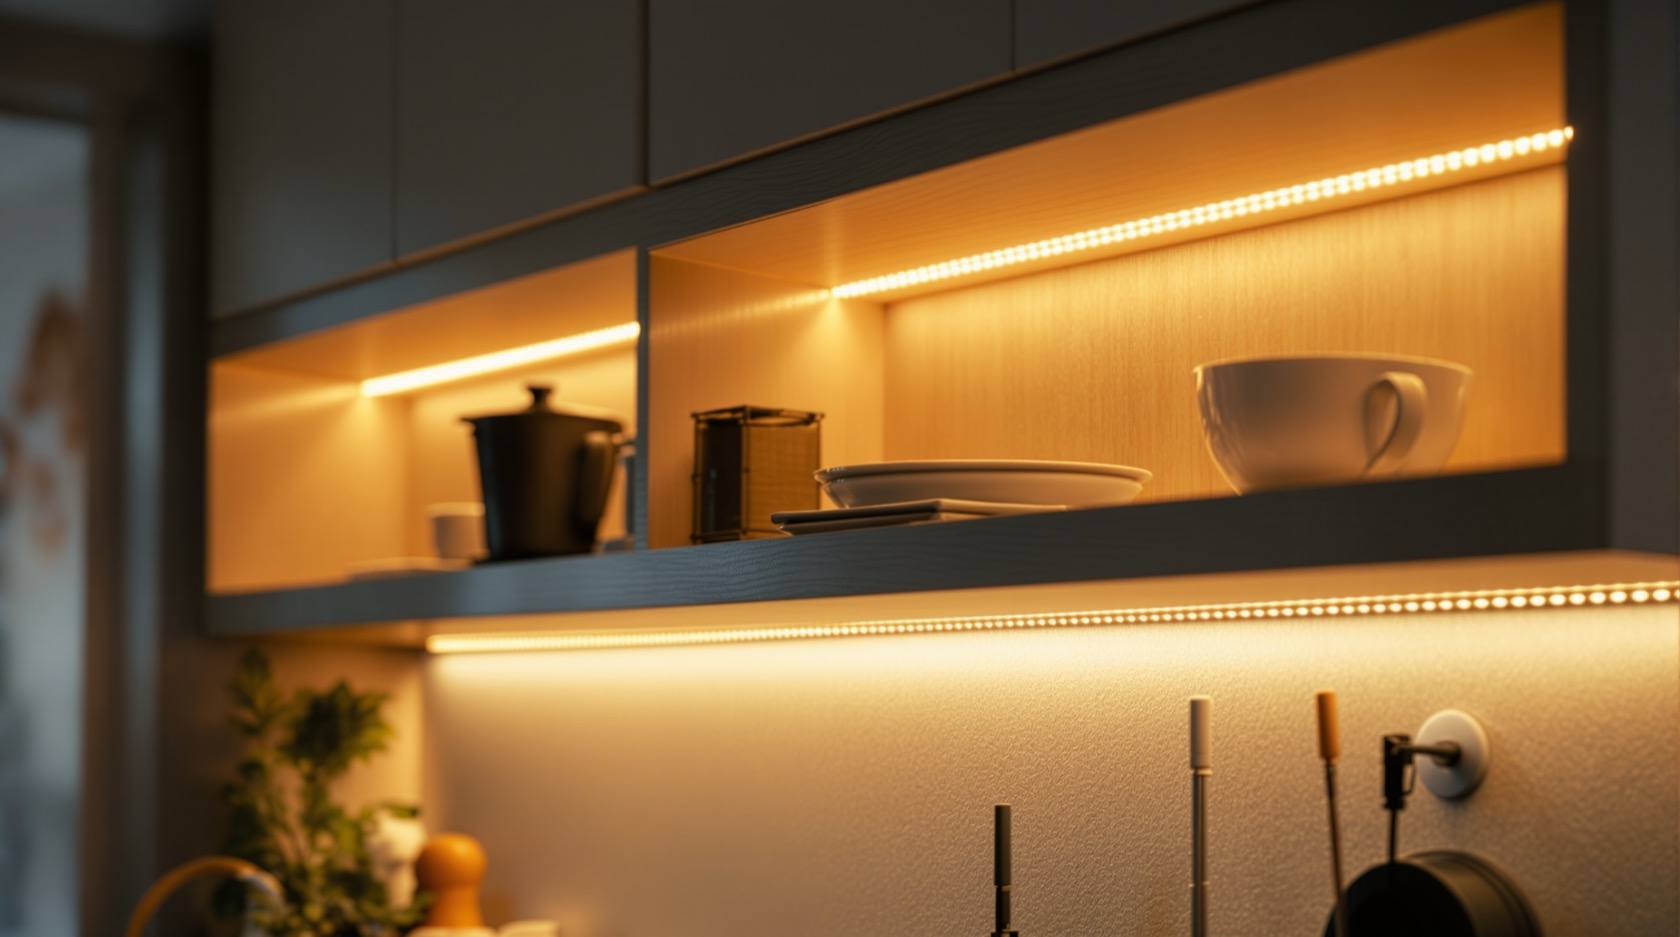
LED Strip & Profile Lighting: Under-Cabinet, Shelves & Edges (2026)
The design guide to LED strip and aluminium-profile lighting for Indian homes — the flexible linear layer for counters, shelves, TV units, stairs, mirrors and niches. What to specify, why the profile matters, and where the wiring hands off to a licensed electrician.
LED strip lighting is the quiet workhorse of a good modern interior. It is the thin, flexible line of light you never quite see but always feel — the glow under the kitchen wall units that makes chopping safe, the warm wash inside a wardrobe, the halo behind the TV that stops your eyes aching at night, the soft path under the stair nosings that guides a midnight walk. Done well, with a proper aluminium profile and the right driver, it reads as a crafted architectural edge. Done cheaply — a bare reel stuck straight onto MDF — it shows up as a row of hot dots that shift colour and die in two years.
This guide is the design and specification side of strip and profile lighting for Indian homes: where the flexible linear layer belongs, the strip spec that actually matters when you buy, why the aluminium profile is the single biggest quality upgrade, and how the driver and long-run voltage drop decide whether your light is even end to end. It sits inside the complete guide to lighting and pairs closely with cove and indirect lighting — cove uses the same strips, but hidden in a ceiling ledge to bounce light off the slab, whereas this guide is about strips on edges, shelves and task surfaces you light directly.
Scope & how to read this. This is a design-led guide to help you plan, choose and brief — every wattage, lumen and cost figure is indicative to size your thinking, not a firm quote; get local quotes. The strip and profile you can plan and even stick down yourself, but the driver, the mains tap that feeds it, any dimmer, and the circuit are electrical work that a licensed electrician must design and connect — a mis-sized or badly wired low-voltage driver is a real fire and shock risk. Confirm luminaire and IP figures against IS 16107 (LED performance), IS 10322 / IEC 60598 (luminaire safety), IP ratings per IS/IEC 60529, and lux targets against IS 3646 and NBC (SP 7:2026). Automation and app control belong to the Smart Home hub.
What strip lighting is — and where it goes
An LED strip is a flexible printed circuit, a few millimetres wide, carrying tiny surface-mount LEDs at regular spacing, sold on a reel and cut to length at marked points. It runs on low-voltage DC — usually 12V or 24V — from a driver (the transformer that steps 230V mains down). Because it is thin, flexible and cuttable, it fits where no rigid fixture can: along an edge, inside a groove, around a curve, under a shelf.
That flexibility is why it has become the go-to for the whole linear and concealed layer of a home. The common jobs, roughly in order of how often Indian homes use them:
- Under-cabinet kitchen task light — a strip under the wall units, at the front edge, lighting the counter where you actually work. The single most useful application in the house.
- Wardrobe and shelf lighting — inside almirahs, under open shelves, in crockery units and display niches, so contents are lit not shadowed.
- TV-unit backlight / bias light — a strip behind the panel or along the unit, giving a soft glow that reduces the harsh contrast between a bright screen and a dark wall, easing eye strain during long viewing.
- Skirting and floor-level glow — a low night-wash along a corridor or bedroom, bright enough to walk by without switching on the mains light.
- Staircase treads — under each nosing, marking every step; a genuine safety detail, not just drama.
- Mirror lighting — vertical strips flanking a dressing or bathroom mirror give even, shadow-free light on the face (a dedicated bathroom-mirror lighting guide covers the wet-area version).
- Headboard, niche, pelmet and bar — accent and mood: a halo behind a headboard, a lit puja or display niche, a glow above a curtain pelmet, a backlit home bar.
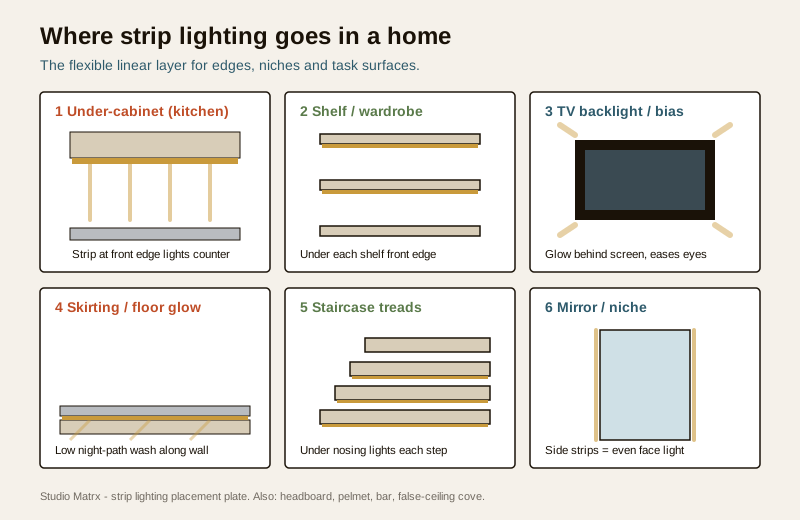
The application table pairs each job with the spec that suits it — the details behind those columns are explained in the next section.
| Where | Colour temperature | CRI / density | IP rating | Note |
|---|---|---|---|---|
| Under-cabinet (kitchen task) | 3000-4000K neutral | High CRI (90+), high density | IP44+ near splashes | Mount at the front edge, not the back |
| Wardrobe / shelf | 3000K warm-neutral | High density, no dots | IP20 dry | Motion sensor is a nice add |
| TV backlight / bias | 6500K or tunable | Medium density | IP20 dry | Dim, low output — mood not task |
| Skirting / floor glow | 2700-3000K warm | Low-medium density | IP20 dry (IP65 if washable) | Keep output low for night use |
| Staircase treads | 3000K warm | Medium density | IP20 indoor | Even output per step matters |
| Mirror (dressing) | 3500-4000K | Very high CRI (90+) | IP44 near basin | Vertical side strips beat a top strip |
| Bathroom / balcony wet | 3000-4000K | High CRI | IP65 / IP67 | Wet-rated strip + electrician only |
The strip spec that actually matters
Strip reels look identical on a shelf; the price gap between a good one and a throwaway is entirely in numbers you have to ask for. These are the ones that decide the result.
- LEDs per metre (density). The count of diodes per metre — commonly 60, 120, or 180+ per metre. Higher density means the individual points blur into a continuous line instead of a row of visible dots. For anything seen close up (under-cabinet, shelves, mirrors) insist on high density; skimping here is the number-one reason cheap strip looks like "dots".
- Lumens per metre and watts per metre. Lumens per metre is the actual brightness; watts per metre is the power draw that sizes your driver. A task strip might be 12-15W per metre and bright; a mood strip 5-8W per metre and gentle. You need the watts-per-metre figure to size the driver correctly (next section).
- Colour temperature. Warm (2700-3000K) for bedrooms, lounges and mood; neutral (3500-4000K) for kitchen task and mirrors where you want things to look true; cool (5000-6500K) rarely, mostly for TV bias or utility. RGB adds colour-changing; RGBW / RGBWW add a proper white channel so you get good white and colour; tunable white (CCT) shifts warm-to-cool on demand — the grown-up choice for a bedroom that wants warm evenings and brighter mornings. The colour temperature and CRI guide has the full science.
- CRI (Colour Rendering Index). How faithfully the light shows colour, out of 100. For kitchens this is non-negotiable — high CRI (90+) makes vegetables, dal and meat look their real colour so you can judge freshness and doneness; low-CRI strip makes food look grey and sickly. Also matters at mirrors, where you want skin tones true.
- IP rating. The dust/water seal, per IS/IEC 60529. IP20 is bare, dry-indoor only (most shelf and wardrobe strip). IP44/IP54 tolerates splashes — near a hob or basin. IP65 and above is fully sealed for bathrooms, balconies and outdoors. Never put IP20 strip anywhere it can get wet.
| Spec | What it controls | Choose higher when |
|---|---|---|
| LEDs per metre (density) | Smoothness — line vs dots | Seen close up (under-cabinet, shelf, mirror) |
| Lumens per metre | Brightness | It is a task surface, not mood |
| Watts per metre | Driver size needed | (Total the run, then size driver above it) |
| Colour temperature (K) | Warmth of light | Warm for rest, neutral for task |
| CRI | Colour truth of light | Kitchen, mirror, anywhere food or faces matter |
| IP rating | Dust / water resistance | Near splashes (IP44), wet or outdoor (IP65+) |
For the deep buying technicals — chip types, binning, lumen maintenance, BEE star efficiency and warranty reading — cross to the Electrical hub's LED lighting guide; this guide keeps to the design-relevant picks.
The profile and diffuser — the quality upgrade
If you take one thing from this guide, take this: buy the aluminium profile, not just the strip. An extruded aluminium channel (also called a profile or track) that the strip sits inside does three jobs a bare stuck-on reel cannot:
- Heat sink. LEDs hate heat — it is what shifts their colour and shortens their life. The aluminium draws heat away from the strip, so it stays truer in colour and lasts far longer. A bare strip on wood or MDF cooks itself.
- A clean, straight architectural line. The channel gives a crisp, intentional edge instead of a wavy adhesive strip that later peels.
- A diffuser that hides the dots. The profile takes a frosted or opal cover that blends the individual LEDs into one smooth line of light. This is the single visual difference between "designer detail" and "DIY glow".
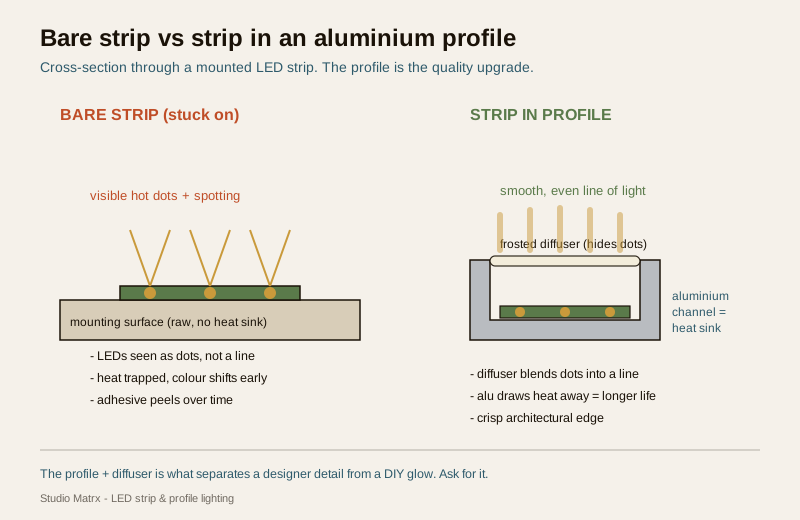
Profiles come in shapes for the job: surface-mount (sits on top of a shelf or under a cabinet), recessed (let into a groove flush with the surface), corner / 45-degree (for under-cabinet and cove returns, aiming light down and out), and step / stair profiles with a lip. Match the profile to the mounting, ask for the diffuser, and the same strip looks twice as expensive.
The driver, voltage drop and long runs
The strip is the easy half. The driver — the low-voltage transformer feeding it — is where the engineering lives, and where a licensed electrician earns their fee.
- Sizing the driver. Total the watts-per-metre across your whole run, then choose a driver rated comfortably above that (a headroom margin, not at the limit) so it runs cool and lasts. An undersized driver overheats and fails; an unbranded one can fail dangerously.
- Voltage drop on long runs. This is the classic mistake. Power a long single strip from one end and the far end goes visibly dimmer — the voltage falls along the copper as current is drawn off. 12V strip suffers this sooner than 24V. The fixes: keep each single feed within the maker's stated maximum run length, or inject power — run a second feed to the far end from the same driver so both ends are fed. For long cove or skirting runs this is standard, and it is exactly the kind of detail a good electrician plans for.
- Dimming. To dim a strip you need a dimmable driver matched to your dimmer (or a smart controller). A normal wall dimmer on a non-dimmable driver flickers, buzzes or simply does not work. Decide dimming up front so the right driver is bought.
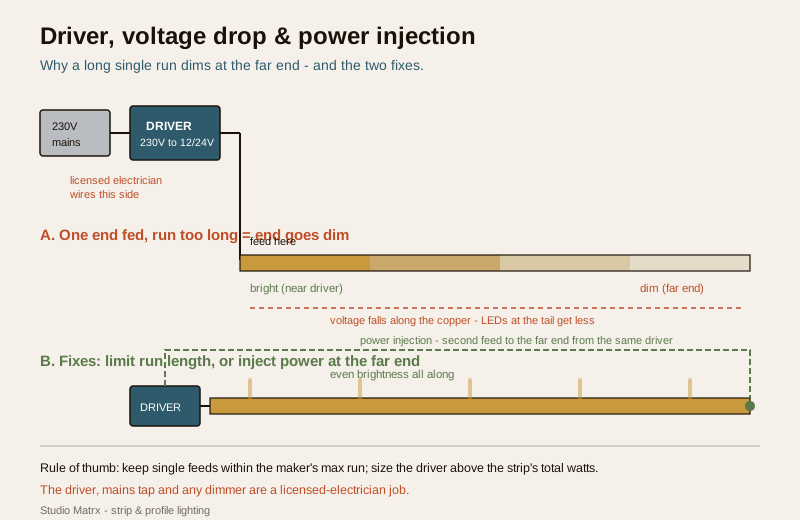
This is the electrician's line. You choose the strip, the profile, the colour and where it goes. The driver selection, the mains connection that feeds it, the dimmer, and the circuit are licensed electrical work — low voltage is not "harmless", and a bad driver install is a fire risk. Plan the design; have a professional wire it.
Placement that makes or breaks the effect
The right strip in the wrong place still disappoints. A few design rules that matter more than the spec sheet:
- Under-cabinet: mount at the FRONT edge. The commonest kitchen error is fixing the strip at the back of the cabinet underside, against the wall — it lights the backsplash and leaves your hands and the front of the counter in shadow. Mount it toward the front edge (in a corner profile angled down-and-out) so the light lands on the working counter. This one move fixes most "my under-cabinet light is useless" complaints — more in kitchen lighting mistakes.
- TV bias: keep it dim and behind. The point is a gentle halo, not a light show. A low-output warm-to-neutral strip behind the panel, washing the wall, reduces the contrast your eyes fight in a dark room.
- Shelves and wardrobes: hide the source. Set the strip behind a front lip or in a recessed profile so you see lit contents, not the LEDs.
- Stairs: even output per step. Uniform brightness on every tread reads as considered; one bright step and one dim one reads as a fault.
- Always hide the strip, show the light. Whatever the location, the diffuser or a lip should conceal the diodes. Visible strip is the tell of a rushed job.
Avoiding the cheap-strip traps
The market is full of bargain reels that cost you later. The recurring failures:
- Visible dots — too-low density and no diffuser. Fix with high density + a profile.
- Colour shift — cheap chips and no heat sink drift pink or green within a year or two. Fix with a branded strip in an aluminium profile.
- Early failure — an undersized or no-name driver dies and takes the strip with it. Fix by sizing the driver with headroom and buying a reputable one.
- Uneven long runs — voltage drop, unaddressed. Fix with run limits or power injection.
- No profile at all — the strip peels, sags and looks DIY. The profile is not optional for a finished look.
- Wrong IP near water — IP20 strip near a hob or basin fails fast and is unsafe. Match IP to the location.
Buy fewer, better metres in proper profile rather than long cheap runs — strip is one place where the budget version genuinely does not last.
How it connects
- Start with the complete guide to lighting for the whole scheme, then see how strips fit the layered lighting plan and the functional vs ambient vs accent split — strip is usually your task and accent layer.
- Its closest sibling is cove and indirect lighting — same strips, hidden in a ceiling ledge; pair the two guides. For the fixed downlights that share the ceiling, see recessed and downlight lighting.
- For colour and truth of light, the colour temperature and CRI guide and the Electrical hub's LED lighting guide carry the buying technicals this guide keeps light.
- Going colour-changing or app-controlled? That is the smart lighting guide and the Smart Home hub.
- Planning a kitchen where strip does the heavy lifting? See kitchen lighting mistakes and the modular kitchen design ideas.
- Size the room's overall light with the lighting spacing calculator before you decide how much accent strip to add.
Key takeaways
- LED strip is the home's flexible linear layer — under-cabinets, shelves, TV bias, skirting, stairs, mirrors and niches — distinct from cove, which hides the same strip in a ceiling ledge.
- The specs that matter: density (LEDs per metre) for smoothness, lumens/watts per metre for brightness and driver sizing, colour temperature for mood, CRI (90+) for kitchens and mirrors, and IP rating for wet areas.
- The aluminium profile is the upgrade — heat sink, clean line, and a diffuser that hides the dots. Never buy bare strip for a finished look.
- The driver, mains connection and any dimmer are licensed-electrician work; low voltage is not risk-free.
- Long runs dim at the far end from voltage drop — limit the run length or inject power at the far end; use a dimmable driver matched to your dimmer.
- Under-cabinet strip goes at the front edge to light the counter, not the backsplash; TV bias stays dim; always hide the strip and show the light.
- Avoid cheap-strip traps — dots, colour shift, early failure, uneven runs — by buying high-density branded strip, in profile, with a properly sized driver.
References
- NBC (SP 7:2026), Bureau of Indian Standards — general illumination and lighting provisions (named generally).
- IS 3646 — code of practice for interior illumination and recommended lux levels (named generally).
- IS 16107 — performance requirements for LED luminaires and related products (named generally).
- IS 10322 / IEC 60598 — luminaire safety, including low-voltage LED fittings and drivers (named generally).
- IP ratings per IS/IEC 60529 — ingress protection (IP20 dry, IP44 splash, IP65 wet/outdoor).
- BEE star rating and ECBC lighting power density (LPD) — energy efficiency benchmarks for LED lighting (named generally).
- A licensed electrician — driver selection, sizing, mains connection, dimmer compatibility and circuit design.
All wattages, lumen figures, colour-temperature and cost bands here are indicative planning aids only; confirm the governing values against IS codes and NBC (SP 7:2026), get local quotes, and have a licensed electrician select, size and connect the driver, dimmer and mains wiring for any strip lighting installation.
Export this guide
Related Guides — Deep-dive reading
Lighting Controls & Dimming Design: Zones, Scenes & Switches (2026)
How to plan lighting control so an Indian home's light is flexible — split each room's layers onto separate switches, choose dimmers that actually work with LEDs, add two-way switching where you need it, and layer scenes on top. The design decisions you must settle before the electrician wires.
LightingKitchen Lighting Design for Indian Homes: Task-First & Shadow-Free (2026)
The design guide to lighting an Indian kitchen where task and safety matter most: the one rule that ends counter shadows, the ambient-task-accent layers, the right lux, neutral colour and high CRI so food looks true, and where wiring near water hands off to a licensed electrician.
LightingLED Bathroom Mirror India: Backlit vs Front-Lit, Colour Temperature, Cost & The Point Behind the Glass
A practical India-first guide to LED and backlit bathroom mirrors — integrated shadow-free face lighting, 2700K-6500K colour temperature and tunable white, halo backlight versus sandblasted front strips, plus the concealed electrical point, IP rating, demister and driver access you must plan behind the mirror before you tile.
BathroomsRelated Tools — Try Free
Circadian Light Meter
Patient-centric circadian lighting visualizer for Indian healthcare design — time-of-day × intensity → CCT, melanopic lux (EML / mEDI), melatonin suppression, and an alertness curve. Calibrated against WELL v2 L03 Circadian Lighting Design, CIE S 026:2018, Brainard 2001, and Lucas et al. 2014.
Circadian ToolBathroom Lighting Calculator
A lux-based bathroom lighting plan — total lumens, number of LED downlights, mirror task lighting and indicative wattage.
Bathroom CalculatorHome Lighting Planner
Enter room dimensions and fixture type — required lumens and fixture count calculate instantly.
Live Calculator