
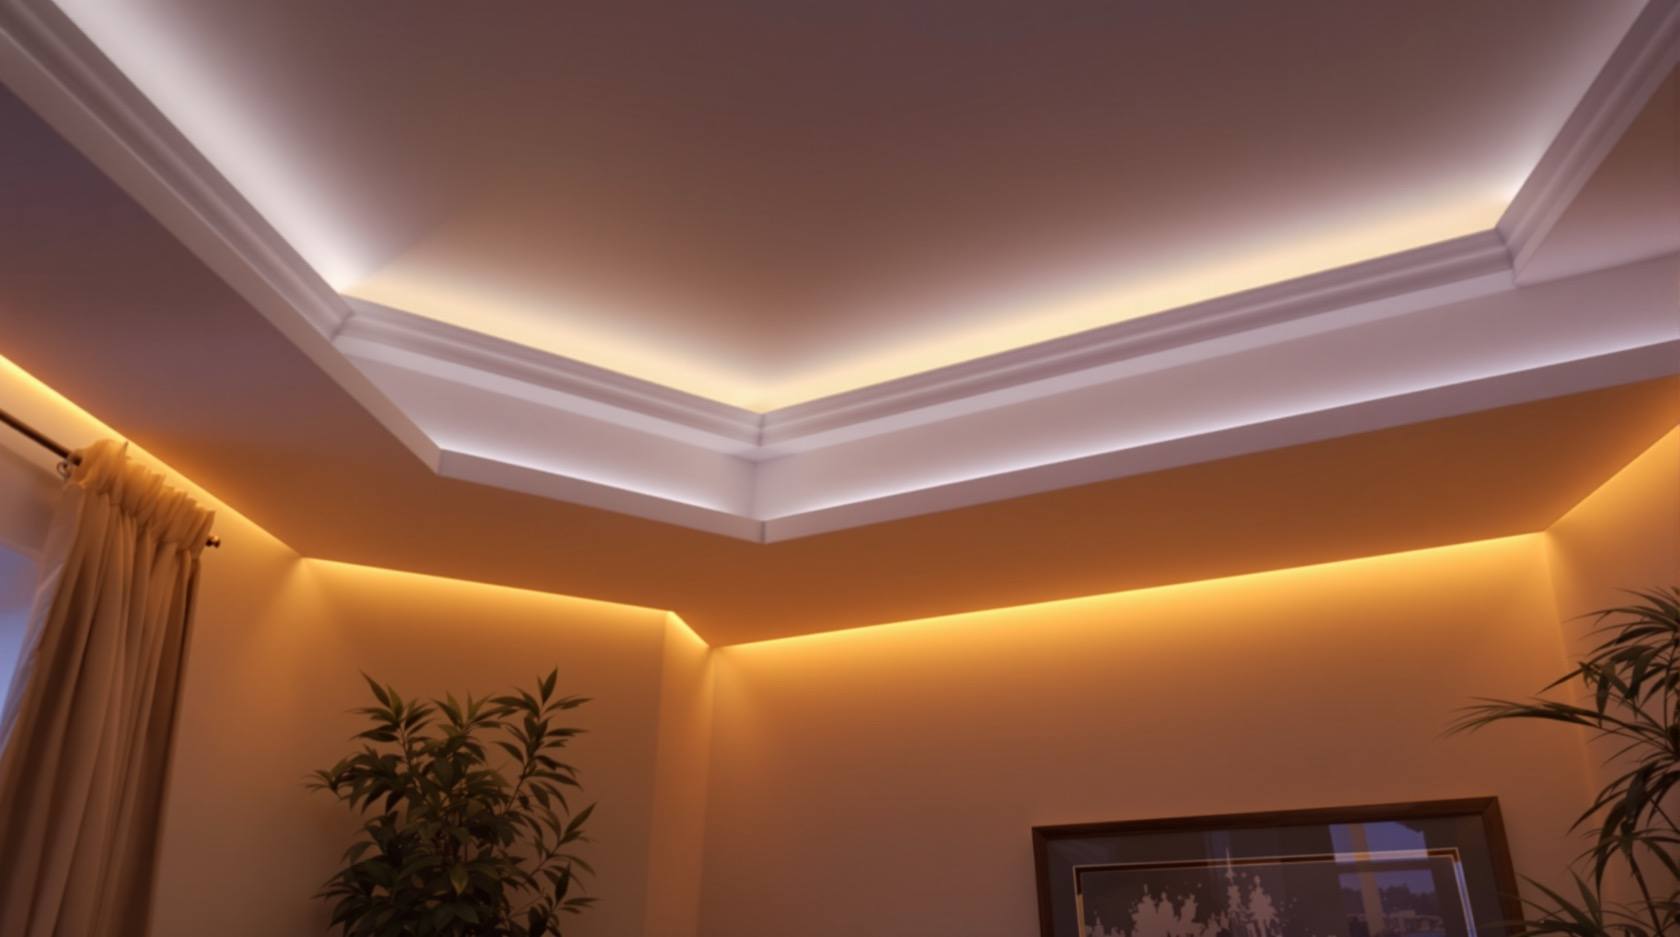
Cove & Indirect Lighting: The Soft Glow Done Right (2026)
The design guide to cove and indirect lighting for Indian false ceilings — what it really is, why it is so loved and so often botched, and the depth, lip, setback, strip density and colour rules that separate a smooth ceiling wash from a strip of visible dots.
Cove lighting is the single most requested lighting move in an Indian false ceiling — and one of the most often botched. Done right, a cove is invisible: you see only a soft band of light washing the ceiling or wall, a shadow-free glow that makes a room feel calm, layered and expensive. Done wrong, you see a hard line of glowing dots, a run of uneven scallops, or a strip of harsh blue-white light sitting in a shallow groove where anyone on the sofa can look straight at it. The difference is not the budget or the brand of strip — it is a handful of design details in the recess that most homeowners never get told about.
This is the design guide to getting cove and indirect lighting right. It is written for the person planning a false ceiling with a carpenter or interior contractor, deciding where the coves go and how they should look — not for the person wiring them. It sits alongside the deeper strip-and-profile technicals and the pillar overview; see the complete guide to lighting for the whole scheme and strip and profile lighting for the hardware that actually goes in the cove.
Scope & how to read this. This is a design-led guide — it helps you plan and specify the cove detail, choose warm colour and strip density, and brief your carpenter and electrician. Every dimension and cost here is typical and indicative to help you plan, not a firm figure; get local quotes and confirm sizes with your false-ceiling contractor. All wiring, the driver/transformer, the dimmer install and the circuit are electrical work that a licensed electrician must design, connect and certify — mains work done wrong is a fire and shock hazard. Cove lighting is a mood/ambient layer, never a room's only or primary light.
What cove lighting actually is
A cove is a ledge, recess or step — usually built into a false ceiling or along the top of a wall — that hides a light source and lets its output bounce off the ceiling or wall before it reaches your eye. Because you never see the lamp directly, only the surface it lights, the result is indirect light: soft, diffuse, low-glare, almost shadow-free. That is the whole point. Direct light (a downlight, a bulb) creates crisp shadows and bright spots; indirect light fills a room evenly and gently, which is exactly what you want for atmosphere.
In practice, the source is almost always a flexible LED strip tucked into an aluminium profile running along the ledge. The ceiling or wall becomes a giant soft reflector. This is why cove light reads as "premium" — it is the same principle interior designers use in hotels and lounges, and it costs relatively little to build into a ceiling you are already making.
Two things to be clear about from the start:
- Cove lighting is ambient/mood light, not task light. It is beautiful for setting a scene, but you cannot read, cook, study or do close work by it alone. It is one layer of a layered lighting scheme, not the scheme itself.
- Cove is a detail, not a product. You do not "buy cove lighting" — you buy a strip and a profile, and the cove is the recess your carpenter builds to hide them. Getting the recess right is your job at the design stage.
Why India loves it — and why it goes wrong
Cove lighting fits the Indian home almost perfectly, which is why it is everywhere.
- False-ceiling culture. Gypsum and POP false ceilings are near-standard in Indian living rooms and master bedrooms, and a cove is the natural, low-cost way to make that ceiling do something. The recess is built anyway — adding a strip is a small step.
- Festive glow. A warm, dimmable perimeter glow is wonderful for Diwali, weddings, a pooja evening or simply hosting — it lifts the whole room without switching on harsh overheads. Many families run the cove alone in the evenings for exactly this feeling.
- Cost and drama for money. For a modest spend on a false ceiling you already wanted, cove light adds a layer of visible "design" — it photographs well and impresses guests. That popularity, unfortunately, is also why it is so often done badly by contractors chasing the look without the detail.
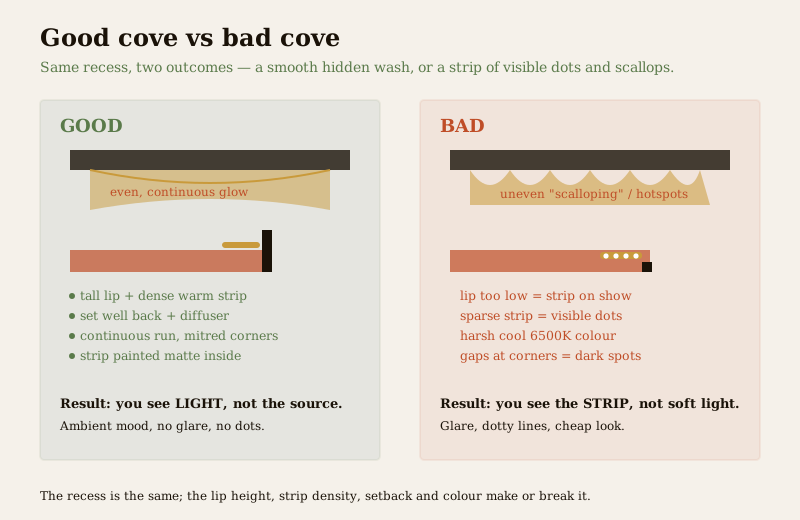
Here are the faults you see again and again in Indian homes — learn to spot them before your ceiling is built:
- The strip is visible. The lip (the raised edge that hides the source) is too low, or the strip is set too far forward on the ledge, so from the sofa you look straight at the LEDs. Instead of a glow you get a bright glare line.
- Visible dots. A sparse, cheap strip (too few LEDs per metre) with no diffuser shows as a row of individual bright dots rather than a continuous line of light — dotty, restless, cheap-looking.
- Scalloping and hotspots. Uneven brightness — bright arcs or blobs with darker gaps between — from wrong strip density, the strip sitting too close to the ceiling, or gaps left at joins and corners.
- Harsh cool colour. A 6000-6500K "cool white" strip in a living room or bedroom kills all the warmth; cove light in these rooms should be warm, not the bluish light meant for a workshop.
- Cove as the only light. The most common planning mistake — relying on the cove for everything, so the room is atmospheric but useless for reading or work, with dark corners the wash never reaches. Cove is a layer, not the plan.
The design rules — the cove detail that makes or breaks it
Almost everything good about a cove is decided by the shape of the recess and the strip you put in it. Get these right on the drawing and the light looks after itself.
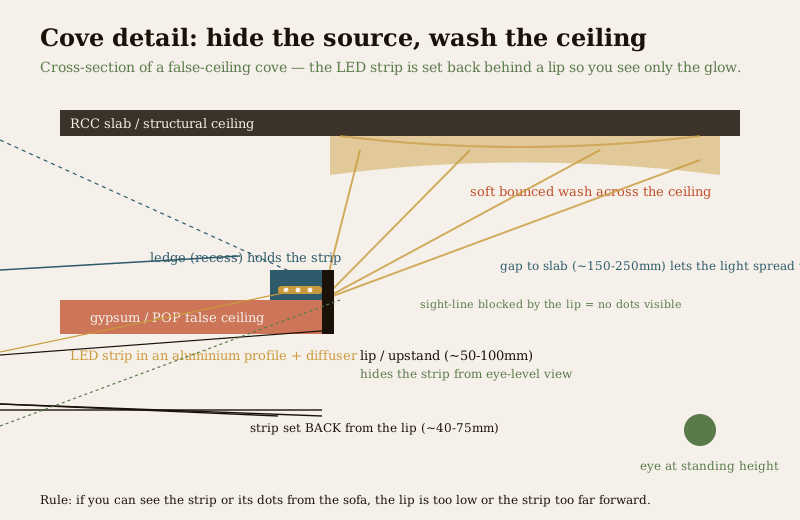
1. Hide the source — lip height and setback. The lip (upstand) must be tall enough that no one at standing or seated height can see the strip. A too-shallow lip is the number-one cause of visible-strip glare. Set the strip back from the lip, not at its edge, so the light throws upward and outward instead of spilling over the front.
2. Leave a gap for the wash to spread. The ledge should sit far enough below the ceiling that the light fans out and blends before it hits the surface. Too tight a gap and the strip's own dots and hotspots print straight onto the ceiling as scallops; a generous gap lets them merge into one smooth band.
3. Choose a dense strip and a diffuser to kill dots. LED strips are sold by LEDs per metre and by wattage per metre. A denser strip (more LEDs, closely spaced) reads as a continuous line; a sparse one reads as dots. Pair it with an aluminium profile and a frosted/opal diffuser cover — the diffuser blurs the individual LEDs into a smooth glow and is the cheapest insurance against a dotty finish. The full strip-and-profile choices live in strip and profile lighting.
4. Go warm. For living rooms, bedrooms, headboards and any relaxing space, choose a warm colour temperature — around 2700-3000K. This is the mood range; cool white belongs in kitchens and workshops, not a cove meant to feel soft. If you want the option of both, a tunable/CCT strip lets you shift warm for evenings and neutral for daytime. The why is covered in colour temperature and CRI — also pick a decent CRI so skin and materials look true.
5. Run it continuously and handle corners. A cove should read as one unbroken line of light. Avoid gaps between strip runs, and cut and rejoin cleanly at corners so there is no dark spot where two walls meet — corner gaps are a classic source of visible interruptions. Plan the run as a loop, not a series of stubs.
6. Put it on a dimmer. A cove that can only go full-on wastes half its value. On a dimmer (a dimmable driver plus a compatible dimmer, installed by your electrician) you can drop it to a low evening glow for hosting or a pooja, and bring it up when you need more fill. Dimming is a mood layer's superpower.
Here is the cove detail as a table you can hand to your carpenter — treat every figure as indicative and confirm against your ceiling build-up and the strip you buy.
| Cove element | Typical / indicative value | Why it matters |
|---|---|---|
| Lip / upstand height | ~50-100mm above the strip | Hides the strip and its dots from view; too low = visible glare line |
| Strip setback from lip | ~40-75mm behind the lip | Throws light up and out, not over the front edge |
| Gap from ledge to ceiling | ~150-250mm | Lets the beam spread and blend into a smooth wash |
| Ledge width | ~75-150mm | Room to seat the profile and aim the strip |
| Strip density | Higher LEDs/metre (denser) | Continuous line, not dots |
| Diffuser | Opal / frosted profile cover | Blurs individual LEDs into a smooth glow |
| Colour temperature | ~2700-3000K (warm) for living/bed | Mood, not clinical; matches Indian décor and skin tones |
| Dimming | Dimmable driver + compatible dimmer | Adjustable glow for hosting, festivals, evenings |
And here is the fault-finding table — match the symptom to the cause and the fix. Most fixes are a design decision made before the ceiling is built; a couple can be retrofitted.
| Symptom | Likely cause | Fix |
|---|---|---|
| You can see the strip / glare line | Lip too low, or strip too far forward | Raise the lip; set the strip further back on the ledge |
| Row of visible dots | Sparse strip, no diffuser | Use a denser strip and add an opal diffuser cover |
| Scalloping / uneven arcs | Gap to ceiling too small; strip too close to surface | Increase the ledge-to-ceiling gap; move strip down and back |
| Bright hotspots at joins | Overlapping strip or a bright driver point | Space runs evenly; hide joins; balance the run |
| Dark spots at corners | Gaps left where runs meet | Continuous run; cut and rejoin cleanly at corners |
| Cold, unflattering light | Cool-white (6000K+) strip | Switch to a warm 2700-3000K strip (or tunable) |
| Room looks moody but is unusable | Cove is the only light | Add task and accent layers; treat cove as ambient only |
Where cove and indirect lighting works
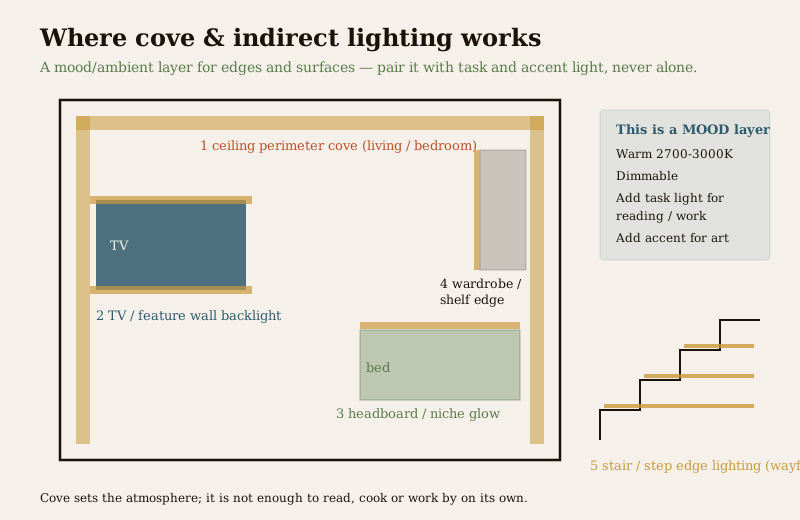
Cove is not only a ceiling-perimeter trick. The same hide-the-source-and-bounce principle works on several surfaces:
- Ceiling perimeter in the living room and master bedroom — the classic, and still the best. A warm band around the false ceiling sets the whole room's mood.
- TV / feature wall — a backlight or cove behind the media unit or feature panel lifts the wall off the background and cuts the eye-strain contrast of a bright screen in a dark room.
- Headboard and bedroom niches — a soft glow behind or above the headboard reads as luxurious and doubles as gentle, low, non-glaring night light.
- Wardrobe and shelf edges — a discreet strip along the top or edge of a wardrobe or display shelf grazes the surface and adds depth.
- Stairs and step edges — cove or step lighting on a staircase is both atmospheric and genuinely useful wayfinding at night, so no one misjudges a tread.
In every one of these, the cove is doing the mood/ambient job. Combine it with proper task light (reading, work, kitchen prep) and accent light (art, a plant, a texture) for a room that both feels good and works — the discipline of lighting design principles and layered lighting. For layout inspiration, browse living-room design ideas.
Cove vs recessed vs profile lighting
These get confused, so a quick untangle:
| Layer | What it is | What it does best |
|---|---|---|
| Cove / indirect | Hidden strip bouncing off ceiling/wall | Soft, shadow-free ambient / mood light |
| Recessed downlight | A point source set into the ceiling, throwing down | General and task light, pools of brightness |
| Profile / linear | The aluminium channel + strip itself (in a cove, or exposed as a line) | The hardware; can be hidden (cove) or a visible design line |
A cove and downlights are partners, not rivals: the cove gives the ambient wash, recessed downlights give the task and general pools you actually see and work by. Profile is the hardware — the channel and diffuser — that a cove uses; you can also run a profile as an exposed architectural line, which is where cove design shades into strip and profile lighting. Choose the layer for the job; a good room uses all three.
The hand-off — you design, they build and wire
Cove lighting sits at the meeting point of three trades, and it is worth being clear about who does what.
- You (with your designer) decide where the coves go, how they should look, the lip and setback detail, the warm colour, the dimming intent, and that the cove is one layer among task and accent. That is this guide's job.
- Your carpenter / false-ceiling contractor builds the recess — the ledge, the lip, the gap — to the detail you specify, and usually seats the profile. If they build the lip too low or the gap too tight, no strip will save it, so agree the detail before the ceiling closes up. See the false ceiling guide for how the ceiling itself is built.
- A licensed electrician does everything electrical: the driver/transformer sizing, the wiring, the dimmer, the circuit and the certification. This is mains work — a fire and shock hazard if done wrong — and is not a DIY or carpenter job. Specify the effect; let the electrician make it safe and compliant.
Get the three talking at the design stage. The commonest expensive mistake is closing the false ceiling before the cove detail and the wiring route are agreed, then discovering the lip is wrong or there is no power where the driver needs to sit.
How it connects
- Start with the complete guide to lighting for the whole-home scheme, then set the mood-and-task balance with layered lighting and lighting design principles.
- The hardware that goes in the cove — strips, profiles, diffusers, drivers — is covered in strip and profile lighting; its partner point-source layer is recessed and downlights.
- Get the colour right with colour temperature and CRI, and build the recess itself using the false ceiling guide.
- For festive and mood ideas beyond coves, see decorative lighting; for spacing your other layers, try the lighting spacing calculator.
- For layout inspiration, browse living-room design ideas.
Key takeaways
- Cove lighting is a hidden strip bouncing off a surface — soft, shadow-free, indirect ambient light. You should see the glow, never the source.
- It is a mood / ambient layer, not task light and never the only light — pair it with task and accent layers or the room will look good but be unusable.
- The look is decided by the detail, not the brand: a tall enough lip, the strip set back, a generous gap to the ceiling, a dense strip plus diffuser, and a continuous run with clean corners.
- Go warm — around 2700-3000K — for living rooms and bedrooms; keep cool white out of the cove.
- Put it on a dimmer for evening, festival and pooja glow — a mood layer's whole point is adjustability.
- Fix the classic faults at the design stage: visible strip = raise the lip / set back; dots = denser strip + diffuser; scalloping = bigger gap; cold light = warm strip.
- You design the effect; the carpenter builds the recess; a licensed electrician wires and certifies it — agree all three before the ceiling closes. Every figure here is indicative — get local quotes.
References
- National Building Code of India, NBC (SP 7:2026), Bureau of Indian Standards — general illumination and lighting provisions (named generally).
- IS 3646 — code of practice for interior illumination and recommended lux levels (named generally).
- IS 16107 / relevant BIS standards — LED luminaire and module performance (named generally).
- IS 10322 / IEC 60598 — luminaire safety; IP ratings per IS/IEC 60529 for damp locations (named generally).
- Energy Conservation Building Code (ECBC) and BEE star rating — lighting power density and LED efficiency guidance (named generally).
- A licensed electrician and your false-ceiling / interior contractor — for the driver, wiring, dimmer, circuit and the cove build; costs to be confirmed with local quotes.
All dimensions, colour-temperature ranges and cost notes here are indicative design aids only; confirm sizes with your false-ceiling contractor, get local quotes for cost, and have a licensed electrician design, connect and certify all wiring, drivers and dimming — mains electrical work done wrong is a fire and shock hazard.
Export this guide
Related Guides — Deep-dive reading
Lighting Controls & Dimming Design: Zones, Scenes & Switches (2026)
How to plan lighting control so an Indian home's light is flexible — split each room's layers onto separate switches, choose dimmers that actually work with LEDs, add two-way switching where you need it, and layer scenes on top. The design decisions you must settle before the electrician wires.
LightingCommon Home Lighting Mistakes in India (and How to Fix Them) (2026)
The most common lighting mistakes in Indian homes — one bright tubelight per room, everything blue-white, glare, no dimming, dark stairs — and the specific, affordable fix for each, plus the one habit that causes half of them: not planning the scheme before the electrician wires.
LightingBedroom Lighting Design for Indian Homes: Calm, Layered & Dimmable (2026)
How to light an Indian bedroom for rest first and function second — why the harsh central tube light in your eyeline is the classic mistake, how to layer soft ambient, bedside reading task, accent and a low night light, and how to specify warm 2700K, dimming and two-way switching so the room winds down with you.
LightingRelated Tools — Try Free
False Ceiling Cost Estimator
Live ₹/sqft across 8 ceiling types — POP, gypsum, designer, metal, PVC, wooden — with cove and spot lighting for 20 Indian cities.
Cost CalculatorCircadian Light Meter
Patient-centric circadian lighting visualizer for Indian healthcare design — time-of-day × intensity → CCT, melanopic lux (EML / mEDI), melatonin suppression, and an alertness curve. Calibrated against WELL v2 L03 Circadian Lighting Design, CIE S 026:2018, Brainard 2001, and Lucas et al. 2014.
Circadian ToolFull-Room BOQ — Living, Bedroom, Kitchen, Bath
Room-wise BOQ across living, bedrooms, kitchen, utility, and bathrooms with line-item pricing.
Full-Room BOQ