
Compound Wall Construction in India: Step-by-Step Build Sequence (2026)
A plain, India-grounded walkthrough of how a boundary wall actually gets built on site — setting-out, excavation, footing, plinth and DPC, masonry or precast or cast RCC, piers, coping, plaster and gate — with the quality-control checkpoints a homeowner should watch and the shortcuts to catch.
A compound wall looks simple from the road — a line of masonry with a coping on top — but it is built in a fixed sequence of stages, and the quality of the finished wall is decided at each one, mostly in the parts you can no longer see once the next stage buries them. The footing depth, the mortar mix, the curing, the damp-proof course: these are all invisible in the finished wall, which is exactly why a shortcut here is so tempting to a hurried contractor and so worth a homeowner watching for.
This is the build-process guide for the Compound Walls and Gates hub. Its job is not to turn you into a mason — it is to give you the literacy to stand on your own site, follow what is happening, and know what "good" looks like at each stage. It sits alongside the boundary wall vs compound wall guide (what you are building and where the line legally sits), the foundation guide (the footing under it) and the piers and columns guide (the verticals that stiffen it). Read those for the design; read this for the order of work and the checkpoints.
Scope & how to read this. Every dimension, depth and mix here is typical and indicative to help you supervise and ask the right questions — it is not a specification to build to. The structural stages — footing size, reinforcement, pier spacing, and the stability of any tall, free-standing or retaining wall against wind and overturning — are designed and signed off by a licensed structural engineer to your soil and height, and the wall is built strictly to that drawing, not to a thumb-rule. A tall or retaining wall that fails can collapse and kill. Confirm everything against the relevant IS codes (IS 1905 masonry, IS 456 RCC, IS 1904 foundations, IS 14458 retaining walls), NBC (SP 7:2026) and your local municipal bye-laws. Security toppings and gate automation live in the Perimeter Security library, not here.
The build sequence at a glance
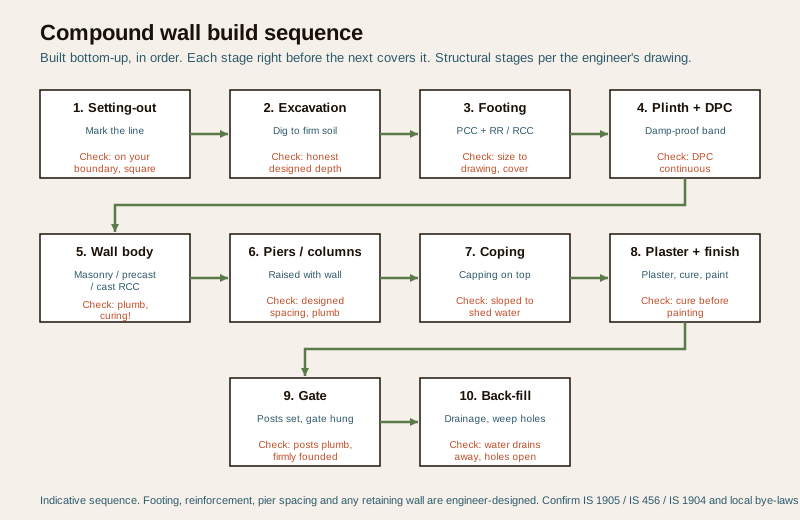
A compound wall is built bottom-up, and each stage must be right before the next one covers it. The table below is the whole job in one view: what happens, and the one thing a homeowner should watch at that stage.
| Stage | What happens on site | What to check / the common shortcut |
|---|---|---|
| 1. Setting-out | The boundary line is confirmed and the wall centre-line is marked with string and pegs; corners squared | Line is on your boundary (survey/records), not encroaching; check the corner right-angles. Shortcut: eyeballing the line off a neighbour's wall |
| 2. Excavation | Trench dug down to firm, undisturbed soil at the engineer's depth | Trench reaches the designed depth to firm soil; sides not collapsing. Shortcut: a shallow trench "to save digging" |
| 3. Footing | PCC levelling course, then RR-stone or RCC footing per the drawing | Footing width and depth match the drawing; concrete compacted. Shortcut: thin footing, weak mix, no PCC |
| 4. Plinth + DPC | Wall built up to plinth level; a continuous damp-proof course laid | DPC is continuous and unbroken all along; plinth level and true. Shortcut: DPC skipped or patchy |
| 5. Wall body | Masonry laid / precast panels erected / RCC cast, in lifts, cured | Plumb, level, full mortar joints, proper curing. Shortcut: racing up without curing; thin mortar |
| 6. Piers / columns | Piers or RCC columns raised with the wall at the designed spacing | Piers at the designed spacing, plumb, bonded/tied to the wall. Shortcut: fewer piers, wider spacing |
| 7. Coping | A shed-water coping cast or laid along the top | Coping continuous, sloped to throw water off. Shortcut: flat or gappy coping that lets water in |
| 8. Plaster + finish | Faces plastered, cured, then painted or finished | Even plaster, cured before paint, no hollow patches. Shortcut: painting green (uncured) plaster |
| 9. Gate | Gate posts set true, gate hung, ironmongery fitted | Posts plumb and firmly founded; gate swings/slides true |
| 10. Back-fill + drainage | Trench back-filled; weep holes and drainage cleared, ground graded away | Weep holes open; water drains away from the wall. Shortcut: dumping back-fill against a green wall |
The rest of this guide walks these stages in order. Two things cut across all of them: the wall is only as good as the foundation under it, and curing — keeping concrete and mortar wet as they harden — is the single most-skipped step and the one that most decides how the wall ages. For why curing matters to concrete strength, the deep guide covers it properly.
Setting-out and excavation
Marking the line
The very first job is settling where the wall goes. On a boundary that matters, this comes from your survey records / plot demarcation, not from splitting the difference with a neighbour or copying an old fence line — an inch of encroachment can become a legal problem years later, and the boundary wall vs compound wall guide explains why the legal line and the built line must agree. The centre-line of the wall is set out with string lines and pegs, the corners are squared (a mason checks the diagonals or uses the 3-4-5 method), and the setback from the road is confirmed against your local bye-laws. Get this stage wrong and everything above it is wrong.
Digging to firm soil
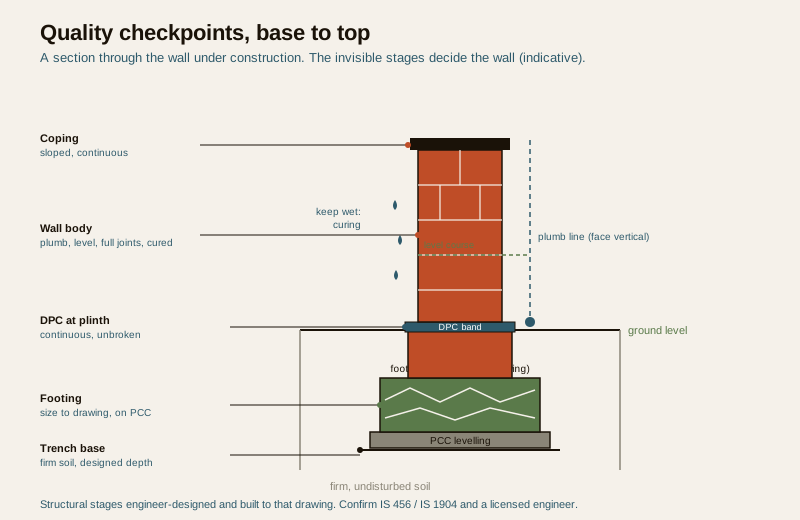
Excavation follows the marked line. The rule that matters: the trench goes down to firm, undisturbed soil at the depth the engineer specified — not to a convenient shallow depth. In good soil that may be modest; in black-cotton / expansive soil it is deeper, because that soil swells and shrinks with the monsoon and a shallow footing will heave and crack the wall. This is the classic hidden shortcut — a shallower trench saves a contractor time and money and cannot be seen once the footing is in. If you watch one thing at this stage, watch the honest depth against the drawing. Loose or filled ground, sloping sites and any wall meant to retain earth change the whole foundation problem and are strictly engineer-designed; the foundation guide and the wider foundation-problems guide cover what drives the depth.
Footing, plinth and DPC
The footing
With the trench open and its base firm and levelled, the footing is built to the engineer's design. Typically a thin PCC (plain cement concrete) levelling course goes down first, then the load-spreading footing itself — commonly random-rubble stone masonry or a reinforced-concrete (RCC) footing, chosen for your soil, height and load. This is where the wall's weight is spread onto the ground, so the width and depth matter and are not places to improvise. Watch that the footing matches the drawing, that the concrete or masonry is properly compacted, and that any RCC footing has its steel with correct cover before it is poured. Never accept a footing sized by eye.
Plinth level and the damp-proof course
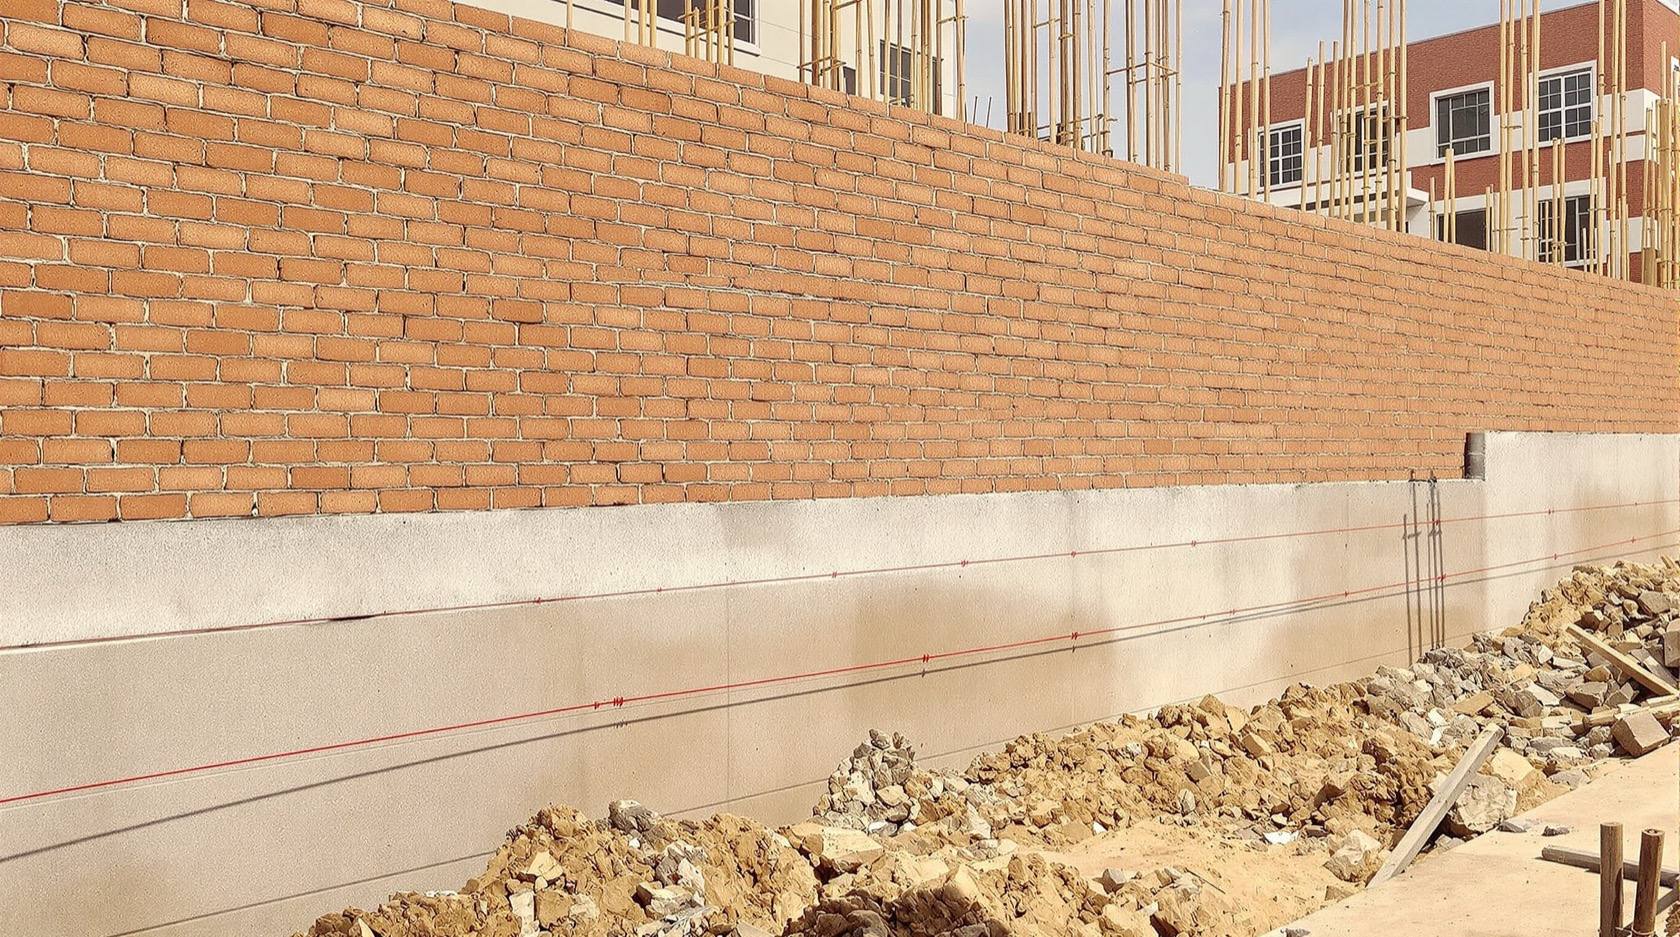
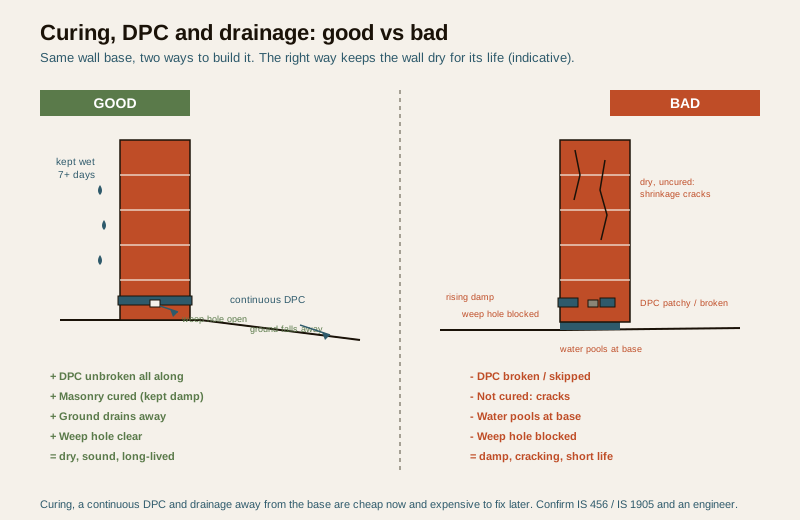
From the footing, the wall is built up to plinth level — roughly the finished ground line — and here comes one of the most important and cheapest bits of quality in the whole wall: the damp-proof course (DPC). This is a continuous water-resisting layer (a rich cement mortar band, often with a waterproofing admixture) laid right across the wall at plinth level to stop ground moisture wicking up into the masonry above and blistering the plaster and paint for years. The single thing to check is continuity: the DPC must run unbroken all along the wall. A patchy or skipped DPC is invisible the day it is laid and shows up as rising damp a monsoon or two later. For everything the DPC and coping protect against, see the waterproofing guide.
| Stage | Who signs off / who does it | The homeowner checkpoint | Why it matters |
|---|---|---|---|
| Setting-out | Surveyor / contractor; you confirm the line | Line on your boundary; corners square | Encroachment and skew are permanent |
| Excavation depth | Engineer specifies; contractor digs | Trench reaches designed depth to firm soil | Shallow footing heaves and cracks |
| Footing | Engineer designs; contractor builds | Size matches drawing; PCC + compaction; steel cover | Spreads the load; hidden once buried |
| DPC | Contractor lays | Continuous, unbroken along the whole wall | Stops rising damp for the wall's life |
| Curing | Contractor; you can insist | Kept wet 7+ days; not rushed | Decides real strength and durability |
| Plumb / level | Mason; you can sight it | Wall vertical and courses level | A leaning wall is a stability risk |
| Coping | Contractor | Continuous, sloped to shed water | Keeps the top of the wall dry |
Building the wall body
This is the stage most people picture when they think "building a wall", and it takes one of three forms depending on the material you chose in the materials guide.
Laying masonry
For a brick, stone or block wall, the mason lays units in mortar, course upon course, keeping each course level and the face plumb (checked with a spirit level and plumb line or string), with fully-filled mortar joints — no hollow or "buttered-edge-only" joints that look fine but are weak. The mortar mix matters: too little cement and the joints are weak and porous; the ratio should follow the engineer's or a standard specification, not the mason's mood. Walls go up in lifts, not all at once, so lower courses set before more weight lands on them. And then the step everyone rushes: curing. Fresh masonry and concrete must be kept damp for several days (commonly seven or more) so the cement hydrates and gains strength — a wall raced up and left to dry in the sun is weaker and cracks more. This is the easiest shortcut to spot and the most worth insisting on: is anyone wetting the wall?
Erecting precast or casting RCC
A precast wall is different work: factory-cast panels are slotted between grooved posts that stand on engineer-specified foundations — fast, but the posts must be plumb and truly founded, and the panel joints are the detail to watch over time; the precast compound walls guide covers it. A cast-in-situ RCC wall is poured on site into formwork around a steel cage: here the reinforcement, cover, concrete mix and curing are all to the engineer's design, the formwork must be rigid and clean, and curing is even more critical. For what governs concrete quality, see understanding concrete strength and, for the steel, the TMT steel guide. Any wall that retains earth is a cast RCC (or engineered) job from the start — never eyeballed masonry.
Piers, coping and finish
Piers and columns as the wall rises
A long, thin free-standing wall behaves like a sail in the wind, so it is stiffened by piers (thickened masonry) or RCC columns raised with the wall at the spacing the engineer set. Watch that the piers actually appear at the designed spacing — dropping a pier or widening the gap "to save a bit" quietly weakens the wall against wind load — that each is plumb, and that masonry is properly bonded or tied into them rather than just butted up. How piers are sized, spaced and reinforced is the whole subject of the piers and columns guide, and it is engineer-led, especially as the wall gets tall.
Coping, plaster and gate
At the top, a coping — a capping band, cast or laid, sloped to shed water — protects the whole wall from rain soaking in from above; a flat or broken coping is a slow leak into the masonry. Then the faces are plastered, allowed to cure, and only then painted or finished — painting fresh "green" plaster traps moisture and peels; the wall finishes guide and the exterior paint guide cover doing this properly. The gate is fitted once its posts are set plumb and firmly founded (a heavy gate on a weak post sags and binds), and it should swing or slide true; gate security and automation are a separate subject in the compound wall security guide.
Back-fill, drainage and weep holes
Finally the trench is back-filled and the ground graded to fall away from the wall so rain does not pool against the base, and any weep holes (small openings that let water trapped behind the wall escape) are left open and clear. On a wall that retains any earth this is not optional — trapped water builds pressure that can push a wall over — and the drainage guide explains how weep holes, back-fill and grading work together. A wall that stands dry at its base and top will outlast one that is left sitting in water, whatever it is made of.
Estimating what the job needs
Before and during the build you can sanity-check quantities and cost so you can tell whether a contractor's numbers are honest:
- The brick and block quantity calculator turns your wall's length, height and thickness into an indicative brick or block count with a mortar allowance.
- The concrete volume calculator gives an indicative concrete quantity for the footing, plinth, columns and coping so you can check what is being ordered.
- The compound wall cost calculator puts an indicative cost band on the whole wall for planning — not a quote.
Treat all three as planning aids. The real numbers come from local quotes against your engineer-checked drawing, because soil, transport and the day's steel and cement rate move the total far more than any online estimate.
Site supervision checklist
Keep this in hand when you visit the site. It is the stages above turned into things you can look at.
| What to look at | Good sign | Warning sign |
|---|---|---|
| The marked line | On your surveyed boundary; corners square | Copied off a neighbour's wall; skewed corners |
| The open trench | Reaches designed depth; base firm and dry | Shallow; loose or wet base; caving sides |
| The footing | PCC laid; size matches drawing; well compacted | No PCC; thin; visibly weak or dry mix |
| The DPC band | Continuous, unbroken along the whole wall | Missing in places; only near the gate |
| Mortar joints | Full, consistent, right mix | Hollow, raked thin, sandy / weak mix |
| Plumb and level | Face vertical to a plumb line; courses level | Visible lean; wavy or sloping courses |
| Curing | Wall / concrete being kept wet for days | Bone-dry masonry drying in the sun |
| Piers / columns | At the designed spacing; plumb; bonded in | Fewer than drawn; wide gaps; just butted |
| Coping | Continuous; sloped to shed water | Flat, gappy, or laid before the wall cured |
| Plaster and paint | Plaster cured before painting; even, solid | Paint over green plaster; hollow patches |
| Base and drainage | Ground falls away; weep holes open | Water pools at base; weep holes blocked |
If several boxes fall on the warning side, pause and raise it with your contractor and engineer before the next stage buries the problem — almost every one of these is cheap to fix now and expensive to fix later.
How it connects
- Sits under the Compound Walls and Gates hub and follows the design decisions in the materials guide, the foundation guide and the piers and columns guide.
- For where the wall legally goes, see boundary wall vs compound wall; for keeping it dry, the waterproofing guide and the drainage guide.
- The build depends on getting concrete right — understanding concrete strength and TMT steel in the Structural Safety library — and on curing, plumb and the DPC being done honestly.
- Finish and gate: wall finishes, exterior wall paint, and compound wall security.
- Estimate with the brick and block quantity calculator, the concrete volume calculator and the compound wall cost calculator.
Key takeaways
- A compound wall is built bottom-up in a fixed sequence — setting-out, excavation, footing, plinth and DPC, wall body, piers, coping, plaster, gate, back-fill — and each stage must be right before the next covers it.
- The structural stages are engineer-led: footing size, reinforcement, pier spacing and the stability of any tall or retaining wall are designed and signed off by a licensed structural engineer, and the wall is built to that drawing.
- Most quality is hidden once built — the honest footing depth to firm soil, a continuous DPC, full mortar joints and steel cover — which is exactly why a homeowner should watch these stages.
- Curing — keeping concrete and mortar wet for several days — is the most-skipped step and the one that most decides strength and durability; if nobody is wetting the wall, ask why.
- Watch plumb and level, piers at the designed spacing, a sloped continuous coping, plaster cured before paint, and weep holes open with the ground falling away from the base.
- Every dimension and mix here is indicative — confirm against IS 1905, IS 456, IS 1904 and IS 14458, NBC (SP 7:2026) and local bye-laws, and build to a licensed engineer's design and local quotes.
References
- IS 1905, Bureau of Indian Standards — code of practice for structural use of unreinforced masonry (brick, stone and block walls; named generally).
- IS 456, Bureau of Indian Standards — code of practice for plain and reinforced concrete (footings, plinth, columns, coping and cast-in-situ walls; named generally).
- IS 1904, Bureau of Indian Standards — code of practice for design and construction of foundations in soils (footing depth and bearing; named generally).
- IS 14458, Bureau of Indian Standards — guidelines for retaining walls (earth-retaining boundary walls; named generally).
- National Building Code of India, NBC (SP 7:2026), Bureau of Indian Standards — general building, materials and structural-safety provisions.
- Local municipal bye-laws and development-control regulations — boundary-wall setback, height and construction requirements (city-specific; these govern approval).
- Local contractor and supplier quotations — current material, steel, cement, transport and labour rates for your specific site.
All dimensions, depths, mixes and build stages here are indicative planning and supervision aids only; confirm the governing specification against the relevant IS codes, NBC (SP 7:2026) and your local municipal bye-laws, and have a licensed structural engineer design, finalise and certify the foundation, reinforcement, piers and any tall, reinforced or retaining wall, which is built strictly to that design.
Export this guide
Related Guides — Deep-dive reading
Compound Wall Piers and Columns in India: Spacing, Reinforcement and Stability (2026)
Why a long, free-standing boundary wall needs intermediate piers or RCC columns to stay up — the physics of overturning in plain terms, thickened masonry piers vs reinforced-concrete columns on footings, indicative spacing that an engineer sets to your height and wind zone, the coping or tie beam that braces the top, and where to break a long run with movement joints.
Compound WallsCompound Wall Foundation in India: Footings, Soil and Reinforcement (2026)
The part of a boundary wall you never see is the part that decides whether it stands straight for decades or leans, cracks and falls — a plain, India-grounded literacy guide to what sits under your compound wall: how your soil drives the footing, the common footing types, how deep to go, the plinth and DPC transition, and why footing size and reinforcement are engineer-designed to your soil and wall height, never a build-to number.
Compound WallsCompound Wall Cost in India: Materials, Labour and What Drives the Price (2026)
An honest, indicative cost-literacy guide to what a boundary wall really costs in India — why the price swings so much (material first, then height, foundation, finish, gate and site), the full cost stack most people forget, how the wall is measured, and where to trim without cutting the wrong corner. Relative bands, not quotes — get local numbers.
Compound WallsRelated Tools — Try Free
Monsoon-Readiness Checklist
Pre-rain home audit across 9 categories — terrace, drains, waterproofing, electrical, HVAC, pest, vehicles, documents.
Seasonal AuditStructural Modification Approval Checklist
41 items across structural assessment, society approval, municipal compliance, and safety.
Approval ChecklistSite & Perimeter Security Assessment
Rate your site across five areas — site, neighbourhood, perimeter, entry/exit and lighting — for a readiness score and prioritised fixes.
Site Assessment