
Video Door Phone Wiring in India (2026): Planning the Cable Routes and Power
A homeowner's planning view of how a video door phone is wired: which cable class to run, where the mains point goes, conduit at construction versus retrofit, long villa runs, multi-monitor layouts, and what to tell your electrician.
You do not need to strip a cable or touch the mains to get a video door phone wired well. What decides whether the system is quiet and reliable for a decade, or a nest of noise and dropped calls, is planning: which cable runs where, where the power point sits, and whether the route was laid before the plasterer arrived or chased in afterwards. Those are decisions the owner and architect make. The stripping, the 230V point and the work at height belong to a licensed electrician and installer.
Video door phone wiring is the plumbing of the system: a run of cable from the door station at your entry to the indoor monitor inside, plus a mains point to power the monitor. Get the class of cable and the route right on paper and the install is boring in the best way. This guide is the coordination view, the sibling to placement and power and backup in the Studio Matrx video door phone hub. It is deliberately not a CCTV cabling guide; if you are also running camera cable, the CCTV hub covers that separately, and the two runs should be planned together but kept apart in the wall.
Scope and safety. This guide helps you plan cable routes, choose a cable class and brief the professionals. It does not tell you to wire anything yourself. The 230V adaptor point that powers the indoor monitor is a licensed electrician's job, and any cabling at height, chasing of walls, or work near the distribution board is qualified-professional work under Indian practice and the National Building Code. Point the door station at your own doorstep only; footage and audio are personal data under the Digital Personal Data Protection Act, 2023. This is educational guidance, not legal advice.
First, know which cable your kit needs
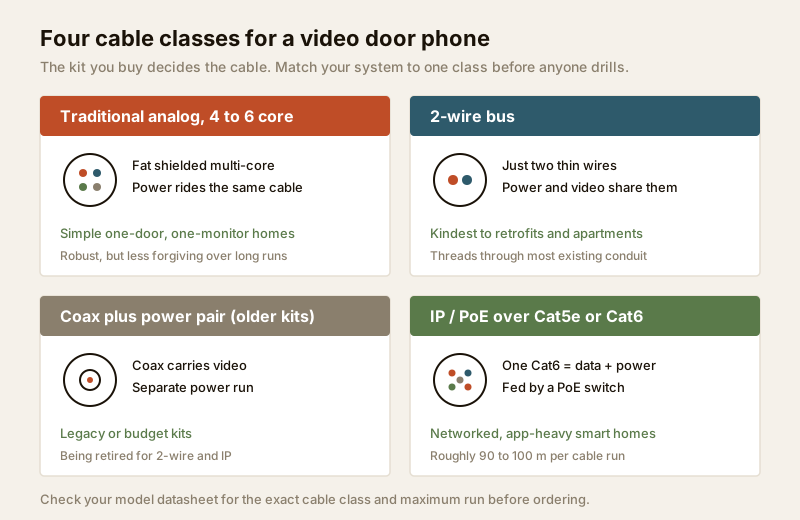
There is no single "door phone cable." The cable depends entirely on the kind of system you buy, and buying the system decides the wiring, not the other way round. Before anyone lifts a drill, match your kit to one of these four classes. Each links to the fuller Studio Matrx guide for that architecture.
| Class | Typical cable | How it powers the door station | Best for |
|---|---|---|---|
| Traditional analog, 4-core / multi-core | 4-core to 6-core shielded, or a maker's proprietary multi-core | Power sent down the same multi-core from the monitor or a separate adaptor | Simple one-door, one-monitor homes; see analog video door phones |
| 2-wire bus | Just two wires (non-polarised on many kits) | Power and video share the same two wires | Retrofits and apartments where pulling thick cable is hard; the wiring star of wired video door phones |
| Coax (older kits) | Coaxial video cable plus a separate power pair | Separate power run | Legacy or budget kits; being retired in favour of 2-wire and IP |
| IP / PoE | Cat5e or Cat6 network cable | Power over Ethernet down the same Cat6, from a PoE switch or injector | Networked homes, app-heavy setups, IP video door phones |
A few consequences fall straight out of this table. A 2-wire system is the kindest to a retrofit because two thin wires thread through almost any existing conduit. An IP/PoE system gives you one clean Cat6 that carries both data and power, and it dovetails with a smart home, but it needs a network point and a PoE source, so read mobile-app door phones alongside it. A traditional multi-core kit is simple and robust but the cable is fatter and less forgiving over long runs. If you have not yet chosen a system, the type selector will point you at a class before you commit to any wiring.
Where the power actually comes from
This is the point most homeowners miss until the installer is standing in the hall. A video door phone has two ends, and they are powered differently.
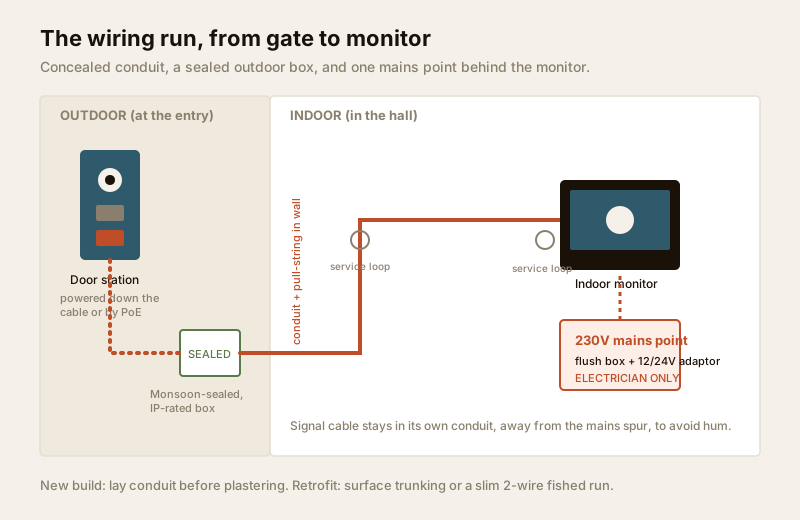
- The indoor monitor almost always needs its own 230V mains point behind or beside it, feeding a small 12V or 24V adaptor that came with the kit. That adaptor point is the single genuinely electrical part of the job, and it is an electrician's work: a spur off a lighting or socket circuit, a proper flush box behind the monitor, and the low-voltage adaptor tucked in. Plan this point at the same height and wall as the monitor so no wire trails.
- The door station is usually powered down the cable from inside, or by PoE on an IP kit, so the outdoor unit generally needs no separate power at the gate. This is deliberate: you do not want a 230V point out in the monsoon at the door. On some multi-monitor or long-run systems a separate power supply or distribution box sits indoors and feeds both the station and the monitors.
So the owner's job is simple to state: decide where the indoor monitor goes, and tell the electrician to bring a mains point to exactly that spot. The electrical hub covers how that spur is taken safely; the power and backup guide covers keeping the whole thing alive through a cut, which in India matters as much as the wiring itself.
Construction stage versus retrofit
The cheapest, cleanest wiring is the wiring you plan before the walls are plastered. The difference is stark.
New build: run conduit before plastering
If your home is under construction or being renovated to the shell, this is the moment. Decide the door station and monitor locations now, and have the electrician lay concealed conduit (a PVC pipe in the wall) along the route, with a pull-string left inside so the actual cable can be drawn later. Chase the wall, drop the conduit, leave junction boxes at both ends, and only then plaster. The cable itself can go in on the day the kit arrives, months later, because the pull-string is waiting.
Getting this on the drawing before the plasterer is the single highest-value thing an owner can do. Once the wall is closed, adding a concealed run means breaking finished plaster or paint. Coordinate it with the rest of the low-voltage plan, and mark it on the same layout you use for placement.
Retrofit: surface conduit, trunking, or a fished run
If the house is finished, concealed wiring means chasing walls and re-plastering, which is messy and expensive. The usual retrofit answers are:
- Surface conduit or trunking run neatly along skirting, door frames or the ceiling line, painted to match. Honest, cheap, and no re-plastering.
- A fished run through an existing empty conduit if one happens to line up, which is where a slim 2-wire system earns its place.
- Wireless for the last hop where a wired route is truly impossible, though a wireless door phone trades the cable for a battery and Wi-Fi to manage; it is a genuine option, not a lazy one, but read that guide for the tradeoffs.
For an apartment, remember the wiring may not be fully yours to route: a common riser, a guard station tie-in or a society intercom backbone can be involved. The apartment intercom and multi-apartment systems guides cover where the building's wiring ends and yours begins.
The long run: villas, gates and voltage drop
A flat is a short run: door to hall, a few metres. A villa or independent house is a different animal, because the door station often sits at a compound gate that can be twenty, forty, even sixty metres from the indoor monitor. Over that distance, wiring choices that do not matter in a flat suddenly do.
- Cable length has a limit. Every kit has a maximum run for its cable class, quoted on the datasheet. Analog multi-core kits commonly manage a few tens of metres; 2-wire bus systems often reach further; IP over Cat6 is limited to roughly 90 to 100 metres of cable before you need a switch to extend it. Read your specific model's figure before you assume the gate is reachable.
- Voltage drop is the villain on long runs. Power sent down a thin cable over a long distance arrives weaker at the far end, and a starved door station shows up as a dim night image, a dropping call, or a unit that reboots. The cure is a thicker conductor (a larger gauge, meaning a lower AWG number or a bigger square-millimetre rating) for the power pair, or a separate local power supply near the door end. This is exactly the kind of number to hand your installer: tell them the run length and let them size the gauge.
- Plan the trench and the gate box. A gate-to-house run usually shares a trench or conduit with the gate motor and lighting cable. Keep the door-phone cable in its own conduit inside that trench, and terminate it in a sealed box at the gate pillar.
The villa door phone guide is the companion here, and the type selector will steer a long-run villa toward a class that can actually cover the distance.
More than one monitor
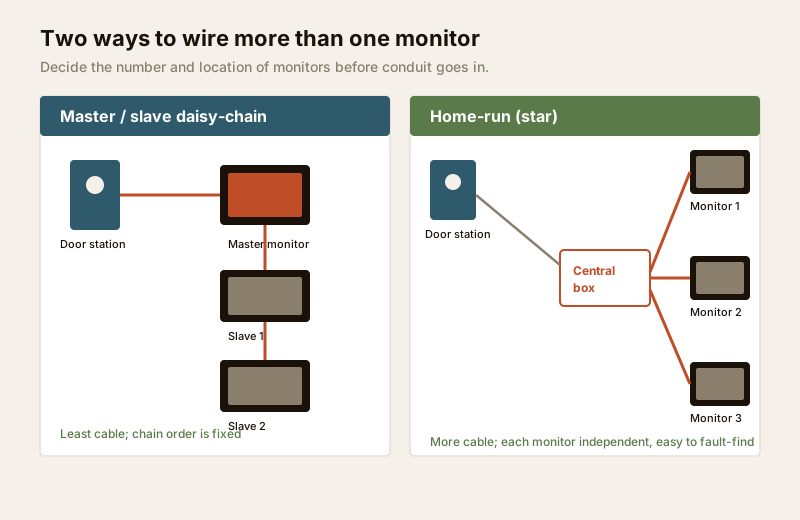
Many homes want a monitor in more than one place: one in the living room, one in the master bedroom, sometimes one on each floor. There are two ways to wire that, and the difference decides your conduit layout.
| Layout | How it is wired | Trade-off |
|---|---|---|
| Master / slave daisy-chain | Cable runs from the door station to a master monitor, then hops monitor-to-monitor in a chain | Least cable; but the chain order is fixed, and on some kits the master must be powered for slaves to work |
| Home-run (star) | Each monitor has its own cable back to a central distribution box or the door station | More cable and a tidy central box; each monitor is independent and easier to fault-find |
For two monitors, a daisy-chain is usually simplest. For three or more, or across floors, a home-run to a central box is cleaner to maintain and to extend later. Either way, decide the number and location of monitors before conduit goes in, because adding a fourth monitor to a finished daisy-chain can mean a fresh run. Sketch it on the same plan as your placement decisions.
Getting a clean signal: separation and service loops
Two small habits, agreed at planning time, prevent most of the noise problems that plague door phones.
- Keep the door-phone cable away from mains cabling. A low-voltage signal cable run tight alongside a 230V power line can pick up hum and interference, showing as a buzzing image or crackly audio. The rule of thumb your electrician already knows: run them in separate conduits, cross at right angles rather than in parallel, and keep a gap where they must run together. This is one more reason the mains point behind the monitor is planned as its own spur.
- Leave a service loop at each end. A service loop is a small coil of spare cable (roughly 30 centimetres) left behind the monitor and at the door station box. It costs nothing, and it is the difference between an easy re-termination years later and a wall being reopened because the cable was cut flush. Insist on it at both ends.
- Use the right cable, sealed the right way. For an IP kit, a genuine Cat6 (not a thin patch cord) makes the PoE run reliable. The outdoor junction box must be a monsoon-sealed, IP-rated box, and the whole outdoor route should be rodent-proofed, because rats chewing a door-phone cable in the ceiling void is a real and common Indian failure. These points connect to the wider smart home low-voltage plan if you are wiring more than the door.
What to tell your electrician and installer
You are the coordinator, not the technician. The most useful thing you can do is hand over a clear brief so the professional wires it right the first time. Give them this.
1. The two locations, marked on the wall. Door station spot at the entry; indoor monitor spot inside, at a stated height. If multi-monitor, mark every one.
2. A 230V point behind the monitor. Ask for a mains spur to the monitor location for the adaptor, in a flush box, planned as its own run away from the signal cable.
3. The cable class your kit needs. Tell them whether it is multi-core, 2-wire, coax, or Cat6 PoE, from the datasheet, so they buy and pull the right cable.
4. The run length, especially for a villa. State the gate-to-house distance so they can size the conductor gauge against voltage drop, or plan a local power supply.
5. Concealed conduit with a pull-string (new build) or a neat surface route (retrofit), with junction boxes at both ends.
6. Separation from mains and a service loop at each end. Ask for it explicitly; it is easy to skip.
7. A sealed, IP-rated outdoor box and rodent-proofing on the outdoor run.
8. Leave the mains and any height work to the licensed people and keep the low-voltage plan on the same drawing as the rest of the electricals.
When to bring in a professional. Choosing the system, fixing the locations, drawing the routes and writing this brief are the owner's and architect's job, and doing them well is most of the battle. The 230V adaptor point, any chasing of walls, cabling at height, the gate trench and every mains-connected task belong to a licensed electrician and installer, per the National Building Code and normal Indian practice. If you are wiring a villa gate run or a multi-monitor home, have the installer confirm the cable length and gauge against the datasheet before you order. Never let a door station point beyond your own entry, and keep the recorded footage and access private under the DPDP Act, 2023.
Key takeaways
- The kit decides the cable. Match your system to one of four classes first, multi-core, 2-wire, coax or Cat6 PoE, and the wiring follows; the type selector helps you choose before you dig.
- Plan the mains point where the monitor goes. The indoor monitor needs a 230V spur for its adaptor, an electrician's job; the door station is usually powered down the cable or by PoE, so no power sits out in the weather.
- Conduit before plastering beats chasing later. In a new build, lay concealed conduit with a pull-string now; in a retrofit, neat surface trunking or a slim 2-wire run saves you breaking finished walls.
- Long villa runs need a gauge and length check. Respect the datasheet's maximum run and size the conductor against voltage drop, or the far-end door station dims and drops calls; see the villa guide.
- Separate from mains, leave a service loop, seal and rodent-proof. These planning-time habits prevent hum, ease future work, and survive the monsoon; hand your electrician the eight-point brief and leave the mains and height work to them.
References
- Digital Personal Data Protection Act, 2023 (India) - video and audio captured by a door station are personal data; restrict the door station to your own entry and keep recordings and access private.
- Manufacturer datasheets and installation manuals - the authority for your kit's cable class, maximum cable-run length, conductor gauge, power rating and PoE requirement; confirm these numbers before any cable is ordered or pulled.
- National Building Code of India (SP 7) and relevant Indian Standards for electrical installations and low-voltage wiring, via the Bureau of Indian Standards catalogue: https://www.services.bis.gov.in/ - verify the current edition before relying on any electrical or conduit detail.
This is an educational overview, not legal or electrical-engineering advice. The mains adaptor point, wall chasing, work at height and all mains-connected wiring are qualified professional tasks - engage a licensed electrician and installer, and verify any standard's current status via the BIS catalogue before relying on it.
Export this guide
Related Guides — Deep-dive reading
Smart Home Planning Guide India: New Build & Existing Homes
The decisions that make or break a smart home are taken at the plan stage — before a wall goes up or a switch box is chased. Here is how to plan conduits, neutrals, network backbone and device points for an Indian home that stays smart for a decade.
Smart HomePoE vs Wi-Fi CCTV: Which Home Security Cameras Are Better?
One camera type runs power and video down a single Cat6 cable to an NVR and almost never drops out; the other clips to a wall in minutes and streams over your home Wi-Fi. This guide settles PoE vs Wi-Fi CCTV for Indian homes — reliability, video quality and bandwidth, cabling and power, retrofit versus new-build effort, NVR versus SD and cloud storage, hacking risk, real rupee costs, scalability and outdoor use — and gives a clear verdict for each kind of home.
Smart HomeSecurity Cabling Requirements for Indian Homes
How to plan the wiring behind a home security system - which cable feeds which device, the 90-metre ethernet rule and the interference rules, and why laying conduit at construction stage beats surface trunking every time.
SecurityRelated Tools — Try Free
Video Door Phone Type Selector
Answer a few questions about your building, cabling, budget and internet and get the right video door phone — analog / wired / wireless / IP, single-home or multi-apartment, monitor or app.
Door Phone SelectorApartment Video Door System Planner
Enter flats, entrances, floors and guard desk for a first-pass building intercom plan — door stations, indoor monitors, guard station, the right architecture and an indicative cost band.
Building PlannerCCTV Cable-Length Calculator
Total cable to buy for a CCTV job and a warning when a run exceeds the cable's maximum length.
Cable Length