
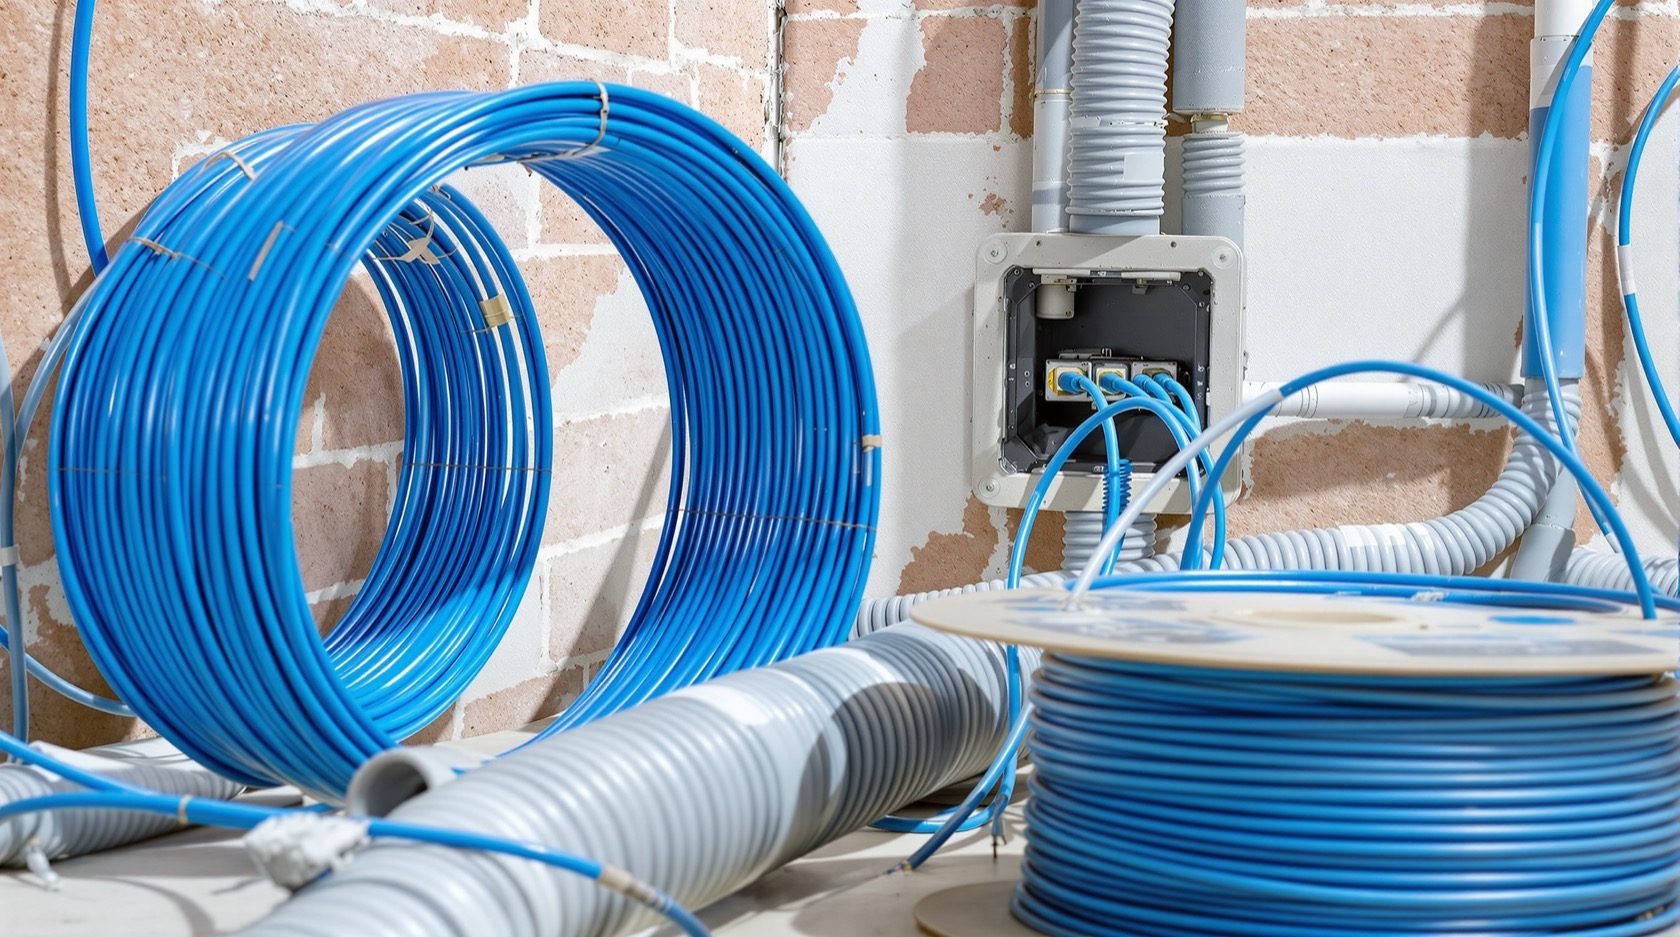
Security Cabling Requirements for Indian Homes
How to plan the wiring behind a home security system - which cable feeds which device, the 90-metre ethernet rule and the interference rules, and why laying conduit at construction stage beats surface trunking every time.
Cameras, sensors and alarms get all the attention, but the part that quietly decides whether your security system works for a decade is the cabling behind the wall. Wireless is convenient, yet the backbone of a reliable system - the camera runs, the recorder, the router, the power to it all - is still wired. Get the cabling plan right and everything downstream is easy; get it wrong and you are chasing dropped cameras, chiselling plastered walls, or living with ugly trunking stapled across the ceiling.
This guide helps you plan and specify that cabling so you can hand a clear brief to your electrician or system integrator. It is the infrastructure companion to the home security risk assessment and sits alongside your internet and network readiness and power supply planning. When you want to size runs and count drops interactively, the Security Cabling & PoE Planner turns this logic into a printable materials list.
Scope & safety. This is a planning and specification guide. Pulling structured cabling, terminating outlets and anything touching mains power is qualified work - specify what you want, then have a licensed electrician or integrator install, test and certify it. Never route security cable in a way that blocks a fire-escape path, and never share a conduit with mains unless the cable and method are rated for it.
Know your cable types - what feeds what
Different devices want different cable. Choosing right at the plan stage avoids re-pulling later.
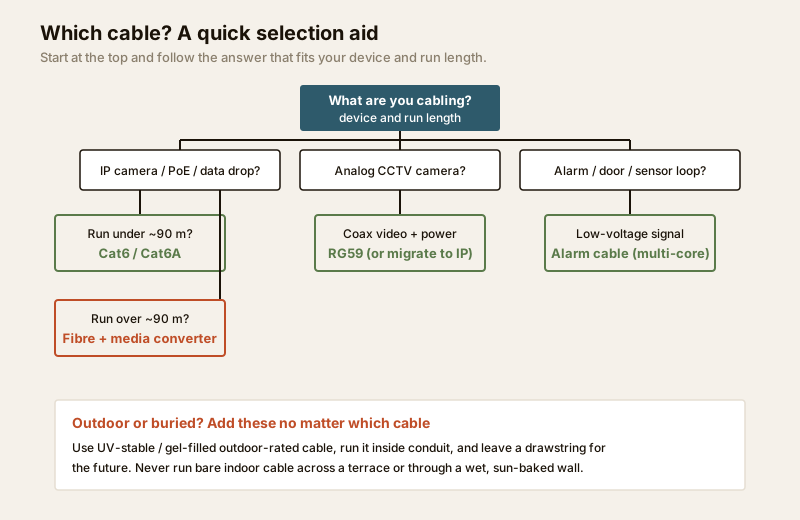
- Cat6 / Cat6A ethernet - the modern default. Almost every current camera is an IP camera powered over the same cable that carries its data (Power over Ethernet, or PoE). One Cat6 run to each camera carries video and power together, which is why it has become the standard for new homes. Cat6 is plenty for a home; Cat6A adds headroom for higher-bandwidth cameras and longer PoE budgets. Buy solid-copper cable, not copper-clad aluminium - CCA fails PoE and corrodes.
- Coax / RG59 - older analog systems. Analog CCTV uses coaxial video cable, usually RG59 with a bonded power lead (a "Siamese" cable). It still works, but if you are wiring fresh, prefer IP over Cat6 - it is easier to extend, higher resolution, and future-proof. Keep coax in mind mainly if you are extending an existing analog setup.
- Alarm / sensor cabling. Door contacts, motion detectors, panic buttons and siren loops run on low-voltage multi-core alarm cable (commonly 4-core or 6-core). These are signal, not power-hungry, but they still want their own home runs back to the panel.
- Fibre - for the long haul. When a run is too long for ethernet (see the 90-metre rule below) - a gate camera at the end of a long drive, a separate block, a farmhouse outbuilding - fibre optic cable carries the signal reliably over hundreds of metres, with a small media converter at each end. Overkill inside a flat; essential across a large plot.
The cabling requirements table
Use this as the backbone of your brief. The cabling planner tool builds the same table for your specific device list.
| Device | Recommended cable | Powered how | Planning notes |
|---|---|---|---|
| IP / PoE camera | Cat6 (Cat6A for long or high-bitrate) | PoE over the same cable | One home run per camera to the switch; solid copper only |
| Video door phone | Cat6 or maker's cable | PoE or local adaptor | Run to both the door and the indoor monitor location |
| Analog CCTV camera | RG59 Siamese (coax + power) | Local / DVR power lead | Only if extending existing analog; else migrate to IP |
| Wi-Fi access point | Cat6 | PoE | Ceiling-mounted APs love PoE - no socket needed |
| Alarm sensor / door contact | 4-core alarm cable | Panel-powered loop | Home run to the alarm panel; keep loops tidy and labelled |
| Siren / sounder | 2 or 4-core alarm cable | Panel-powered | Mount high and out of reach; plan the run early |
| Gate / outbuilding camera (far) | Fibre + media converter | Local PoE at far end | Use where the run exceeds ~90 m of copper |
| Network backbone / NVR uplink | Cat6A or fibre | n/a | Links the equipment cabinet to the main router |
The practical rules that make cabling reliable
Cable type is the easy half. The runs, spacing and protection are where installs go wrong.
The ~90-metre ethernet rule
A single ethernet run - and its PoE - is designed to work up to about 90 metres of cable (100 m including patch leads at each end). Past that, data and power both start to fail. Most Indian homes never approach this, but a long villa, a plot with a distant gate, or a run that snakes up two floors and along a ceiling can add up faster than you think. When a run would exceed the limit, the fix is not a longer cable - it is either a PoE extender / mid-span switch partway along, or fibre with a media converter for the whole leg. Plan the distance at design stage; discovering it after the walls close is expensive.
Keep data cable away from mains
Data cable and mains power do not like to run side by side. A long parallel run lets electrical noise from the mains leak into the data cable, and the result is dropped video frames, cameras that keep reconnecting, and flaky sensors.
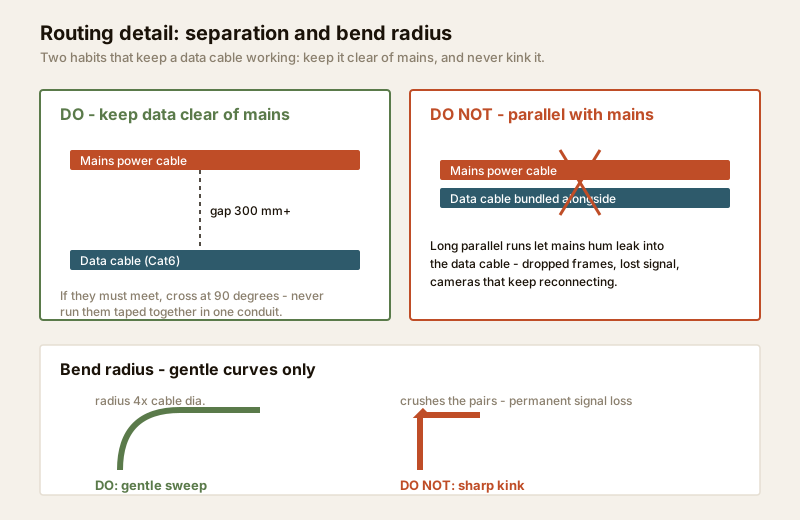
The rules are simple and worth writing into your brief:
- Keep a gap. Aim for at least 300 mm (about a foot) of separation between data and mains cabling on parallel runs.
- Cross at right angles. If a data cable must meet a power cable, cross it at 90 degrees rather than running alongside it.
- Do not share conduit with mains unless the cable and installation are specifically rated for it - as a homeowner, keep them separate.
- Stay clear of big electrical noise - avoid running data cable hard against distribution boards, motor rooms, lift shafts or large transformers.
Bend radius, indoor vs outdoor, and conduit
- Do not kink the cable. Ethernet carries signal on twisted pairs; a sharp bend or a tight cable-tie crushes them and permanently hurts performance. Keep bends to gentle sweeps - a rough rule is a radius of at least four times the cable diameter. This matters most at the recorder end, where cables crowd together.
- Match the cable to its environment. Ordinary indoor cable degrades fast in sun, heat and monsoon damp. Anything outdoors, on a terrace, or buried needs UV-stable, outdoor-rated (often gel-filled) cable. Direct-buried runs should also sit inside conduit.
- Run everything in conduit with a drawstring. Conduit (a hollow pipe in the wall or ground) protects the cable and, crucially, lets a future cable be pulled through without breaking anything - especially if you leave a drawstring (a nylon pull-cord) in place. This one habit is the difference between a five-minute upgrade and a day of chiselling.
Home-run everything to a central point
Good cabling has a shape: every device cable runs back, unbroken, to one central equipment point - a cabinet or small cupboard that holds the recorder (NVR), the PoE switch, the router, the alarm panel and a UPS. This is called a home-run or star topology, and it is worth insisting on.
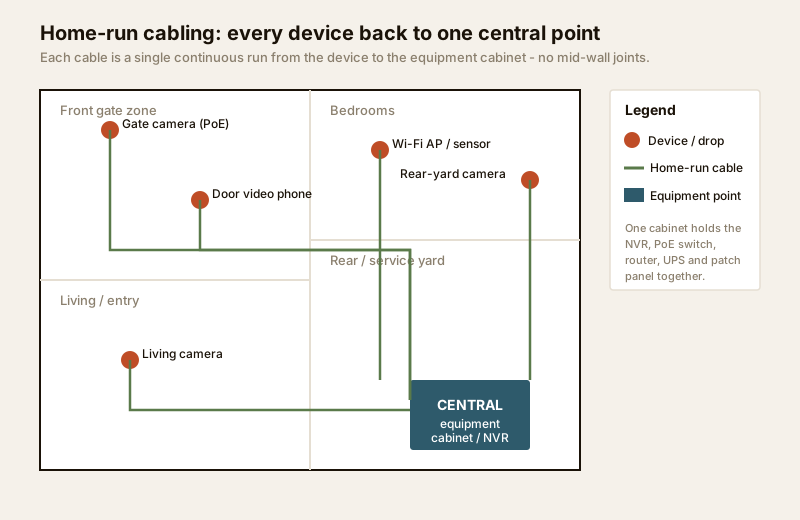
Why it matters:
- No mid-wall joints. Every run is one continuous cable from device to cabinet. Joints buried in walls are the number-one cause of faults you cannot find later.
- One place to power, protect and diagnose. All your gear sits together behind one UPS, on one board, where a fault is easy to trace.
- Easy to grow. Adding a camera means pulling one more cable to the same cabinet, not rewiring.
Where that central point should live, how to ventilate and power it, and how big to make it are covered in the security equipment room planning guide; the storage and recorder side is in the data storage planning guide.
Construction stage vs retrofit - plan this now
The single biggest cabling decision is when you do it. Cabling laid inside the walls during construction is invisible, neat, protected and cheap to pull. The same cabling added after the house is finished means surface conduit and trunking screwed across walls and ceilings, or messy chiselling and re-plastering. The cost and neatness gap is enormous - and it is entirely avoidable if you plan early.
| Factor | At construction stage (in-wall) | Retrofit (surface trunking / chasing) |
|---|---|---|
| Appearance | Invisible - cable hidden in wall / slab | Visible trunking, or patchy re-plaster |
| Cost | Low - conduit laid with other services | High - labour to chase walls or clip trunking |
| Disruption | None - done before finishes | Dust, drilling, moving furniture |
| Route freedom | Any wall, any ceiling, shortest runs | Limited to surfaces you can reach |
| Future-proofing | Spare conduits + drawstrings easy to add | Hard and ugly to add capacity later |
| Best for | New build, full renovation, gutted floor | Existing finished homes, rentals, small adds |
If you are building or renovating, fold the security cabling into the drawings from the start - the security planning guide for new homes and the architects' security design guide show how it drops into the electrical plan. If your walls are already finished, retrofit is still perfectly workable with tidy surface conduit - just accept that runs are constrained to reachable surfaces.
Future-proofing: spare conduits and extra drops
Cabling is cheap while the walls are open and expensive afterwards, so over-provision now:
- Lay spare conduits to likely future camera and access-point positions - even empty ones with a drawstring pay for themselves the first time you extend.
- Pull extra drops. A spare Cat6 to each corner, the gate, the terrace and the equipment cabinet costs little today and saves a wall-breaking exercise tomorrow.
- Oversize the equipment cabinet and its power. Leave spare switch ports and UPS headroom so growth does not mean a rebuild.
Coordinate all of this with your internet and network readiness plan and your electrical backup assessment so cabling, network and power are designed as one system rather than three afterthoughts.
Termination, patching and labelling
The last metre matters as much as the first. Insist that your installer:
- Terminate to a patch panel in the cabinet rather than crimping bare plugs on every run - it is tidier, more reliable, and far easier to re-arrange.
- Test every run after termination (a simple cable tester confirms each pair) and note the result. A run that tests clean today saves hours of blame later.
- Label both ends of every cable - "Gate cam", "Rear cam", "Living AP" - on the cable and on the patch panel. An unlabelled cabinet is unmaintainable; a labelled one lets anyone service it in minutes.
This discipline is what makes the ongoing maintenance of the system painless years later.
When to bring in a professional
Do the planning yourself - decide the device positions, the routes, the central point and the spare capacity, and write it into a clear brief. But hand the physical work to qualified people. Pulling and terminating structured cabling, anything sharing a route with mains wiring, mains-powered equipment, and any work inside the electrical distribution board is licensed work. A structured-cabling installer or security integrator should pull, terminate, test and label the runs and certify the install. For new builds especially, get the cabling designer talking to your electrician early so the electrical guide and the security plan agree before a single wall is closed.
Key takeaways
- Match the cable to the job - Cat6/Cat6A with PoE for IP cameras and access points, RG59 only for existing analog, alarm cable for sensors, fibre for runs beyond ~90 m.
- Respect the rules - keep ethernet runs under about 90 m, keep data at least 300 mm from mains, cross at right angles, and never kink the cable.
- Home-run everything to one central equipment point with no mid-wall joints, so the system is easy to power, diagnose and grow.
- Plan at construction stage - in-wall conduit with drawstrings is invisible and cheap; retrofit trunking is neither. Over-provision spare conduits and drops now.
- Terminate, test and label every run, and route the actual electrical and cabling work to a licensed installer.
Plan your runs and count your drops with the Security Cabling & PoE Planner, then browse the full security guides collection to plan the rest of your infrastructure.
This is an educational planning guide. Structured cabling, mains-adjacent wiring and electrical work is qualified professional work - engage licensed installers, keep security cabling clear of fire-escape paths, and verify any applicable National Building Code or municipal bye-law requirement for your project.
Export this guide
Related Guides — Deep-dive reading
Electrical Safety for Security Systems in India (2026): Powering It Without Peril
A homeowner's guide to the power side of home and RWA security systems, CCTV, alarms, gates, access control and NVRs, done so it protects you instead of quietly becoming a shock or fire hazard. What makes a supply safe, what to insist on, and why the mains work belongs to a licensed electrician.
SecurityPoE vs Wi-Fi CCTV: Which Home Security Cameras Are Better?
One camera type runs power and video down a single Cat6 cable to an NVR and almost never drops out; the other clips to a wall in minutes and streams over your home Wi-Fi. This guide settles PoE vs Wi-Fi CCTV for Indian homes — reliability, video quality and bandwidth, cabling and power, retrofit versus new-build effort, NVR versus SD and cloud storage, hacking risk, real rupee costs, scalability and outdoor use — and gives a clear verdict for each kind of home.
Smart HomeSmart Home Planning Guide India: New Build & Existing Homes
The decisions that make or break a smart home are taken at the plan stage — before a wall goes up or a switch box is chased. Here is how to plan conduits, neutrals, network backbone and device points for an Indian home that stays smart for a decade.
Smart HomeRelated Tools — Try Free
Security Cabling & PoE Planner
Estimate cable length, drops, PoE power budget, the right switch, conduit and cost for a CCTV/security cabling plan.
Cabling PlannerCCTV Cable-Length Calculator
Total cable to buy for a CCTV job and a warning when a run exceeds the cable's maximum length.
Cable LengthCCTV Camera Coverage & Count Calculator
Estimate how many CCTV cameras you need, the NVR channels, storage in TB for your retention period, and an indicative all-in cost with GST.
CCTV Calculator