
Fitting Door Hinges: New-Fit Craft Guide (India 2026)
Mark the three hinge positions, cut a clean recess, screw hinges to leaf and frame, and get a new door to swing true on the first try.
The difference between a door that swings sweetly and one that binds, drops or self-swings is almost always in the hinges — not the hinge product, but the fitting door hinges craft: where you mark them, how cleanly you cut the recess, and how truly the two leaves of each hinge line up between leaf and frame. Get the geometry right and the door hangs itself; get it wrong by a millimetre and you chase the latch, the gaps and the swing for the rest of the day. This guide is the new-fit craft of hanging hinges on a fresh leaf — distinct from the door hinges product guide (what a hinge is and which type to buy) and from hinge replacement (swapping a worn hinge on a door already hung). For the full fitting workflow it sits inside, start from fitting door hardware and the complete door guide.
Before you mark: tools, hinges and the door
Fitting door hinges well is a sharp-tool job. A blunt chisel tears flush-door veneer and leaves a ragged recess that the hinge rocks in. Sharpen first.
| Tool | Use in hinge fitting | Indicative cost (₹) |
|---|---|---|
| Bevel-edge chisels 12-25mm | Chopping and paring the recess | 600-2,500 (set) |
| Marking knife & combination square | Scoring the recess outline crisply | 400-1,200 |
| Marking/mortise gauge | Setting recess depth and back-line | 350-900 |
| Cordless drill + hinge-sinker / pilot bit | Pilot holes square to the face | 3,000-9,000 |
| Router + hinge jig/template | Production-speed identical recesses | 8,000-30,000+ |
| 600mm spirit level, 4ft straightedge | Checking the leaf flat and hinges in line | 800-2,500 |
Decide the hinge specification before you cut: leaf weight and width set the size and number. As a rule of thumb a standard 35-40mm internal flush leaf takes three 100mm (4-inch) butt hinges; a heavy, solid or fire-rated leaf takes four, and fire doors must use CE/fire-rated hinges as part of the tested set (see fire-door installation compliance). Stainless or brass washered hinges resist the squeak and rust common in Indian humidity. Confirm handing now — a wrongly handed door is the most expensive five-minute mistake on site; see door handing and swing.
Marking the three hinge positions
Hinge set-out is conventional, not arbitrary, so doors across a job match. Work from the marking out door hardware discipline: mark leaf and frame together, in one operation, so the two halves cannot drift.
| Hinge | Position (rule of thumb) | Why |
|---|---|---|
| Top | 150-200mm from the top of the leaf to the top of the hinge | Resists the leaf's tendency to drop and twist |
| Bottom | 250mm from the floor to the bottom of the hinge | Carries the dead weight low down |
| Third (middle) | Midway, or one-third down from the top | Stops the leaf bowing; mandatory for stability |
| Fourth (heavy/fire) | ~150mm below the top hinge | Shares load on heavy or fire leaves |
Stand the leaf in the frame on wedges/packers giving the correct floor gap (typically 8-12mm, more over carpet or for undercut ventilation). Set the head gap to 2-3mm. With the leaf held true, mark both leaf and frame in one pass: knife a square line across both at the top and bottom of each hinge, then carry the lines onto the edge with the square. The marking gauge then scribes the back-line (hinge knuckle barely proud of the edge) and the depth (one leaf-thickness of the hinge, so the closed door sits flush). Number the recesses if leaves are stacked — see door numbering and tagging.
Cutting the recess: chisel or router jig
By chisel (hand method)
With the outline knifed, set the hinge in place and re-score around it for a tight fit. Then: chop a series of shallow vertical cuts across the recess to the gauge depth, holding the chisel bevel-in; pare the waste out horizontally, working to the depth line; finish the floor of the recess dead flat — a high spot makes the hinge rock and the screws never pull tight. Keep the back-line crisp so the hinge knuckle projects the right amount. Test-fit: the hinge should drop in flush with no packing and no rock.
By router and hinge jig
For more than a couple of doors, a router + hinge jig pays for itself in speed and consistency. The jig clamps to the edge, indexes the three positions, and the router with a guide bush cuts an identical recess every time; you square the rounded corners with a chisel (or buy radius-corner hinges to match the bit). This is the production method on a fit-out — see hinge mortising jig for jig set-up, and the wider door fitting power tools and door fitting hand tools guides for the kit. On a dusty, power-cut-prone Indian site, keep a sharp chisel as backup; never down tools because the inverter died.
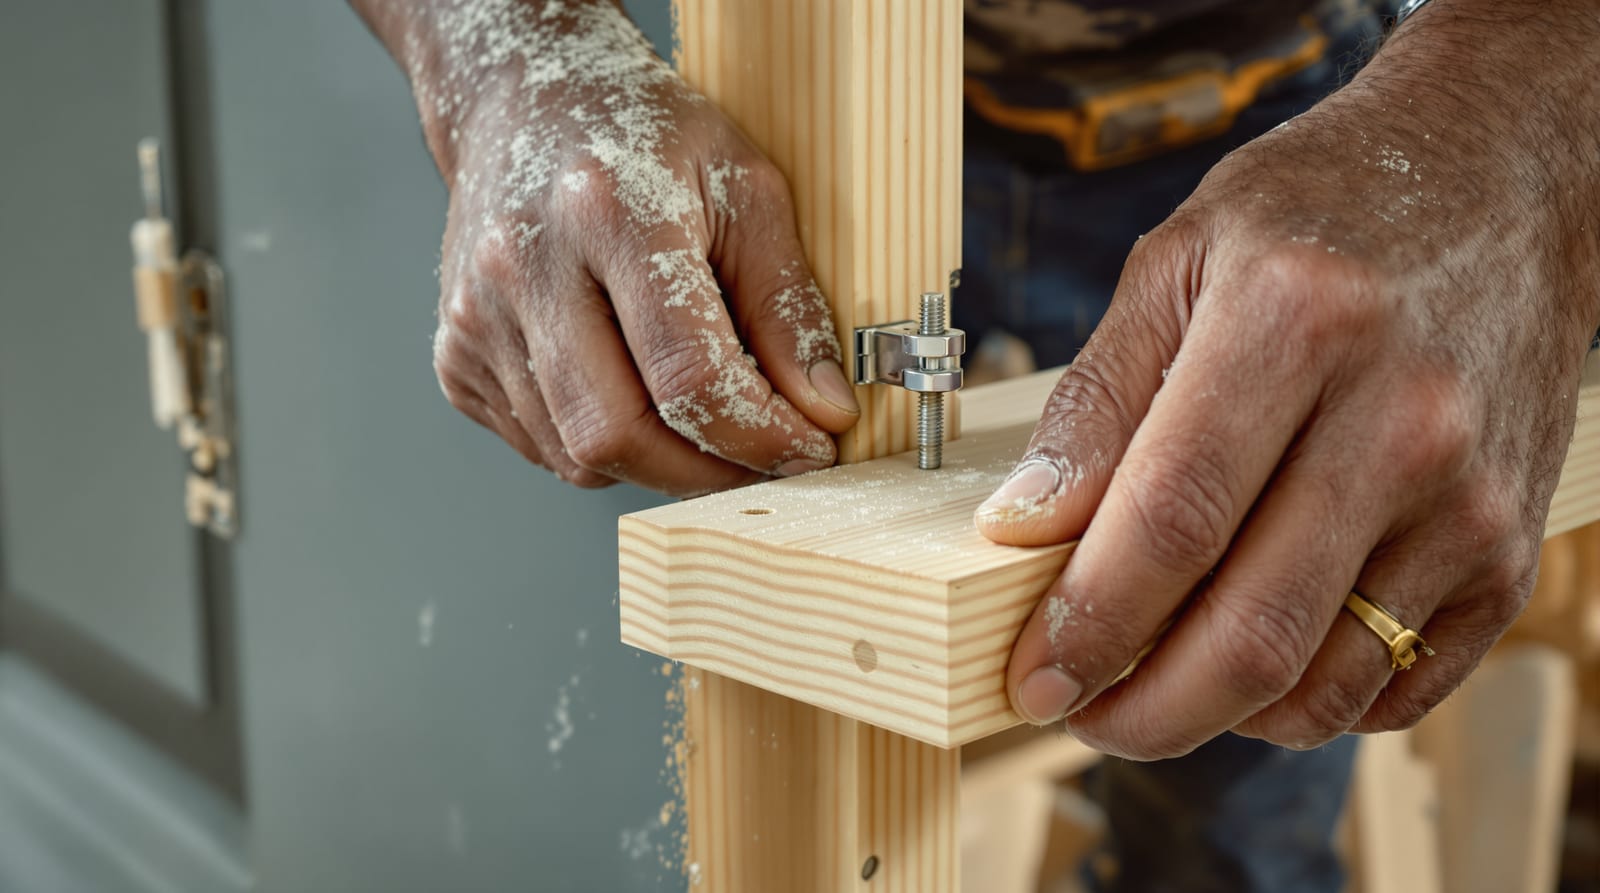
Screwing the hinges and hanging the leaf
Mount the hinges to the leaf first. Use a hinge-sinker or self-centring bit so pilot holes sit dead-centre in the countersink — off-centre screws drag the hinge sideways and the door won't line up. Drill pilots square to the face to avoid splitting hardwood. Drive matched screws fully home and flush; proud heads stop the leaf closing and look amateur. On fire doors, use the screws supplied with the certified set, all holes filled, into the solid frame.
Offer the leaf back into the opening on its wedges, mark and cut the frame recesses to match, then fix the top hinge to the frame first with one screw, swing-test, then the bottom, then the middle. Drive one screw per hinge, test the swing and the gaps, adjust if needed, then fill the remaining screws. Two craftsman's fixes when a door drops or binds: a cardboard packer behind a hinge leaf throws the door away from that jamb; deepening a recess pulls it in. For a hinge-bound leaf that springs open, the recesses are too deep — pack them out. Check the result against door clearances and tolerances: even 2-4mm margins, the leaf swinging freely and latching first time. Plan the labour with the door fitting time estimator and set heights with the door hardware height calculator.
| Symptom after hanging | Likely cause | Fix |
|---|---|---|
| Door drops / hinge edge tight | Top recess too deep or screws loose | Pack top hinge, re-fix into solid timber |
| Leaf springs open (hinge-bound) | One or both recesses too deep | Pack the recess with card |
| Won't latch first time | Leaf set too far from latch jamb | Pack the hinge-side recesses or re-set frame |
| Squeak | Dry knuckle / steel-on-steel | Lubricate; specify washered hinges next time |
| Visible rock in a hinge | Recess floor not flat | Pare the recess flat, re-seat |
This is honest, learnable craft, but it rewards a steady hand and sharp tools. A first-timer can hang a flush internal door; a heavy hardwood, glazed or fire leaf is a joiner's job, and fire-door integrity is a life-safety matter — when in doubt, bring in a specialist and inspect against door installation QA.
Frequently asked questions
How many hinges does a door need?
Three per leaf is the standard for a normal internal door: top 150-200mm down, bottom 250mm up, and a third in the middle or one-third from the top. Heavy, solid, glazed or fire-rated leaves take four — the fourth roughly 150mm below the top hinge to share the load.
What is the correct recess depth for a butt hinge?
The recess is cut to one leaf-thickness of the hinge, so that when the door is shut both hinge leaves close together and the door sits flush in the frame. Set this with a marking gauge and keep the recess floor dead flat — a high spot makes the hinge rock and the screws never pull tight.
Chisel or router jig — which should I use?
For one or two doors a sharp bevel-edge chisel and a knifed line are quicker to set up. For a whole fit-out, a router and a hinge mortising jig cut identical recesses fast and consistently. Keep a chisel handy on Indian sites for power cuts and corner-squaring.
My new door won't latch first time — is it the hinges?
Usually yes. If the leaf sits too far from the latch jamb it overshoots the strike. Pack the hinge-side recesses with card to throw the leaf across, or re-check the frame is plumb. Confirm against door clearances and tolerances before adjusting the strike.
Do fire doors have special hinge-fitting rules?
Yes. Fire doors must use CE/fire-rated hinges (usually three or more) that are part of the certified door-set, fixed with the supplied screws into the solid frame, with every screw hole filled and no oversize cut-outs that breach the leaf core. Follow fire-door installation compliance and NBC 2016 / IS 3614.
Export this guide
Related Guides — Deep-dive reading
Door Frame Plumb, Level & Square: Setting It True (India 2026)
How to set a door frame plumb, level, square and out-of-wind on Indian sites — spirit level, plumb bob, diagonals, shimming and the 1-2mm tolerance that decides whether the leaf latches.
Home Doors & EntrancesDoor Hinge Replacement: DIY Step-by-Step Guide (India 2026)
Match the size, type and finish, then swap a worn or rusted hinge yourself without taking the whole door off its frame.
Home Doors & EntrancesMeasuring for a Door: Opening Sizes & Checks (India 2026)
How to measure a door opening in India — three width and height points, diagonals, plumb and level — so the carpenter cuts it right the first time.
Home Doors & EntrancesRelated Tools — Try Free
Cross-Ventilation Analyzer
Estimate airflow and air changes per hour (ACH) from room size, window areas, layout, and local wind — with NBC 2016 Part 8 compliance check.
Ventilation CalculatorFire Door Rating Checker
See the likely fire-door rating (30/60/90/120 min) and components a location needs per IS 3614 / NBC — guidance, confirm with your architect.
Compliance ToolWindow Hardware Cost Calculator
Estimate window hardware cost — hinges, handles, locks, rollers and multipoint gears.
Window Calculator