
Marking Out Door Hardware Positions: Set-Out (India 2026)
Standard fitting heights, story rods and templates for setting out hinges, locks, viewers and bolts consistently across an Indian project.
Get the heights wrong on the first door and you repeat the mistake on every door after it. Marking out door hardware is the quiet discipline that separates a tidy, consistent fit-out from a project where one room's handle sits at 950mm and the next at 1,080mm, where lock keeps miss their strikes and hinge mortises drift. This guide is the setting-out craft: the standard Indian fitting heights, how to use a story (setting-out) rod so a batch of doors comes out identical, how to transfer marks from a template or jig, and how to meet RPwD accessible lever heights — so the marks are right before a single chisel touches the timber.
This sits upstream of the cutting work in fitting door hardware: mark first, mortise second. Marking out is cheap to correct and expensive to ignore.
Why marking out door hardware deserves its own step
On an Indian site with mixed-skill labour, the fastest route to inconsistency is letting each fitter eyeball heights off the floor. Floors are rarely dead level, packing under frames varies, and "about a metre" drifts by leaf. Marking out door hardware to a single reference fixes this: you set the heights once, capture them on a rod, and reproduce them on every leaf. The payoff is a building where handles, locks and viewers line up at the same height down a corridor — the visible signature of a quality fit-out, and an accessibility requirement, not just an aesthetic one.
Three principles run through everything below. One datum — mark from a single reference (the finished floor level or a benchmark line), never the door bottom. One rod — capture the set-out on a story rod and use it for the whole batch. One handing check — confirm the door's hand before you transfer marks, so hinges and lock land on the correct edge. Get the leaf handing wrong here and you cut the lock into the hinge stile; confirm against door handing and swing.
Standard fitting heights (India / NBC / RPwD)
Heights are measured to the centre of the item, from finished floor level (FFL) unless noted. These are the common Indian conventions; always defer to the manufacturer's template and the project ironmongery schedule where they differ.
| Item | Height (to centre, from FFL) | Notes |
|---|---|---|
| Lever / handle | 900-1050mm (≈1000mm typical) | RPwD accessible range 800-1100mm; lever, never knob |
| Mortise lock keep | ~900mm | Backset 60mm (some 57mm) |
| Top hinge | 150-200mm from frame head | Carries most swinging load |
| Bottom hinge | ~250mm from floor | — |
| Third (centre) hinge | mid-leaf or one-third down from top | Steadies leaf; reduces warp |
| Fourth hinge (heavy/fire) | between top and centre | Add for FD60, heavy or tall leaves |
| Door viewer (eye) | 1400-1500mm | Lower a second viewer for wheelchair users |
| Tower / flush bolt (top) | within reach, ~1800mm or head | Inactive leaf of a pair |
| Tower / flush bolt (bottom) | ~150-300mm from floor | Foot-operated where possible |
| Letter plate (where used) | 760-1450mm aperture zone | Coordinate with gate / wall |
Accessibility is a must, not an option
The RPwD Act 2016 and the Harmonised Guidelines require door furniture that is easy to operate with one hand and without tight gripping or twisting — that means lever handles, not knobs, mounted in the 800-1100mm band. For doors on accessible routes, hold the lever near 1000mm and keep it consistent so users find it by habit. Pair this set-out with the guidance in accessible doors and wheelchair-accessible doors. Treat the accessible lever height as a hard constraint that overrides house style.
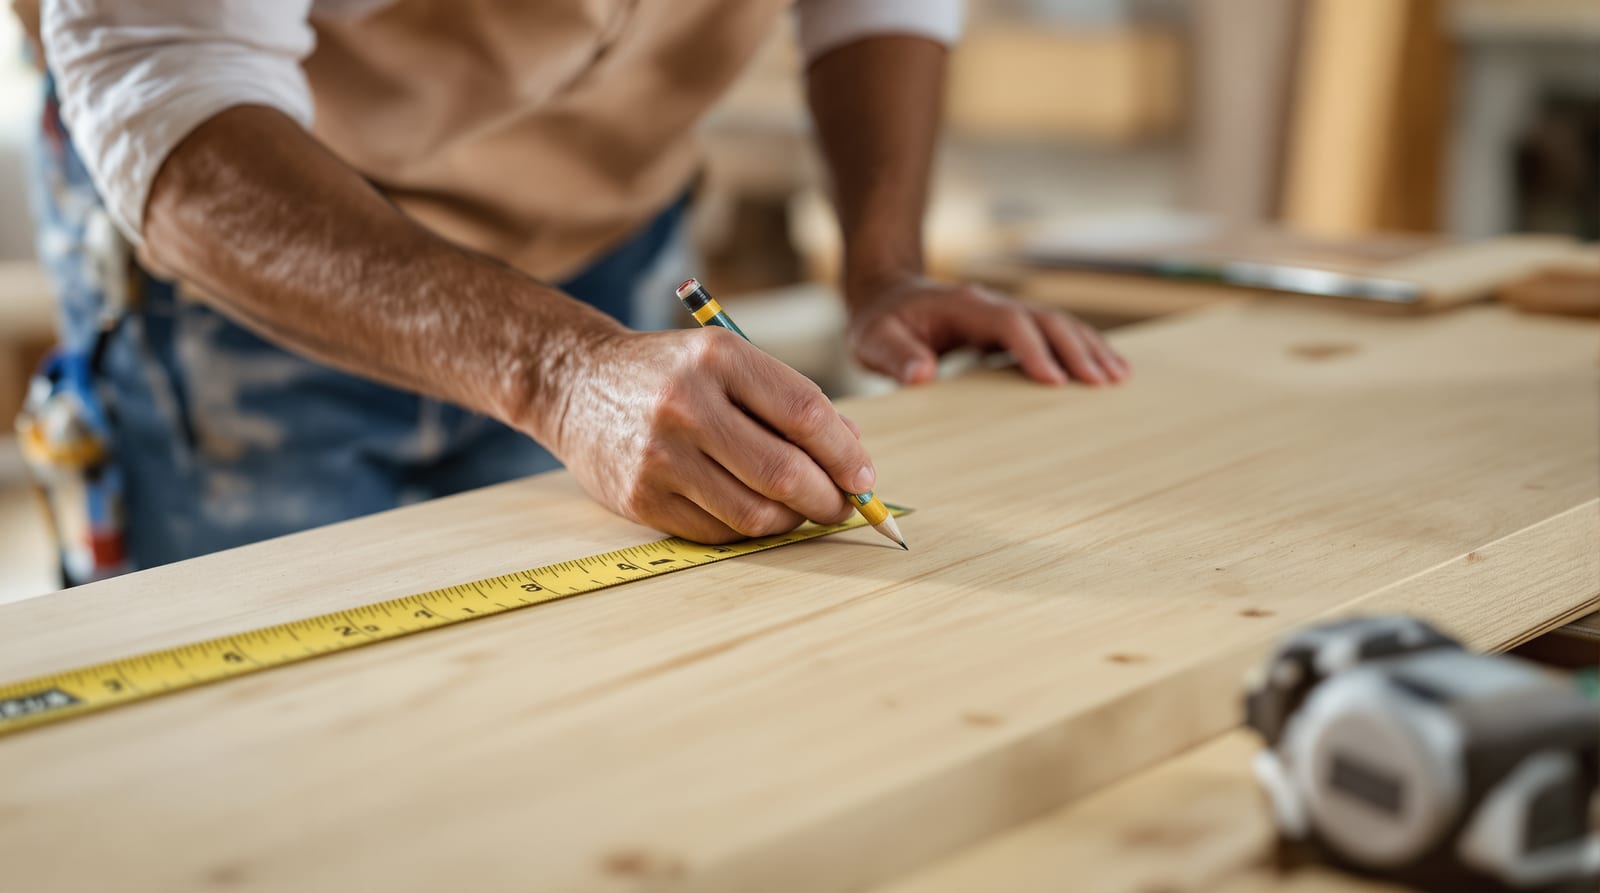
The story rod: set out once, repeat exactly
A story rod (setting-out rod) is a straight batten — a planed length of timber or a stiff aluminium section — onto which you transfer every hardware centre-line for the door type, measured from one end that represents FFL. Mark the rod once, clearly, in pencil and ink:
- A square line for FFL at the zero end.
- Centre lines for bottom hinge, top hinge, third hinge.
- A centre line for the lock keep / lever (~900-1000mm).
- A centre line for the viewer (~1400-1500mm).
- Bolt positions for paired doors.
To mark a leaf, stand the rod against the door edge (or hold it on the frame jamb for hinge positions), aligned to your FFL line, and tick across each centre. Because every leaf in the batch is marked from the same rod, every handle lands at the same height — no cumulative tape error, no "about a metre." Make one rod per door type (internal flush, main door, fire door) because their hinge counts and lock heights differ. The rod is the single source of truth; the door hardware height calculator is the quick way to generate the centres before you cut the rod.
Transferring marks from a template or jig
Manufacturers supply a paper or card template with most mortise locks, latches and viewers; hinge jigs and lock jigs carry the cut-out positions in steel. The template fixes the fine set-out — backset, spindle and cylinder bores, faceplate depth — while the story rod fixes the height. Combine them:
1. Mark the height line on the leaf edge and face from the story rod (lock centre, hinge centres, viewer).
2. Fold and align the template to that height line, registering its centre to your mark; tape it square to the door face and edge.
3. Awl through the template at the bore centres and faceplate corners; remove and join with a square and marking gauge.
4. Set the marking gauge to the backset (60mm typical) and run it from the lock stile face for the spindle line.
5. Verify before cutting — re-measure the lock centre to FFL and check the lever will land 800-1100mm.
For hinges, position the door hinge set-out from the same rod and use a hinge jig so the router cuts a clean, repeatable housing. The discipline is always the same: the rod gives height, the template gives detail, the gauge gives depth. Never freehand a bore on a flush leaf — an oversized or off-centre cut tears the veneer and, on a fire door, breaches the core. For the actual cutting and mounting, follow fitting mortise locks and fitting strike plates and keeps.
Consistency across a whole project
Setting out one door well is craft; setting out two hundred identically is site control. The governing document is the ironmongery (hardware) schedule — the per-door-set list of hinges, lock, lever, closer, bolts and viewer with heights and finishes. Marking-out heights must be driven from it, not improvised. Build the schedule with the ironmongery schedule guide and the ironmongery schedule builder, then translate each door type into a story rod.
| Control step | Practice | Why it matters |
|---|---|---|
| Fix house heights | Lever 1000mm, lock 900mm, viewer 1450mm | One number per item, project-wide |
| One rod per door type | Internal / main / fire / accessible | Hinge counts and heights differ |
| Brief the fitters | Issue a printed heights card + rod | Mixed-skill labour needs a reference |
| Sample door first | Mark, cut and approve one leaf | Catch set-out errors before the batch |
| Spot-check on site | Tape lever heights down a corridor | ±5mm between adjacent doors is the target |
| Record as-built | Note any deviations on the schedule | Feeds handover and snagging |
A practical rule of thumb: approve a sample door before the gang sets out the rest. Mark it from the rod, cut, hang and check the lever height, the lock function and the viewer line; once signed off, that rod becomes law for the batch. This ties directly into the wider set-out logic in setting out doors. Consistent set-out also makes door snagging faster — fewer height mismatches to flag at handover.
Keep the marking discipline aligned with the whole sequence in the complete door guide, and where you are ordering hardware, cross-check the products against the door hardware guide.
Frequently asked questions
What height should a door handle be in India?
The lever centre is typically set around 1000mm from finished floor level, within the common 900-1050mm range. For accessible routes the RPwD Act and Harmonised Guidelines require 800-1100mm, operable one-handed — so a lever near 1000mm satisfies both house style and accessibility. Use lever handles, not knobs.
How far apart should hinges be on a door?
Three hinges per leaf is standard: the top hinge 150-200mm from the frame head, the bottom hinge about 250mm from the floor, and the third hinge at mid-leaf or one-third down from the top. Heavy, tall or fire-rated leaves take a fourth hinge between the top and centre.
What is a story rod and why use one?
A story rod (setting-out rod) is a straight batten carrying every hardware centre-line measured from finished floor level. You mark each leaf from the same rod, so handles, locks and viewers land at identical heights across the whole batch — eliminating cumulative tape error and the drift you get from eyeballing "about a metre" on each door.
Where should a door viewer be fitted?
The peephole or door viewer goes at about 1400-1500mm to suit an average standing eye level. On accessible doors, add a second, lower viewer so a wheelchair user can also see out. Mark its centre from the story rod like every other item.
Should I measure hardware heights from the floor or a benchmark line?
Measure from finished floor level (FFL) captured on the story rod, not from the bottom of the leaf. Door bottoms are trimmed for clearance and floors are rarely dead level, so marking from the leaf edge introduces error. A single FFL datum keeps every door consistent. See setting out doors.
Do I still need the manufacturer's template if I have a story rod?
Yes — they do different jobs. The rod fixes the height of each item; the template fixes the fine detail (backset, spindle and cylinder bores, faceplate corners). Use the rod to mark the height line, then register the template to it for the cut-out positions, and a marking gauge for depth.
Export this guide
Related Guides — Deep-dive reading
Fitting Door Hardware: Ironmongery Install Guide India 2026
The new-fit craft of mounting hinges, locks, levers, closers, bolts, stops and seals onto a door and frame — in the right order, at the right heights.
Home Doors & EntrancesDoor Hardware Guide India 2026: Hinges, Handles, Locks, Closers and Every Fitting Explained
What each piece of door hardware actually does, where it belongs, which material (SS304, brass, zinc or iron) survives Indian conditions, the quality signals to check before you pay, and a buyer's checklist with 2026 prices.
Home Doors & EntrancesFitting Mortise Locks: New-Fit Craft Guide India 2026
The on-site craft of fitting a mortise lock to a new door — marking, mortising the pocket, boring cylinder and handle holes, and testing the throw.
Home Doors & EntrancesRelated Tools — Try Free
Window Hardware Cost Calculator
Estimate window hardware cost — hinges, handles, locks, rollers and multipoint gears.
Window CalculatorDoor Hardware Height Calculator
Get the standard fitting heights for handle, lock, hinges, viewer and bolts, with the accessible RPwD lever range flagged.
Height CalculatorDoor Hinge Selector
Get the right hinge type, size and count for a door by its height, weight and material — with a coastal SS-304 note.
Door Tool