
Hinge Mortising Jig for Doors: Router Templates India 2026
How a router and hinge mortising jig cut clean, repeatable hinge recesses fast — and when batch fitting pays off on Indian sites.
A hinge mortising jig turns the slowest, fussiest part of hanging a door — sinking three identical butt-hinge recesses dead level down a leaf edge — into a 20-second, repeatable router pass. Where a chisel-and-gauge mortise depends on the carpenter's eye and a steady hand, the jig clamps a hardened template to the edge and a router with a guide bushing follows it, cutting a recess of exact width, length and depth every time. On Indian sites running batches of identical flush doors, that consistency is the difference between a leaf that swings true and one that is hinge-bound. This guide covers what the jig is, how it works against hand mortising, how to set hinge positions to NBC and IS practice, the ₹ cost bands, and the project size at which the kit pays for itself. It complements the product-side door hinges guide — here we cover the new-fit craft, not the ironmongery itself.
What a hinge mortising jig is
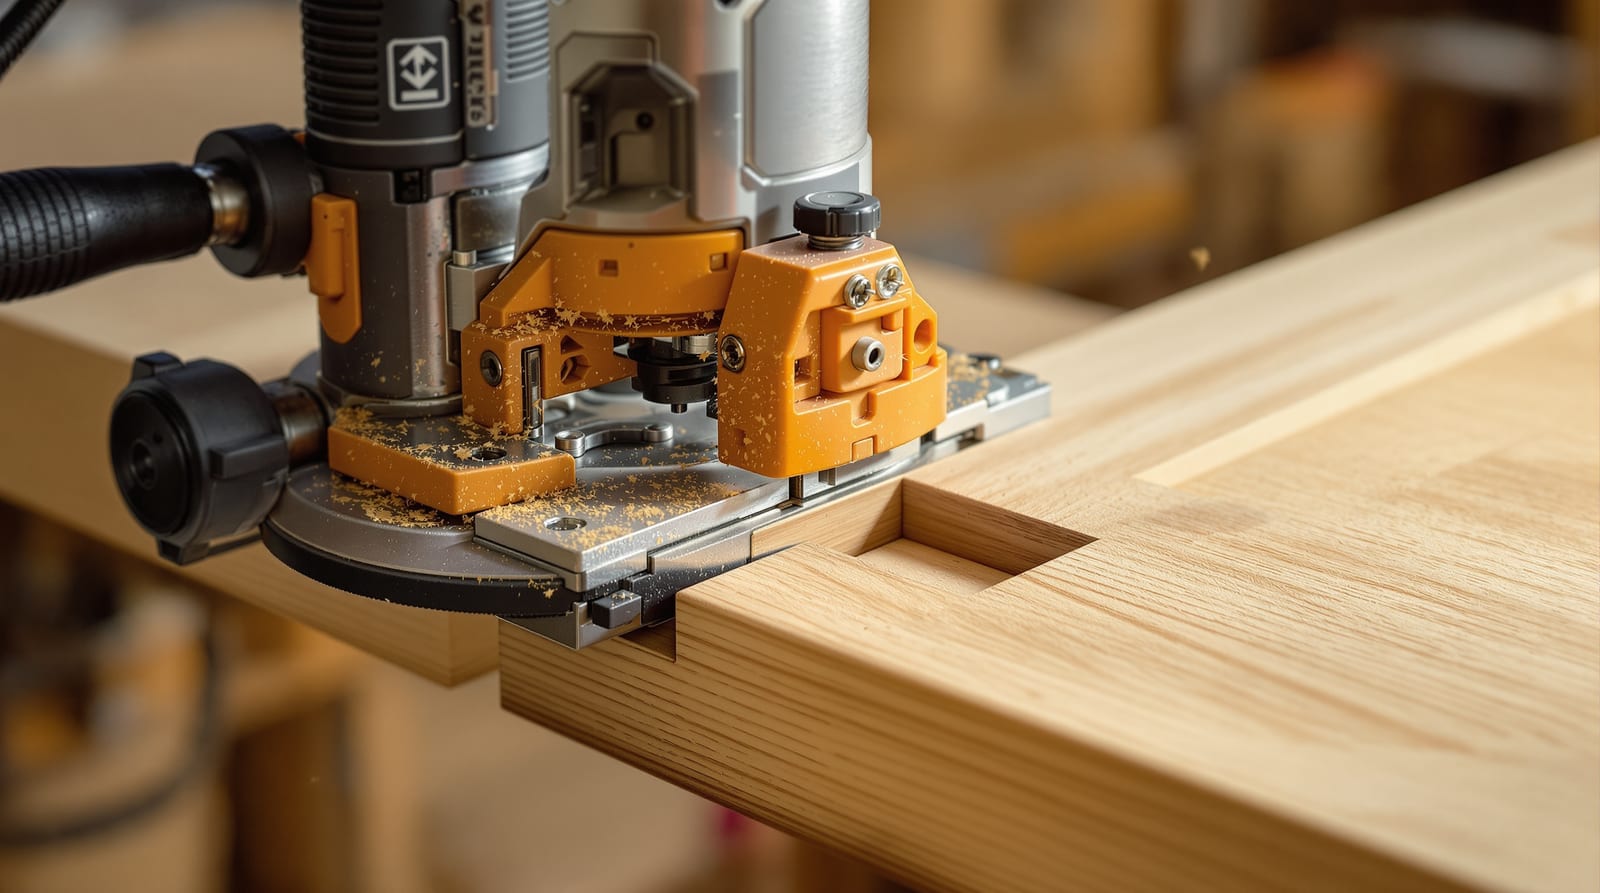
A hinge mortising jig is a clamped guide that constrains a hand router so it can only cut the precise rectangular pocket a butt hinge needs to sit flush in the door edge (and, on better systems, the matching mortise in the frame). Three parts do the work:
- The template / cassette — a metal or tough-polymer frame the size and shape of the hinge, mounted on a rail or sub-frame so multiple hinge templates space themselves automatically down the edge.
- The router and guide bushing (collar) — a fixed or plunge router fitted with a straight cutter and a guide bushing that runs against the inside of the template window.
- The clamps and edge stop — to register the jig square to the door edge and at the right offset from the face, so every recess lands in the same place leaf-to-leaf.
The cutter is a straight, often spiral, bit. Because the bushing has a diameter larger than the cutter, the finished recess is slightly smaller than the template window by the bushing offset (typically 4–6 mm of radius difference). Quality kits either give you a hinge that exactly fits the cut, or supply corner chisels to square the radiused corners a router leaves. Always test the offset on a scrap before cutting a real leaf.
How the router cuts the recess
The sequence is short once the jig is set. Mark the leaf and frame as a pair, clamp the template at the marked hinge centre, set the cutter depth to the hinge leaf thickness (usually 2.5–3.5 mm for a standard pressed-steel or stainless butt hinge to IS 1003), then plunge and route within the window in light passes. The bushing rides the template walls; you cannot wander outside the recess. A skilled hand clears a recess in well under a minute, including a final pass to flatten the floor of the mortise.
Two cautions specific to Indian sites:
1. Power and dust. Routers draw real current and stall on voltage dips; on sites with frequent cuts, batch your routing for stable-supply windows or run off an inverter/genset. MDF and flush-veneer doors throw fine dust — wear a mask and clear chips between passes.
2. Veneer tear-out. A sharp spiral down-cut bit and light passes protect the thin face veneer of flush doors. A blunt straight bit tears the lipping; replace bits before they char the cut.
Hand mortising versus the jig
Neither method is wrong; they suit different volumes and skill levels. Hand mortising — marking gauge, marking knife, sharp bevel chisel, mallet — needs no power, no setup and costs nothing beyond tools every fitter owns. It is right for one-off doors, repairs, and sites with no reliable power. The jig wins on speed, repeatability and consistency across a batch, but demands a router, a learning curve and an upfront spend.
| Factor | Hand mortising (chisel) | Router + hinge jig |
|---|---|---|
| Time per recess | 3–6 min | 20–60 sec (after setup) |
| Setup time | None | 10–20 min first leaf |
| Consistency leaf-to-leaf | Depends on the hand | Identical |
| Skill needed | High (sharpening, paring) | Moderate (router control) |
| Upfront cost | ₹0 extra | ₹4,000–₹30,000+ |
| Power needed | No | Yes (router) |
| Best for | One-offs, repairs, no power | Batches of identical doors |
| Veneer tear-out risk | Low if sharp | Low with sharp spiral bit |
| Corner finish | Square as cut | Radiused — needs corner chisel |
A blunt chisel tears flush-door veneer just as a blunt router bit does; keep both keen. For the wider kit choice, see the door fitting tools guide and the power tools for door fitting.
Setting hinge positions
The jig only cuts where you tell it, so the set-out comes first. Standard Indian practice fits three hinges per leaf for internal flush doors, with a fourth on heavy, tall or fire-rated leaves. Mark the leaf and frame together as a pair so recesses align exactly — never measure them independently. The figures below are rules of thumb consistent with IS 1003 / NBC 2016 practice; always confirm against the door schedule and the hinge maker's data.
| Hinge / element | Position (rule of thumb) | Note |
|---|---|---|
| Top hinge | 150–200 mm from head of leaf | Carries swing load |
| Bottom hinge | 250 mm from floor (bottom of leaf) | Resists sag |
| Middle / third hinge | Mid-point, or one-third down from top | Anti-bow |
| Fourth hinge (heavy/fire) | Between top and middle | FD30/FD60 leaves |
| Recess depth | = hinge leaf thickness, 2.5–3.5 mm typical | Flush, not proud |
| Knuckle projection | Centre of barrel on the leaf face line | Sets clearance |
Get your detailed marking sequence right before you route — the companion marking out door hardware guide covers the leaf-and-frame pairing and the gauge settings. For the actual hanging once recesses are cut, follow fitting door hinges. On fire doors, use CE/fire-rated hinges and never over-cut the recess into the intumescent line — the fire-door installation compliance guide explains the gap and integrity limits.
Accuracy and speed in practice
The jig's value is twofold. Accuracy: every recess shares the same depth and the same distance from the door face, so all three knuckles line up and the leaf hangs without the high-low twist that causes hinge-bind or a self-swinging door. Speed: once the jig is set for a door height, the fitter routes a full set of three recesses in two to three minutes and moves to the next identical leaf. A skilled carpenter who manages 4–6 hand-fitted flush doors a day can lift well past that on a batch with the jig once the rhythm is set — the gain is almost entirely in the hinge stage.
Cost and when the jig pays off
Prices below are indicative ₹ bands for 2026; hardware carries 18% GST, and tooling cost varies by brand and import source. Treat these as a rule of thumb.
| Item | Indicative ₹ band | Notes |
|---|---|---|
| Basic single-hinge template + bushing | ₹4,000–₹8,000 | Reposition by hand per hinge |
| Adjustable multi-hinge jig (rail set) | ₹12,000–₹30,000 | Self-spaces 3–4 hinges |
| Router (if not already owned) | ₹6,000–₹15,000 | Plunge/fixed base |
| Spiral cutter + spare bits | ₹500–₹2,000 each | Keep spares sharp |
| Corner chisel (square the radius) | ₹600–₹1,500 | If hinge needs square corners |
The economics are simple. A jig costs time to set up but almost nothing to repeat. On a handful of doors, hand mortising is faster end-to-end because there is no setup. The cross-over comes with volume and repetition — a flat of identical flush doors, a hostel, an office fit-out, or a builder repeating the same leaf across units. As a rule of thumb, the kit starts paying for itself somewhere around 15–25 identical leaves, and clearly pays beyond that. For one-off premium joinery, custom sizes or repairs, the chisel still wins. Run the numbers for your job with the door fitting time estimator and price the labour against the kit using the door fitting cost estimator.
Whatever the method, the test is the hung door, not the recess: even 2–4 mm margins, a leaf that latches first time and does not self-swing. Where the work feeds a contract handover, the recesses become part of the workmanship measured under IS 1200 / CPWD specifications. For the full picture of hanging a door, return to the cluster pillar, the complete door guide.
Frequently asked questions
Do I need a router to use a hinge mortising jig?
Yes — the jig is only a guide template; the router and its guide bushing do the cutting. A plunge router gives the cleanest depth control. If you do not own one and only fit occasional doors, hand mortising with a sharp chisel is more economical than buying the whole kit.
How deep should the hinge recess be?
Cut the recess to the thickness of the hinge leaf — typically 2.5–3.5 mm for a standard pressed-steel or stainless butt hinge to IS 1003 — so the hinge sits perfectly flush with the door edge, neither proud nor sunk. Set the router depth on a scrap first and check the hinge sits level before routing the real leaf.
Why does the router leave rounded corners in the recess?
The straight cutter has a radius, so it cannot reach square into the corners. Either buy hinges with radiused leaves that match the cut, or square the four corners with a corner chisel. Many jig kits supply the matching radiused hinges so no corner work is needed.
At how many doors does the jig become worth it?
As a rule of thumb, somewhere around 15–25 identical leaves the setup time is repaid by the per-recess speed and consistency. Below that, hand mortising is usually faster end-to-end. Batch fit-outs — flats, hostels, offices — are where the jig clearly pays off.
Can I use a hinge jig on fire-rated doors?
Yes, but only with CE/fire-rated hinges and within the tested fire-door set. Do not over-cut the recess or breach the intumescent line or the leaf core, and keep three or more hinges as tested. See the fire-door installation compliance guide before routing any FD30/FD60 leaf.
Export this guide
Related Guides — Deep-dive reading
Door Fitting Hand Tools: Chisels, Planes, Gauges (India 2026)
A trade guide to the hand tools every door fitter needs in India — chisels, planes, marking gauges, squares and rasps — how to choose them, why sharp matters, and what they cost.
Home Doors & EntrancesFitting Door Hinges: New-Fit Craft Guide (India 2026)
Mark the three hinge positions, cut a clean recess, screw hinges to leaf and frame, and get a new door to swing true on the first try.
Home Doors & EntrancesDoor Hinge Replacement: DIY Step-by-Step Guide (India 2026)
Match the size, type and finish, then swap a worn or rusted hinge yourself without taking the whole door off its frame.
Home Doors & EntrancesRelated Tools — Try Free
Window Hardware Cost Calculator
Estimate window hardware cost — hinges, handles, locks, rollers and multipoint gears.
Window CalculatorCross-Ventilation Analyzer
Estimate airflow and air changes per hour (ACH) from room size, window areas, layout, and local wind — with NBC 2016 Part 8 compliance check.
Ventilation CalculatorDoor Hinge Selector
Get the right hinge type, size and count for a door by its height, weight and material — with a coastal SS-304 note.
Door Tool