
Door Clearances & Tolerances: The Gaps Guide (India 2026)
The exact margins around a hung leaf — 3mm reveals, 2-3mm latch gaps, 6-12mm undercut and tighter fire-door tolerances explained.
A door that latches sweetly, swings without dragging and seals against draughts is held there by a handful of millimetres. Getting door clearances and tolerances right is the difference between a leaf that closes with one push and one that rubs the frame, springs open on its own, or whistles in the monsoon wind. This guide sets out the exact gaps a skilled Indian fitter should leave around a hung leaf — the head and stile reveals, the hinge and latch margins, the bottom undercut — plus the tighter limits fire doors demand, the even-reveal standard, why each gap exists, and the build tolerance you can reasonably accept on site.
Door clearances and tolerances: the target gaps
Think of a hung leaf as a panel floating inside the frame rebate with a deliberate margin on every edge. Those margins are not slop — each one does a job: it lets the leaf swing past the frame without binding, gives the latch room to throw, lets the seal compress, and absorbs the small inaccuracies of timber, plaster and floor finish. The numbers below are the working targets used across Indian joinery; flush doors are governed broadly by IS 2202 and shutters by IS 1003, while the gaps themselves are a fitting convention rather than a single legislated figure.
| Edge | Target clearance | Acceptable range | What the gap does |
|---|---|---|---|
| Head (top) | 3mm | 2-4mm | Lets the top corner clear the frame on swing |
| Hinge stile | 2-3mm | 2-4mm | Knuckle clearance; sets the swing pivot |
| Latch stile | 3mm | 2-4mm | Room for the latch to throw and re-enter |
| Bottom (undercut) | 6-12mm | 6-15mm | Clears floor finish; ventilation; carpet |
| Fire-door perimeter | 3mm | 2-4mm | Tight gap so intumescent seal can close it |
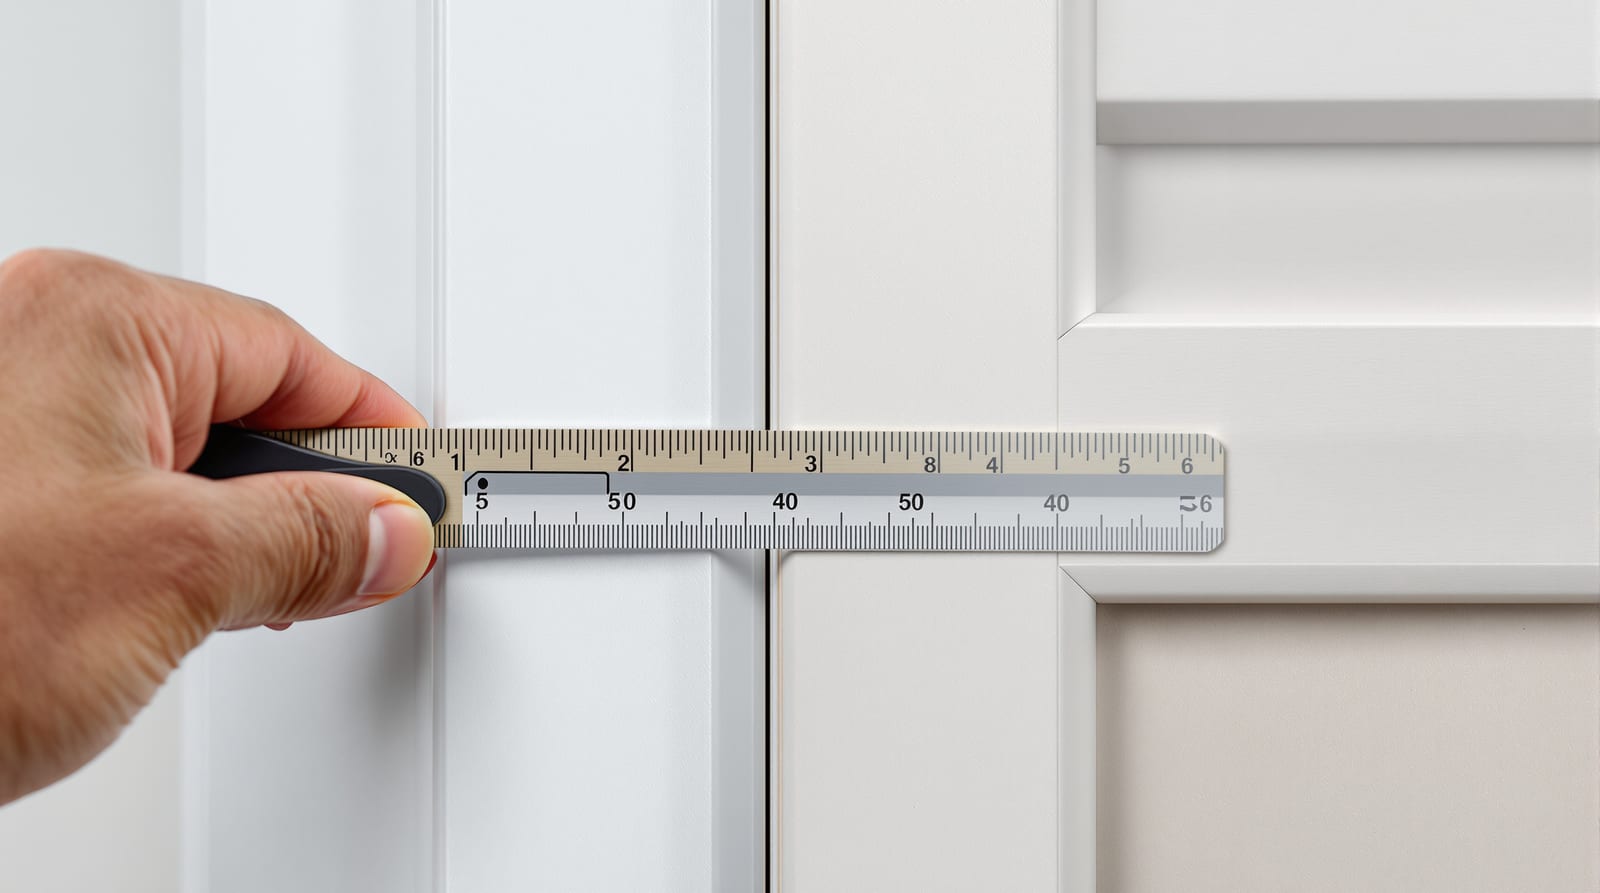
The two stile gaps (hinge edge and latch edge) and the head gap should read as one continuous, even line — the even reveal. If you can see the gap pinch in one corner and yawn open in another, the frame is out of square or the leaf was trimmed unevenly, and the door will not behave.
The head and stile reveals (~3mm)
The gap at the top and down both vertical edges is the reveal. The convention is around 3mm, with anything from 2 to 4mm acceptable depending on the timber and the climate. Why not zero? Two reasons. First, swing geometry: as the leaf opens, its leading top corner has to sweep past the frame, and a tight-fit panel would catch — the reveal gives it room. Second, movement: timber and flush doors take up and shed moisture across the Indian seasons, swelling a millimetre or two in the monsoon and shrinking in summer. A 3mm reveal absorbs that movement so the door that closes in March still closes in July.
The hinge stile can sit a touch tighter (2-3mm) because that edge pivots rather than sweeps. The latch stile wants the full ~3mm so the latch bolt has room to throw clear and re-enter the strike cleanly. Crucially, all three gaps must be even — a parallel, consistent line all the way round. An uneven reveal is the visible symptom of a frame that is out of plumb or square; fix the frame, do not chase the gap by planing the leaf.
The bottom undercut (6-12mm)
The gap under the leaf — the undercut — is the largest and most variable. The working range is 6-12mm over the finished floor, and it earns its size by doing several jobs at once:
- Clears the floor finish. The leaf is usually hung before the final tile, marble or wood floor goes down. The undercut must clear the finished level, including any step where one room's flooring meets another.
- Ventilation and return air. A 10-12mm undercut lets air move under the door — important for bathrooms (moisture escape) and for rooms served by a central AC return.
- Carpet and rugs. Where soft floor coverings are planned, the larger end of the range stops the leaf from dragging.
- Threshold and seals. Where a threshold strip, drop-seal or weather-bar is fitted, the undercut is reduced so the leaf meets the seal — often 3-6mm plus the seal.
Bathrooms in India often run a deliberately larger undercut for ventilation, while a sealed external door runs tight to a threshold. Get the floor-finish thickness confirmed before you set the undercut, or you will end up either scraping the new tiles or leaving a draughty trench. Our guide to the door undercut clearance covers this trade-off in detail, and the gap under door fix note helps when an existing door has too much.
Fire doors: tighter tolerances
Fire-rated doorsets are the exception to the relaxed reveal. Here the gaps must be tight and consistent — typically ≤3mm (2-4mm) at the head and stiles — because the perimeter carries an intumescent seal that swells in heat to choke off the gap and a cold-smoke brush seal for everyday smoke control. Too large a gap and the seal cannot bridge it; too tight and the leaf binds. The undercut on a fire door is also controlled (commonly with a threshold or drop-seal) rather than left as a generous ventilation gap. Fire-door gaps are not a fitter's preference — they follow the door's tested certification, so set them to the manufacturer's data sheet, not to the general 3mm habit.
Build tolerance: what you can accept on site
Clearances are the target; tolerance is how far real-world work may stray from it and still pass. India's site reality — hand-plastered reveals, seasonal timber, uneven floor screeds — means some tolerance is unavoidable, but the leaf must still swing, latch and seal.
| Check | Target | Acceptable tolerance | Reject if |
|---|---|---|---|
| Frame plumb (jamb) | Dead plumb | Within 1-2mm over full height | Leaf self-swings or won't latch |
| Frame square (diagonals) | Equal diagonals | Within 2-3mm | Reveal visibly tapers |
| Reveal evenness | 3mm parallel | +/- 1mm along each edge | Pinch in one corner, yawn in another |
| Undercut consistency | 6-12mm chosen value | +/- 2mm across width | Leaf drags on finished floor |
| Leaf flat (no twist) | Flat in frame | Light, even rebate contact | Corner stands proud, will not seal |
The single most important number is frame plumb: hold the jambs plumb within 1-2mm over the height and pack solidly behind the hinge and lock points so the frame cannot bow. A leaf that self-swings or refuses to latch is almost always a plumb/square problem, not a leaf problem. See door frame plumb and level for setting the frame true, and measuring for a door for taking the opening sizes (width at top/middle/bottom, height at both jambs, and the diagonals) that feed these tolerances.
When the gaps go wrong
If a hung door rubs the frame, springs open, or will not latch, work back through the chain: is the frame plumb and square? Are the hinges packed? Was the leaf over-trimmed on one stile? Trimming a slab should never exceed about 5-6mm per side, taken equally, with a slight 2-3 degree back-bevel on the latch edge. The door rubbing frame note diagnoses the common causes. For the full fitting sequence in which these clearances are set, see how to fit a door.
Quick on-site checklist
1. Confirm the finished floor thickness before choosing the undercut.
2. Set and pack the frame plumb and square (1-2mm tolerance).
3. Hang the leaf and check the even 3mm reveal all round.
4. Swing the leaf — it should stay where left, not creep open.
5. Throw the latch — it should re-enter the strike with light hand pressure.
6. For fire doors, set gaps to the certified data sheet, not the 3mm default.
For the wider context — frame, threshold and the whole install — see this phase's pillar, the door frames overview, and the cluster-wide complete door guide. To check your specific gaps quickly, the door clearance checker sets the reveals and undercut for your floor and door type.
Frequently asked questions
What gap should a door have around the frame?
Around 3mm at the head and both stiles (2-4mm acceptable), with the hinge edge often a touch tighter at 2-3mm. The gaps should read as one even, parallel reveal all the way round. The bottom undercut is larger — typically 6-12mm over the finished floor.
How much gap should there be under an internal door?
Usually 6-12mm over the finished floor. Use 10-12mm where there is carpet, an AC return or a bathroom needing ventilation, and the lower end (or a threshold/seal) where you want to limit draughts. Always confirm the final floor-finish thickness first.
Why are fire-door gaps tighter?
A fire doorset carries an intumescent seal that swells in heat to seal the perimeter, plus a smoke seal for everyday use. The gaps are kept tight and even (≤3mm) so the seal can bridge them. Set fire-door gaps to the manufacturer's certified data sheet, not the general 3mm convention.
What is an even reveal and why does it matter?
The even reveal is a consistent, parallel gap (about 3mm) along the head and both stiles. An uneven reveal — pinching in one corner and yawning in another — is the visible sign that the frame is out of plumb or square, which makes the door rub, self-swing or fail to latch.
What tolerance is acceptable for door fitting in India?
Hold the frame plumb within 1-2mm over its height, diagonals equal within 2-3mm, the reveal even within about 1mm, and the undercut consistent within 2mm across the width. Beyond that the leaf starts to drag, self-swing or refuse to latch.
Can I just plane the door to fix an uneven gap?
Only within limits. Trim a slab a maximum of about 5-6mm per side, taken equally, with a slight 2-3 degree back-bevel on the latch edge. If the gap is uneven because the frame is out of plumb or square, fix the frame first — planing the leaf only chases the symptom and weakens the door.
Export this guide
Related Guides — Deep-dive reading
How to Fit a Door Leaf: Hang, Trim & Hinge (India 2026)
A practical India guide to hanging a door slab — measuring, scribing and planing to the frame, the lock-edge bevel, mortising three hinges, and checking the swing.
Home Doors & EntrancesMeasuring for a Door: Opening Sizes & Checks (India 2026)
How to measure a door opening in India — three width and height points, diagonals, plumb and level — so the carpenter cuts it right the first time.
Home Doors & EntrancesDoor Frame Plumb, Level & Square: Setting It True (India 2026)
How to set a door frame plumb, level, square and out-of-wind on Indian sites — spirit level, plumb bob, diagonals, shimming and the 1-2mm tolerance that decides whether the leaf latches.
Home Doors & EntrancesRelated Tools — Try Free
Cross-Ventilation Analyzer
Estimate airflow and air changes per hour (ACH) from room size, window areas, layout, and local wind — with NBC 2016 Part 8 compliance check.
Ventilation CalculatorDoor Clearance Checker
Check your door's measured gaps and undercut against the recommended margins for normal, fire, bathroom and external doors.
Clearance CheckerDoor Security Rating Calculator
Score your main door out of 100 across leaf, frame, lock and hardware — and see the top upgrades.
Security Tool