
Maintenance-Access Planning for Home Security Systems in India
Design your security system at the drawing-board stage so it can actually be maintained later — cameras mounted where a technician can safely reach them, a serviceable equipment room, labelled cabling, an as-built asset register, and a plan for AMC and vendor access that does not itself become a weakness.
Most home security systems are designed to be installed, not maintained. The camera goes up wherever the view is best, the recorder is stuffed into whatever cupboard is free, cables vanish into the wall unlabelled, and the whole thing works beautifully — for about eighteen months. Then a lens fogs, a hard disk fills, a cable rat-nibbles, and suddenly a five-minute job needs scaffolding, a half-day of tracing wires, and a technician who has never seen your house guessing which cable does what.
Maintenance-access planning fixes that at the design and install stage, before anything is drilled. It is the quiet discipline that decides whether your system stays healthy for a decade or quietly rots. This guide is about designing in serviceability. Its companion, the Security Maintenance and Audit Guide, is about doing the maintenance once the system is live — read that for schedules, checklists and audits. Here we make sure the technician of 2029 can actually reach, identify and safely work on what you build in 2026. Start, as always, from your security risk assessment: the assets and threats it surfaced decide which devices are worth the extra care to keep serviceable.
Scope & safety. This is a defensive planning guide. It never describes how to defeat a measure. Working at height, mains-electrical connections, electric locks and anything on the fire or egress path is qualified professional work — specify it here, then have a licensed electrician or PSARA-licensed installer carry it out and certify it. Security hardware must NEVER obstruct a fire-escape route or a locked-from-inside exit.
Why serviceability is a design decision, not an afterthought
A security device is not a "fit and forget" object. Cameras need their lenses wiped and their aim re-checked; recorders need disks swapped; batteries in sensors, sirens and the UPS need replacing every few years; firmware needs updating; a lightning-fried port needs a swap. Every one of those tasks needs a human to physically reach the device, understand what it is, and work on it safely — often while the rest of the home stays protected.
If you design only for the day of installation, you inherit three recurring costs: jobs that need special access (scaffolding, cherry-pickers, roof harnesses) for what should be routine; time wasted identifying unlabelled equipment and cables; and whole-system downtime because there is no way to isolate one part. Plan for maintenance up front and each of those collapses into a quick, cheap, safe visit. The theme running through this guide is a single balance you will meet again and again: reachable enough to service, protected enough to resist tampering.
Mounting for access without inviting tampering
The most visible trade-off is camera and device height. Mount a camera too low and anyone can wipe it, spray it, unplug it or wrench it off the wall — it becomes the first thing a determined intruder disables. Mount it too high and every clean, re-aim or replacement needs a tall ladder, a scaffold tower, or a technician balancing where they should not be. The sweet spot sits between the two.
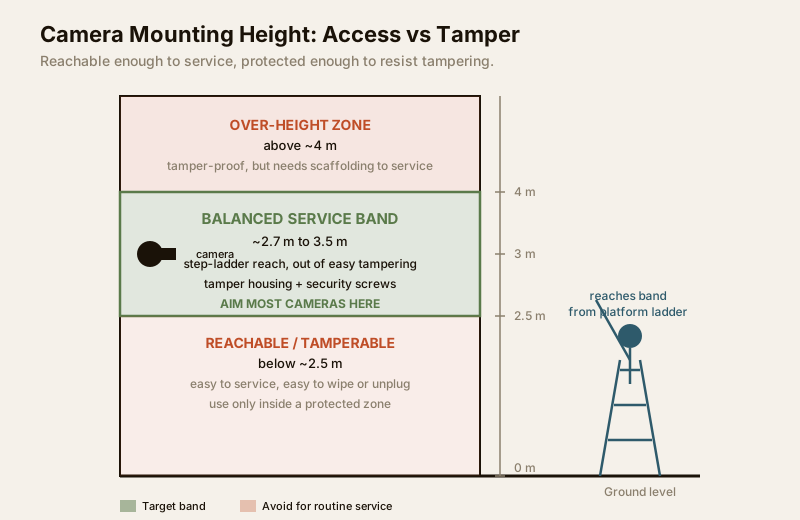
As a planning rule of thumb for Indian homes:
- Below roughly 2.5 m — easily reached by hand from the ground. Convenient to service, but tamperable. Reserve for locations already inside a protected zone (inside a locked porch, above a grille, under a monitored eave) or for devices that are meant to be hand-reachable, like a video door phone panel.
- Roughly 2.7 m to 3.5 m — the balanced service band. High enough to be out of easy reach and casual tampering, low enough to service safely from a standard platform step-ladder without scaffolding. Aim most external cameras here. Add a tamper-resistant housing and use security screws so the height plus the fixing together deter interference.
- Above 4 m — genuinely hard to tamper with, but now every routine wipe needs working-at-height equipment and a trained person. Use only where the view demands it (a tall gable, a boundary tower), and accept the higher service cost, or pair it with a lower serviceable camera nearby.
Two more mounting principles keep future service cheap and safe:
- Leave a service loop. Ask the installer to leave a short coil of slack cable at every device so a camera can be brought down to eye level to work on, or a connector re-terminated, without re-pulling the whole run.
- Fix to something solid and reachable. A camera on a flimsy bracket over a fragile asbestos or sloping tiled roof edge is a fall risk at every service visit. Choose mounting points a person can stand near safely, on a stable surface, well clear of the roof edge and any live electrical line.
For anything that cannot be reached from a step-ladder on firm ground, treat the work itself as a hazard to plan for — see the working-at-height note below.
A serviceable equipment room, not a stuffed cupboard
The recorder, network switch, UPS, PoE injectors and cabling terminate somewhere. Where that "somewhere" is decides how painful every future service call will be. Plan it as a proper serviceable space — the full case for siting and sizing it is in the equipment room planning guide; here we focus on the access to work dimension.
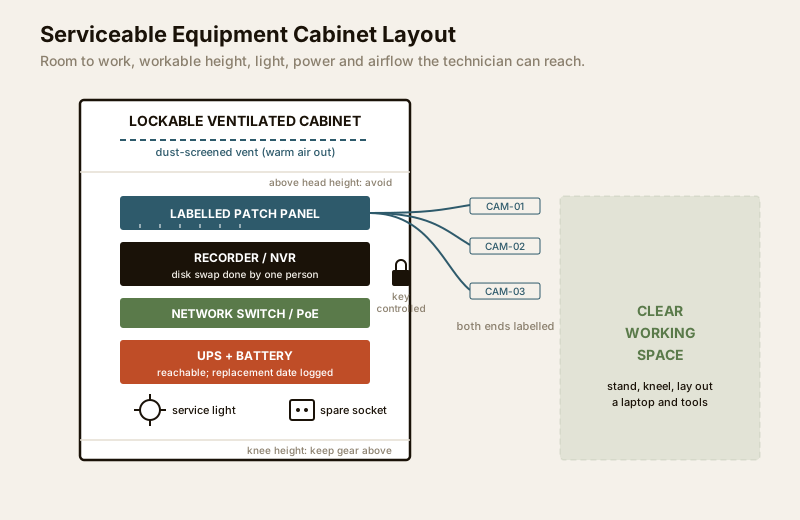
A room or cabinet is serviceable when a technician can stand in front of it and work without dismantling the house. Design in:
- Room to work. Clear floor space in front of the rack or cabinet so a person can open it fully, kneel, and lay out a laptop and tools. A recorder wedged behind a wardrobe fails this on day one.
- A workable height. Mount the recorder, switch and patch panel between knee and shoulder height, not at floor level (where they collect dust and monsoon damp) or above head height (where disk swaps become a two-person job).
- Light and power at the point of work. A dedicated service light and a spare mains socket inside or beside the cabinet, so nobody works by phone-torch or unplugs a live camera to power a laptop.
- Ventilation that keeps working. Heat kills recorders and disks. A ventilated, dust-screened enclosure with airflow the technician can inspect — not a sealed loft that bakes at 45 °C by April.
- Lockable, but openable by the right people. The cabinet should lock (it holds your recorded footage — a genuine security and data-storage concern), yet the key must be controlled and available when a supervised technician needs it.
Label everything: cabling, ports and devices
The single cheapest thing you can do for future maintenance is label the cabling at install time. An unlabelled bundle of identical cables turns every fault into an afternoon of continuity-testing. A labelled one turns it into a two-minute swap. Plan the labelling into the cabling requirements spec so the installer prices it in rather than skipping it.
At minimum, insist on:
- Both ends of every cable labelled with a matching code (for example, CAM-04 at the camera and at the patch panel), using printed heat-shrink or wrap labels that survive heat and damp — not a marker pen that fades in a monsoon.
- A patch-panel or port map so each port on the switch and recorder ties to a named device and location.
- Consistent device names carried across the labels, the recorder's channel list and the asset register, so "CAM-04" means the same camera everywhere.
- Colour or zone coding for larger homes — power vs data, ground floor vs first floor — so a technician orients instantly.
The asset register and as-built drawings
A labelled cable helps at the wall. An asset register and as-built drawings help before the technician even arrives — they let a vendor quote accurately, bring the right spares, and service a system they have never seen. This is the documentation half of maintenance access, and it is almost always skipped, because the installer who knows the system in their head walks away and takes that knowledge with them.
Insist that the handover pack captures the system as actually built, not as originally proposed — installs always drift from the plan.
Maintenance-access design checklist
Fold these decisions into the spec before installation begins. Each line is a small cost now that removes a large cost later.
| Element | Access requirement to design in | Why it matters |
|---|---|---|
| External cameras | Mount in the 2.7–3.5 m service band; tamper housing + security screws; short service loop | Reachable from a step-ladder for cleaning/re-aim without scaffolding, yet out of easy tampering reach |
| High/gable cameras | Note as working-at-height; pair with a lower serviceable camera where possible | Flags the recurring access cost up front; avoids risky improvised climbs |
| Video door phone / keypad | Reachable by hand at ~1.4 m, inside a protected zone | Daily-use device needs easy reach; protection comes from location, not height |
| Recorder / NVR & switch | Knee-to-shoulder height, clear working space, service light + socket | Disk swaps and re-cabling done safely by one person without dismantling |
| Equipment cabinet | Lockable, ventilated, dust-screened, key controlled | Protects footage yet stays openable and cool for the technician |
| Every cable | Both ends labelled, printed durable labels, port map | Fault-finding becomes a swap, not a trace |
| UPS / batteries | Reachable, ventilated, replacement date recorded | Batteries are consumables — plan their swap, do not discover them dead |
| Isolation points | Per-zone breaker/fuse and a labelled power feed | Lets one part be powered down without blacking out the whole system |
| Documentation | As-built drawing + asset register handed over | Any technician can service a system they have never seen |
Working at height — a hazard to plan, not improvise
Cleaning or replacing an elevated camera is the most common way a routine security job turns dangerous. Design it out where you can (the balanced mounting band above), and where you cannot, plan the safe method in: a stable platform ladder or tower on firm ground, never a chair on a table; two people for anything above step-ladder height; and, for roof-edge or tower cameras, a competent contractor with proper access equipment and fall protection. Never let a technician improvise a climb over a fragile roof or near a live overhead line. This is qualified work — specify who does it and how, and keep it strictly separate from any electrical work, which must go to a licensed electrician.
Service one part without disarming the whole home
A well-planned system lets you take one camera, one zone or one recorder offline for service while the rest of the home stays protected. A badly planned one has a single power feed and a single point of failure, so servicing anything means switching everything off — and an intruder-savvy afternoon is exactly when the system is down.
Design in graceful partial isolation:
- Zoned power. Separate, labelled power feeds or breakers per zone (perimeter, entry, interior) so one can be isolated while others run. Plan this alongside your power-supply requirements.
- Don't let maintenance create a blind spot. If a camera must come down for service, make sure an overlapping camera or a sensor still covers that approach, or schedule the work for a low-risk window with someone home. This overlap is part of designing system redundancy — the same overlap that survives a fault also survives a service visit.
- Keep alarms and egress independent. Servicing a camera must never disable the intruder alarm, and no maintenance switch may ever lock or block a fire-escape route — that stays clear at all times, as covered in emergency evacuation planning.
Planning AMC and vendor access
Sooner or later a technician you do not know will need to be inside your home, near your recorder, with the cabinet key. An Annual Maintenance Contract (AMC) is sensible, but vendor access is itself a security event and deserves the same planning as any other visitor. The vendor and installer evaluation guide covers choosing whom to trust; here is how to design the access itself so it does not become the weakness.
- Named, supervised access. Know in advance who is coming, verify identity at the gate, and have a household member present while they work near the recorder and footage — never hand over the cabinet key and leave.
- Least privilege. Give the technician what the job needs and no more. Keep the recorder's admin password separate from the everyday viewing login, and change any password the vendor used for a visit afterwards.
- Log every visit. Record who came, when, what they touched and what they took away (a swapped disk holds your footage — treat it as sensitive data under the spirit of the DPDP Act 2023).
- Beware remote access. A vendor who wants permanent remote login to your recorder for "support" is opening a door into your home network. Prefer on-site or on-request, time-limited remote sessions over standing access; coordinate with your network readiness plan.
- Contract the essentials. Response time, what is covered, spares availability and data-handling should be written into the AMC, not assumed.
The documentation and handover pack checklist
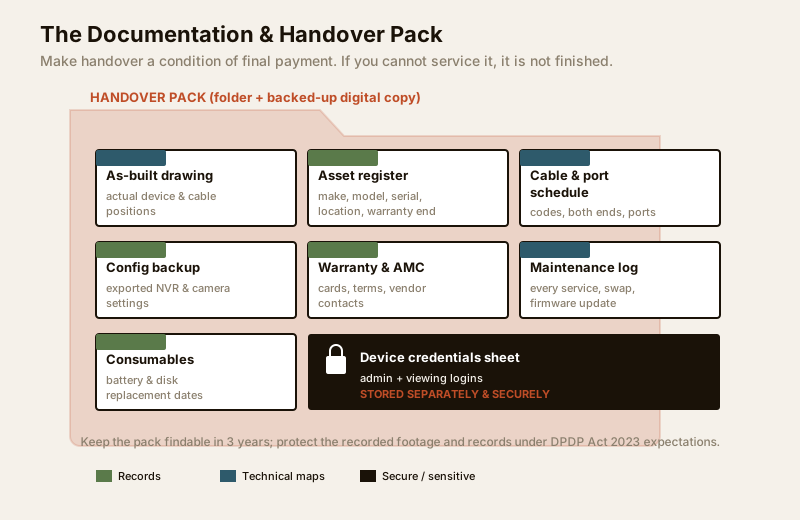
Make handover a condition of final payment. If you cannot service what you paid for, the job is not finished. Insist on receiving — and safely storing — this pack.
| Handover item | What it contains | Why you need it |
|---|---|---|
| As-built layout drawing | Actual positions of every camera, sensor, cable route and the equipment room | Lets any technician understand the system without opening every wall |
| Asset register | Make, model, serial number, location, install date and warranty end of each device | Accurate quotes, correct spares, warranty claims |
| Cable & port schedule | Every cable code with both ends and its switch/recorder port | Turns fault-finding into a labelled swap |
| Device credentials sheet | Admin and viewing logins, stored securely and separately | Needed for service; a security risk if left loose |
| Configuration backup | Exported recorder/NVR settings and camera config | Fast recovery after a failure or replacement |
| Warranty & AMC papers | Warranty cards, AMC terms, vendor contacts | Claims and support without a scramble |
| Maintenance log (started) | A running record of every service, swap and firmware update | Shows the system's health history over time |
| Consumables schedule | Battery and disk replacement dates | Plan swaps before things fail |
Store this pack somewhere you will find it in three years — a labelled folder plus a backed-up digital copy — and keep the credentials portion separate and secure. The data-storage planning guide covers protecting the recorded footage and these records under India's data-protection expectations.
When to bring in a professional
Do the planning yourself — you know your home and your risk. But hand the physical work to qualified people wherever height, mains power or life-safety is involved: elevated camera mounting and servicing, mains-electrical feeds and isolation, electric locks and access control, and anything on the fire or egress path. A PSARA-licensed security installer should build and document the system; a licensed electrician handles the power side; and any working-at-height task needs proper access equipment and a competent person. Specify what you want and why, insist on the labelled, documented handover, then let certified professionals execute and sign off.
Key takeaways
- Design for the technician of the future, not just the installer of today — serviceability is a decision you make on the drawing board, or a cost you pay forever.
- Mount in the balanced band (about 2.7–3.5 m) — reachable from a step-ladder for routine service, high enough to resist casual tampering; leave a service loop and a safe standing point.
- Make the equipment space workable — room to stand, a workable height, light, power and real ventilation, lockable but openable by the right people.
- Label every cable at both ends and keep an as-built drawing plus an asset register so anyone can service a system they have never seen.
- Isolate parts without disarming the whole home, and treat AMC and vendor access as a supervised, least-privilege, logged security event.
- Route height, electrical and life-safety work to licensed professionals, and never let any security or maintenance hardware block a fire-escape route.
Plan the rest of your build alongside this in the Security Knowledge Hub, and when the system is live, run it well with the Security Maintenance and Audit Guide.
This is an educational planning guide. It is strictly defensive and does not describe how to defeat any security measure. Working at height, electrical, electronic-lock and fire/egress work is qualified professional work — engage licensed installers and verify any applicable National Building Code or municipal bye-law requirement for your project.
Export this guide
Related Guides — Deep-dive reading
Access Control Maintenance in India (2026): Readers, Locks and Fail-Safe Egress
How to keep a card, keypad, fingerprint or face access-control system reading reliably and locking securely — and, above everything, how to test that its doors still release on a fire alarm and on power loss, so an access-controlled door never becomes a life-safety trap.
SecurityCCTV Remote Access in India (2026): Watch From Your Phone, Safely
How to view your own cameras from anywhere without leaving the front door open to the internet — change the defaults, use strong credentials and 2FA, keep firmware current, prefer the vendor's secure cloud relay or a VPN, segment the camera network, and treat footage as personal data.
SecurityElectrical Safety for Security Systems in India (2026): Powering It Without Peril
A homeowner's guide to the power side of home and RWA security systems, CCTV, alarms, gates, access control and NVRs, done so it protects you instead of quietly becoming a shock or fire hazard. What makes a supply safe, what to insist on, and why the mains work belongs to a licensed electrician.
SecurityRelated Tools — Try Free
Home Security Risk Scorecard
Score your home across six security layers — perimeter, entry points, lighting, detection, alarm and habits — and get a prioritised action plan.
Security ScorecardSecurity Vendor Evaluation Scorecard
Rate a CCTV/security installer or guarding agency across eight weighted criteria for a hire / negotiate / walk-away verdict.
Vendor ScorecardAccess-Control Battery-Backup Calculator
Size the standby battery so an access system keeps running through a power cut, with an egress life-safety note.
Battery Backup