
Internet and Network Readiness for Home Security in India
Before you buy a single camera, plan the network under it: enough upload bandwidth for cloud and remote viewing, wired PoE for the cameras that matter, a segregated IoT network so a hacked gadget cannot reach your laptop, and secure remote access that never exposes your DVR to the open internet.
A modern home-security system is really a small computer network wearing a camera on its face. Recording, motion alerts, phone notifications, remote viewing while you are travelling, cloud clip backup, a video door phone that rings your handset — every one of those rides on your internet connection and your home network. Get the network wrong and you get the classic Indian complaint: cameras that lag, an app that spins forever, footage that was never actually saved, and a "smart" doorbell that goes deaf every afternoon.
This guide is the network-planning companion within Security Planning Prerequisites. It assumes you have already run a home security risk assessment and know roughly which cameras and devices you want. Its job is to make sure the plumbing underneath them is ready — enough bandwidth, the right mix of wired and wireless, a sane and safe network layout, and remote access that does not quietly invite the internet into your DVR. It is a planning guide: the actual cabling and mains work goes to professionals.
Scope & safety. This is a defensive planning guide. It helps you spec a resilient, private home network — never how to break into one. Structured cabling behind walls, any mains-electrical work, and the placement of powered equipment are qualified trades: plan and specify here, then have a licensed cabling contractor or electrician install and certify it. Security hardware must never block an escape route or a fire exit.
Start with upload speed, not download
Most Indians judge broadband by the download number in the ad — 100, 200, 300 Mbps. For security, the number that actually matters is upload speed, because your cameras are constantly sending video: to the cloud, to your phone when you view live, and to off-site backup. Indian home broadband is frequently asymmetric — a fat download pipe with a much thinner upload lane — so a "300 Mbps" plan might give you only 20–50 Mbps up, shared across the whole house.
A useful way to plan: each 2MP (1080p) camera streaming to the cloud or to your phone typically needs roughly 2–4 Mbps of upload at good quality; a 4MP/4K camera can want 6–10 Mbps or more. You rarely upload every camera at full quality at once — most systems send a low-bitrate "substream" for alerts and only push full quality on demand — but you should still budget headroom. If you plan four cloud-connected cameras, assume you may need 10–20 Mbps of usable upload, on top of everything else the household does.
Two India-specific realities to plan around:
- Recording locally saves your uplink. A camera that records to a local NVR or SD card and only sends alerts and on-demand live view to the cloud uses a fraction of the bandwidth of one that streams continuously to a cloud plan. For most homes, local recording with cloud clips for important events is the sweet spot — it also keeps working during an internet outage.
- Your uplink is shared and contended. Video calls, kids gaming, someone uploading to Drive — all compete with your cameras for the same upload lane. If live camera view stutters exactly when the house is busy, the uplink, not the camera, is usually the culprit.
If you are unsure whether your line can carry the plan, run a speed test at a busy hour and note the upload figure. When it is thin, favour local recording and reserve cloud for the one or two cameras that matter most.
Wired vs Wi-Fi vs cloud: choose per camera, not per house
The biggest reliability decision is how each camera connects. There is no single right answer — the honest rule is wire the cameras you would be upset to lose, and reserve Wi-Fi for the convenient extras.
| Approach | How it connects | Strengths | Weaknesses | Best for |
|---|---|---|---|---|
| Wired / PoE | Ethernet cable carrying data + power from a PoE switch | Rock-solid, no dead zones, powered over one cable, easy to back up centrally | Needs cabling planned/pulled (a pro job), fixed location | Front gate, main door, perimeter, any critical camera |
| Wi-Fi camera | Home Wi-Fi + a separate power adapter at the camera | Quick to place, no data cabling, flexible | Drops in dead zones, congestion and interference, still needs mains power nearby, more to hack | Indoor extras, temporary or rented spaces |
| Cloud camera | Wi-Fi/wired to internet, records to vendor cloud | View anywhere, off-site footage survives theft of the recorder, low setup | Depends on uplink + a paid plan, monthly cost, privacy handed to vendor | Homeowners wanting simple off-site backup |
Why critical cameras should be wired (PoE). A Power-over-Ethernet camera gets both its video connection and its power from a single Ethernet cable running back to a PoE switch. That means: no dependence on flaky Wi-Fi, no separate power adapter to fail at the camera, and — crucially — you can put the switch on one battery backup so every wired camera keeps running through a power cut (see the electrical backup assessment). For the gate, main door and perimeter, this reliability is worth the one-time cost of cabling.
Wi-Fi camera pitfalls to plan around. Wi-Fi is convenient but fails in predictable ways: dead zones behind thick Indian brick-and-concrete walls, an outdoor camera at the boundary too far from the router, congestion when 20 devices share one band, and interference on the crowded 2.4GHz band that most cameras use. A Wi-Fi camera also still needs a mains socket at its location — so it is rarely as "wireless" as it sounds. If you must use Wi-Fi outdoors, plan a mesh node or access point near the camera, and never put a life-critical view on Wi-Fi alone. The cabling and PoE trade-offs are worked through in the security cabling requirements guide and you can size runs and switch ports with the cabling & PoE planner.
The switch, PoE and a sane IP scheme
Once you have more than a couple of cameras, the heart of the system is a network switch — ideally a PoE switch that powers the cameras too. Plan the switch with headroom: count your wired cameras and NVR, add a few spare ports, and check the switch's total PoE power budget (in watts) covers all cameras at once, not just the port count. A recorder (NVR) with built-in PoE ports is a tidy all-in-one option for smaller homes — the cameras plug straight into the NVR.
A sane IP scheme keeps the system diagnosable instead of mysterious:
- Give the NVR and each fixed camera a stable address (a static IP or a DHCP reservation on the router) so it never "moves" and drops out of the app.
- Keep cameras in a known, documented range — write down which camera is which address. When one goes dark, you want to find it in seconds, not hunt.
- Do not expose these addresses to the wider internet (more on this below).
Segregate security and IoT devices onto their own network
This is the single most important — and most skipped — network decision, so treat it as mandatory rather than optional.
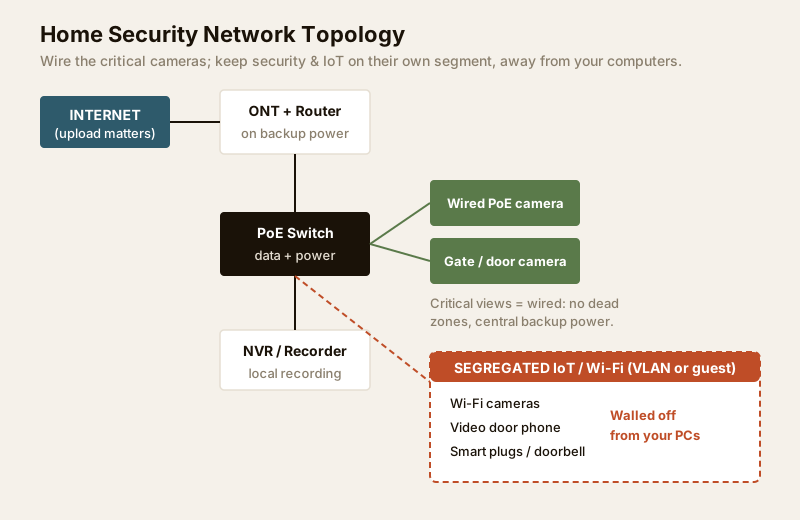
Cheap cameras, smart plugs, doorbells and other IoT gadgets are notoriously insecure: weak default passwords, firmware that is rarely patched, and cloud links to who-knows-where. If one of them is compromised and it sits on the same flat network as your laptop and phone, the attacker has a foothold next to your banking, work files and family photos. The fix is network segregation — put security cameras and IoT devices on a separate network from your personal computers, so a hacked gadget is walled off.
You have two practical ways to do this in an Indian home:
- The simple way — a guest network. Almost every modern router offers a guest Wi-Fi network that is isolated from your main LAN. Put your Wi-Fi cameras, smart plugs and doorbells on the guest network and keep laptops, phones and NAS on the main one. It is not perfect, but it is one setting and it stops the worst cross-contamination.
- The proper way — a VLAN. A router/switch that supports VLANs (virtual LANs) lets you create a dedicated "Security/IoT" network segment with firewall rules controlling exactly what can talk to what — for example, cameras can reach the NVR but nothing on your personal network can reach them, and they cannot reach your PCs. This is the approach used in the topology figure above, and it is the right target for a larger home. It is a setup step best specified for, and configured by, someone comfortable with network gear.
Either way, the principle is the same: your cameras and gadgets should live in their own room of the house, with a locked door between them and your computers. For the wider smart-home angle, see the smart-home privacy and security guide.
Router and ONT placement — and backing them up
Where you put the router shapes coverage. Plan for it early:
- Central and open, not buried. An ONT and router shoved inside a metal meter cupboard or a corner utility niche will have poor reach. Place the router centrally and in the open; use mesh nodes or wired access points to reach far rooms and the boundary rather than cranking up one router's power.
- Near the equipment, sensibly cabled. If you run a PoE switch and NVR, the router, switch and NVR usually live together in one tidy spot — plan that location, ventilation and socket count with the equipment-room planning guide.
The router must be on backup power too. This is the most common oversight in Indian security setups: people put the cameras and NVR on a UPS but forget that during a power cut, if the router and ONT are dead, there is no internet — so no remote viewing, no cloud upload, no phone alerts. Your cameras may keep recording locally, but you are blind until power returns. Plan a small UPS/inverter feed for the router and ONT together, sized alongside the rest of the security load. Work out the runtime you need in the security power supply requirements guide and the whole-system view in the electrical backup assessment.
Secure remote access — the part people get dangerously wrong
Being able to watch your cameras from your phone anywhere is the whole point for most homeowners. How you enable that is a genuine security decision, because the wrong method exposes your home to the entire internet.
Do not port-forward your DVR to the internet
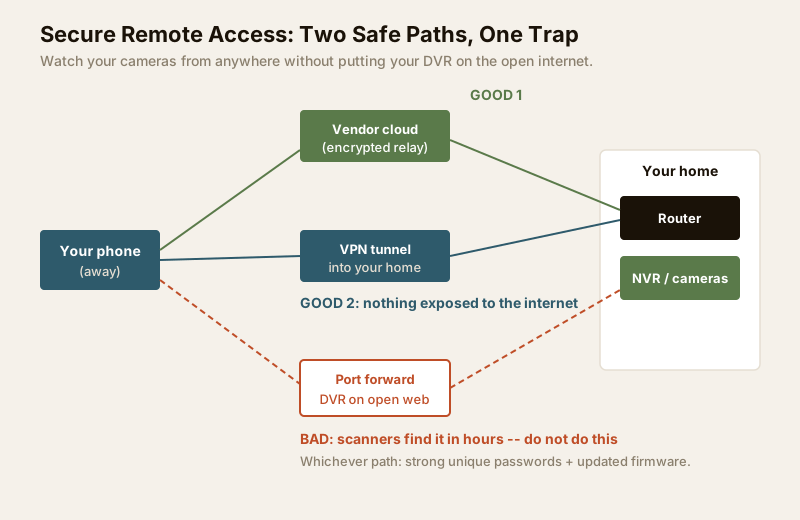
The old, dangerous shortcut is port forwarding: opening a port on your router so your DVR/NVR is directly reachable from the public internet. It works — and it also puts your camera system on the open web where automated scanners find it within hours. Countless DVRs with default or weak passwords have been found streaming to strangers precisely because they were port-forwarded and never hardened. Treat "open a port to your DVR" as a red flag, not a setup tip.
Prefer, in order:
- The vendor's cloud/relay app (P2P). Reputable camera brands connect your phone to your cameras through their own encrypted cloud relay, so nothing is exposed directly on your router. Convenient and safe if the vendor is trustworthy and you set a strong password.
- A VPN back into your home. For the privacy-conscious, run a VPN server on your router (many support this) and connect your phone to your home network over that encrypted tunnel to view cameras as if you were at home. Nothing is exposed to the public internet; only your VPN endpoint is reachable, protected by keys. This keeps footage entirely on your own kit — no vendor cloud — and is the gold standard for self-hosted NVRs.
Harden whatever you choose
Regardless of method, the basics that actually keep intruders out of your camera feed:
- Change every default password on the router, NVR and each camera to a strong, unique one. Default credentials are the number-one way camera systems are breached.
- Keep firmware updated on the router, NVR and cameras — updates patch the very holes attackers scan for. Buy from vendors who actually ship updates.
- Turn off features you do not use (UPnP auto-port-opening, unused remote services, unnecessary cloud sharing).
- Use two-factor authentication on the camera app account if the vendor offers it.
These principles carry over to your whole connected home — see the smart security systems guide.
Assess your current network's readiness
Before you commit to a camera plan, honestly score the network you already have. Use this checklist — anything you cannot tick "Ready" is a planning item, not a surprise to discover after installation.
| Readiness item | Why it matters | Ready? |
|---|---|---|
| Usable upload speed measured at a busy hour | Cameras send video up; a thin uplink stalls cloud + remote view | |
| Local recording (NVR/SD) planned, not cloud-only | Keeps footage during outages and saves the uplink | |
| Critical cameras (gate, door, perimeter) wired/PoE | No dead zones; central backup power possible | |
| Wi-Fi actually reaches each wireless camera location | Avoids dropouts behind thick walls / at the boundary | |
| PoE switch sized for ports + total wattage, with spares | Runs all cameras at once with room to grow | |
| Cameras/IoT segregated (guest network or VLAN) | A hacked gadget cannot reach your computers | |
| Stable IPs / DHCP reservations for NVR and cameras | Devices do not "move" and drop out of the app | |
| Router and ONT on backup power | No power cut = no internet = no remote view / alerts | |
| Router placed centrally and in the open | Coverage without cranking one router to the limit | |
| Remote access via vendor cloud or VPN, not port-forwarding | Keeps your DVR off the open internet | |
| Default passwords changed; firmware updatable | Blocks the most common camera breaches |
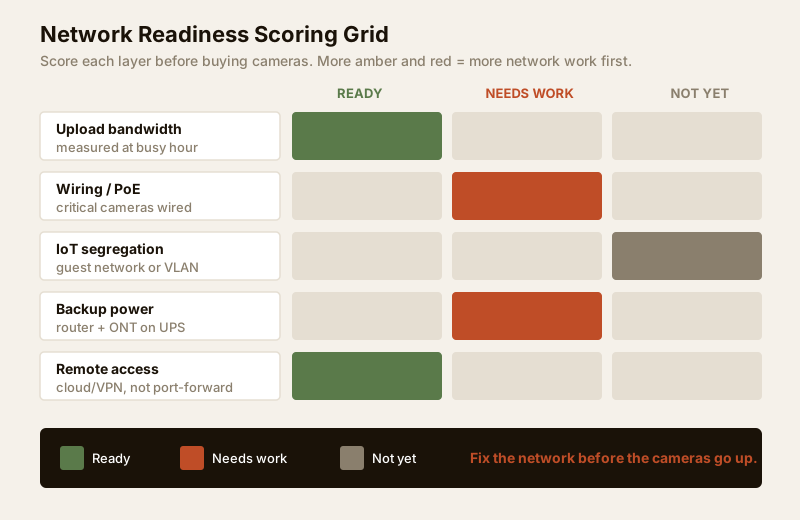
Score it visually with the readiness grid below — the more amber and red items, the more network work belongs in your plan before the cameras go up.
When to bring in a professional
Do the assessment and the plan yourself — you know your home and habits best. But hand the execution to qualified trades wherever it involves walls, mains or configuration that carries risk: structured cabling behind walls, PoE switch and rack setup, any mains-electrical work for backup power, and VLAN/firewall configuration for network segregation. Give the installer your plan — camera locations, the wired-vs-Wi-Fi call per camera, the segregation intent, and the remote-access method you want — and let them size, pull, terminate, configure and certify it. Coordinating cabling and power early, at the equipment-room planning stage, is far cheaper than retrofitting after the walls are closed.
Key takeaways
- Upload speed rules. India's asymmetric broadband means the download number is a distraction — measure usable upload at a busy hour and favour local recording with cloud clips for what matters.
- Wire the cameras you cannot afford to lose. PoE for the gate, door and perimeter — one cable for data and power, and central backup. Reserve Wi-Fi for convenient indoor extras and plan for dead zones.
- Segregate security/IoT from your computers — a guest network at minimum, a VLAN ideally — so a compromised gadget cannot reach your laptops and data.
- Back up the router and ONT, not just the cameras — a power cut with a dead router means no remote view, no cloud, no alerts.
- Never port-forward your DVR. Use the vendor's cloud app or a VPN back into your home, change every default password, and keep firmware updated.
- Route cabling, mains and network configuration to professionals — plan and specify here, then let licensed trades install and certify.
Plan the wiring next in the security cabling requirements guide, size the switch and runs with the cabling & PoE planner, or step back to the full security guides collection.
This is an educational planning guide. It is strictly defensive and does not describe how to defeat any security measure. Structured cabling, mains-electrical and powered-equipment work is qualified professional work — engage licensed installers, and verify any applicable National Building Code or municipal bye-law and data-protection obligation for your project.
Export this guide
Related Guides — Deep-dive reading
CCTV Remote Access in India (2026): Watch From Your Phone, Safely
How to view your own cameras from anywhere without leaving the front door open to the internet — change the defaults, use strong credentials and 2FA, keep firmware current, prefer the vendor's secure cloud relay or a VPN, segment the camera network, and treat footage as personal data.
SecuritySecurity System Network Failure (2026): When Everything Goes Offline at Once, and How to Get It Back
When your whole security system drops offline together, the fault is almost never in the cameras. It is in the shared network they all lean on. This guide helps an Indian homeowner tell an internet outage from a router, switch or cabling fault, power-cycle things in the right order, and know when to call a professional.
SecuritySmart Security Cybersecurity in India (2026): Hardening the Home That Watches Itself
Every connected security device is also a way in for an attacker, and an insecure smart camera or lock is worse than none because it gives false safety while exposing your home. This is the plain hardening checklist a homeowner can actually do: passwords, two-factor, updates, a wise buy, and a segmented network.
SecurityRelated Tools — Try Free
Security Backup Power Calculator
Size a UPS/inverter and battery to keep CCTV, NVR, router and alarm running through a power cut — load, Ah, VA and cost.
Backup PowerCCTV Placement Planner
Pick your property and zones to get a prioritised, zone-by-zone checklist of which camera goes where and how to mount it.
Placement PlannerPoE Power-Budget Calculator
Whether a PoE switch can power the connected cameras with cable-loss headroom, and how many devices it supports.
PoE Budget