
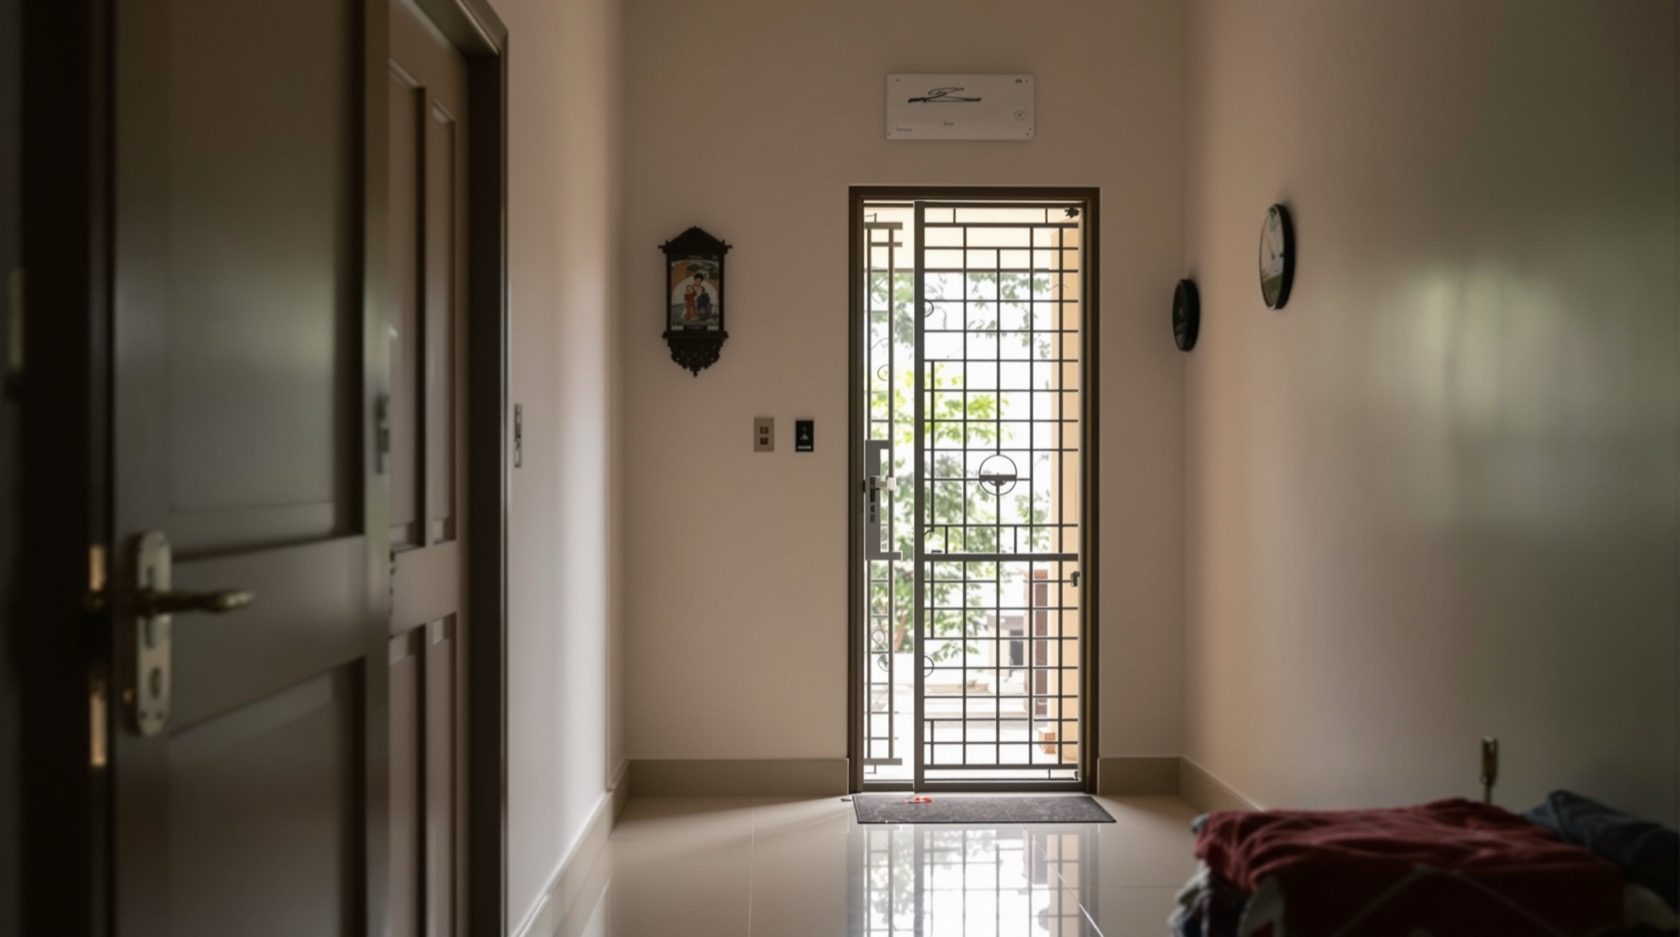
Emergency-Evacuation Planning for a Secure Indian Home
The flip side of keeping intruders out is getting your family out. Map primary and secondary escape routes from every room, make sure your security hardware can never trap anyone, fix a muster point, and drill it — the evacuation plan every secure home needs.
We spend so much effort keeping the wrong people out that it is easy to forget the harder job: getting the right people out, fast, when something goes wrong inside. A barred window that defeats a burglar can also trap a child in a fire. A gate that locks tight can strand an elderly parent during a gas leak. Security and escape pull in opposite directions, and the only home that is truly safe is one where both are planned together.
This guide is about the evacuation plan itself — the routes, the hardware, the muster point and the drills. It is a focused companion to the broader emergency-preparedness guide, which covers kits, contacts and every kind of emergency, and to the home fire-risk assessment, which finds the hazards in the first place. Here we plan one thing well: how everyone gets out and stays out, without your security ever standing in the way. It sits inside the wider planning covered by the home security risk assessment guide.
Scope & safety. This is a defensive planning guide. It teaches you to design an escape plan and specify egress-safe hardware — never how to defeat any security measure. Fire alarms, electric locks, structural grilles and gates are life-safety-critical, qualified work: specify what you want, then have a licensed professional fit and certify it. Verify local fire and building requirements for your building through your architect, RWA or fire service.
The one rule that outranks everything: two ways out
Start with a principle borrowed from every fire service in the world: every room a person sleeps or spends time in needs two independent ways out. A primary route — usually the door into the passage and out the main entrance — and a secondary route for when smoke, fire or an intruder blocks the first. The secondary is almost always a window.
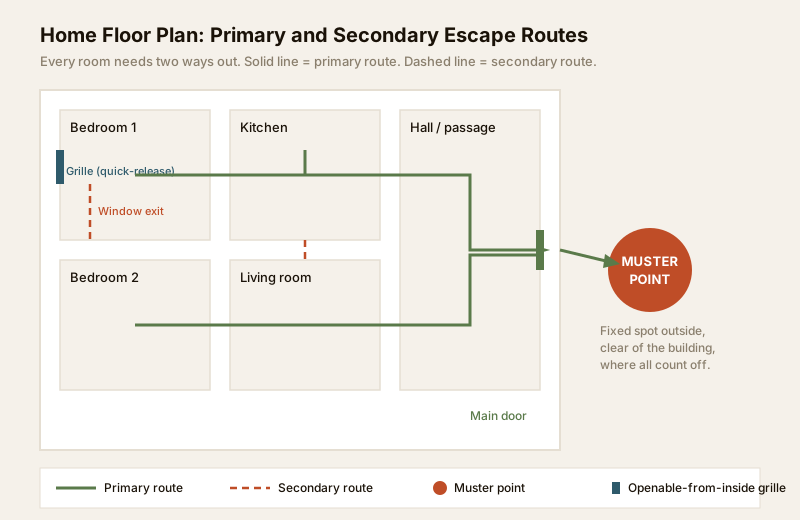
Walk your home room by room and, on paper, draw both routes for each. If a bedroom has only one door and a grilled window that does not open, that room has zero usable escape routes in a fire — the single most dangerous condition in the house, and one that expensive security hardware often creates. Fixing it is the whole point of this plan.
Map the routes to converge somewhere sensible. In most Indian homes the primary routes flow through the passage or living room to the main door and out through the gate; secondary routes drop through ground-floor windows or, on upper floors, to a balcony that a ladder or the fire service can reach. Number the openings so every family member can name their two ways out without thinking.
Security hardware must never trap people
This is the heart of an evacuation plan and where it collides hardest with security. The barrier that stops an intruder from getting in must never stop your family from getting out. Every escape opening has to release from the inside, by hand, in the dark, in seconds — with no key.
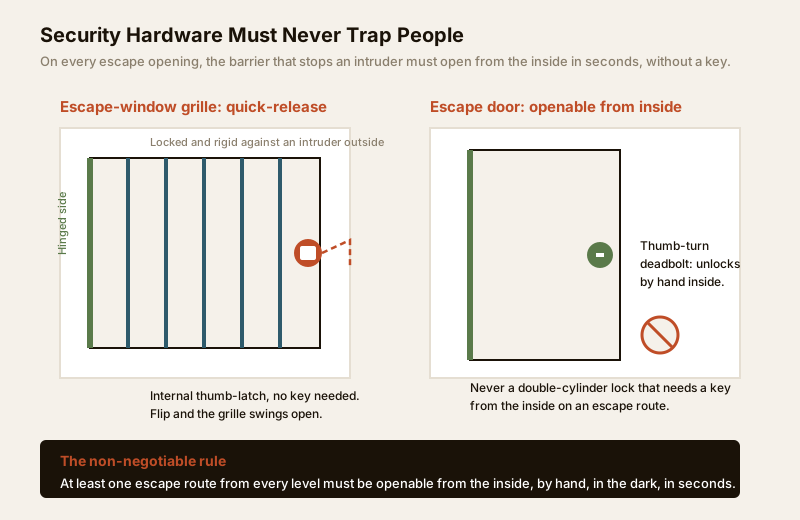
Three non-negotiables:
- Escape-window grilles must be quick-release or keyed-inside. A fixed welded grille over a bedroom window is a death trap. Specify a hinged grille with an internal thumb-latch (a "quick-release" or "escape" grille) so it stays rigid against an intruder outside but swings open from within in one motion. If you keep it keyed, the key must live permanently in the lock or on a hook beside it — never in a drawer.
- Escape doors must open from inside without a key. Fit thumb-turn deadbolts on doors on an escape route, never a double-cylinder lock that needs a key from both sides. A key you fumble for in smoke is a route you have closed. This is the security rule the entry and exit security assessment exists to catch.
- At least one route from every level must always be clear and unlocked-from-inside. Collapsible gates, roller shutters and grilled balconies are fine as security layers only if at least one path down and out never depends on finding a key.
If any of this needs new grilles, hinges or locks, treat it as a specification you hand to a licensed fabricator or locksmith — get the egress behaviour right on paper first, then let a professional build and certify it.
The muster point: where everyone gathers and gets counted
An evacuation is not over when people are out of the building — it is over when you know everyone is out. That is what a muster point (or assembly point) does. Pick one fixed spot outside, well clear of the building and its falling debris, that everyone can reach from any exit: a specific tree on the street, the far corner of the compound, a neighbour's gate, the society's open ground. The rules for it are simple and absolute:
- Same spot, every time, so no one has to decide under stress.
- Away from the building and away from where fire engines will need to pull in.
- Everyone counts off there — an adult confirms each person by name. If someone is missing, you tell the fire service; you do not go back in.
- Never go back for belongings. Phones, documents and valuables are replaceable. Plan the go-bag (covered in the emergency-preparedness guide) so nothing worth dying for is ever inside.
Planning for different emergencies
The route out is similar for every emergency, but the trigger and the do-not-do differ. Plan each so the household reacts on instinct.
- Fire. Get low under smoke, feel doors for heat before opening, use your secondary route if the primary is smoke-filled, close doors behind you to slow the spread, and get out. Never use a lift. Once out, stay out.
- Gas leak (LPG / PNG). Do not switch anything electrical on or off — no lights, no fans, no exhaust — as a spark can ignite the gas. Open doors and windows on the way out if you can do so without a switch, turn the cylinder regulator off only if it is safe and on your path, evacuate, and call the supplier and fire service from outside.
- Intrusion / break-in in progress. The defensive rule is the opposite of confrontation: get out and get away, then call for help — never confront an intruder. If your escape route is clear, take it quietly and raise the alarm from a neighbour's home or the street. If you cannot get out, lock yourselves in a room with a phone and call for help. Your life is worth infinitely more than any possession. This is the same stance the home security risk assessment guide takes throughout.
A useful habit: whatever the emergency, the sequence is always get to safety, alert others, then act — never act first.
The room-by-room escape-route plan
Fill this out for your own home — one row per room. It becomes the reference you brief the household on and drill against.
| Room / zone | Primary route | Secondary route | Egress-safe hardware needed | Who needs help here |
|---|---|---|---|---|
| Master bedroom | Door to passage to main door | Window grille (quick-release) to compound | Hinged escape grille, internal latch | — |
| Children's room | Door to passage to main door | Window to side yard | Quick-release grille; low latch children can reach | Young children |
| Grandparents' room | Door to living room to main door | Ground-floor window | Thumb-turn door lock; step-free path | Elderly, limited mobility |
| Kitchen | Door to passage | Rear service door (thumb-turn) | No double-cylinder lock; clear of cylinders on path | — |
| Living room | Main door | Front window / balcony | Grille key on hook by frame | — |
| Upper-floor bedroom | Stairs to main door | Balcony reachable by ladder / fire service | Openable balcony grille | All, if stairs blocked |
The columns that matter most are the last two: the hardware that must be fixed, and the person who cannot self-evacuate. Those are your priorities.
Special provision for children, the elderly and the disabled
An average plan assumes everyone can walk, see, hear and move fast. A real household rarely does. Build the plan around whoever needs the most help.
- Children. Assign each child a specific adult who is responsible for them, plus a backup. Teach children the muster point as a game they know cold. Fit latches they can actually reach and operate — a quick-release grille a six-year-old cannot lift is not an escape for that child. Teach them to never hide from firefighters.
- Elderly and limited mobility. Give them the ground-floor or most direct route wherever possible, ideally step-free. If someone sleeps upstairs and cannot manage stairs in an emergency, that is a planning problem to solve now — relocate the bedroom, or agree who carries or assists, and make sure a phone is always within their reach.
- Disabled occupants. Plan for the specific need — a wheelchair user needs a step-free egress and a strong assigned helper; someone deaf needs a visual or vibrating alarm they will actually notice; someone blind needs routes they can navigate by feel and a helper assigned. The emergency-preparedness guide covers the alerting side in more depth.
The principle: no one evacuates alone if they cannot. Every dependent person has a named helper and a named backup.
Keep the routes clear — always
A brilliant plan fails against a corridor full of boxes. Escape routes are not storage. Walk each route today and clear it:
- No furniture, cartons, cycles or stacked luggage narrowing the passage or blocking a door.
- No heavy items on balconies or landings that a secondary route depends on.
- No grille whose latch is painted over, rusted shut or hidden behind a wardrobe.
- The main door and gate reachable and openable at night without moving anything.
Clutter creeps back, so make a clear-routes check part of the same seasonal rhythm as your other security maintenance.
Score your evacuation readiness
Use this grid to rate the six pillars of a plan from 0 (not done) to 2 (ready). A score below 5 means an emergency would find you improvising — the worst possible time.
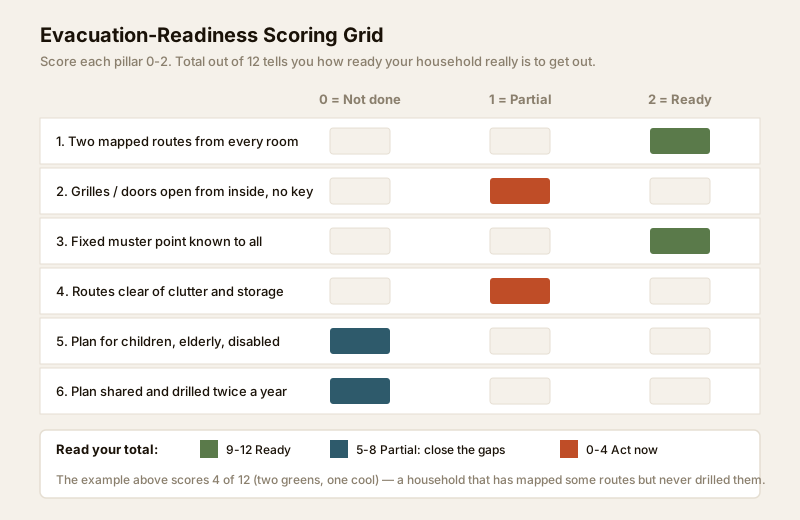
| Readiness pillar | 0 — Not done | 1 — Partial | 2 — Ready |
|---|---|---|---|
| Two mapped routes from every room | No routes drawn | Some rooms mapped | Every room has two, on paper |
| Grilles / doors open from inside, no key | Fixed welded grilles | Some quick-release fitted | Every escape opening egress-safe |
| Fixed muster point | None agreed | Vague idea | One spot, everyone knows it |
| Routes clear of clutter | Passages blocked | Mostly clear | Always clear, checked seasonally |
| Provision for dependents | None | Discussed | Named helper + backup for each |
| Plan shared and drilled | Never | Told once | Drilled twice a year |
Add the six scores. 9-12: ready — keep drilling. 5-8: partial — close the marked gaps. 0-4: act now, starting with egress-safe hardware and a muster point.
Communicate the plan — to everyone, including domestic help
A plan in your head protects no one else. Everyone who lives in or works in the home must know it: your family, and your domestic help, cook, driver or anyone who spends hours in the house. Walk them through the routes physically, show them how each quick-release grille and thumb-turn works, name the muster point, and make clear the one rule that never changes — get out, gather, count off, do not go back in. For help and visitors, that includes where the main gate key or release is, so no one is ever locked in a compound during an emergency.
Drill it, twice a year
A plan you have never practised is a theory. Run a simple drill at least twice a year — many families tie it to the clock change or a fixed date so it never slips:
1. Announce a scenario ("fire in the kitchen") and start.
2. Everyone takes their route to the muster point — walking, not running.
3. Time it, and note what went wrong: a jammed latch, a blocked passage, a child who forgot the spot, a grandparent who needed more help than planned.
4. Fix each fault, and drill the alternate (secondary) route too, so it is not the first time anyone has used it in a real fire.
Drills also surface the hardware faults no inspection catches — the grille that sticks, the key that has wandered — so they double as a maintenance check.
Coordinate with your RWA, society and the fire service
Your home does not evacuate into a vacuum. In an apartment or gated community, your escape depends on shared stairs, corridors and gates staying clear and unlocked, and on the guards knowing what to do. Push your RWA or society to keep common escape routes and fire exits clear and never chained shut, to know where fire engines enter, and to run building-wide drills. Keep the local fire service number and your society control-room number on the fridge and in every phone. For an independent house, a friendly word with the nearest fire station about access to your street is time well spent. This coordination is part of the wider emergency-preparedness picture.
When to bring in a professional
Design the plan yourself — you know your household and your home best. But hand the hardware to qualified people wherever life-safety or structure is involved: quick-release and escape grilles, gate and door locks on escape routes, fire and smoke alarms, and any structural opening. Specify the egress behaviour you need — opens from inside, no key, in seconds — then let a licensed fabricator, locksmith or alarm installer build and certify it. If you are building or renovating, fold egress into the design from the start with your architect and the security planning guide for new homes; retrofitting a safe escape later always costs more. Budget for the hardware changes alongside your other measures using the security budget planning guide.
Key takeaways
- Two ways out of every room — a primary route and a secondary (usually a window). A room with only one blocked route is the most dangerous condition in the house.
- Security hardware must never trap people — escape grilles quick-release or keyed-inside, escape doors on thumb-turns not double-cylinder locks, and at least one always-clear route per level.
- Fix a muster point outside, count everyone off there, and never go back in for belongings.
- Plan around your most dependent occupant — a named helper and backup for every child, elderly or disabled person — and keep every route clear of clutter.
- Communicate the plan to the whole household including domestic help, drill it twice a year, and coordinate with your RWA and fire service.
Start by scoring your home against the readiness grid above, then read the companion emergency-preparedness guide and fire-risk assessment, or browse the full security guides collection.
This is an educational planning guide. It is strictly defensive and does not describe how to defeat any security measure. Fire alarms, electric locks, escape grilles and structural work is qualified professional work — engage licensed installers and verify any applicable National Building Code or municipal fire and building requirement for your project.
Export this guide
Related Guides — Deep-dive reading
Entry and Exit Assessment for Indian Homes
How to audit every way IN and OUT of your home or building — a complete inventory of doors, gates, windows, balconies and forgotten access points, rated for how easily each could be used to get in and how well it serves escape in an emergency, turned into a hardening priority list.
SecurityDoor and Window Security Assessment for Indian Homes
Go opening by opening and rate the hardware itself — leaf and frame, hinges and locks, strike plates, grilles, glazing and latches — so you can grade each door and window's real resistance while never trapping anyone behind it.
SecuritySecurity for People Living Alone in India (2026): Calm, Practical Habits When There Is No Second Person to Notice
Living alone is an ordinary and growing part of Indian life - the student in a new city, the working single, the elder whose children are abroad, the person after a separation. It does not call for fear. It calls for a few deliberate habits, because there is no second person in the home to notice trouble, raise the alarm, or catch an accident. This is calm self-reliance, layer by layer.
SecurityRelated Tools — Try Free
Child & Elder Home-Safety Audit
Room-by-room safety audit for households with children or seniors — 10 categories, 70+ checkpoints tagged by audience.
Safety AuditDoor Security Rating Calculator
Score your main door out of 100 across leaf, frame, lock and hardware — and see the top upgrades.
Security ToolWindow Hardware Cost Calculator
Estimate window hardware cost — hinges, handles, locks, rollers and multipoint gears.
Window Calculator