
Door Veneer Repair: Fix Lifting & Chips (India 2026)
Veneer bubbling, lifting at the edge or chipped off? Here is how to re-glue, patch and colour-match wood veneer at home, step by step.
A thin skin of real wood, the veneer, is what gives a flush or panel door its rich grain. When that skin starts to bubble, lift at an edge or chip at a corner, the door looks tired even if it is structurally perfect. The good news is that door veneer repair is one of the most rewarding DIY jobs there is: re-gluing a lifted edge takes ten minutes, a chipped corner can be patched with a matching offcut, and small losses fill, sand and polish away almost invisibly. You rarely need a new door.
This guide covers the three common faults, lifting or bubbling, a missing chip, and small scratches or dents, with a step-by-step for each, the tools you need, and honest notes on when a veneer is too far gone to save. For the wider picture see the complete door guide and door troubleshooting. If your door's surface is plastic laminate, not wood veneer, use the sibling guide instead: door laminate peeling fix.
Veneer or laminate? Tell them apart first
The repair material is completely different, so check what you have before you start. Veneer is a wafer-thin slice of real timber bonded to the door, it shows natural, irregular grain, feels like wood, and can be sanded and polished. Laminate (Sunmica and the like) is a printed plastic sheet, it has a repeating grain pattern, feels harder and plasticky, and must NOT be sanded. Repairs below are for wood veneer only.
| Clue | Wood veneer | Plastic laminate |
|---|---|---|
| Grain | Natural, irregular, never repeats | Printed, often repeats |
| Feel | Warm, wood-like | Hard, plasticky, cool |
| Edge | Wood layer, may show ply core | Thin coloured plastic skin |
| Can sand / polish? | Yes | No (sanding ruins print) |
| Typical fault | Bubbling, edge lifting, chips | Edge peeling, delamination |
Why does veneer lift in the first place? In India the usual suspects are monsoon humidity swelling the glue line, water seeping into an unsealed bottom or edge, sun-baked heat cycling, and simple age, the original adhesive (often PVA or urea) lets go. Edges and the door bottom are most vulnerable because they are least often sealed. That is also the prevention story, which we will come to.
Fault 1: lifting or bubbling veneer (easy, 15 min + drying)
A raised edge or a soft bubble means the glue under that patch has failed. The fix is to get fresh adhesive under it and press it flat until it cures. Difficulty easy.
Step-by-step: re-glue a lifted edge or bubble
1. Clean and dry the area. Wipe away dust and grease. If the veneer is damp from a recent leak, let it dry fully for a day first, gluing over moisture only traps it.
2. Open the gap gently. For a lifted edge, ease it up a little with a thin palette knife or an old credit card so you can reach underneath. For a closed bubble, slit it cleanly along the grain with a sharp craft knife so glue can go in.
3. Work glue underneath. Use white wood glue (Fevicol) on the tip of the knife, or a fine syringe/nozzle for a bubble. Spread a thin, even film on both faces, the door core and the back of the veneer. Avoid a thick blob, which dries lumpy.
4. Press out the excess. Smooth the veneer down from the centre outward (or from the firm side toward the loose edge) with a roller or a cloth-wrapped block, squeezing surplus glue out of the gap.
5. Wipe immediately. Clean off all squeezed-out glue with a damp cloth before it sets, dried glue resists polish and shows as a pale smear.
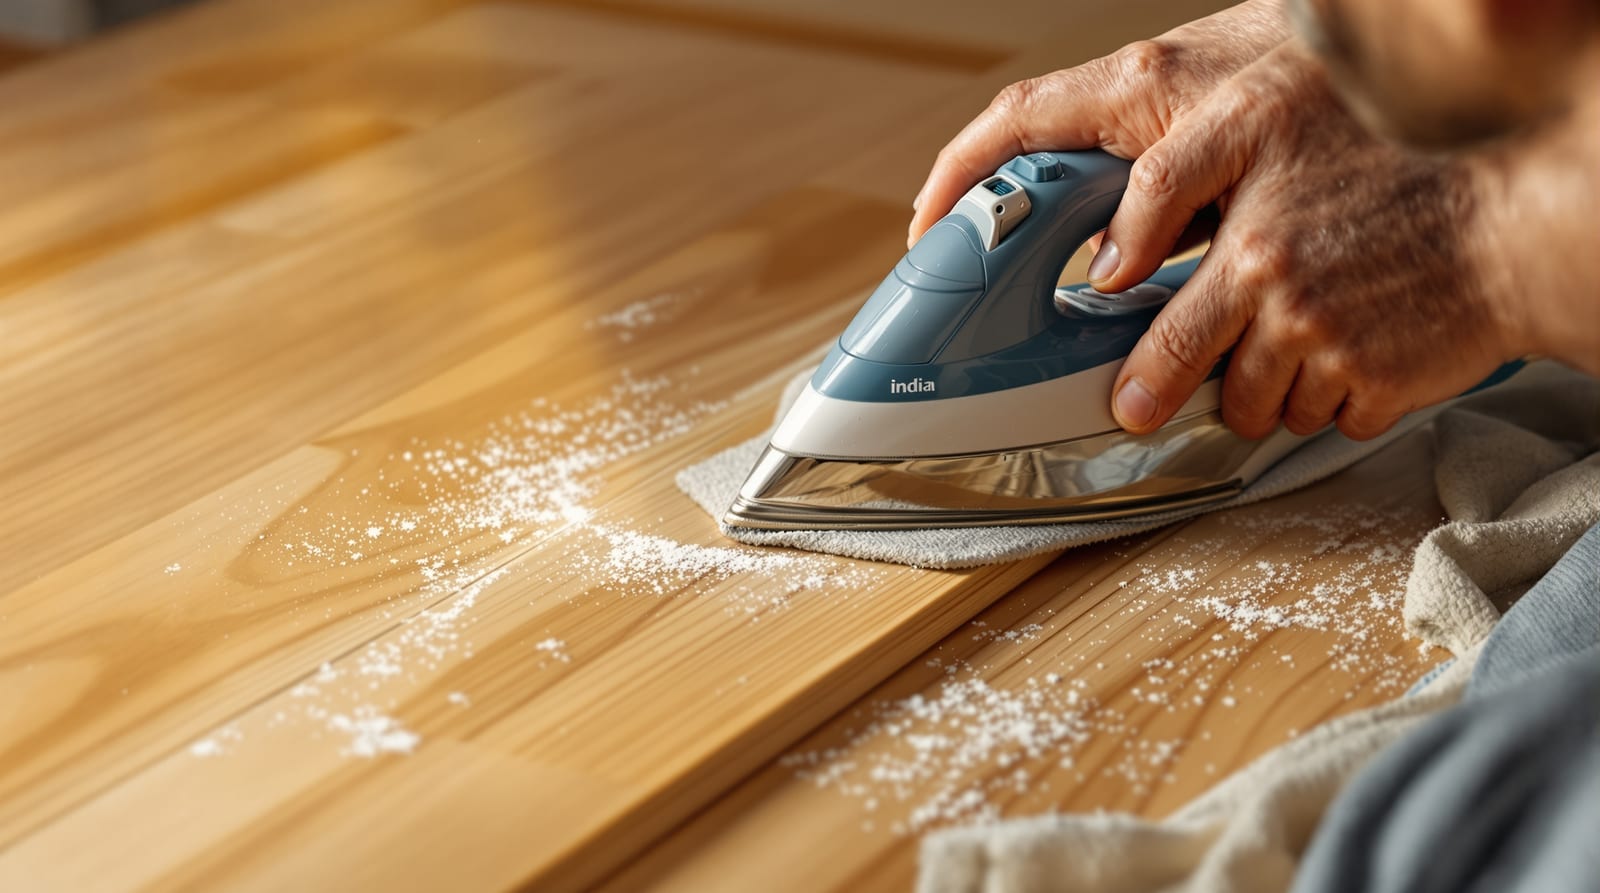
6. Clamp or weight it flat. Lay wax paper (so nothing sticks), then a flat board, then a clamp or a stack of heavy books. For an edge, a couple of small G-clamps with caul blocks work. For a bubble in the field, a warm (not hot) iron over a cotton cloth for a few seconds can reactivate some glues, then weight it.
7. Leave to cure. Give it 4-6 hours, ideally overnight, before removing the clamps. Rushing this is the main reason the edge lifts again.
8. Touch up. Buff the area and, if the polish looks dull, re-coat that patch, see re-polishing below.
Fault 2: a chipped or missing piece (moderate, 45 min + drying)
Where a corner or edge has lost veneer entirely, you patch in a fresh piece. The trick is to make the patch edges follow the grain so the join hides. Difficulty moderate.
Step-by-step: patch a missing chip
1. Square up the damage. With a sharp knife and a steel rule, cut the ragged hole into a neat shape, ideally a diamond or a shape whose edges run along the grain lines, which disguises the seam far better than a rectangle across the grain.
2. Find matching veneer. Use an offcut saved from installation, a strip from a hidden spot (top edge of the door, inside a wardrobe), or buy a small veneer sheet of the same species, teak, oak, etc., from a plywood shop. Match grain direction and colour as closely as you can.
3. Cut the patch to fit. Lay the offcut over the hole, trace the exact shape, and cut the patch slightly oversize, then trim for a snug, gap-free fit. Aim the grain the same way as the surrounding veneer.
4. Glue and clamp. Spread a thin film of wood glue in the recess and on the patch back, press it home, wipe excess, cover with wax paper and a flat block, and clamp or weight it. Cure 4-6 hours.
5. Level the patch. Once dry, sand the patch flush with the surrounding surface using fine 220-grit paper on a flat block, working with the grain. Stop the moment it is level, veneer is thin and easy to sand through.
6. Colour-match and seal. See the colour-matching section, then seal and re-polish the whole panel so the patch blends in.
Fault 3: small scratches, dents and minor losses (easy, 20 min)
For shallow scratches and tiny chips you do not need a patch at all, fill, colour and polish. Difficulty easy.
1. Clean the groove. Wipe out dust.
2. Fill the loss. Press a colour-matched wood filler or wax stick into the scratch or dent, slightly proud of the surface. For dents in real wood (not a loss), a drop of water and a warm iron over a cloth can sometimes swell the fibres back up.
3. Level it. When the filler is hard, sand back flush with fine paper, with the grain.
4. Re-grain and colour. Use a touch-up marker or fine artist's brush to draw the grain lines across the filler so it disappears.
5. Seal. Coat with the matching polish.
Colour-match and re-polish
Getting the colour and sheen right is what makes a repair invisible:
- Start lighter than you think, it is easy to darken a patch in layers, hard to lighten an over-dark one.
- Use touch-up markers and wax fill sticks (furniture-repair kits, in walnut, teak, oak shades) for small areas; a matching stain or tinted polish for a whole patch.
- Test on a hidden spot first, the top edge or a wardrobe back, to see the dried colour.
- Re-draw the grain over filler with a fine brush or marker, grain lines fool the eye more than perfect colour.
- Finish over the whole panel, not just the patch, so the sheen matches.
Veneer is sealed with melamine, PU or traditional polish, so after any repair re-coat to protect bare wood. Lightly scuff the area, wipe clean, then feather a thin coat of the matching finish over the repair. For a full refresh of the leaf, see door polishing and refinishing and the door painting guide.
Door veneer repair at a glance
Tools & materials you'll need
- Sharp craft knife / scalpel and a steel rule
- Thin palette knife, old credit card, or fine glue syringe
- White wood glue (Fevicol) for re-gluing; matching wood veneer offcut for patches
- Fine sandpaper (180-220 grit) and a flat sanding block
- Wood filler or wax fill stick, colour-matched
- Wood touch-up markers / stain in your timber shade (teak, walnut, oak)
- Matching polish: melamine, PU lacquer or wipe-on PU
- Clamps or heavy weights, wax paper, a soft cloth, a household iron (optional)
What it costs
| Job | Difficulty | Time | DIY parts cost | Carpenter / polisher |
|---|---|---|---|---|
| Re-glue lifted edge / bubble | Easy | 15 min + cure | ₹50-150 (glue) | Part of a ₹400-800 visit |
| Patch a missing chip | Moderate | 45 min + cure | ₹150-500 (veneer + filler) | ₹500-2,000 |
| Fill scratch / dent + touch-up | Easy | 20 min | ₹150-400 (kit) | ₹400-800 |
| Re-polish a panel after repair | Easy | 30 min + dry | ₹150-400 (polish) | ₹500-1,500 incl material |
| Re-veneer a whole face (badly damaged) | Pro | half-day+ | not DIY | ₹2,000-6,000+ |
GST of 18% applies on goods. A touch-up kit (markers, wax sticks, filler) is the single most useful buy, around ₹150-400, and covers most small jobs across the whole house. Compared with the ₹500-2,000 a polisher charges for a veneer patch, the DIY route is very satisfying. Not sure whether the door is worth saving? Run the repair vs replace door calculator or get a figure from the door repair cost estimator.
Prevent it coming back
Most veneer failure starts at unsealed edges, so prevention is mostly about sealing:
- Seal the bottom and all four edges of the door with polish or PU, the raw end-grain and ply core soak up moisture and let veneer lift. This matters most for bathroom and external doors.
- Wipe up water fast and never let a door stand in a wet patch; for the door bottom specifically see door bottom rot repair and fix water-damaged door.
- Manage monsoon humidity, ventilate, and re-polish tired finishes before the rains; pair this with wooden door maintenance.
- Re-coat the finish every few years so the seal stays intact, dull, bare patches are where water gets in.
When to stop and call a professional
Veneer repair is mostly DIY, but step back if:
- A large area is delaminating or the whole face is bubbling, the original bond has failed wholesale and the door may need re-veneering or replacing, see door replacement guide.
- The core underneath is swollen, soft or rotten, fix or replace the substrate first; a patch over spongy wood will fail. See warped door fix.
- It is a high-value teak or designer leaf and you are unsure of the colour match, a polisher's patch is cheap insurance. See teak wood doors.
- The damage is on a glass, automatic or sensor door panel, do not improvise; isolate any power and call the installer.
Frequently asked questions
How do I know if my door is veneer or laminate?
Look at the grain and feel it. Veneer is real wood, the grain is natural and never repeats, it feels warm and can be sanded. Laminate is a printed plastic sheet with a repeating pattern that feels hard and must not be sanded. The repairs here are for wood veneer; for plastic, see door laminate peeling fix.
Can I just glue a lifted veneer edge back down?
Yes, this is the easiest repair. Clean and dry the area, work white wood glue underneath, press out the excess, wipe it clean, then clamp or weight the edge flat and leave it overnight. The most common mistake is removing the clamp too soon, give the glue a full cure.
Where can I find matching veneer for a patch?
Use an offcut saved from installation, or take a small piece from a hidden spot like the door's top edge or the back of a wardrobe. Otherwise a plywood or hardware shop will sell a small veneer sheet, ask for the same species (teak, oak, etc.) and match the grain direction.
Will the repair be invisible?
On small chips and scratches, yes, if you colour-match patiently and re-draw the grain over filler. The biggest tip is to re-polish the whole panel, not just the patch, so the sheen matches; a colour-perfect patch can still show if its gloss is different.
Why does veneer keep lifting on my bathroom door?
Moisture. Steam and splashes get into unsealed edges and the bottom, breaking the glue line. After re-gluing, seal every edge and the bottom with polish or PU, and improve ventilation. See fix swollen door in monsoon for related humidity issues.
Can I sand veneer to remove a stain or scratch?
Very lightly, and only real wood veneer, never laminate. Veneer is wafer-thin, so use fine paper on a flat block, go with the grain, and stop the instant the mark is gone or you will sand through to the core. Then re-polish the area.
Export this guide
Related Guides — Deep-dive reading
Fix a Water-Damaged Door: Repair Guide (India 2026)
Dry it, assess swelling vs delamination vs rot, sand and fill, re-glue veneer, seal every edge, and know when to switch to WPC or uPVC.
Home Doors & EntrancesDoor Laminate Peeling Fix: Re-Bond at Home (India 2026)
Lifting or bubbling laminate on a flush door? Re-bond with contact adhesive, clamp it flat, and fix edges yourself for under a few hundred rupees.
Home Doors & EntrancesHow to Fill Door Holes and Dents: DIY (India 2026)
Patch screw holes, dents and punched hollow-core damage with filler or epoxy, then sand, prime and paint so it disappears.
Home Doors & EntrancesRelated Tools — Try Free
Cross-Ventilation Analyzer
Estimate airflow and air changes per hour (ACH) from room size, window areas, layout, and local wind — with NBC 2016 Part 8 compliance check.
Ventilation CalculatorMaterial Comparison Sheet
India's interior material cheatsheet — plywood, finishes, hardware, countertops, paints, waterproofing.
Reference GuideDoor Material Comparison Tool
Compare 2–4 door materials on cost, durability, maintenance, security and moisture resistance.
Comparison Tool