
Door Laminate Peeling Fix: Re-Bond at Home (India 2026)
Lifting or bubbling laminate on a flush door? Re-bond with contact adhesive, clamp it flat, and fix edges yourself for under a few hundred rupees.
A door laminate peeling fix is one of the most satisfying small repairs you can do at home: a corner that has lifted, a bubble that flexes under your thumb, or an edge-banding strip that catches your nail every time you pass. Left alone, that little flap of laminate (often called sunmica) only grows — humidity creeps under it, dust packs the gap, and one monsoon later you are looking at a whole peeling face. The good news is that for most flush and membrane doors this is a re-bonding job, not a replacement, and rubber-based contact adhesive plus a few clamps will set it right for a fraction of a carpenter's bill.
This guide is for Indian homes, where heat, humidity and the odd splash of water at the bottom rail conspire against glued surfaces. It is a close sibling of our door veneer repair guide — veneer is real wood and laminate is a printed plastic sheet, so the colour-matching differs, but the lifting-and-re-bonding logic is much the same.
Why laminate peels in the first place
Laminate does not let go without a reason. Understanding the cause tells you whether a re-bond will hold or whether you are patching a doomed door.
| Cause | What's really happening | Will re-bonding hold? |
|---|---|---|
| Water ingress at edges/bottom | Moisture wicks under unsealed edges, breaks the glue bond | Yes, if you dry it fully and seal the edge afterwards |
| Poor original bonding | Too little adhesive, or it was pressed before tacking off | Yes — this is the classic, easy fix |
| Heat near the surface | Doors near a hob, geyser flue or sun-baked balcony soften the glue | Yes, but address the heat or it returns |
| Substrate swelling | The MDF/block-board core has swollen and pushed the laminate off | Often no — swollen core means re-lamination or replacement |
| Age / brittle laminate | Old sunmica turns brittle and cracks at fold edges | Partial — re-bond what's intact, but expect more failures |
The quick test: press the lifted area flat. If it sits down clean and the core underneath feels firm and dry, you have a bonding problem and a re-bond will last for years. If the area feels spongy, smells musty, or the core crumbles, water has already damaged the substrate — read our fix water-damaged door guide before you glue anything, because adhesive will not stick to rotten board.
Tools and materials you'll need
- Rubber-based contact adhesive — Fevicol SR or any neoprene/SR contact cement. This is the correct glue for laminate; ordinary white wood glue (PVA) will not hold laminate reliably.
- A small putty knife or palette knife to lift and butter the gap
- A thin paint brush or stick to spread adhesive into tight spots
- Sandpaper (180 and 320 grit) to key the old glue and ease edges
- A clean cloth, mineral turpentine or thinner to wipe squeeze-out
- Clamps (G-clamps or quick-clamps) plus scrap wood caul to spread pressure; failing that, heavy books, a brick, or masking tape
- A household iron and baking paper, for small bubbles only
- Laminate edge-banding tape (iron-on or self-adhesive) if the edge strip is gone
- Touch-up marker / laminate seam-filler in a matching colour
- A wax candle or clear silicone to seal the repaired edge afterwards
Difficulty: easy to moderate. Time: 30-60 minutes of work plus 24 hours undisturbed curing. Cost in parts: ₹150-500 of consumables versus ₹500-2,000 for a carpenter's laminate patch visit.
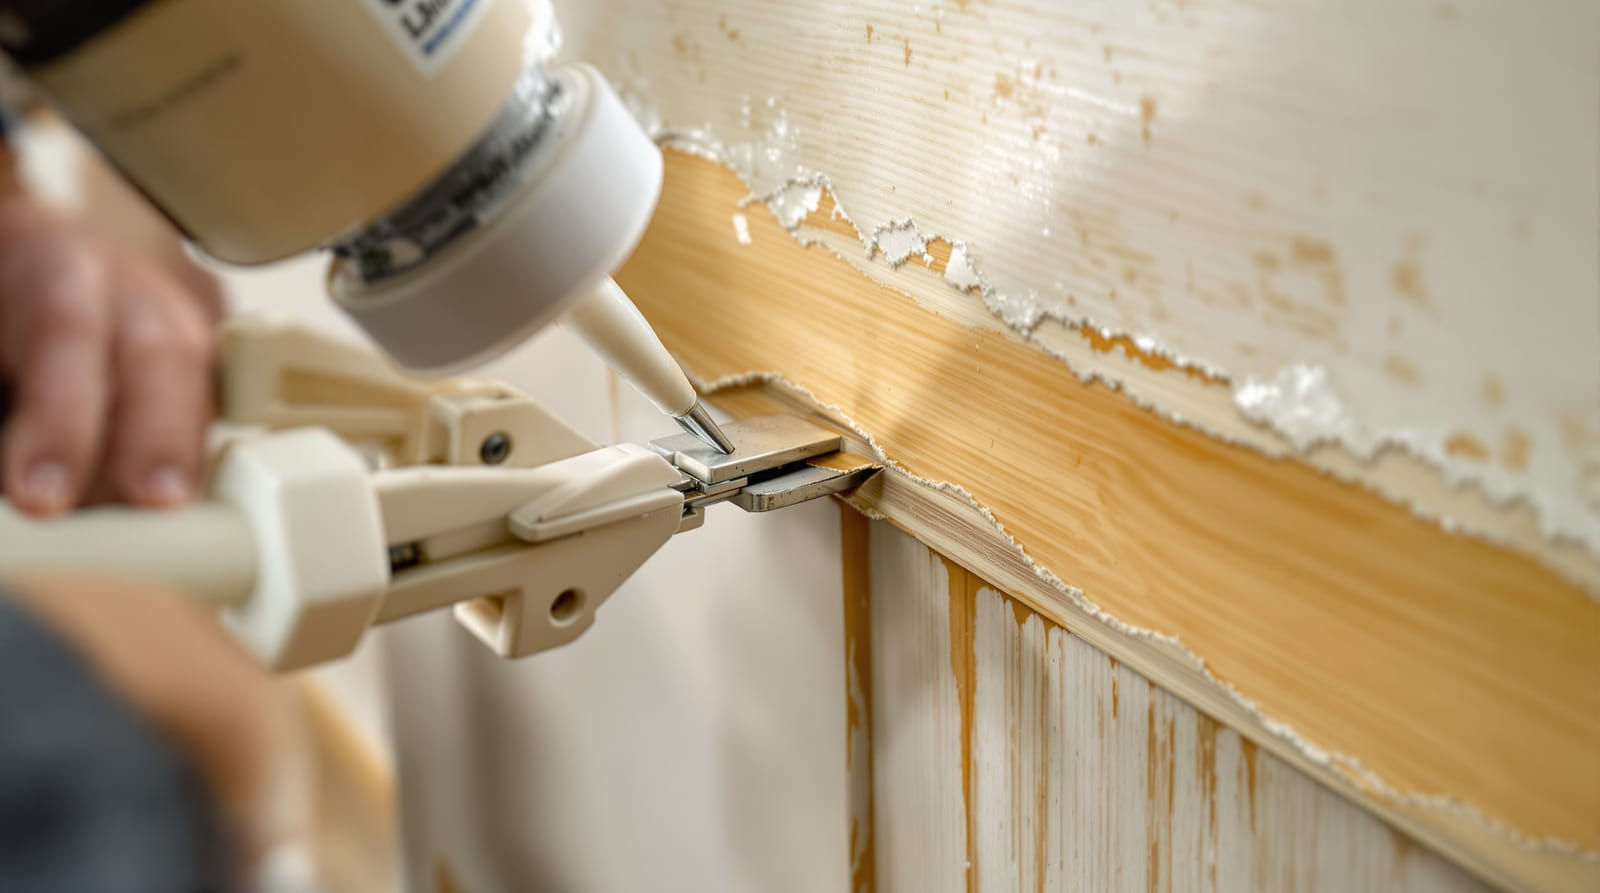
Step-by-step: re-bond lifting laminate
1. Lift gently and inspect. Ease the loose laminate up just enough to see and reach the gap — do not peel further than you must. Note how far the lift extends.
2. Clean both faces. Scrape out dust, old crumbly glue and any grit from the gap. Lightly sand the back of the laminate and the exposed core with 180 grit so fresh adhesive grips. Wipe with a dry cloth — and if there was moisture, let it dry a full day before gluing.
3. Apply contact adhesive to BOTH surfaces. This is the key rule with Fevicol SR: coat the back of the laminate and the door core in a thin, even film. Spread it right into the corners with a stick.
4. Wait for tack-off. Let both coats go touch-dry — usually 5-10 minutes — until the glue feels tacky, not wet. Contact adhesive grabs on contact, so you only get one shot at alignment.
5. Press into place. Lower the laminate exactly where it belongs and press from the centre outward to chase out air. Misaligned? You can usually re-soften with a little thinner, but aim to land it right first time.
6. Clamp and weight. Lay a scrap-wood caul over the area and clamp firmly, or pile on books/a brick. Even pressure across the whole repair beats a single hard point. Wipe away any glue squeeze-out immediately with a thinner-damp cloth.
7. Cure undisturbed for 24 hours. Resist testing it. Then unclamp, ease any proud edge with 320 grit, and seal the repaired edge with a wax candle rub or a bead of clear silicone so water cannot wick back in.
Fixing a bubble in the middle of the face
A bubble where you cannot reach an edge needs a small incision. With a sharp blade, slit the bubble along its length following the laminate's grain or pattern line so the cut hides. Work a little contact adhesive under each flap with a thin stick, let it tack, press flat and clamp with a caul. For a very small bubble on heat-set laminate, a warm (not hot) iron over baking paper can sometimes re-activate the glue and let you press it down — test on a hidden spot first, because too much heat blisters laminate.
Re-sticking peeling edge-banding
The thin strip on the door's vertical edge is the first thing to go. If it has lifted but is intact, re-bond it exactly as above with contact adhesive and tape it tight while curing. If it has snapped off, buy matching edge-banding tape, cut it slightly oversize, iron or stick it on, then trim the overhang flush with a sharp blade held flat and ease the corner with 320 grit. A neat edge is what stops the next round of peeling.
Trimming, finishing and colour-matching
Once the bond has cured, the repair should be nearly invisible — but seams and chips still show. Run a touch-up marker or laminate seam-filler in the closest colour along any hairline, wiping excess before it sets. For a glossy laminate, a dab of clear lacquer over the seam evens the sheen. Because laminate is a printed pattern, you cannot stain it like wood; match by colour and sheen, not grain. If your door is real-wood veneer rather than plastic laminate, follow door veneer repair instead, and for surface marks see scratched door repair.
When to re-laminate the whole face — or call a carpenter
A spot repair is right when the lifting is local and the core is sound. Re-do the whole face when the laminate is brittle and peeling in several places, when an old sunmica colour you cannot match is failing, or when water has reached a large area. Whole-face re-lamination means stripping the old sheet, sanding the core flat, and bonding a fresh full-size laminate — a carpenter's job (₹500-2,000 for a patch, more for a full face plus the laminate sheet at GST 18%).
Stop and call a carpenter if: the door core feels spongy or crumbly (water/borer damage — see door borer & fungus treatment); the door is also swollen or sticking (fix the swollen door in monsoon first, because a warped door will not hold a flat repair); or you would rather replace the leaf entirely. If you are weighing a fresh laminate against a new door, our repair vs replace door calculator and door repair cost estimator will give you honest numbers.
| Symptom | Likely cause | Your fix | Difficulty |
|---|---|---|---|
| Corner lifting, core firm | Glue failed locally | Re-bond with contact adhesive | Easy |
| Bubble in the middle | Trapped air / weak bond | Slit, glue both flaps, clamp | Moderate |
| Edge strip gone | Edge-banding peeled off | New iron-on banding, trim flush | Easy |
| Peeling in many spots | Brittle/aged laminate | Re-laminate whole face | Pro |
| Spongy, musty core | Water/rot under laminate | Repair core or replace leaf | Pro |
For the wider picture of keeping doors in shape, see our complete door guide, the door troubleshooting hub, and our wooden door maintenance routine, which keeps edges sealed so laminate never starts lifting in the first place.
Frequently asked questions
Can I use ordinary Fevicol (white glue) to stick laminate back?
No. Standard white PVA wood glue does not bond laminate reliably and stays flexible. Use a rubber-based contact adhesive such as Fevicol SR or any neoprene contact cement, applied to both surfaces and allowed to tack off before pressing.
Why does my laminate keep peeling after the monsoon?
Humidity and water are wicking under an unsealed edge and breaking the glue line. Re-bond it, then seal every exposed edge with wax or clear silicone, and keep the door bottom dry. If the door also swells, fix that first with our fix swollen door in monsoon guide.
How do I get rid of a bubble without an edge to lift?
Slit the bubble with a sharp blade along the pattern line so the cut hides, work a little contact adhesive under each flap, let it tack, then press flat and clamp with a wood caul for 24 hours. A warm iron over baking paper can sometimes re-set a tiny bubble.
How long should I clamp the repair?
Leave it clamped or weighted for a full 24 hours, undisturbed, even though contact adhesive grabs on contact. The clamp keeps the laminate dead flat while the bond reaches full strength.
When is it not worth repairing?
When the laminate is brittle and failing in several places, or when the core underneath is spongy from water or borers. At that point you are re-laminating the whole face or replacing the leaf — run the numbers with the repair vs replace door calculator.
Export this guide
Related Guides — Deep-dive reading
Fix a Water-Damaged Door: Repair Guide (India 2026)
Dry it, assess swelling vs delamination vs rot, sand and fill, re-glue veneer, seal every edge, and know when to switch to WPC or uPVC.
Home Doors & EntrancesDoor Veneer Repair: Fix Lifting & Chips (India 2026)
Veneer bubbling, lifting at the edge or chipped off? Here is how to re-glue, patch and colour-match wood veneer at home, step by step.
Home Doors & EntrancesDoor Repair Guide India: Fix Holes, Dents, Swelling, Hinges & Locks (2026)
A fix-it reference for Indian homes: every common door problem with a quick fix, a proper repair, a replace verdict, the materials needed, and indicative rupee costs.
Home Doors & EntrancesRelated Tools — Try Free
Door Cost Calculator
Estimate the all-in cost of a door — leaf, frame, hardware, fitting and GST — by type, material and size.
Door CalculatorDoor Problem Diagnoser
Tell us the symptom and get the likely cause, the fix, DIY difficulty and indicative cost for any door fault.
Diagnostic ToolHealing View Impact Calculator
Evidence-Based Design dashboard quantifying the recovery impact of nature view + daylight factor on analgesic use, length of stay, and HCAHPS patient-experience uplift. Calibrated against Ulrich 1984 (Science), Park & Mattson 2008, and the CHD EBD evidence base.
EBD Calculator