
CCTV Commissioning and Testing in India (2026): The Go/No-Go Checklist Before You Pay
The acceptance walk-through to run BEFORE you clear the final bill: aim and focus every camera, check the picture day and night, prove recording and retention, test motion, alerts and remote viewing, and label every channel.
The most expensive mistake in a home or society CCTV project is not choosing the wrong camera. It is signing off and paying the final bill before anyone has actually checked that the system works. Months later, after a break-in or a parking dispute, the family opens the recorder to find the rear camera was never recording, the night footage is an unusable white blur, or the "30 days" of storage turned out to be four.
CCTV commissioning is the acceptance walk-through you run before you clear that final payment. It is the single point in the whole project where you hold all the leverage, because the installer wants to be paid. This guide gives you a plain go/no-go checklist to run, view by view, so that money changes hands only when every camera is aimed, focused, recording, and viewable — day and night. It sits in Studio Matrx's CCTV hub, between planning the installation and taking formal handover and documentation.
Scope & safety. This guide helps you run and supervise the acceptance. You watch, test and sign off; the installer does the physical work. Anything at the mains board, cabling, or working at height is a licensed professional's job — see the electrical hub. Footage is personal data under the DPDP Act, 2023: cameras belong on your own property and shared areas only, never on bathrooms, bedrooms or into a neighbour's private space. This is educational guidance, not legal advice.
Why a formal acceptance, and why now
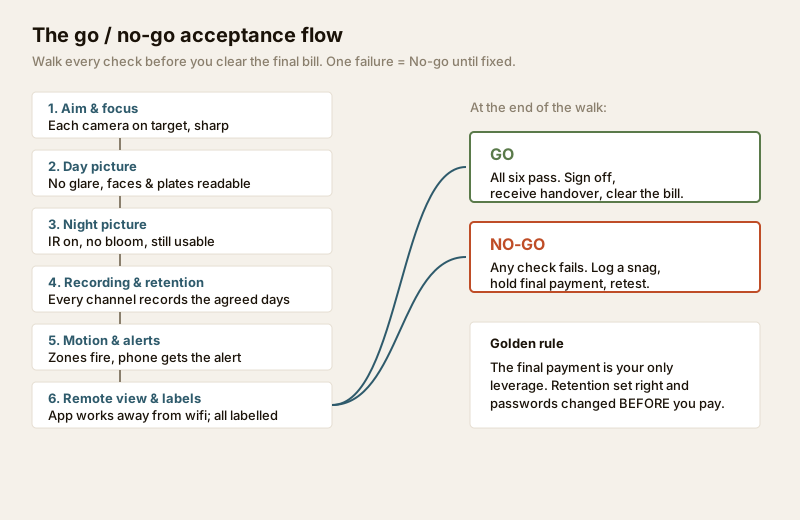
An install is not "done" when the last camera is screwed to the wall. It is done when you have proof — seen with your own eyes — that it does what you paid for. Two things make the acceptance walk-through matter in India specifically:
- The final payment is your only leverage. Once the installer has been paid in full, a return visit to fix a soft-focus camera or a channel that will not record becomes a favour you have to chase, not an obligation. A commonly used arrangement is to hold back a retention amount (often around 10–20% of the job) until acceptance passes.
- What looks fine on the day may not be recorded. A live preview on a phone can look sharper and brighter than what the recorder actually stores. Every check below is done on the recorder or its playback, not just the live view.
Run the walk-through with the installer present, a printed checklist in hand, and someone to stand in front of each camera as a test subject. The companion tool, the CCTV commissioning checklist, lets you tick each item off view by view and print or export a signed record.
Check 1 — Aim and focus, camera by camera
Go to each camera on the recorder, full-screen, and confirm two things:
- Aim. Is it actually pointing at what it is meant to watch? The gate camera should frame the gate and the face of anyone arriving — not the sky, not the top of the wall, not half a bush. Compare against the coverage you planned; the camera height and angle guide explains what a correct aim looks like.
- Focus. Is the image sharp at the distance that matters? A camera can be perfectly aimed but soft-focused, so faces at the gate are a smudge. Have someone stand at the key spot and confirm they are crisp on the recorder.
Note any camera that is loose on its bracket, easy to reach and twist, or vibrating in the wind — a camera that drifts out of aim next week is a fail today.
Check 2 and 3 — The picture, in BOTH day and night
This is where most weak installs are exposed. A camera that gives a clean picture at noon can be worthless after dark, and vice versa. Test both, deliberately.
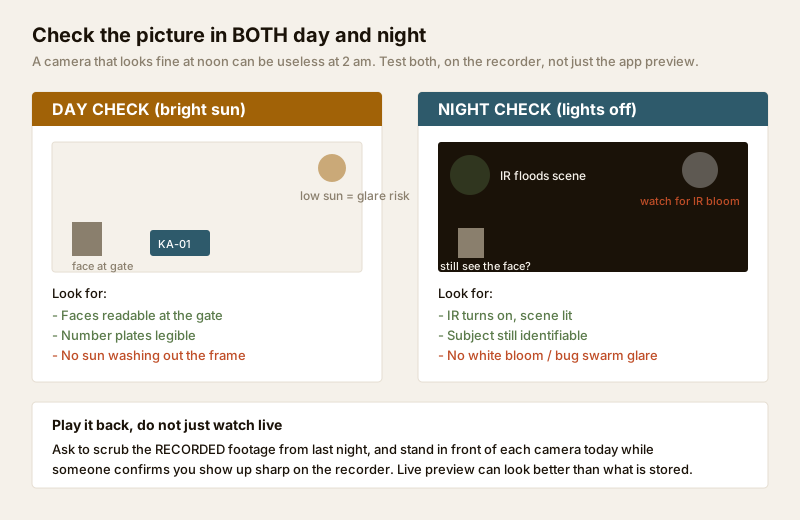
Day check (bright sun). Look for readable faces at entry points and legible number plates in the parking or driveway. The common Indian failure is a camera aimed into the low morning or evening sun, which washes the frame to white just when someone is arriving. If a view is glared out, it must be re-aimed or shaded before you accept it.
Night check (lights off). This usually means a second visit, or waiting until dark on the same day — do not skip it. Turn off the area lights and confirm the infrared (IR) comes on and lights the scene, that a person is still identifiable, and that there is no IR bloom (a white glow washing the centre out, often from IR bouncing off a wall or the camera's own housing). In the monsoon, watch for insects swarming the IR and blinding the camera — a real, recurring problem that a small change of position fixes. The video analytics guide is background on what good, usable night video looks like.
Crucially, play back last night's recording, do not just judge the live view. The stored footage is what you will actually rely on.
Check 4 — Recording and retention actually work
A live picture is not a recording. This check has caught more silent failures than any other.
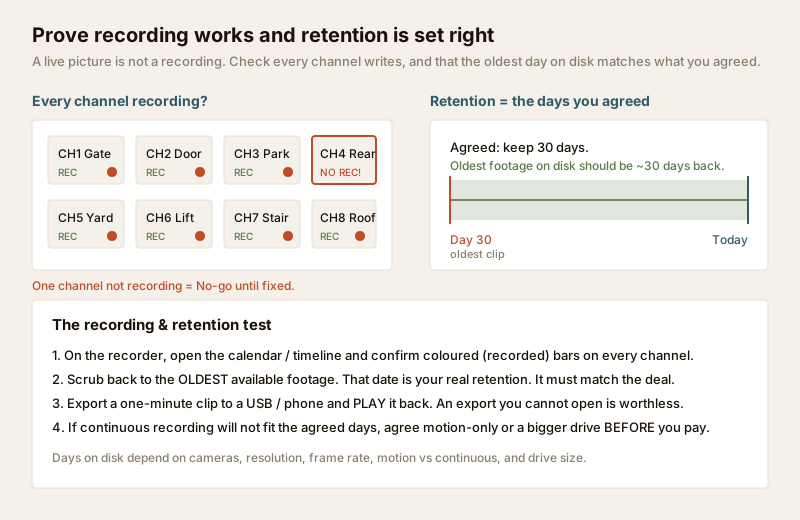
Do all four steps on the recorder itself:
1. Every channel is writing. Open the recorder's calendar or timeline view and confirm coloured (recorded) bars on every channel, not just the ones on screen. It is common to find one camera live but not recording.
2. Retention matches the deal. Scrub back to the oldest available footage. That date is your real retention — if you agreed 30 days, the oldest clip should be roughly 30 days back (or, on a new install, the disk should be sized and configured to reach it). If continuous recording will not fit the agreed days, settle motion-only recording or a bigger drive now, before you pay — see the storage and HDD sizing guide and size it with the storage bitrate calculator.
3. Export works. Export a one-minute clip to a USB stick or phone and play it back. An export you cannot open in a court, a police station or an insurance claim is worthless.
4. The recorder survives a power cut. Pull the recorder's mains (or simulate the daily cut) and confirm it stays up on its UPS long enough, and comes back recording on its own. The power supply and UPS guide covers why this matters in India.
The go/no-go acceptance checklist
Run this in order. Any single NO holds the final payment.
| # | Check | Pass criterion | Go / No-go |
|---|---|---|---|
| 1 | Aim | Each camera frames its intended target | ___ |
| 2 | Focus | Subject sharp at the key distance | ___ |
| 3 | Day picture | Faces and plates readable, no sun wash-out | ___ |
| 4 | Night picture | IR lights scene, subject identifiable, no bloom | ___ |
| 5 | Every channel records | Recorded bars on all channels | ___ |
| 6 | Retention | Oldest footage = agreed days | ___ |
| 7 | Export | One-minute clip exports and plays back | ___ |
| 8 | Power cut | Recorder rides the cut and resumes recording | ___ |
| 9 | Motion / alerts | Zones fire, phone receives alert | ___ |
| 10 | Remote view | App works away from home wifi | ___ |
| 11 | Passwords | Every default changed, 2FA on, installer access agreed | ___ |
| 12 | Labels | Every camera and channel named | ___ |
Check 5 — Motion detection and alerts
If you paid for motion alerts, prove they fire and reach you. Walk through each camera's detection zone and confirm the recorder registers motion. Then confirm the alert actually lands on your phone — many installs enable detection on the recorder but never finish the mobile push setup, so the alerts go nowhere.
Just as important, check for false alarms: a camera that alerts on every passing street dog, waving tree or headlight sweep will be muted within a week and then misses the real event. Tune the zones and sensitivity now. The motion detection guide explains how to set zones that fire on people and vehicles, not shadows.
Check 6 — Remote viewing and labelling
Remote viewing. Test the phone app the way you will really use it — on mobile data, away from your home wifi — because "it works on the app" while standing next to the recorder proves nothing about viewing it from the office or while travelling. Confirm live view and playback both work, and that at least one trusted family member is set up too. Do this with security in mind: the remote access security guide covers keeping that phone access safe.
Labelling. Every camera and every channel must be named — "Main Gate", "Rear Door", "Basement Parking" — on the recorder and in the app. An unlabelled grid of eight identical views is useless in an emergency when you are trying to tell the police which camera saw the car. Ask the installer to label them before sign-off and confirm the names match a simple site map.
Before you pay: passwords and access
Do not clear the final bill until the security handover is done — this is where commissioning meets handover and documentation:
- Change every default password on the recorder, the app account and each camera to a strong, unique one that only you hold.
- Enable 2FA on the app / cloud account.
- Agree the installer's access. By default the installer should not keep standing remote access to your footage. If you want them to support the system remotely, agree it explicitly, in writing, and be able to switch it off. Footage is personal data under the DPDP Act, 2023.
When to bring in a professional
When to bring in a professional. You run the walk-through and sign off — but the fixes belong to the installer and other licensed pros. Re-aiming a camera at height, correcting a cable termination, adding a UPS circuit or anything at the mains board is a qualified professional's task; see the electrical hub. If a system repeatedly fails acceptance and the installer cannot resolve it, an independent security consultant can run the commissioning for you before you release payment. For the wider picture of what a complete, resilient system looks like, see the building security systems guide.
A note for societies and RWAs
For a gated community, the same checklist applies but the stakes and the paperwork are higher. Have a committee member witness the acceptance alongside the security in-charge, run the checklist for every camera (perimeter, gates, lift lobbies, parking), and keep the signed record with the society's documents. Agree who holds the master password and how retention will be audited, before the vendor is paid. The control room and monitoring guide covers setting up who actually watches the feeds once the system is live.
Key takeaways
- CCTV commissioning is the acceptance walk-through you run before clearing the final bill — the one moment you hold all the leverage. Hold back a retention amount until it passes.
- Test on the recorder and its playback, not the live app preview, and check the picture in both day and night — IR failure and sun glare are the classic silent faults.
- Prove recording and retention: every channel writing, oldest footage matching the agreed days, and an export that actually plays back.
- Test motion alerts and remote viewing the way you will really use them — alerts landing on your phone, and the app working on mobile data away from home.
- Before you pay, change every default password, enable 2FA, agree installer access, and label every camera — then use the CCTV commissioning checklist to record a signed go/no-go.
References
- Digital Personal Data Protection Act, 2023 — treat recorded footage and remote access as personal data; restrict cameras to your own property and shared areas with a legitimate purpose.
- Manufacturer commissioning and user manuals for your specific recorder and cameras — follow the maker's procedure for recording schedules, retention configuration and firmware; verify default-password change on each device.
- National Building Code of India (SP 7), Bureau of Indian Standards, and local municipal bye-laws for any structural, electrical or life-safety aspect of an install; verify the current edition via the BIS catalogue: https://www.services.bis.gov.in/
This is an educational overview. Mounting at height, cabling and any electrical work are qualified professional tasks — engage licensed installers and verify any standard's current status via the BIS catalogue before relying on it. Not legal advice.
Export this guide
Related Guides — Deep-dive reading
CCTV Recording Failure in India (2026): Live View Works but Nothing Was Saved
You open the recorder to pull footage of an incident and there is nothing there, even though every camera shows a crisp live picture. A calm, ordered guide to why an Indian CCTV system records live but saves nothing, and how to fix it before the next incident.
SecurityCCTV Remote Access in India (2026): Watch From Your Phone, Safely
How to view your own cameras from anywhere without leaving the front door open to the internet — change the defaults, use strong credentials and 2FA, keep firmware current, prefer the vendor's secure cloud relay or a VPN, segment the camera network, and treat footage as personal data.
SecurityParking Security Lighting in India (2026): Lighting Basement, Stilt and Open Parking So Nothing Hides in the Dark
How to light apartment and commercial parking so vehicles, people and number plates are clearly seen, cameras can actually read the scene, and the space stops being a soft spot for theft and lurking, without ever compromising the emergency lighting on the escape route.
SecurityRelated Tools — Try Free
CCTV Commissioning & Handover Checklist
An interactive go/no-go checklist to run at handover — cameras day and night, recording, alerts, passwords and documents — before you clear the final bill.
Handover ChecklistCCTV Camera Coverage & Count Calculator
Estimate how many CCTV cameras you need, the NVR channels, storage in TB for your retention period, and an indicative all-in cost with GST.
CCTV CalculatorCCTV Recording-Duration Calculator
How many days of footage your storage holds, from cameras, bitrate, hours per day and recording mode.
Retention Days