
CCTV Recording Failure in India (2026): Live View Works but Nothing Was Saved
You open the recorder to pull footage of an incident and there is nothing there, even though every camera shows a crisp live picture. A calm, ordered guide to why an Indian CCTV system records live but saves nothing, and how to fix it before the next incident.
There is a particular sinking feeling that a CCTV system saves for the worst possible moment. Something happens at the gate, a delivery goes missing, a scooter is scratched, and you sit down at the recorder to pull the footage, calm in the knowledge that the cameras were watching. The live view is perfect. Every camera shows a sharp, current picture. And then you open playback and there is nothing. An empty timeline. "No recordings found." The system was watching the whole time and saving none of it.
Take a breath, because this is one of the most common CCTV faults there is, and it is almost never the cameras. Live view and recording are two completely separate jobs. A camera can send a flawless live picture to the screen while the part that is supposed to write that picture to disk is quietly broken. The good news is that the cause is usually in the storage or the settings, both of which you can check yourself, and the fix is often free. This guide walks the causes in the order you should actually check them, from the most common and easiest to the rarest and hardest.
Scope and safety. This is a diagnostic guide for a homeowner or a small facility person with an ordinary DVR or NVR CCTV system. Everything here is screen-and-settings work you can safely do: reading the recorder menus, checking the disk status page, enabling recording, and widening retention. The one physical job that is not DIY is opening the recorder to swap a hard disk or attempting data recovery from a failed drive; that is for a qualified CCTV technician or your annual maintenance contract. This is not a price or a buying guide, so where a disk must be replaced, the numbers belong in the cost library, not here. Recorded footage is personal data under the DPDP Act 2023, so treat any recovered footage carefully and share it only with the police or those who need it.
First, the one question that decides everything
Before you chase causes, answer a single question, because it splits the whole problem in two:
Is footage MISSING ENTIRELY, or was it only OVERWRITTEN sooner than you expected?
These feel the same at the empty timeline, but they are completely different faults with different fixes.
- Missing entirely means the system was not recording at all. There is no footage from yesterday, none from last week, none from any camera. The playback timeline is blank as far back as it goes. This points to a storage or settings failure, the disk is not being written to, or recording is switched off.
- Overwritten sooner than expected means the system WAS recording, but the oldest footage is being deleted to make room faster than you assumed. You have the last two days but not last Tuesday. The timeline is full but short. This is a retention problem, not a recording failure, and it is normal behaviour taken too far.
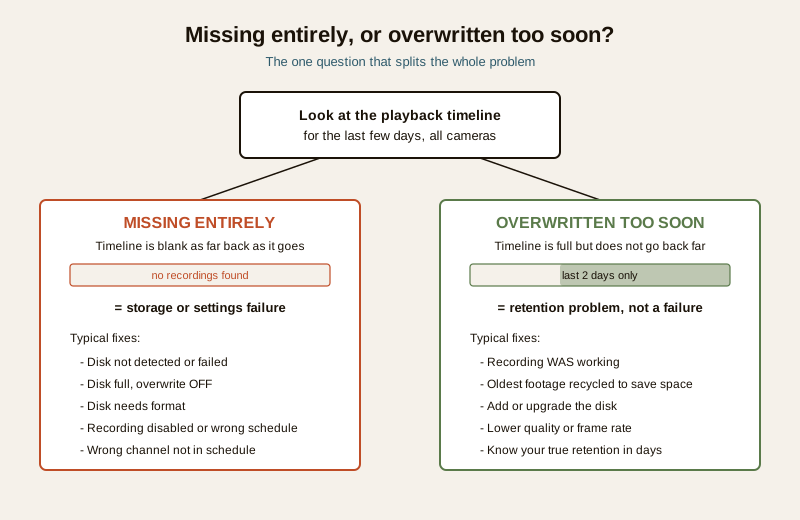
To tell which one you have, look at the playback timeline for ALL cameras across the last few days. If there is a solid band of recording that simply does not go back far enough, you have an overwrite and retention issue, skip ahead to the retention section. If the timeline is empty or badly broken, you have a genuine recording failure, and the rest of this guide is for you.
The likely causes, in the order to check them
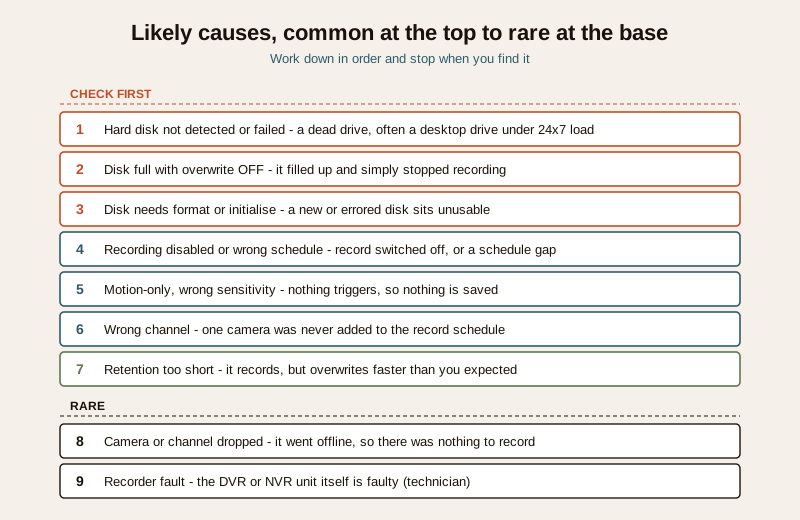
The causes of a recording failure line up in a reliable order. The hard disk is the culprit far more often than anything else, so it is first. Settings come next. The rarer faults come last. Work down this list and stop when you find the problem.
| Cause | Why it stops recording | The fix |
|---|---|---|
| Hard disk not detected | The recorder cannot see the disk, so it has nowhere to write | Check disk status; reseat or replace the disk (pro for the swap) |
| Hard disk failed | A dead or dying drive under 24x7 load, often an ordinary desktop drive | Replace with a surveillance-grade disk (pro) |
| Disk full, overwrite OFF | The disk filled up and, with overwrite disabled, recording simply stopped | Turn overwrite ON |
| Disk needs format or initialise | A new or errored disk sits unformatted, so nothing is written | Format or initialise the disk in the recorder menu |
| Recording disabled | The record schedule is switched off for a channel or all channels | Re-enable continuous or scheduled recording |
| Motion-only, wrong sensitivity | Set to record on motion, but sensitivity or zones are wrong so nothing triggers | Fix motion settings or switch to continuous |
| Schedule gap | The schedule only covers some hours, leaving a blind window | Extend the schedule to cover the full day |
| Wrong channel | One camera was never added to the record schedule | Add the channel to the schedule |
| Retention too short | Recording works, but footage is overwritten faster than expected | Add disk or lower quality to lengthen retention |
| Camera or channel dropped | The channel went offline, so there was nothing to record | Fix the camera link (a separate connection fault) |
| Recorder fault | The DVR or NVR unit itself is faulty | Technician diagnosis or replacement |
The diagnostic path, step by step
Follow this in order. Each step tells you where to go next.
Step 1 — Open the disk status screen
On almost every DVR or NVR there is a storage or HDD page in the main menu, usually under a heading like Storage, HDD Management, or Disk. This one screen answers most of the question.
- If it shows no disk at all, or "No HDD" / "not detected", the recorder cannot see a drive. There is nowhere to record. The disk has failed, come loose, or is disconnected. This is the single most common cause. The screen-side is done; the physical swap is a technician job. See the note below on disks.
- If it shows a disk but the status is "Uninitialized", "Unformatted", or an error/abnormal state, the disk is present but not usable. It needs to be formatted or initialised in that same menu. Formatting erases the disk, so understand that any footage on it will be lost, but if there is none to lose anyway, initialise it and recording should begin. If a disk repeatedly needs re-initialising, it is failing and needs replacement.
- If it shows a healthy disk with a normal or "OK" status, storage is probably fine, move to Step 2.
Step 2 — Check free space and the overwrite setting
Still in the storage area, look at two things: how full the disk is, and whether overwrite (sometimes called "recycle" or "cyclic recording") is ON.
- If the disk is full and overwrite is OFF, you have found it. A full disk with overwrite disabled simply stops recording once it fills, which can happen within days. Turn overwrite ON. The recorder will then continuously recycle the oldest footage to keep recording the newest, which is what you almost always want. This one setting is a very common cause of a system that "stopped recording weeks ago" without anyone noticing.
- If overwrite is ON and there is free space, storage is behaving. Move to Step 3. For the full detail on a filled disk, see the CCTV storage full guide.
Step 3 — Confirm recording is actually enabled
Go to the recording or record schedule menu. This is where a system that is physically fine records nothing because it was simply told not to.
- Is recording enabled at all for the channels you care about? It is surprisingly easy for a schedule to be left blank or switched off after a settings reset or an installer visit.
- Is it set to continuous, or to motion only? Motion-only recording is efficient, but if the sensitivity is too low, the detection zones are wrong, or the camera points at a still scene, it may almost never trigger, and you get an empty timeline that looks like a total failure. If you are unsure, set the important channels to continuous recording and see if footage appears.
- Does the schedule cover the whole day? A schedule that only records, say, 9pm to 6am leaves a daytime hole. Extend it to cover 24 hours if you want full coverage.
- Is every camera in the schedule? Check channel by channel. A camera added later is sometimes never included in the record schedule, so it shows live but never saves.
Step 4 — Verify by checking whether ANY recent footage exists
This is the confirmation step, and it is the one people skip. After you change a setting, do not assume it worked. Wait a few minutes, then open playback and confirm that the last few minutes of footage are actually there for each camera. If they are, recording is working now. If they are not, and the disk is healthy and the schedule is on, then the fault is deeper, a channel that keeps dropping, or a recorder fault, and it is time for a technician.
The retention problem: recording works, but not for long enough
If your timeline is full but too short, nothing is broken; the disk is just recycling old footage faster than you assumed. Retention, how many days of footage you keep, is decided by three things: the size of the disk, how many cameras you run, and the recording quality and frame rate. More cameras or higher quality means fewer days on the same disk.
To lengthen retention, you can add or upgrade the hard disk, lower the resolution or frame rate on less critical cameras, or switch some channels to motion-only recording so they consume less. Balancing these is exactly what the CCTV storage maintenance guide is for. The key point is to know your real retention. If you assumed thirty days and the reality is four, you will lose the footage of a slow-to-surface incident every time.
Safe DIY versus when to call a professional
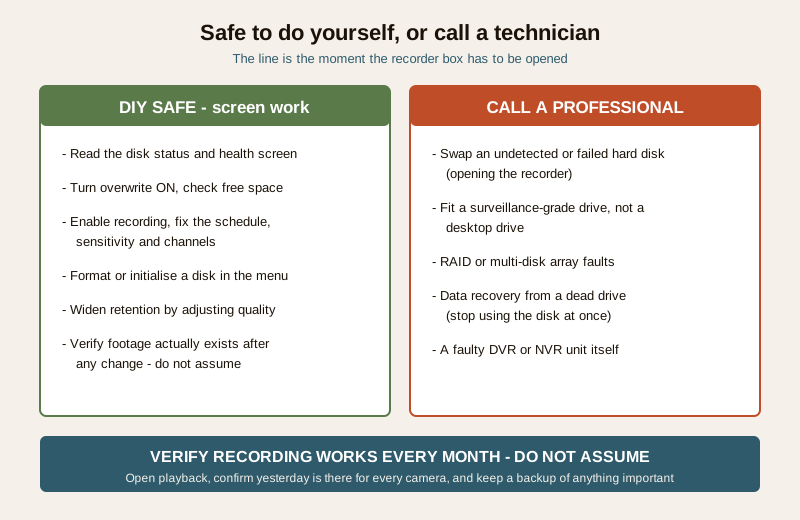
Everything below the DIY line is screen work you can do from the recorder menu with a mouse. The professional line begins the moment the recorder box has to be opened or a disk has to be recovered.
Safe to do yourself:
- Read the disk status and health screen.
- Turn overwrite ON and check free space.
- Enable recording and fix the schedule, sensitivity, and channels.
- Widen retention by adjusting quality or by planning a larger disk.
- Verify that footage actually exists after any change.
Call a qualified CCTV technician or your maintenance contract for:
- Swapping a hard disk that is not detected or has failed. This means opening the recorder, and choosing the right surveillance-grade drive.
- Any RAID or multi-disk recorder where a disk has dropped out of the array.
- Data recovery from a failed drive. If footage of a real incident is on a dead disk, stop using that disk immediately and consult a professional; continued use reduces the chance of recovery.
- A recorder that shows a healthy disk and correct settings but still records nothing, which points to a fault in the unit itself.
On hard disks, one plain warning. A great many "recording failure" calls in India come down to an ordinary desktop computer hard drive that was fitted to save money and then died under the relentless 24x7 write load a CCTV recorder puts on it. Surveillance is not the same duty as a home PC. When a disk is replaced, it should be a surveillance-rated drive built for continuous writing. That is a technician conversation, but it is the single biggest thing that stops this fault from coming back.
Prevention: never be surprised again
The whole tragedy of a recording failure is that you learn about it at the worst moment, weeks after it started. The cure is one habit.
- Verify recording every month. Do not assume. Once a month, open playback and confirm that yesterday's footage is actually there for every camera. This thirty-second check is the single most valuable thing in this guide, because a system that "looks fine" on live view can have been saving nothing for weeks.
- Turn overwrite ON and leave it on, so a full disk never silently stops recording.
- Know your true retention in days, and make sure it comfortably exceeds how long an incident might take to come to light.
- Use surveillance-grade drives, not desktop drives, so the disk survives continuous writing.
- Keep a backup of anything important. The moment you have footage of a real incident, export it off the recorder so it cannot be overwritten or lost with the disk. The security system backup guide covers doing this properly.
The two-minute recording health check
- Open playback, pick each camera, and confirm the last day of footage is there.
- Open the disk status screen and confirm the disk shows a normal, healthy status.
- Confirm overwrite is ON and the disk is not sitting full with recording stopped.
- Confirm the record schedule is enabled and covers the whole day for every channel.
- Export one recent clip to confirm you can actually get footage OUT of the system.
A recording failure is frightening precisely because you find it too late, but it is one of the most fixable faults in a CCTV system, and usually a free one. Work down the causes in order, disk first, then settings, then retention, and verify at the end that footage is genuinely being saved.
If a camera itself is the reason there was nothing to record, that is a separate connection fault; see NVR not detecting a camera. For the wider set of surveillance faults, the CCTV hub and the security system troubleshooting pillar collect the related guides.
Export this guide
Related Guides — Deep-dive reading
CCTV Storage Full in India (2026): Why It Filled Up and Stopped Recording
A disk-full warning on your recorder, or footage that just stopped one day, almost always means one thing: the loop or overwrite setting is off, so the disk filled and halted instead of recycling old footage. A calm, ordered guide to why an Indian CCTV disk fills and stops, and how to fix it.
SecurityCCTV Storage Maintenance in India (2026): Keeping the Footage There When You Need It
Surveillance storage is a wear item that fails silently. This professional guide covers checking disk health, verifying recordings actually exist for the full retention window, planning drive replacement before failure, keeping a spare, and holding an off-site backup so a dead or stolen recorder is not total loss.
SecurityCCTV Camera Not Working (2026): A Calm, Step-by-Step Fix for Indian Homes
A black screen, no feed or a dead camera almost always traces back to power or a loose connection long before the camera itself has failed. This guide walks a homeowner through diagnosing the cause in order, the safe fixes you can do yourself, and exactly when to call a technician.
SecurityRelated Tools — Try Free
CCTV Camera Coverage & Count Calculator
Estimate how many CCTV cameras you need, the NVR channels, storage in TB for your retention period, and an indicative all-in cost with GST.
CCTV CalculatorNVR Channel Calculator
What size recorder a system needs with room to grow, plus a check on its incoming bandwidth.
NVR ChannelsCCTV Camera Overlap Calculator
The overlap or blind gap between two adjacent cameras, from coverage width and spacing, plus the spacing for a target overlap.
Overlap