
Blind Spot Identification for Home Security in India
A defender's method to find and close the blind spots around an Indian home — the corners no camera, light or neighbour can see. Walk it by day and after dark, map each coverage gap, and fix it by re-aiming cameras, adding light, trimming planting and opening sightlines.
Every home has places you cannot see. A blind spot is any patch of ground around your property where someone could stand, hide or work unseen — out of view of your cameras, beyond your lighting, and screened from the street and your neighbours. Intruders do not pick the front door under a bright lamp; they gravitate to the dark side return, the recessed porch, the gap behind the parked car. This guide teaches you to find those spots the way a professional does, and to close them one by one.
It sits within Section B of the Home Security Hub, the planning you do before you spend on hardware. It goes one level deeper than the master security risk assessment guide on a single question: where, precisely, is your property invisible — and what does it cost to make it visible again? When you have your gaps mapped, feed them back into the Home Security Risk Scorecard so they land in your ranked action plan.
Scope and safety. This is a defensive planning guide. It teaches you to find and fix gaps in visibility around your own home — never how to exploit or defeat any measure. Mains-powered lighting, electric locks and any structural change are qualified work: specify what you want, then have a licensed professional install and certify it. Nothing you add may ever block a fire-escape or egress route.
What actually creates a blind spot
Blind spots are not random. They come from a short list of repeatable causes, and once you can name the cause you can picture the fix. Most homes have several of these at once.
- Camera field-of-view gaps. No camera sees everything. Between two cameras aimed outward there is almost always a wedge neither covers. A lens has a fixed horizontal angle — a typical bullet camera sees roughly 70 to 90 degrees — so the ground fans out into a cone, and the space between cones is dark to the system even though the cameras look "everywhere".
- Mounting and aiming errors. A camera mounted too low is easily blocked or tampered with; too high and it watches the tops of heads and rooftops, not the approach. The single most common mistake is the area directly beneath a camera — a downward-pointing lens has a dead zone right at the wall it hangs on, exactly where someone can press flat and stay unseen.
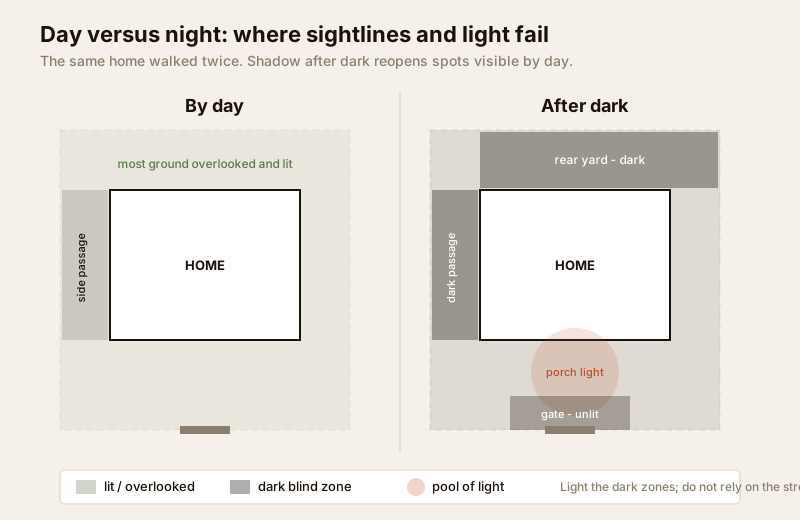
- Dark, unlit corners. A camera is only as good as the light reaching it. A side passage with no lamp is a blind spot after dusk regardless of how many cameras point at it, unless they have real infra-red or the corner has its own light.
- Screening. Anything solid enough to hide a person behind it: a boundary wall return, dense planting and overgrown shrubs, a parked car or scooter, a garden shed, water tanks, an AC condenser bank, stacked construction material. Screening is the cause you can most often fix for free.
- Recessed doorways and returns. A porch set back into the facade, a service door in an alcove, the narrow side return between the house and the compound wall — geometry hides these from the street and from most camera angles.
- The rear and sides. The front is watched because it faces the world; the back service yard and the two side passages are where oversight quietly fails. They are the classic Indian-home blind spot.
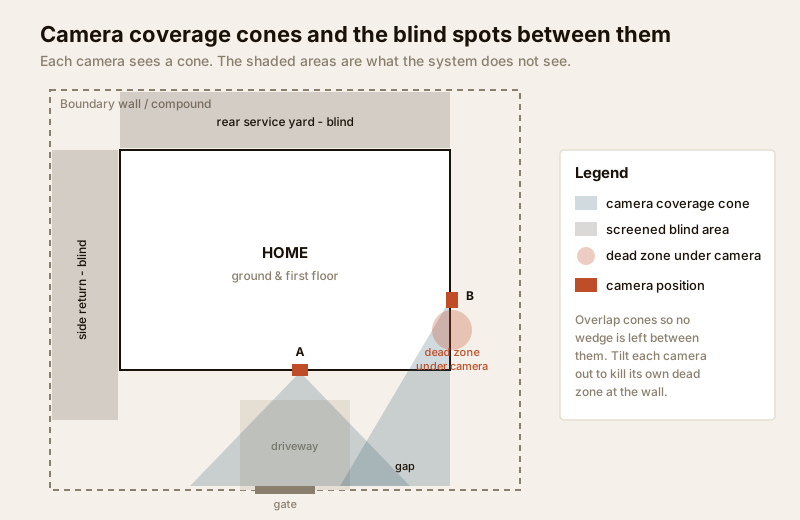
The plan above is the mental model to carry as you walk. Each camera throws a cone of vision; the shaded areas are what the system does not see — the wedge between the front and side cameras, the dead zone directly under the wall-mounted unit, and the whole rear yard that no camera reaches. Your job is to find your own version of these shaded areas.
The method: a defensive day-and-night walk
You find blind spots on foot, twice — once in daylight and once after dark — because different gaps show at different times. In daylight you see screening, geometry and camera aim; at night you see where light and, with it, camera coverage actually fail. Walk it defensively: you are looking for weaknesses in your own home to fix them, never rehearsing anything else. Carry your phone to photograph each gap and a torch for the night lap.
Step 1 — Walk the boundary, opening by opening
Start at the street and circle the whole plot slowly, staying just inside the compound wall. At every few steps, stop and ask one question: if I stand here, who can see me? If the honest answer is "no camera, no neighbour, not the street", you are standing in a blind spot — mark it. Pay special attention to the side returns, the rear yard, behind any parked vehicle, and every recessed doorway.
Step 2 — Check each camera's real coverage
Do not trust the sticker on the box. For every camera, look at the live view on your phone or monitor and physically walk a person (a family member) through the scene while you watch. Note exactly where they appear and disappear. You will usually find the frame is narrower than you assumed, the area right under the camera is invisible, and the useful range at night is far shorter than by day. The CCTV camera coverage calculator turns a lens angle and mounting height into the actual footprint on the ground, so you can predict gaps before you climb a ladder.
Step 3 — Map where light fails
Repeat the boundary walk after dark. Note every stretch where you move from light into shadow: unlit passages, the far end of the garden, the gate approach when the street lamp is out, the porch when the bulb has failed. A person can work unseen anywhere the light does not reach — and most cameras go nearly blind there too. The day-versus-night map below is the second figure; build your own version of it.
Step 4 — Note where natural surveillance fails
Natural surveillance is the free oversight you get from neighbours, passers-by and your own windows. A spot overlooked by a neighbour's kitchen window or a busy street is self-policing; a spot screened from all of them relies entirely on your hardware. As you walk, note which gaps are also invisible to people — those are the ones that most need a camera or light, because nothing else is watching them.
The blind-spot audit checklist
Work through this table on your walk. For each location, name the cause, judge the risk, and write the fix. Anything you cannot immediately close becomes a line in your action plan. This is the assessment output you will carry forward.
| Location | Likely cause of the blind spot | Why it matters | Fix to plan |
|---|---|---|---|
| Side return / passage | Narrow geometry, no camera, no light | Screened from street, leads to windows and rear | Add a motion-sensor light; aim or add a camera down the passage |
| Directly under wall camera | Downward lens dead zone | A person can press to the wall unseen | Re-aim, tilt out, or add a second wide camera facing back |
| Rear service yard | No camera reaches it; dark | The classic unwatched break-in path | Dedicated camera plus lighting; clear stored clutter |
| Recessed porch / alcove door | Set-back geometry hides it | Someone can work the lock out of view | Light the recess; angle a camera into it |
| Behind parked car / scooter | Vehicle screens a standing person | Hidden approach beside the house | Move parking, or light and cover the gap it creates |
| Overgrown planting / shrubs | Foliage blocks sightlines and lenses | Grows into a permanent hide | Trim to below sightline; keep it maintained |
| Garden shed / water tank / clutter | Solid screening | Fixed hiding place | Relight around it or relocate; do not stack against the wall |
| Gate approach at night | Street lamp out; no own light | Entry point unseen after dark | Own gate light on sensor; do not rely on the street |
| Far garden corners | Beyond camera range and light | Staging area out of view | Accept, light, or fence off; prune the sightline |
| First-floor balcony reachable via a dark side | Height assumed safe; passage unlit | Climb route worked unseen | Light the climb route; remove the aid; cover it |
Grading severity: not every gap is equal
You cannot close every blind spot at once, so grade them. A gap matters more when it is (a) hidden from people and cameras and light, (b) next to a real entry point, and (c) offers a hiding place rather than just a passing shadow. Use this severity table to sort your findings, then fix the reds before the greens.
| Severity | What the gap looks like | Typical example | Priority |
|---|---|---|---|
| Critical (red) | Fully screened from people, camera and light, right beside a door or window | Dark side return leading to the rear service door | Fix this week — often a light plus a re-aimed camera |
| High (amber) | Hidden from cameras and dark, but partly overlooked by a neighbour | Rear yard corner a neighbour can half-see | Plan within the quarter |
| Moderate (yellow) | A gap in coverage but well lit or on a busy overlooked side | Wedge between two front cameras over the open driveway | Re-aim on next maintenance |
| Low (green) | Brief shadow, no hiding place, well overlooked | A pool of shade under a tree on the open front lawn | Note and monitor |
How to close a blind spot
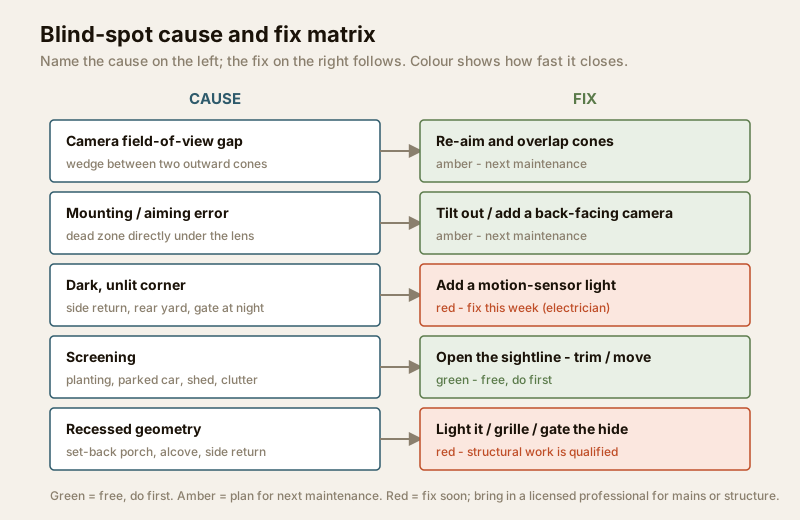
Every fix is one of five moves — and the cheapest ones usually cut the most risk. Work down this list before you buy anything.
- Open the sightline (often free). Trim the shrub, move the parked scooter, relocate the shed, clear the stacked material, cut the hedge below eye level. Removing the screening removes the blind spot entirely, and costs nothing but an afternoon. This is always the first move.
- Add light. A motion-sensor LED flood on the dark side return or rear yard turns a hiding place into an exposed one and doubles as deterrence. Choose warm, glare-free fittings aimed down, not out into neighbours' windows. Because this is mains work, specify it and have an electrician wire it — see the electrical guide for how lighting circuits and outdoor points are planned.
- Re-aim or add a camera. Tilt the wall camera out to kill its own dead zone; add a wide-angle unit facing back along the wall; put a dedicated camera on the rear yard. Use the CCTV camera coverage calculator to check the new footprint overlaps the old so the wedge between them closes. Overlap cones by a few degrees — never butt them edge to edge, or the gap simply moves.
- Improve natural surveillance. Trim planting that blocks a neighbour's view of your side passage; keep a frosted-but-open sightline from your own stair window to the rear yard; support the RWA in keeping shared lighting and guard patrols covering the lane behind the row. The more eyes on a spot, the less hardware it needs.
- Change the geometry. Where a recess or return cannot be watched, a low grille, a gate across the side passage, or moving parking away from the wall removes the hide itself. Structural changes are qualified work — specify, then have them built and certified.
Blind-spot fixes rarely need big money. As rough Indian ranges: a good outdoor motion-sensor LED flood, roughly ₹800 to ₹3,000 plus wiring; an added wide-angle camera on your existing recorder, about ₹2,000 to ₹6,000; trimming and clearing, free. Spend from your red-graded gaps down, not from the shiniest product up. Model the full layout cost with the security system cost estimator once your gaps are mapped.
How blind spots fit the wider assessment
Blind-spot mapping is one layer of a fuller site read. It overlaps with, but does not replace, its siblings. Map your coverage gaps here, then check the boundary itself with the perimeter vulnerability assessment, study how someone approaches the plot in the site security assessment, and pressure-test the doors and gates themselves in the entry and exit security assessment. Together these turn a vague unease into a precise, ranked plan. For the layered thinking that ties detection, delay and lighting together, see the layered security design guide.
When to bring in a professional
Do the walk and the mapping yourself — you know your home, and no one will spend the patient hour in the dark side passage that you will. But hand over the installation wherever life-safety or structure is involved: outdoor lighting on mains circuits, any powered camera cabling, electric locks, and structural changes such as a side-passage grille or gate. A larger property, a housing society, or a commercial building should consider a one-off professional survey with a light meter and a proper camera layout — see the security design guide for architects. Specify what you want and why, then let a licensed installer size, fit and certify it.
Re-check after every change
A blind spot you closed can quietly reopen: a shrub grows back, a camera droops or is knocked out of aim, a bulb fails, the neighbour builds a wall that removes their overlooking window, you park the new car in a new spot. Re-walk the boundary — day and night — at least twice a year, and always after any planting, parking, construction or camera change nearby. The risk scorecard makes re-scoring quick so you can confirm last season's fixes still hold.
Key takeaways
- A blind spot is anywhere you cannot be seen — by a camera, a light, or a neighbour. Name the cause (coverage gap, mounting error, dark corner, screening, recessed geometry) and the fix follows.
- Find them on foot, twice — once in daylight for geometry and aim, once after dark for where light and camera coverage fail — walking defensively.
- Check each camera's real coverage, remember the dead zone directly beneath it, and overlap cones so no wedge is left between them.
- Grade before you fix — close the fully screened, entry-adjacent red gaps first; the cheapest move (opening the sightline) usually cuts the most risk.
- Route mains lighting, cabling and structural changes to licensed professionals, and re-walk at least twice a year.
Map your gaps, then feed them into the Home Security Risk Scorecard and browse the full security guides collection to plan each fix in depth.
This is an educational planning guide. It is strictly defensive and does not describe how to defeat any security measure. Lighting, electrical, camera-cabling, electronic-lock and structural work is qualified professional work — engage licensed installers and verify any applicable National Building Code or municipal bye-law requirement for your project.
Export this guide
Related Guides — Deep-dive reading
Home Lighting and Visibility Security Assessment for Indian Homes
How to assess your home's security lighting after dark — checking every entry, path and boundary for coverage, uniformity and glare, testing what each camera can actually see at night, and turning the findings into a simple lighting plan.
SecurityParking Security Audit in India: A Walk-the-Park Method
Most parking areas were never audited honestly. This is the capstone method that ties the whole parking-security library together: walk the park by day and after dark, grade every layer Good / Weak / Absent, gate it on life-safety, and turn the gaps into a prioritised action plan before a thief or an incident finds them first.
SecurityEntry and Exit Assessment for Indian Homes
How to audit every way IN and OUT of your home or building — a complete inventory of doors, gates, windows, balconies and forgotten access points, rated for how easily each could be used to get in and how well it serves escape in an emergency, turned into a hardening priority list.
SecurityRelated Tools — Try Free
CCTV Mounting Height & Angle Calculator
Height, target distance and lens angle to the downward tilt, the blind dead-zone below and where coverage begins and ends.
Height & AngleCCTV Blind-Spot Checker
The dead zone under a wall- or pole-mounted camera, from mounting height, downward tilt and vertical field of view.
Blind SpotCCTV Camera Coverage & Count Calculator
Estimate how many CCTV cameras you need, the NVR channels, storage in TB for your retention period, and an indicative all-in cost with GST.
CCTV Calculator