
Roof Planning Guide for New Homes
The decisions to lock in before the slab is cast — loads and future floors, slope and drain outlets, service penetrations, waterproofing and insulation strategy, solar and rainwater readiness, parapet and terrace access. Plan before you pour, because after the pour everything gets expensive. India-grounded.
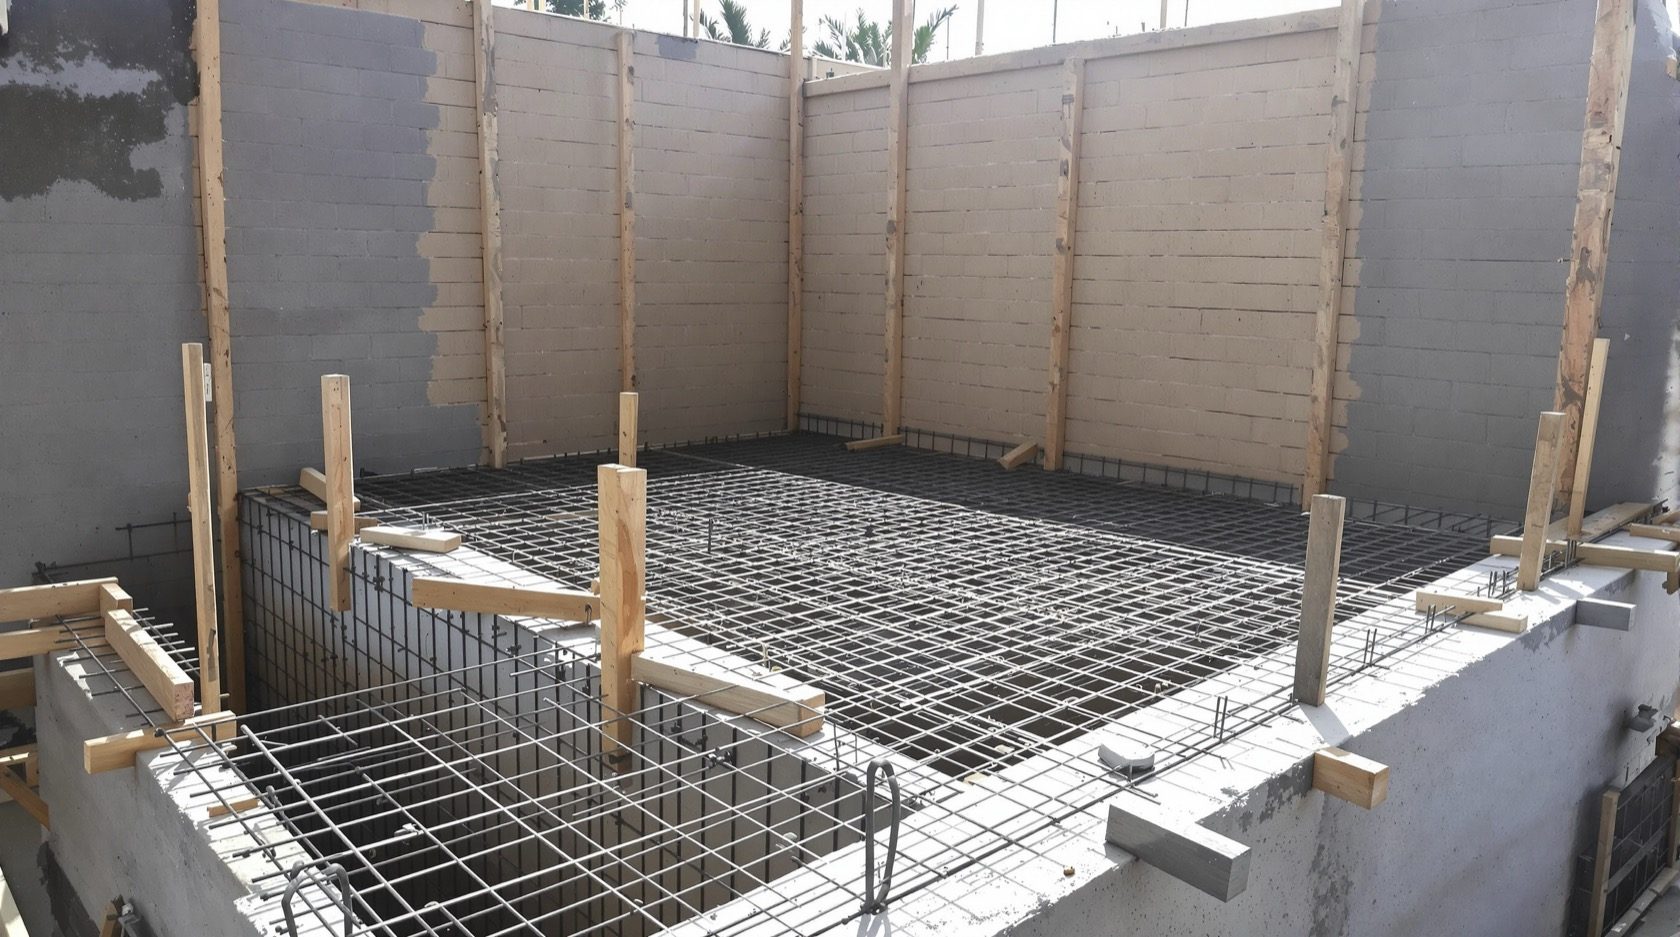
There is a short, decisive window in every house build when the roof is still an idea on paper and a cage of steel in the sun — and in that window almost every roof mistake is either designed out for free or cast permanently into concrete. Once the pour happens, a forgotten drain outlet becomes a core-cut through a live slab, a missed sleeve becomes a chased leak, and a tank you did not plan for lands on a slab that was never told to carry it. The cheapest, most powerful roofing work you will ever do costs nothing but a few careful conversations before the concrete truck arrives.
This is the planning guide within the Roofing Knowledge Hub, and the practical companion to the Ultimate Guide to Roofing Systems. It walks the decisions to make before the slab is cast — loads and future needs, slope and drainage, penetrations, waterproofing and insulation strategy, solar- and rainwater-readiness, parapet and terrace access — and how to line them all up with your structural engineer. The single idea underneath every section is the same: plan before you pour.
Scope & safety. This guide helps you understand, plan, choose and judge the decisions around a roof. Structural design, load calculation, waterproofing application and any work at height are qualified professional work for a structural engineer and a licensed roofing contractor — nothing here is a substitute for a site-specific design or an on-site professional. In India, always work to your sanctioned drawings and local building rules.
Why the pour is the point of no return
A roof slab is not a blank surface you finish later — it is a structural element that quietly encodes dozens of decisions the moment it sets. Steel is placed for the loads it was told to expect. Its top is sloped (or flat, if nobody said otherwise). Every pipe that must pass through it needs a sleeve set in the shuttering before the pour; every outlet needs its mouth formed in the concrete. Miss these and the fix is not an edit but a demolition-and-repair: core-cutting a hardened slab, breaking finishes, and creating exactly the weak points where water later finds its way in.

The economics are lopsided in a way worth internalising. Before the pour, a change is a pencil line. During shuttering, it is the price of a plastic sleeve and five minutes of a bar-bender's time. After the pour, the same change is a diamond-blade core-cut, patched concrete, re-done waterproofing and — often — a leak that argues with you for a decade. This is why the roof deserves a dedicated planning session, not an afterthought squeezed between tiles and paint.
Loads and future needs — what will this roof ever carry?
The first conversation with your structural engineer is about everything the roof will ever hold, not just what it holds on day one. Concrete and steel are sized to loads; adding load later is far harder than designing for it now. Walk through each of these honestly.
- Future floors (vertical extension). The commonest Indian scenario: a ground floor now, another floor or two later. If there is any chance of building up, tell the engineer now. Columns, footings and the slab itself can be designed for the future floors, and starter bars can be left projecting so the next slab ties in cleanly. Retrofitting a house to carry an extra floor it was never designed for is a major, sometimes impossible, exercise.
- Water tanks. Overhead tanks are heavy — a full 1,000-litre tank is a tonne of concentrated load, and homes often carry two or three. They need a planned base: a location over or near a beam or column line, a raised RCC platform or masonry pedestals, and the point load declared to the engineer. Do not let the plumber decide the tank position after the slab is cast.
- Solar array. Rooftop panels add distributed weight and, more importantly, wind uplift the structure must resist. A solar-ready roof plans the array zone up front (see the solar section below).
- AC condensers and outdoor units. Split-AC outdoor units, and any VRF or HVAC plant, sit on the roof or hang off parapets. Each needs a firm, level, drained base and a sensible service route — planned, not improvised onto a finished waterproofed surface.
- People, planting and equipment. A roof used as a terrace carries people, furniture, plant pots and soil; a green roof carries saturated soil weight. These are real imposed loads the engineer sizes to, per the loading code.
The rule of thumb is simple: list every heavy thing the roof will ever carry, and where, before the steel is tied. The Ultimate Guide to Roofing Systems covers how these extras turn a roof into a working plant deck.
Setting the slope and locating the drain outlets
A flat roof is never truly flat — it carries a deliberate fall so that water runs to the outlets instead of sitting in ponds. Ponding is the number-one killer of Indian flat roofs: standing water finds every pinhole in the waterproofing and works it into a leak. The fall is planned before the pour, either built into the slab top or formed in a slope screed over it.
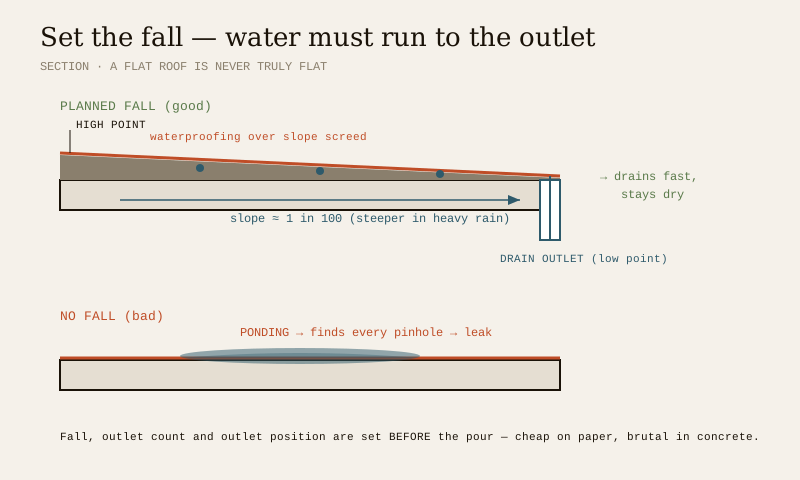
A workable planning checklist for slope and drainage:
- Set a minimum fall. A common practical target for a finished flat roof is a slope of about 1 in 100 (roughly 1 cm per metre) toward the outlets, and steeper — say 1 in 60 — is safer where rainfall is intense. Confirm the value with your engineer and local practice; the point is that there is a positive, continuous fall to every outlet with no flat dead-spots.
- Locate outlets at the low points. Rain-water outlets (RWOs) belong where the fall delivers the water — typically at parapet corners or edges — and there must be enough of them, sized for peak monsoon intensity, so a cloudburst drains fast. A single outlet on a large roof is a flood waiting to happen.
- Form the outlets in the pour. Each outlet's mouth, and the down-take pipe's sleeve through the slab or parapet, is set before casting. Adding an outlet to a finished slab means core-cutting and re-waterproofing exactly at the most vulnerable point.
- Provide overflow / scuppers. Plan a secondary path — a scupper or overflow weep through the parapet — so a blocked outlet in a storm overflows outward instead of flooding the terrace and finding the doors.
Slope, outlet count and outlet position are cheap on paper and brutal to change in concrete. This is the heart of a future roof drainage guide; plan it before you pour.
Planning service penetrations so they never become leaks
Every hole through a roof is a potential leak, and a new house needs a surprising number of them: plumbing vent pipes, the rising main, electrical conduits for the terrace and for future solar, exhaust ducts from kitchens and bathrooms, and cable routes for TV, internet and the water-tank float switch. The professional principle is blunt — decide every penetration before the pour, and cast a proper sleeve for each one.
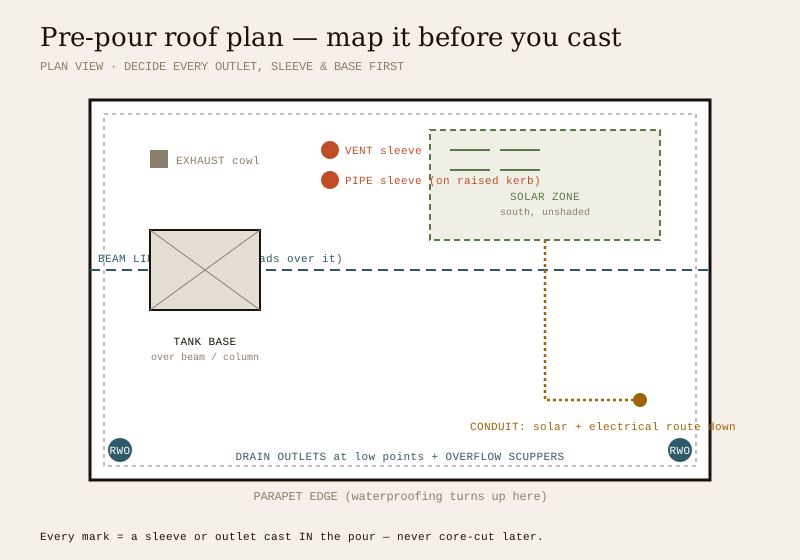
Good penetration planning follows a few rules:
- Sleeve, do not core-cut. A pipe sleeve (a short pipe section cast into the slab) gives a clean, sealable passage. Core-cutting a hardened slab later cuts reinforcement and leaves a rough hole that is far harder to waterproof.
- Group and route deliberately. Cluster penetrations sensibly, keep them clear of beams and heavily-stressed zones (ask the engineer), and keep them away from the low points where water collects.
- Raise them above the water line. Every penetration should emerge from a raised kerb, nib or puddle-flange collar so its base sits above the finished water level, and the waterproofing turns up and seals to it. A pipe flush with the roof surface is a leak by design.
- Plan the vents. Plumbing stacks need vent pipes through the roof; kitchen and bath exhausts need weatherproof cowls. Decide their positions now so they land where they can be flashed cleanly, not squeezed in later.
Get the penetrations right and the roof stays dry for decades; get them wrong and you buy a lifetime of chasing stains. The detailing of collars and flashings belongs in a roof waterproofing guide, but the positions are a pre-pour decision.
Waterproofing and insulation strategy — decide the assembly up front
A roof is an assembly of layers, and the two that fight India's twin enemies — water and heat — are the waterproofing and the insulation. You do not apply these until later, but you must decide the strategy now, because the strategy sets the levels: how much height the finished build-up needs, how high the parapet upstand and door thresholds must sit, and where the fall must arrive.
| Layer decision | Plan before the pour because… | Typical India choice |
|---|---|---|
| Waterproofing system | It sets the upstand height at parapets and penetrations, and the fall it needs | Integral (admixture) + membrane / liquid-applied coating, turned up 150–300 mm at edges |
| Slope screed | It adds thickness above the slab; door and drain levels depend on it | Cement screed laid to the planned fall |
| Insulation position | Over-deck vs under-deck changes the build-up and the level of the finish | Over-deck board / brick-bat coba, or under-deck / false ceiling |
| Wearing / finish | The walkable, reflective top protects the waterproofing and sets the final level | China-mosaic, tiles, or a reflective cool-roof coat |
Two decisions matter most at planning stage. First, whether insulation goes over-deck (above the slab, keeping the concrete itself cool — excellent for a hot terrace) or under-deck (a ceiling-side layer) changes the total build-up and therefore your parapet and threshold heights. Second, a cool-roof finish — a light, high-reflectance surface — is far cheaper to plan than to retrofit, and in most Indian climates it is one of the best rupees you will spend against a baking top floor. Match the whole strategy to your weather with the roof selection guide for Indian climates.
Solar-readiness and rainwater-harvesting readiness
Two systems increasingly define a modern Indian roof, and both are dramatically cheaper if the roof is ready for them even when they are installed later.
- Solar-ready. Reserve a clear, south-facing, unshaded zone on the roof for a future array; keep tanks, vents and parapets from shading it. Cast in the conduit and cable route from the roof down to where the inverter and meter will sit, plan the structural anchorage (the engineer accounts for panel weight and wind uplift), and keep the zone free of penetrations. A solar-ready roof turns a future installation into a plug-in job instead of a re-drilling exercise.
- Rainwater-harvesting-ready. Rooftop rainwater harvesting is mandatory in many Indian cities and a genuine asset everywhere. Plan it into the drainage: dedicate clean roof catchment, route selected down-takes to a first-flush diverter and then to a recharge pit or storage tank, and decide these paths while you are already deciding the outlets. Harvesting shares the same outlets and down-pipes you are planning anyway — so plan them together.
Neither system needs to be installed before you occupy, but both should be designed in before you pour. Doing so is the difference between a clean future upgrade and a messy retrofit.
Parapet, terrace access and the finishing decisions
The edge of the roof and the way you reach it are planning decisions too, and they interact with everything above.
- Parapet. A parapet is both a safety guard and a waterproofing upstand. Plan its height for safety (a guarding height in the region of 1 m is common practice — confirm to your local rule) and remember that the waterproofing must turn up the parapet and be tucked into a groove, so the parapet detail and the waterproofing strategy are one decision. Provide the weep/overflow scuppers here too.
- Terrace access. If the roof will be used, plan safe, weatherproof access now — a staircase headroom and a door with a raised threshold (so water never runs back inside), or at least a well-planned hatch. Retrofitting good access to a finished terrace is awkward and often ugly.
- Level coordination. Every finish above the slab — screed, waterproofing, insulation, wearing course — adds height. Plan so that finished terrace level sits below finished internal floor level at every door, with a threshold step, so the terrace can never pond water back into the house.
These edge-and-access details are where terrace comfort and long-term dryness are won or lost. The residential roof design guide works them through for a whole home.
Coordinating with the structural engineer — the one meeting that pays for itself
Nearly everything above lands on one desk: the structural engineer's. The roof is where architecture, plumbing, electrical, solar and structure all meet, and the pre-pour coordination meeting is where they are reconciled before concrete makes them permanent. Bring to that meeting a single marked-up roof plan showing:
- every future load (extra floors, tank positions and weights, solar zone, AC and plant locations);
- the intended fall and every drain outlet and overflow;
- every penetration and sleeve (plumbing, vents, exhausts, electrical, solar conduit);
- the waterproofing and insulation strategy and the build-up height it implies;
- the parapet height and terrace access.
The engineer confirms the slab and beams can carry it all, positions penetrations clear of critical zones, sets the reinforcement and any starter bars for future floors, and signs off the fall. This single coordinated plan, agreed before the shuttering is closed and the steel is tied, is the deliverable that makes a roof right the first time. It costs one meeting; it saves a decade of leaks.
The one-line answer
A new-home roof is made right — or made wrong — before the slab is cast, so plan it before you pour. In one coordinated pre-pour session with your structural engineer, declare every load the roof will ever carry (future floors with starter bars, water-tank bases over beam lines, a solar array, AC and plant); set a positive, continuous fall (about 1 in 100, steeper in heavy rain) to enough correctly-placed drain outlets with overflow scuppers, all formed in the pour; sleeve every penetration — plumbing vents, pipes, electrical and solar conduit, exhausts — on raised kerbs so none becomes a leak; decide the waterproofing and insulation strategy up front so the build-up, upstands and threshold levels are right; make the roof solar-ready and rainwater-ready by reserving an unshaded south zone and routing conduit and down-takes now; and plan the parapet height, weep scuppers and safe terrace access with the finished terrace below internal floor level. Do all this on paper and steel while it is free to change, hand the structure and waterproofing to professionals, and you get a roof you never have to think about again.
Where to go next
- The whole subject, mapped: Ultimate Guide to Roofing Systems.
- Design one for a home: Complete Guide to Residential Roof Design.
- Match it to your weather: Roof Selection Guide for Indian Climates.
- Fix or replace an old one: Roof Renovation & Replacement Guide.
- The Roofing Knowledge Hub: all roofing guides.
References
- National Building Code of India (SP 7), Bureau of Indian Standards — Part 6 (Structural Design), Part 3 (Development Control & General Building Requirements) and Part 9 (Plumbing Services, including roof drainage & rainwater); verify the current edition via the BIS catalogue.
- IS 875 (Part 2 & Part 3): Design Loads (imposed loads & wind loads) for Buildings and Structures — Bureau of Indian Standards.
- IS 456: Plain and Reinforced Concrete — Code of Practice (RCC slabs and roofs), Bureau of Indian Standards.
- IS 2645: Integral Waterproofing Compounds for Cement Mortar and Concrete — Bureau of Indian Standards.
- IS 3067: Code of Practice for General Design Details and Preparatory Work for Damp-Proofing and Waterproofing of Buildings — verify current status via the BIS catalogue: https://www.services.bis.gov.in/
This is an educational planning overview. Structural design, load calculation, waterproofing application and any work at height are qualified professional work — engage a structural engineer and a licensed roofing contractor for your project, and verify any standard's current status via the BIS catalogue before relying on it.
Export this guide
Related Guides — Deep-dive reading
Bathroom Planning for New Homes in India: Get It Right Before You Build
The bathroom decisions you cannot undo once the slab is cast — location and stacking, sunken vs non-sunken slabs, waterproofing, and the plumbing, electrical and ventilation you must coordinate with the civil work, stage by stage.
BathroomsRoof Access & Walkways
Someone will need to get onto your roof several times a year — to clear a drain, service the tank, wash the solar panels, check the waterproofing. Access designed into the house is far safer and cheaper than a ladder propped against a wall. This guide covers the ways up (mumty stairs, fixed ladders, hatches, loft ladders), the ways around (walkways and duckboards over fragile or waterproofed surfaces), and the guardrails and anchor points that make maintenance safe.
RoofingRoofing Project Management: Sequencing, Weather & Trade Coordination (India)
How to run a roofing package on site so it finishes on time, on budget and leak-free — the work sequence, monsoon-driven weather planning, MEP and plant coordination, hold points, safety-at-height and a simple RACI. A practical, India-grounded guide for professionals.
RoofingRelated Tools — Try Free
Monsoon-Readiness Checklist
Pre-rain home audit across 9 categories — terrace, drains, waterproofing, electrical, HVAC, pest, vehicles, documents.
Seasonal AuditRainwater Tank Sizer
How big should your rainwater tank be? Computes annual harvest, recommended tank capacity in litres, water-bill savings, and payback — for 10 Indian cities.
RWH CalculatorCross-Ventilation Analyzer
Estimate airflow and air changes per hour (ACH) from room size, window areas, layout, and local wind — with NBC 2016 Part 8 compliance check.
Ventilation Calculator