
Bathroom Planning for New Homes in India: Get It Right Before You Build
The bathroom decisions you cannot undo once the slab is cast — location and stacking, sunken vs non-sunken slabs, waterproofing, and the plumbing, electrical and ventilation you must coordinate with the civil work, stage by stage.
Almost everything people notice about a bathroom — the tiles, the vanity, the shower, the mirror — can be changed years after you move in. Almost everything that actually fails — a leaking slab, a floor that pools water, a geyser point in the wrong place, a duct too tight to ever service — is locked in during the few weeks your civil work passes through the bathroom. This is the cruel arithmetic of bathroom planning for a new home in India: the cheapest, most invisible decisions are the ones you can never take back, and the expensive, visible ones are the easiest to redo.
This guide is written for the moment before the mistake — when the bathroom is still a set of lines on a drawing and a hole in a slab. It walks stage by stage through construction, naming which decision gets frozen at each stage and why. If you are instead reinventing a bathroom that already exists, start with our bathroom renovation guide; for the full design vocabulary, the bathroom design guide is the top-level pillar this sits under.
The order of trades matters more than the choice of trades. Get plumbing, waterproofing and electrical sequenced correctly against the civil work and an ordinary bathroom lasts thirty years. Get the sequence wrong and a beautiful bathroom leaks in three.
The stages, and what freezes at each
A bathroom is not built in one go — it is visited several times by different trades, each of whom leaves behind a decision that the next trade builds on top of. Once a layer is covered, the decision under it is effectively permanent. The table below is the spine of this entire guide: read it as a checklist and a warning list at once.
| Construction stage | Bathroom decision locked in | Why it is (nearly) irreversible |
|---|---|---|
| Structural drawing / slab layout | Bathroom location and whether wet areas stack floor-to-floor | Moving a bathroom later means moving stacks, shafts and beams — a redesign, not an edit |
| Slab casting | Sunken vs non-sunken slab; sunken depth; floor-trap and stack openings | Cast concrete cannot be un-poured; a missed sleeve means core-drilling a structural slab |
| Sunken-portion / pre-tiling | Waterproofing of the sunken box and slab; slope to the trap | Buried under filler and screed forever; a leak here means demolishing the finished floor |
| First-fix plumbing | Concealed supply and drain runs, pipe sizes, vent pipe, slopes | Chased into walls and floor and plastered over; re-routing means breaking walls |
| First-fix electrical (conduiting) | Geyser point, exhaust point, light/shaver points, conduit routes | Conduits are cast/chased in before plaster; a forgotten point means surface wiring |
| Second-fix / finishes | Tiling, waterproofing over screed, fixture positions | These can be redone later — this is the reversible layer |
Notice where the line falls. Everything above the last row is a construction decision. The visible bathroom — the part homeowners agonise over — is the only genuinely changeable layer.
Stage 1 — Location and stacking: decided on the structural drawing
The single most consequential bathroom decision is made before a bag of cement arrives: where the bathroom sits in the plan, and whether bathrooms on different floors sit directly above one another. Stacking wet areas vertically lets every floor share one vertical plumbing shaft and one soil stack, keeps drain runs short and steeply sloped, and confines all your waterproofing risk to one column of the building. Scattering bathrooms across the plan forces long horizontal drain runs under floors, more slab penetrations, more joints, and more places to leak.
Under the National Building Code of India (NBC 2016), Part 9 (Plumbing Services), drainage relies on gravity and adequate venting — both of which are far easier to achieve when stacks are continuous and vertical. Plan the bathroom against these fixed constraints:
- Put it against an external wall wherever possible, so an exhaust fan or window can vent directly outside and a light-and-ventilation shaft is available.
- Keep the WC close to the soil stack — the water closet needs the shortest, steepest connection to the vertical stack of any fixture.
- Provide a plumbing shaft or duct (a dedicated vertical chase) for supply lines, the soil stack and the vent pipe, sized so a person can later reach a valve or a leak. A shaft you cannot open is a shaft you will regret.
- Do not place a bathroom directly over a living room, kitchen or bedroom on the floor below if you can avoid it — put it over another bathroom, a passage or a utility.
If you do nothing else at drawing stage, stack your bathrooms. One vertical wet column is the cheapest insurance a house can buy.
Stage 2 — Sunken vs non-sunken slab: decided at slab casting
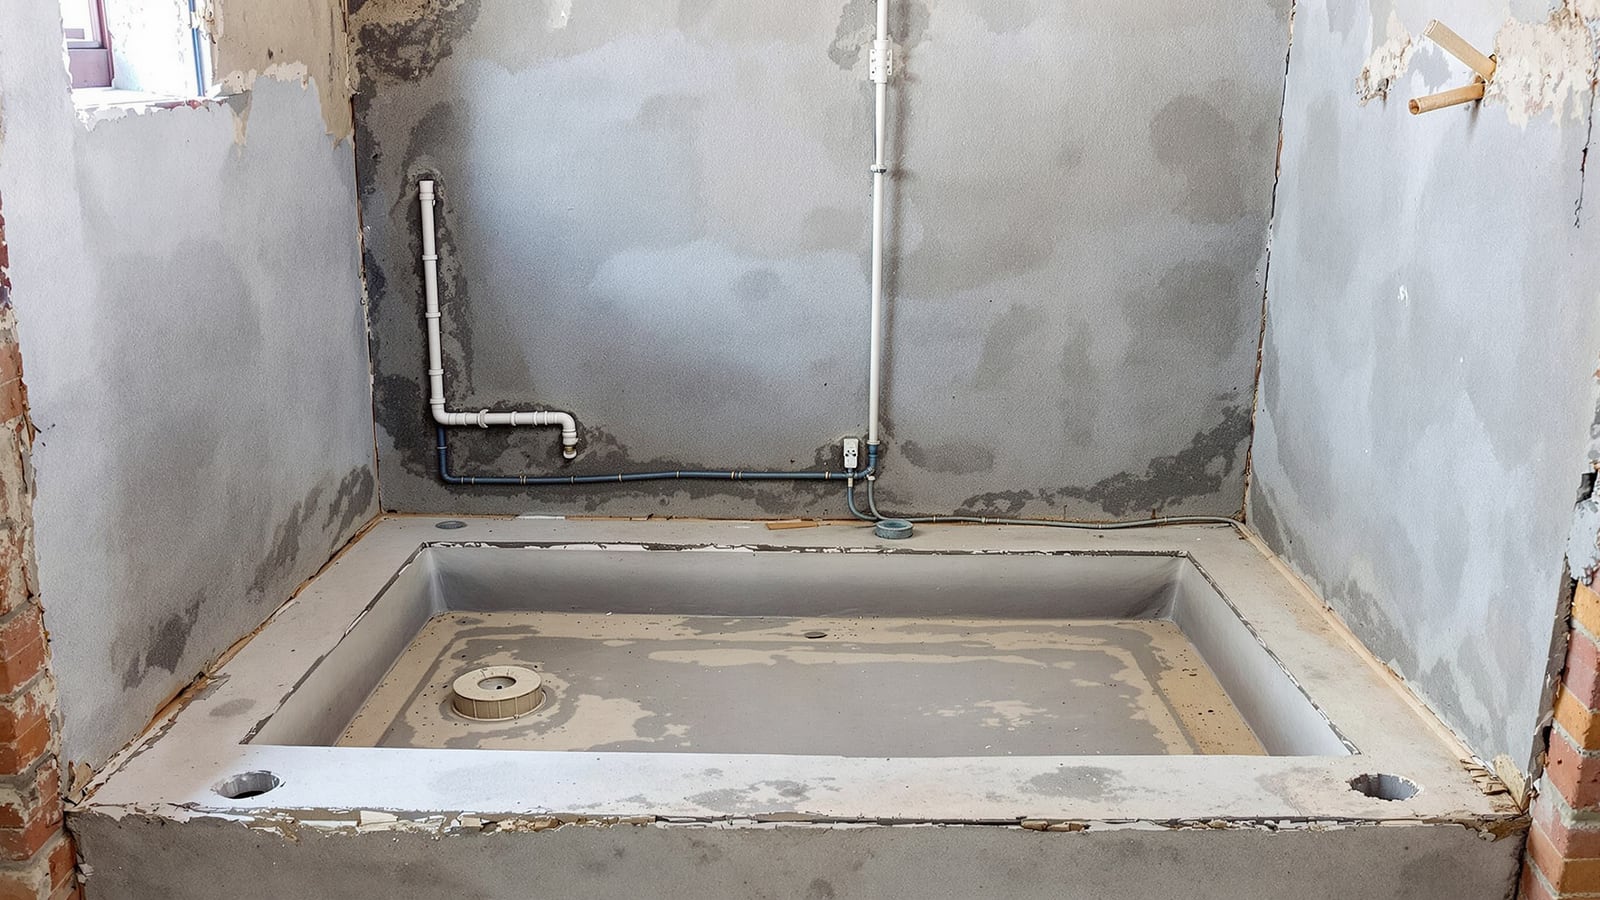
Indian bathrooms are traditionally built on a sunken slab — the slab under the bathroom is dropped 250–450 mm below the surrounding floor, creating a box that holds the drainage pipes, the floor trap and a layer of light filler, with the finished floor built back up on top. The alternative, common in modern construction, is a non-sunken (low-depth) slab where pipes run in a thin screed or shallow recess and the WC is often wall-hung with a concealed cistern.
This is a slab-casting decision, which means it is final. The comparison:
| Sunken slab | Non-sunken slab | |
|---|---|---|
| Pipe concealment | Full drainage buried within the sunk, easy floor-trap placement | Pipes in shallow screed or dropped below in a service void |
| Floor level | Bathroom floor flush with adjoining rooms | May sit slightly raised, or needs a ceiling void below |
| Weight / filler | Heavier; needs lightweight filler + double waterproofing | Lighter, less dead load on the slab |
| Leak diagnosis | Hard — buried under filler; leaks show late | Easier if a service ceiling below is accessible |
| Best suited to | Conventional RCC homes, floor-mounted WCs | Wall-hung WCs, apartments with service voids, retrofits |
Whichever you choose, the openings for the soil stack, floor trap(s) and any shaft must be cast into the slab with sleeves at this stage. A penetration forgotten now becomes a core-drilled hole through a structural slab later — expensive, weakening, and a fresh leak path.
Stage 3 — Waterproofing: the one you can never revisit
If this guide has a single non-negotiable, it is this: waterproofing the sunken portion and the bathroom slab is the most important pre-construction decision you will make, because it is the one buried deepest and the one whose failure is most destructive. A tap can be swapped in an hour. A failed slab membrane means demolishing the finished floor of a room you have already paid to build, and often a stained ceiling below.
Do it in layers, in sequence, and never let the trades skip a step to save a day:
- Cure and clean the sunken box — the RCC must be sound, crack-free and dust-free before any coating.
- Fill honeycombs and treat the pipe penetrations — every point where a pipe passes through the slab is a designed leak path unless it is sealed with a non-shrink grout and collared.
- Apply the membrane — a cementitious crystalline or acrylic-polymer coating (or an APP membrane) over the slab and, critically, turned up the walls by at least 150–300 mm so water rising in the filler cannot creep out sideways.
- Flood-test before you fill — pond the sunk with water for 24–48 hours and check the ceiling below. This is your only free chance to catch a leak. Never skip it.
- Second waterproofing over the screed, below the tile bed, before tiling — a belt-and-braces layer for the finished floor.
Materials from the usual Indian suppliers (Dr. Fixit, Fosroc, MYK Laticrete and others) are all capable — the failures are almost always workmanship and sequence, not product. For the full method, corner-band detailing and product families, see our dedicated waterproofing guide.
Flood-test the sunk before you fill it. Twenty-four hours of standing water now can save you from demolishing a finished bathroom later.
Stage 4 — Plumbing layout: concealed, sloped, and vented
Plumbing first-fix happens while the walls are raw and the sunk is open — the moment to get supply and drainage right. Two core choices define an Indian bathroom.
Concealed vs exposed. Concealed plumbing — CPVC/PPR supply lines chased into walls, drainage buried in the sunk — is the modern default and looks clean, but every buried joint is a joint you cannot inspect. Keep concealed runs simple, minimise buried joints, pressure-test supply lines before plastering, and bring shut-off valves to accessible points. Exposed plumbing is easier to service and still sensible inside a shaft or utility.
Slopes and the vent pipe. Drainage is gravity-driven: horizontal drain runs need a fall of roughly 1:40 to 1:80, and the floor itself must slope to the trap. Just as important and routinely forgotten in small homes is the vent pipe — a pipe that carries the soil stack up above the roof, letting air in so that a flushing WC does not siphon the water seal out of nearby traps (the cause of that intermittent drain smell). NBC 2016 Part 9 and IS 1172 treat venting as part of a properly designed drainage system, not an optional extra.
Size and route with these in mind: WC to soil stack on the shortest path; wash basin, floor trap and shower to a waste stack; a floor trap positioned at the low point of the slope; and cleanouts/inspection points left accessible in the shaft.
Stage 5 — Electrical planning: points you cannot add later
Electrical conduiting is a first-fix trade too — conduits are cast into the slab or chased into walls before plaster. A power point you forget now becomes ugly surface conduit forever. A bathroom is also a wet zone, so the rules are stricter than for a dry room. Plan against IS 732 (Code of Practice for Electrical Wiring Installations) and the electrical provisions of NBC 2016 Part 8:
- Geyser point — a dedicated 16 A (or 20 A) circuit sized for the geyser's load (a 3 kW instant/storage geyser draws ~13 A), positioned high and to the side, never above the shower spray. Run it on its own way from the DB.
- RCBO / RCCB (the Indian equivalent of a GFCI) — a residual-current device on bathroom circuits is the life-safety essential; it trips on the tiny earth-leakage current that a shock represents. Treat this as mandatory, not optional.
- IP-rated points and fittings — accessories near water must carry an appropriate IP (ingress protection) rating; keep switches for wet-zone appliances outside the bathroom or well away from the shower, and use enclosed, moisture-rated fittings inside.
- Exhaust-fan point — a dedicated point for the exhaust fan, ideally switched with the light so it is actually used.
- Zoning — keep the immediate shower/tub zone free of accessories; place shaver sockets, mirror lights and heated-towel points in the drier zone near the basin.
- Earthing — every metal-bodied appliance and the plumbing must be properly earthed and bonded.
Stage 6 — Ventilation: provide the path while the wall is open
Indian bathrooms run wet and humid, and monsoon months keep them that way for weeks. Trapped moisture grows mildew, lifts paint and shortens the life of every fitting. Ventilation must be provided for at construction, because both routes need a hole through a wall or slab:
- Natural ventilation — a window or ventilator opening onto external air or a light-and-ventilation shaft, sized to the openable-area guidance in NBC 2016 Part 8 (a bathroom needs a modest but real fraction of its floor area as openable ventilation).
- Mechanical ventilation — an exhaust fan ducted to outside air, essential for internal bathrooms with no external wall. Cast or leave the wall sleeve and the electrical point for it now; retrofitting a duct through a finished wall is grim work.
The best answer in most Indian homes is both: a window for daylight and passive airflow, and an exhaust fan for the shower's peak humidity.
Stage 7 — Future-proofing: cheap now, impossible later
A little foresight during first-fix costs almost nothing and quietly future-proofs the home:
- Spare conduits — pull an empty conduit or two from the DB to the bathroom for a future heated-towel rail, smart-mirror or bidet-seat point. See the residential bathroom guide for where these tend to be wanted later.
- Grab-bar blocking — fix timber or ply blocking (or a cement-board backing) inside the wall beside the WC and in the shower before tiling, so grab bars can be mounted into solid backing whenever they are needed. This is the cornerstone of accessible, age-in-place design and it is impossible to add once the wall is tiled.
- Level / low-threshold shower — if you want a curbless, wheelchair-friendly shower later, the slope and drain must be set for it now.
- Accessible valves and cleanouts — bring shut-offs and inspection points to a hatch you can actually open.
Blocking for a grab bar costs a few hundred rupees during construction and several thousand plus wall demolition afterwards. It is the perfect illustration of this guide's whole thesis.
Coordinating the trades: sequence is everything
None of the above works if the trades arrive in the wrong order. Plumbing and electrical first-fix must finish before waterproofing; waterproofing must be flood-tested before filling; filling and screed must be done before tiling. The civil contractor holds the schedule, but the homeowner should hold this checklist.
| Sequence | Trade / activity | Coordinated with | Must be complete before |
|---|---|---|---|
| 1 | Slab cast with sleeves for stack, traps, shaft | Structural + plumbing | Any first-fix |
| 2 | Plumbing first-fix — drain, supply, vent, slopes | Civil (sunk open) | Waterproofing |
| 3 | Electrical first-fix — conduits, geyser/exhaust points | Civil (chasing) | Plastering |
| 4 | Waterproofing of sunk + slab, turned up walls | Civil | Flood test |
| 5 | Flood test 24–48 h | Homeowner witnesses | Filling |
| 6 | Filling + sloped screed + second waterproofing | Civil | Tiling |
| 7 | Tiling, fixtures, second-fix electrical | Finishing trades | Handover |
Get this table respected on site and the invisible bathroom under your tiles will be as sound as the visible one on top of it.
References
- Bureau of Indian Standards — National Building Code of India (NBC) 2016, Part 8 (Building Services) and Part 9 (Plumbing Services, including water supply, drainage and ventilation).
- Bureau of Indian Standards — IS 732: Code of Practice for Electrical Wiring Installations.
- Bureau of Indian Standards — IS 1172: Code of Basic Requirements for Water Supply, Drainage and Sanitation.
- Bureau of Indian Standards — IS 2556: Vitreous Sanitary Appliances (Vitreous China) series, for sanitaryware.
- Central Public Health and Environmental Engineering Organisation (CPHEEO) — Manual on Water Supply and Treatment and Manual on Sewerage and Sewage Treatment, Ministry of Housing and Urban Affairs.
- IGBC (Indian Green Building Council) and GRIHA — water-efficiency and fixture-rating criteria for residential buildings.
- Manufacturer application guidelines for cementitious and membrane waterproofing systems (Dr. Fixit, Fosroc, MYK Laticrete) for sunken-slab detailing.
Export this guide
Related Guides — Deep-dive reading
Bathroom Electrical India: Loads, IP Zones, RCD Protection & the Complete Wiring Plan
The complete guide to bathroom electrical planning for Indian homes — the loads and points (geyser on a dedicated 16 A circuit, exhaust, mirror and lights, shaver socket, smart WC), the IP zones 0/1/2 that fix where fittings can sit near water, mandatory 30 mA RCD/RCBO earth-leakage protection, earthing, keeping switches outside the wet zone, cable sizing and getting conduits right before plastering — all per IS 732 and NBC 2016.
BathroomsBathroom Plumbing India: The Complete Guide to Water Supply, Drainage, Traps & Pipes
The whole plumbing picture for an Indian bathroom in one place — the two systems (cold and hot water supply, and waste/soil drainage with its vented SWV stack), traps and the floor trap, slopes and gradients, concealed vs exposed pipework, pipe materials (CPVC/UPVC/PEX/GI) and the overhead-tank pressure reality — with the coordination that must happen before any civil work starts.
BathroomsShower Niche India: Building a Recessed Wall Shelf That Holds Shampoo Without Ever Leaking
A shower niche is a shelf you carve into the wall instead of screwing onto it. Done right it is invisible and dry for decades; done wrong it is the single most common source of seepage into the room behind. Here is how to size it, which wall you may cut, and how to waterproof, slope and tile the recess so it never leaks.
BathroomsRelated Tools — Try Free
Cross-Ventilation Analyzer
Estimate airflow and air changes per hour (ACH) from room size, window areas, layout, and local wind — with NBC 2016 Part 8 compliance check.
Ventilation CalculatorElectrical Safety & Load Audit
Home electrical audit — 10 categories, 65+ checkpoints across earthing, RCCB, MCB, wiring, switchboards, appliance circuits, DG/inverter backup.
Safety AuditPlumbing Pressure-Test & Leak Checklist
Pre-closure pressure and leak test — 9 categories, 60+ checkpoints across water supply, drainage, fixtures, waterproofing, hot water, tanks.
Pre-Closure Test