
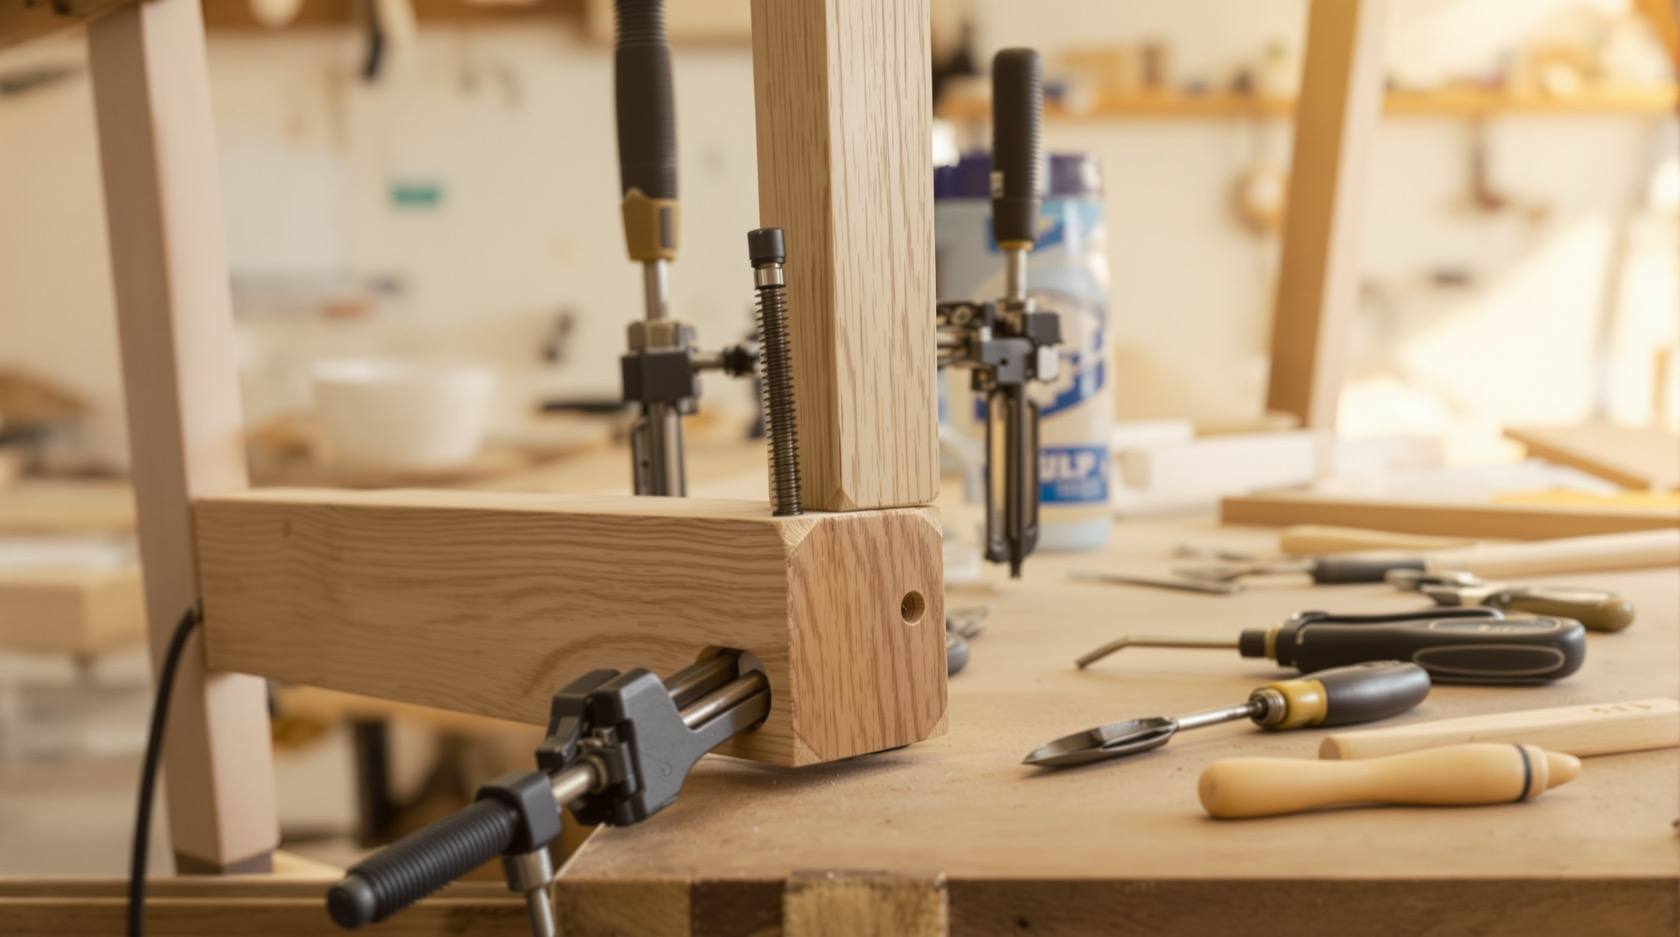
Furniture Repair & Restoration in India: Fix, Restore or Replace (2026)
The homeowner's decision guide to a tired or broken piece — when a quick repair is worth it, when a full restoration pays off, and when it is honestly time to replace. Plus which common fixes you can safely do yourself, which belong to a professional, and the basic toolkit to keep at home.
A wobbly dining chair, a drawer that will not close, a strip of veneer peeling off the sideboard — every home collects these small furniture failures, and every time the same question lands: is this worth fixing, or is it finally time to throw it out and buy new? Most of the time the honest answer is "fix it" — a great many pieces are written off for a problem that a tube of glue, a screw and twenty minutes would solve. This guide helps you tell the quick fix from the real restoration from the genuine replacement, shows which repairs are safe to do yourself and which belong to a professional, and lists the modest toolkit that handles most of it.
It sits in the care-and-maintenance cluster of the Furniture hub, alongside the complete guide to furniture pillar and the routine furniture maintenance guide — because the best repair is the one you never need, and good upkeep is what prevents most of the failures below.
Scope & how to read this. This is a homeowner's decision-and-triage guide, not a workshop manual. The DIY fixes here are the genuinely safe, low-stakes ones — re-gluing a loose joint, swapping a drawer runner, replacing a hinge. Anything structural (a chair that carries body weight, a bed frame, a wall-hung or anti-tip unit), anything valuable or antique, and anything involving stripping chemicals, solvent finishes or spray guns is professional work — those carry safety, fire and irreversible-damage risks, and we hand them off clearly. Costs are indicative bands to help you weigh the decision; get local quotes before committing.
The first decision: repair, restore or replace
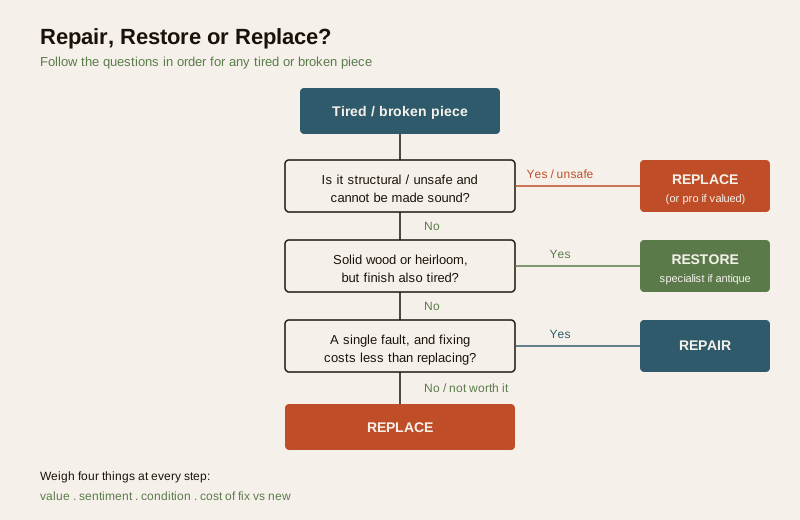
Before touching a tool, decide which of three things you are actually doing — they cost and mean very different amounts.
- Repair — fix a specific fault and return the piece to use. Fast, cheap, targeted: a re-glued joint, a new runner, a fresh hinge. Most everyday problems are repairs.
- Restore — bring a whole tired or old piece back to life: repair the faults, then strip and re-finish so it looks renewed. Bigger job, usually part-professional, worth it for solid-wood and sentimental pieces.
- Replace — accept that the piece is beyond sensible fixing and buy new. The right call for cheap, water-damaged particle-board units and for anything unsafe that cannot be made sound.
Four things decide between them: the piece's value (what it cost, what it is worth now), its sentiment (heirloom, gift, first home), its condition (surface fault or structural rot) and the cost of the fix versus a replacement. Weigh them together — a cheap stool with a wobbly leg is a five-minute repair; the same wobble in your grandmother's teak chair justifies a proper restoration; a swollen, delaminated MDF wardrobe base is usually a replace.
| Situation | Lean repair | Lean restore | Lean replace |
|---|---|---|---|
| Piece is solid wood (teak, sheesham, mango) | Yes — wood loves being fixed | Yes, if the finish is also tired | Rarely — solid wood is worth saving |
| Piece is MDF / particle board and water-swollen | Only if fault is minor & dry | No — the board itself has failed | Yes — swollen board cannot be restored |
| Fault is a single joint, hinge, runner or handle | Yes | — | No |
| Whole piece is tired: dull finish + several faults | — | Yes | Only if the frame is also gone |
| It is an heirloom or antique | — | Yes — via a specialist | Almost never |
| Structure is compromised (frame cracked, leg split through) | If cleanly re-gluable | If part of a wider restore | If it cannot be made safe |
| Repair/restore cost approaches new-piece cost | — | Judge on sentiment & quality | Yes, if no sentimental value |
A simple gut check: if the piece is solid wood, structurally sound, and you like it, the answer is almost always repair or restore. If it is cheap sheet-material, water-damaged, or unsafe, lean replace. Use the furniture cost calculator to get a rough new-piece figure so "repair versus replace" is a real number, not a guess.
Common repairs — and whether to DIY or call a pro
Most household furniture faults fall into a short list. Here is what each one is, and who should do it.
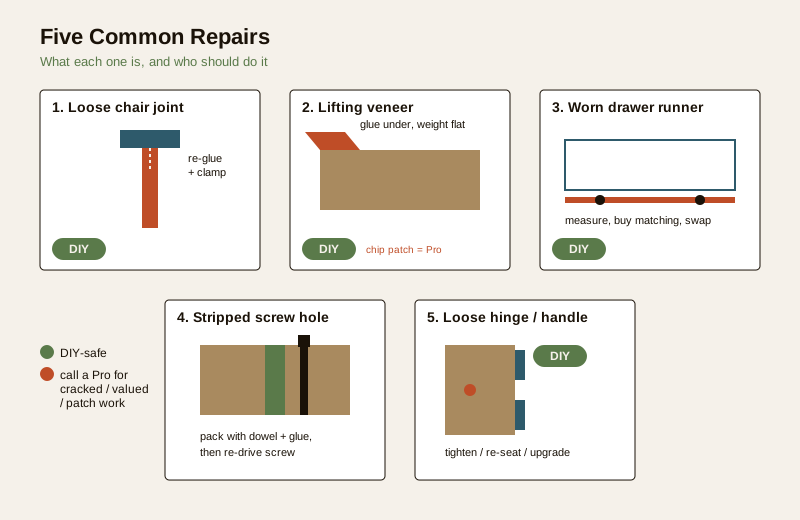
Wobbly or loose joints. The commonest fault of all, especially in chairs and stools where a joint works loose over years. If the joint pulls apart cleanly and is not cracked, this is a classic DIY: clean out the old glue, apply fresh wood glue (a PVA/Fevicol-type adhesive), clamp it square, and leave it a full day. Do not just squirt glue into a joint without dismantling it — it will not hold. A chair that carries weight and is cracked, not merely loose, is a pro job.
Broken or stripped screw holes. A hinge or handle screw that spins without biting has stripped its hole. The tidy home fix: pack the hole with matchsticks or wooden toothpicks dipped in wood glue (or a proper wooden dowel for a bigger hole), let it set, trim flush, then drive the screw into fresh timber. Easy and very satisfying.
Split wood. A clean split along the grain can often be glued and clamped by hand — work glue into the crack, clamp until it beads out, wipe, and leave to cure. A split through a load-bearing part (a chair leg, a bed rail) or a shattered, many-piece break is a professional repair; a re-glued weight-bearing crack that fails can hurt someone.
Veneer lifting or chipping. Lifting veneer at an edge is a friendly DIY: warm it gently, work wood glue underneath with a thin blade, press down and weight it flat overnight. A missing chip on a prominent surface, or veneer over a large blistered area, is better handed to a polisher who can patch and colour-match it invisibly.
Drawer runners and slides. A drawer that scrapes, drops or jams often just needs its runners cleaned and re-waxed, or a worn plastic/metal slide replaced — modern telescopic runners are cheap and swap in with a screwdriver. This is one of the most worthwhile DIY fixes: measure the existing runner, buy the matching size, swap it.
Hinges and handles. Loose, squeaky or bent hinges and tired handles are pure DIY — tighten, re-seat (fix the stripped hole first, above), or replace with a new set. This is also the easiest upgrade: see hardware below.
Sagging cane. A dished or torn cane seat is a specialist re-caning job — hand-woven cane and pressed sheet cane both need a trained hand. Doable as a serious hobby, but for a good result on a chair you value, use a professional. More on the material in the cane and rattan furniture guide.
Broken glass. A cracked or shattered glass top or shelf is a straight replacement — take the measurements to a glazier and, for any table top or shelf people lean on, specify toughened (tempered) safety glass, which breaks into blunt granules rather than shards. Do not reuse ordinary annealed glass for a top that gets daily use.
Stuck drawers and doors (humidity swelling). In India's monsoon months, timber swells and drawers and doors that ran fine in summer start to bind. Often the fix is patience — they free up as the air dries — but you can ease a persistently tight edge with a candle-wax or paraffin rub on the runners, or a very light sanding of the binding edge on a dry day. If a door swells every year, the deeper issue is moisture; the termite and moisture protection guide covers sealing and ventilation.
| Common repair | Typical DIY or Pro | Notes / caution |
|---|---|---|
| Loose (not cracked) joint | DIY | Dismantle, re-glue, clamp a full day |
| Cracked load-bearing joint / leg | Pro | Weight-bearing — do not risk a home glue-up |
| Stripped screw hole | DIY | Matchstick/dowel + glue, then re-drive |
| Clean split along grain | DIY | Glue and clamp; through-splits go to a pro |
| Lifting veneer edge | DIY | Glue under, weight flat overnight |
| Missing/blistered veneer patch | Pro | Colour-matched patch by a polisher |
| Drawer runner / slide worn | DIY | Measure, buy matching runner, swap |
| Loose or bent hinge, tired handle | DIY | Fix stripped hole first; easy to upgrade |
| Sagging or torn cane seat | Pro | Re-caning is a trained-hand craft |
| Broken glass top / shelf | Pro (glazier) | Replace with toughened safety glass |
| Stuck drawer/door (humidity) | DIY | Wax runners; light sanding on a dry day |
| Deep scratches / dull whole finish | Pro | Refinishing — see polishing guide |
| Torn / sagging upholstery | Pro | Reupholstery — see below |
Restoring an old or heritage piece
Restoration is a step up from repair: you are renewing a whole tired piece rather than fixing one fault. The broad sequence is repair, strip, re-finish — first make every joint, split and surface sound, then remove the old, degraded finish, then apply a fresh one (oil, wax, polish or lacquer). A solid-wood piece — old teak, rosewood or sheesham, the stuff of Indian homes — rewards this handsomely; under a lifetime of grime is usually good timber.
But be honest about where the line sits. The repair stage you can often do yourself. The strip-and-re-finish stage is where the risk lives: chemical strippers, solvent-based polishes and spray finishes are hazardous, smelly, fire-prone and easy to botch, and stripping a genuine antique can destroy its value. So:
- For a robust, everyday solid-wood piece you simply want revived, the full method — and the safe, homeowner-friendly parts of it — lives in the furniture polishing and refinishing guide.
- For anything valuable, antique, or heritage — especially traditional French polish work — use a specialist restorer. An amateur strip can turn a prized piece into a cheap-looking one, and original French polish and patina cannot be bought back. When in doubt about value, get it looked at before you touch it.
If you want to understand what you are restoring — how the joints, frames and finishes were built in the first place — the furniture construction detailing course and the solid wood furniture guide are the background reading.
The easy refresh: hardware replacement and upgrades
Before you write off a dated but sound piece, remember the cheapest transformation of all: new hardware. Swapping tired handles and knobs for a fresh set, or fitting soft-close hinges and drawer runners, updates the look and the daily feel of a cabinet for very little money and an afternoon's work — no refinishing required. It is the highest-return, lowest-risk improvement you can make, and it is squarely DIY. A wardrobe or sideboard that feels old often just needs handles from this decade and drawers that glide and shut themselves.
Repair over landfill: the sustainability case
There is a real environmental argument for fixing rather than binning. Furniture — especially solid wood — carries a large embodied footprint in the timber, transport and manufacture; sending a repairable piece to landfill throws all of that away and buys the footprint of a new one on top. Repairing, restoring and upcycling (repurposing an old piece into a new role — a dresser into a bathroom vanity, an old door into a table) keeps that value in use. India also has a deep, affordable ecosystem of carpenters, polishers and re-caners who make repair genuinely economical here in a way it often is not in the West. If you are choosing a new piece anyway, buying repairable solid or well-built engineered wood — the theme of the custom furniture vs ready-made guide — is what makes all of this possible a decade later.
What genuinely needs a professional
Do the safe, satisfying DIY fixes with confidence — but hand these over:
- Structural repairs that carry weight or people — chair and stool frames, bed frames, load-bearing legs and rails, and any wall-hung or anti-tip unit. A failed structural glue-up is a safety hazard.
- Valuable, antique or heritage pieces — get a specialist restorer; the wrong intervention destroys value.
- French polishing and solvent/spray finishes — skilled, hazardous and hard to get right; a pro's finish is worth it and safer.
- Re-caning — hand-woven and sheet cane both need a trained hand.
- Upholstery — torn, sagging or dated fabric and foam is a job for a tapestry-wallah / upholsterer; the upholstery replacement guide covers when and how, and the fabric upholstery care guide keeps it going longer.
The rule mirrors the rest of this hub: do the low-stakes fixes yourself; hand anything structural, valuable or chemical to a professional.
A basic home furniture-repair toolkit
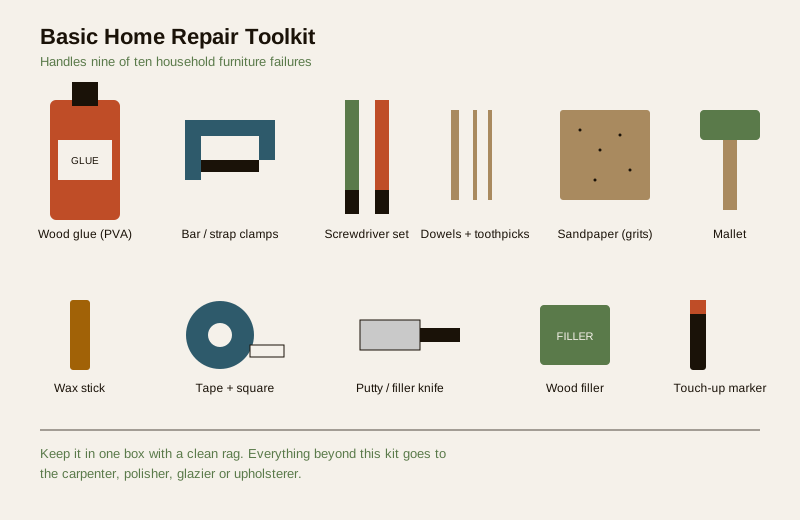
You do not need a workshop. A small, cheap kit handles the great majority of the DIY fixes above:
- Wood glue — a PVA / Fevicol-type adhesive for joints, splits and veneer.
- Clamps — a couple of bar or spring clamps (or a strap/band clamp for chairs) to hold glued parts square while they cure.
- Screwdriver set — flat and Phillips, and ideally a small cordless driver for hinges and runners.
- Wooden toothpicks / matchsticks and a few dowels — for packing stripped screw holes.
- Sandpaper — a few grits (medium to fine) for easing tight edges and prepping surfaces.
- A rubber or wooden mallet — to knock joints apart and back together without bruising the wood.
- A wax stick / paraffin candle — to free sticking drawer runners.
- A tape measure, a small square, and a putty/filler knife — for measuring runners and working glue under veneer.
- A tube of wood filler and a touch-up marker/wax crayon — for small dents, holes and scratches.
Keep it in a box with a clean rag and you are equipped for nine of every ten household furniture failures. For everything beyond it, you now know when to call the carpenter, the polisher or the upholsterer instead.
How it connects
- Start at the complete guide to furniture pillar, and prevent most repairs with the routine furniture maintenance guide and wooden furniture care.
- For the deeper refinishing that a restoration needs, go to furniture polishing and refinishing; for torn or sagging seating, upholstery replacement.
- Tackle the root cause of swelling, warping and stuck drawers in termite and moisture protection for furniture.
- Understand what you are fixing with solid wood furniture and, if you are buying, custom furniture vs ready-made — repairability starts at purchase.
- Learn how the joints and frames are built in the furniture construction detailing course.
- Stay ahead of faults with the furniture maintenance scheduler, and price a possible replacement with the furniture cost calculator.
Key takeaways
- Decide first: repair (fix one fault), restore (renew a whole tired piece) or replace (let it go) — weighed on value, sentiment, condition and cost-versus-new.
- Most everyday faults are cheap, safe DIY repairs — loose joints, stripped screw holes, clean splits, lifting veneer, worn runners, tired hinges and handles.
- Solid wood, sound and liked = repair or restore; swollen sheet-material or unsafe = replace. In India, an affordable carpenter-and-polisher ecosystem makes fixing genuinely economical.
- Hand a professional anything structural, weight-bearing, valuable, antique, re-caned, upholstered, or involving stripping chemicals and spray finishes — the safety and irreversible-damage risks are real.
- New handles and soft-close hardware are the highest-return, lowest-risk refresh of all.
- Repairing and upcycling over binning keeps a piece's large embodied footprint in use — the sustainable choice.
- A small, cheap home toolkit — glue, clamps, drivers, dowels, sandpaper, a mallet and filler — handles most of it.
References
- The IS furniture standards for furniture safety, strength and durability (named generally) — the benchmarks a sound repair should keep a piece within, especially for seating and load-bearing items.
- Plywood, blockboard, MDF and particle-board grade standards (IS 303 / IS 710 for plywood grades; IS 1659 blockboard; IS 12406 MDF; IS 3087 / IS 3097 particle board — named generally) — for judging whether a sheet-material piece is worth repairing.
- Toughened (tempered) safety glass — specify for any repaired or replaced table top or shelf in daily use.
- Professional guidance — a licensed carpenter for structural repairs, a specialist restorer for antiques and French polish, a glazier for glass, and an upholsterer for fabric and foam.
All costs, methods and material notes here are indicative planning aids for a homeowner, not a workshop manual; hand any structural, weight-bearing, valuable, antique, chemical-stripping or spray-finishing work to a qualified professional, specify toughened safety glass for glass tops in daily use, and get local quotes before deciding between repair and replacement.
Export this guide
Related Guides — Deep-dive reading
Door Repair Guide India: Fix Holes, Dents, Swelling, Hinges & Locks (2026)
A fix-it reference for Indian homes: every common door problem with a quick fix, a proper repair, a replace verdict, the materials needed, and indicative rupee costs.
Home Doors & EntrancesRepair a Cracked Wooden Door: DIY Guide (India 2026)
Hairline crack, deep split or panel separation? Match the right glue, clamp and filler method to the fault and refinish like new.
Home Doors & EntrancesFurniture Maintenance Guide: Keep Every Piece Lasting in India (2026)
The start-here routing guide to keeping furniture in good condition through Indian heat, humidity, monsoon, dust, hard water and termites — the one enemy and one habit for each material, a routine schedule you can actually follow, and where upkeep hands off to a professional.
FurnitureRelated Tools — Try Free
Material Decision Framework (M-Score)
Score 30+ Indian construction materials across cost, durability, climate fit, maintenance, and sustainability.
MaterialsWindow Hardware Cost Calculator
Estimate window hardware cost — hinges, handles, locks, rollers and multipoint gears.
Window CalculatorApartment Furniture Size Chart
Standard furniture dimensions for Indian apartments — sofas, beds, tables, dining, storage.
Reference Chart