
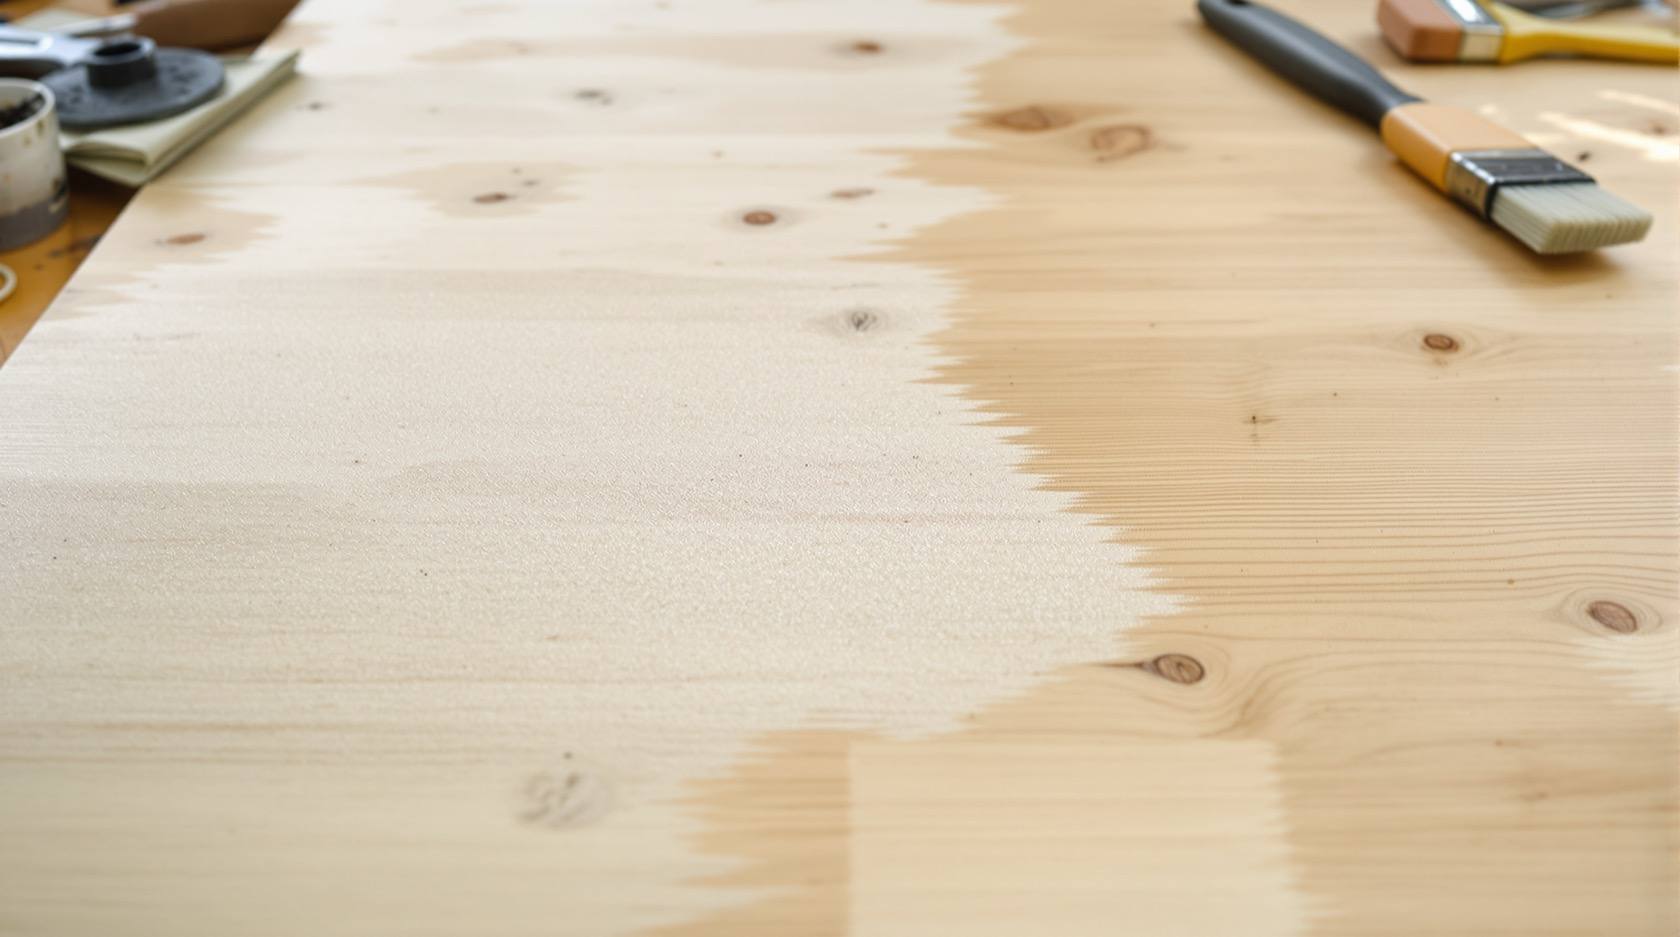
Furniture Polishing & Refinishing in India: Finishes, Cost & Process (2026)
A homeowner's guide to the wood finishes used in Indian furniture — melamine, PU, lacquer, Duco, French polish and wax/oil — when to just re-polish versus fully refinish, how the job actually runs, what it costs, and why the spray and stripping work belongs to skilled, licensed applicators.
The finish is the part of a piece of furniture you actually touch. It decides how the wood looks — warm and open-grained or a mirror gloss — how it survives a wet glass, a hot vessel or a decade of hands, and how easily a scratch can be made to disappear. Yet most homeowners never learn the names of the coatings on their own dining table, so when it dulls or the veneer starts to lift they either live with it or hand a vague brief to a "polish-wala" and hope. This guide fixes the vocabulary. It explains every finish used on Indian furniture, tells you when a light re-polish will do and when the piece needs a full strip-and-recoat, walks the refinishing job so you can supervise it, and is honest about why the spray and solvent work is a professional trade, not a weekend project.
This is a care-and-restoration companion to the complete guide to furniture in India. It sits beside furniture maintenance, wooden furniture care and furniture repair and restoration — read those for day-to-day upkeep and structural fixes; this one is about the coating itself.
Scope & how to read this. This guide helps you understand finishes, brief a professional and supervise the job. Every cost here is an indicative band, not a quote — polishing and refinishing are priced like carpentry, per square foot of surface, and vary by city, wood and finish, so get local quotes. Solvent-based spray finishes and chemical strippers are hazardous, skilled work: they involve flammable, toxic fumes and fine dust and belong to trained, licensed applicators working with proper ventilation and PPE — this is not a DIY spray manual. Furniture strength, joinery and safety sit with the maker; confirm any structural repair against the IS furniture standards and a competent carpenter.
The finishes used on Indian furniture
A wood finish does two jobs at once: it colours or clarifies the wood, and it forms a protective film (or a soaked-in barrier) over it. Indian workshops use a handful of finish families, and knowing which is on your piece tells you almost everything about how to care for it and how it can be renewed.
- Melamine. The workhorse of Indian furniture. A sprayed synthetic finish, usually matte to satin, that is quick, affordable and reasonably tough. It is what you find on most factory and carpenter-made wardrobes, beds and units. Fair water resistance, easy to recoat, but it can look flat and yellows a little with age.
- PU (polyurethane). The premium clear finish. Sprayed in multiple coats and available anywhere from dead matte to high gloss, PU is hard, water- and heat-resistant and rich-looking — the finish of choice on good dining tables, veneered units and export-grade furniture. It is the most expensive and the hardest to spot-repair; a damaged PU surface usually needs a full recoat. Compare it against laminate in PU finish vs laminate.
- Lacquer / NC (nitrocellulose). An older sprayed clear finish, satin to gloss, that dries fast and buffs beautifully. Its trick is that fresh lacquer partly re-melts the coat below, so repairs blend in — but it is less water- and heat-resistant than PU and softer over time.
- Duco (opaque paint finish). Not a clear finish at all but a sprayed, pigmented coating that hides the wood entirely under a solid colour — white, pastel or bold — in matte, satin or gloss. Duco is how you get the painted-furniture and lacquered-look pieces common in modern Indian homes. It is durable and premium-priced, but any damage means a respray, and once a piece is Duco'd you rarely go back to natural wood.
- French polish (shellac). The traditional hand-applied finish — shellac dissolved in spirit, padded on in many thin layers to build a warm, deep, luminous sheen. It shows the grain like nothing else and is prized on antiques and teak. Its weakness is real: it marks with water rings, heat and alcohol, and needs periodic re-polishing. But that same softness makes it the most repairable finish of all.
- Wax and oil. Penetrating finishes — Danish oil, teak oil, linseed, or a paste wax — that soak into the wood rather than forming a hard film. They give the most natural, low-sheen, tactile surface and are the easiest to touch up, but they offer the least protection and must be re-applied periodically. Common on solid-wood and rustic pieces; see solid wood furniture.
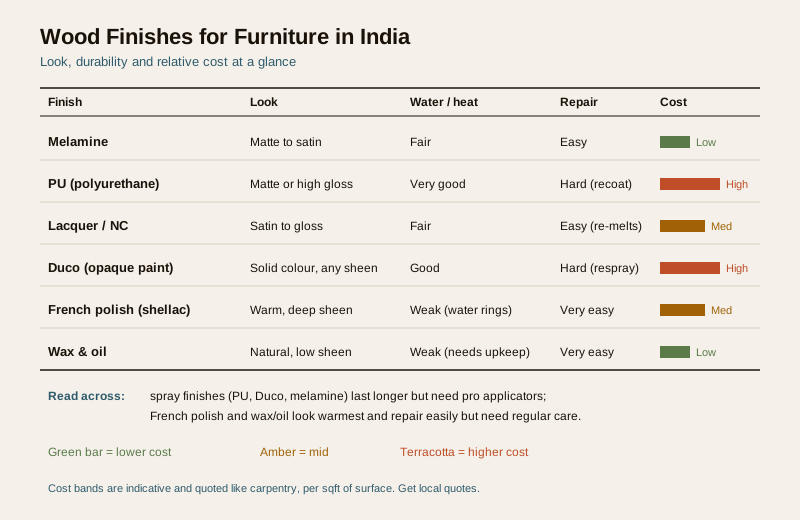
Finish comparison at a glance
Use this to shortlist a finish for a refinish job, or to identify what you already have. The cost bands are relative and indicative — confirm with local quotes.
| Finish | Look | Durability | Water / heat | Repairability | Relative cost | Typically used on |
|---|---|---|---|---|---|---|
| Melamine | Matte to satin | Good | Fair | Easy to recoat | Low | Everyday wardrobes, beds, units |
| PU (polyurethane) | Matte to high gloss | Very good | Very good | Hard (full recoat) | High | Dining tables, veneer, premium units |
| Lacquer / NC | Satin to gloss | Good | Fair | Easy (re-melts) | Medium | Traditional and mid-range pieces |
| Duco (opaque) | Solid colour, any sheen | Good | Good | Hard (respray) | High | Painted, modern, kids' furniture |
| French polish | Warm, deep sheen | Moderate | Weak (rings) | Very easy | Medium | Antiques, teak, heritage pieces |
| Wax & oil | Natural, low sheen | Modest | Weak | Very easy | Low | Solid wood, rustic, artisanal |
Two honest patterns fall out of this table. The tough, long-lasting finishes (PU, Duco, melamine) are sprayed — they need equipment and skill to apply, and they are hard to repair invisibly, so damage tends to mean a whole recoat. The easy-to-repair, warm finishes (French polish, wax, oil) are hand-applied — they forgive scratches and blend touch-ups, but they ask for more frequent care. There is no free lunch: you are trading protection against reparability. Match the finish to how the piece is used — a hard-working dining top wants PU, a display cabinet or an heirloom is happy in French polish.
Polish or refinish? Getting the scope right
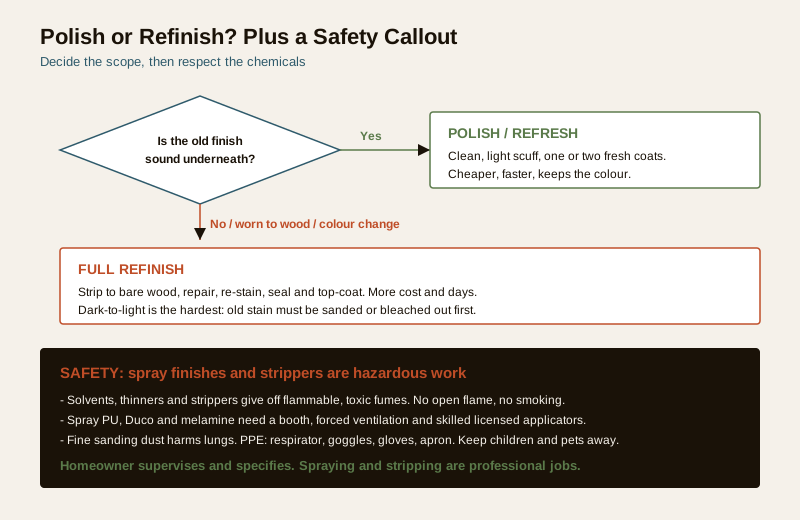
The single most useful decision is whether the piece needs a polish (a refresh of the existing finish) or a refinish (stripping back to bare wood and rebuilding the coating). They differ hugely in cost, time and mess, and people routinely pay for the bigger job when the smaller one would do — or vice versa.
- Polish / refresh. The existing finish is basically sound: dull, lightly scratched or grimy, but intact and adhering. The fix is to clean, lightly scuff and apply one or two fresh coats — for melamine, PU or lacquer, a re-coat; for French polish, a re-padding; for wax or oil, a re-application. Cheaper, quicker, keeps the colour, and possible on many pieces.
- Refinish. The finish has failed — worn through to bare wood in places, water-blushed, flaking, or you want to change the colour. Now the whole coat has to come off (chemical stripping or sanding) and be rebuilt from bare wood: repair, stain, seal, top-coat. Much more cost, days of work, and best done off-site.
| Situation | Do this | Why |
|---|---|---|
| Surface dull or lightly scuffed, finish intact | Polish / refresh | Existing coat is fine; just renew the top layer |
| Grime and hand-marks, no wear-through | Clean then re-coat | A wash and one coat restores depth cheaply |
| French polish gone patchy or ring-marked | Re-pad the shellac | Shellac re-dissolves and blends; no full strip needed |
| Wax or oil looking thirsty and pale | Re-apply oil/wax | Penetrating finishes are meant to be topped up |
| Worn through to bare wood in spots | Full refinish | A patch will never match; the coat must be uniform |
| Flaking, blistered or water-blushed finish | Full refinish | Failed adhesion cannot be recoated over |
| You want to change the colour | Full refinish | Colour lives in the wood and stain, not the topcoat |
| Deep scratches, dents, veneer lifting | Repair first, then refinish | See furniture repair and restoration |
When in doubt, ask the applicator to test-clean and re-coat a small hidden area first. If it takes the new coat and blends, you have saved yourself a full refinish.
How a refinish job actually runs
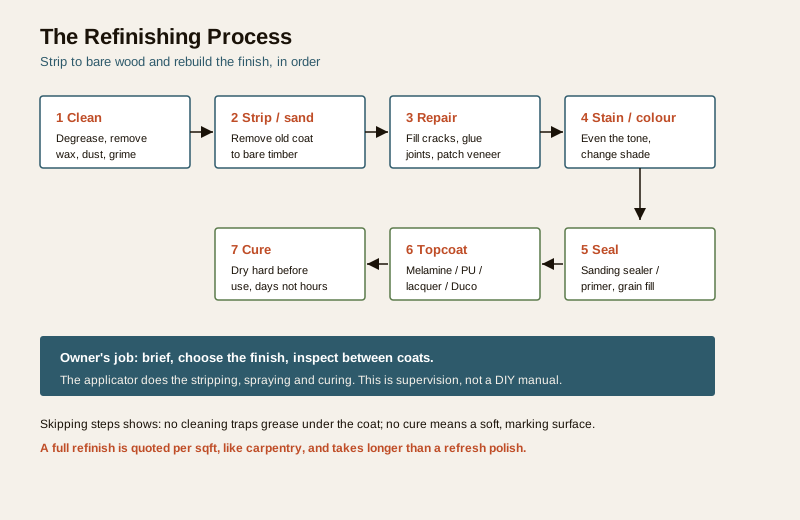
You do not need to do this work, but you should understand it so you can brief clearly, judge quality between stages and know when a corner is being cut. A proper refinish moves through the same sequence whatever the topcoat.
1. Clean and de-wax. Grease, silicone polish and old wax are removed first — anything left behind stops the new finish from bonding, causing "fisheyes" and peeling later.
2. Strip or sand. The old coat comes off, either with a chemical stripper or by sanding, down to clean bare wood. On veneer this is delicate — over-sanding cuts through the thin veneer layer and ruins the piece.
3. Repair. With the wood bare, cracks are filled, loose joints re-glued, dents raised and veneer patched. Structural fixes belong to a carpenter — see furniture repair and restoration.
4. Stain / colour. If the tone is being evened out or changed, stain goes on now and is wiped to an even shade. Getting a uniform colour across old and new wood is a skill.
5. Seal. A sanding sealer or primer (or grain filler on open-grained woods) is applied and cut back, giving the topcoat a smooth, sealed base to sit on.
6. Topcoat. The chosen finish — melamine, PU, lacquer or Duco — is sprayed in several thin coats, each lightly sanded between, or shellac is padded on by hand for French polish.
7. Cure. The finish is left to harden fully before the piece goes back into use — days, not hours, for a proper spray finish. Rushing this leaves a soft surface that marks and prints.
Why spray finishes are professional work — and the safety reality
It is worth being blunt here, because the internet is full of DIY spray tutorials and the risks are real. The high-performance finishes — PU, Duco and melamine — are sprayed, and spraying is a licensed, skilled trade for good reason. A good spray finish needs a controlled, dust-free environment (ideally a spray booth with proper extraction), a calibrated gun, correct thinner ratios and temperature, and an applicator who can lay down even, run-free coats. Do it in a bedroom and you get orange-peel texture, runs, trapped dust — and a room full of hazardous vapour.
The safety issues are not optional cautions:
- Fire and explosion. Solvents, thinners and NC lacquer give off flammable vapours that can ignite from a spark, a switch or a flame. Spraying near any ignition source is genuinely dangerous.
- Toxic fumes. Isocyanates in PU, and the solvents in strippers and lacquers, are harmful to breathe. Proper ventilation and a suitable respirator — not a cloth mask — are essential.
- Chemical strippers. Paint and finish strippers are caustic and can burn skin and eyes; they need gloves, eye protection and ventilation.
- Fine dust. Sanding old finish and bare wood throws fine dust that harms the lungs over time and can contain old, lead-based pigments on very old painted pieces.
- PPE and people. Respirator, goggles, gloves and an apron for the worker; and keep children, pets and anyone with breathing trouble well away from the work and the curing piece.
The homeowner's role is to choose the finish, brief the job, provide access and inspect — not to spray. Insist that any spray or stripping work is done off-site or in a properly ventilated area by a skilled applicator. Water-based and low-VOC finishes are becoming available in India and are worth asking for on indoor-air-quality grounds; look for CRI GreenPro or IGBC-recognised low-emission products where the choice exists, and see the healthy homes hub for why indoor air matters.
Re-polishing, colour changes and the hard cases
A few situations come up often enough to call out:
- Re-polishing French polish. Because shellac re-dissolves in spirit, a tired French-polished surface can often be revived by cleaning and re-padding fresh shellac over the old — no stripping needed. This is the one finish a skilled polisher can renew beautifully in place, which is why it endures on antiques.
- Refreshing wax and oil. These are designed to be topped up. A clean and a fresh coat of the same oil or wax restores depth and protection; you rarely strip an oiled piece unless it has been contaminated.
- Going darker. Easy. A darker stain or a tinted topcoat over the existing colour usually works with minimal stripping.
- Going lighter (dark to light). Hard. The colour lives in the wood and the old stain, so to lighten a piece you must sand or chemically bleach the stain out of the timber first — laborious, and not always fully successful on deeply stained old teak or rosewood. Set expectations, and budget accordingly.
- Veneered pieces. Refinishing veneer is high-risk because the veneer is often under a millimetre thick; aggressive sanding cuts straight through it. On engineered-wood and veneer furniture, a light re-coat is far safer than a full strip — see engineered wood furniture.
Cost drivers and how it is quoted
Polishing and refinishing are priced like carpentry — per square foot of finished surface — not per piece, so the same job costs more on a large, carved or intricate item than on a plain flat one. Understanding the drivers helps you read a quote and avoid surprises.
| Cost driver | Pushes the price up when... |
|---|---|
| Surface area | The piece is large, or has many faces, shelves and edges |
| Finish type | PU and Duco cost more than melamine or a simple polish |
| Scope | A full strip-and-refinish costs multiples of a refresh polish |
| Colour change | Dark-to-light needs bleaching or heavy sanding |
| Repairs | Cracks, veneer patches and re-gluing add labour |
| Detail | Carving, turning, mouldings and lattice slow every coat |
| Gloss level | High gloss needs more coats and careful buffing |
| On-site vs workshop | On-site work costs more and risks a poorer finish |
For a first-cut budget, put your piece through the custom furniture estimator or the furniture cost calculator to get an order-of-magnitude figure, then get two or three local quotes. Always ask a quote to state the finish, the scope (polish vs full refinish), the number of coats and the sheen — vague "polishing" quotes hide big differences. And weigh the cost of refinishing an old but sound piece against replacement: solid-wood furniture is almost always worth refinishing; low-grade particle-board units often are not.
Maintaining the new finish
A fresh finish lasts far longer with a little discipline. The care depends on which finish you chose:
- Let it cure fully. Keep the piece gently used for the first week or two — no heavy objects, no hot vessels, no wet glasses — while the coat hardens.
- Dust dry, wipe damp, never soak. A soft dry cloth for dust; a barely-damp cloth for marks. Water standing on any finish, especially French polish, causes rings and blushing.
- Use mats and coasters. Heat and moisture are the enemies of every finish; trivets and coasters do more for longevity than any polish.
- Match the polish to the finish. Do not put wax or silicone spray polish on a PU or melamine surface — it just smears and complicates future recoating. Follow the finish-specific routine in wooden furniture care.
- Control humidity and termites. India's monsoon swings and termite pressure attack the wood under the finish; pair a good finish with the measures in termite and moisture protection.
- Schedule the refresh. French polish and oiled pieces want periodic re-coating; set a reminder with the furniture maintenance scheduler so it happens before the surface fails.
How it connects
- Start from the pillar, the complete guide to furniture in India, and read this alongside its care siblings: furniture maintenance and wooden furniture care.
- When the damage is structural rather than cosmetic — loose joints, broken parts, lifting veneer — go to furniture repair and restoration; protect the wood underneath with termite and moisture protection.
- To understand what you are refinishing, see solid wood furniture and engineered wood furniture; for finish choices against laminate, PU finish vs laminate and best laminate finishes for Indian homes.
- Budget the work with the custom furniture estimator and time the upkeep with the furniture maintenance scheduler.
- For the indoor-air-quality angle on solvents and low-VOC finishes, see the healthy homes hub.
Key takeaways
- Learn your finish first — melamine, PU, lacquer, Duco, French polish or wax/oil — because it dictates both how you care for the piece and how it can be renewed.
- The tough finishes (PU, Duco, melamine) are sprayed and hard to spot-repair; the warm finishes (French polish, wax, oil) are hand-applied, easy to repair but need regular care. You trade protection against reparability.
- Polish a sound but dull finish; refinish — strip to bare wood and rebuild — only when it has failed or you are changing the colour. Test a hidden patch before committing to a full strip.
- The refinish sequence is clean, strip, repair, stain, seal, topcoat, cure — and the cure is not optional; rushing it leaves a soft, marking surface.
- Spray and stripping are hazardous, skilled work — flammable and toxic fumes, caustic strippers, fine dust. Use trained, licensed applicators with proper ventilation and PPE; the homeowner briefs and inspects, not sprays.
- Dark-to-light colour changes are hard and veneer refinishing is risky — set expectations and lean toward a light recoat over a full strip on thin veneer.
- Costs are quoted per square foot like carpentry and are indicative only — get local quotes stating finish, scope, coats and sheen.
References
- IS furniture standards (strength, durability and safety of furniture; named generally) — for any structural repair carried out alongside refinishing.
- CRI GreenPro / Indian Green Building Council (IGBC) — eco-labels and low-emission product recognition for lower-VOC furniture finishes (named generally).
- Formaldehyde and VOC emission classes (E0 / E1 / E2 context) — indoor-air-quality framing for finishes and the substrates beneath them (named generally).
- Finish and coating manufacturers' technical and safety data sheets — the authoritative source for coverage, coats, cure times and handling of each specific product.
- Skilled polishers, spray applicators and furniture restorers — for on-the-ground assessment, method and local cost quotes.
Every finish note, care routine and cost band here is an indicative planning aid only; confirm product-specific handling against the manufacturer's safety data sheet, verify any structural repair against the IS furniture standards and a competent carpenter, and have solvent-based spray and stripping work done by trained, licensed applicators with proper ventilation and PPE.
Export this guide
Related Guides — Deep-dive reading
Furniture Maintenance Guide: Keep Every Piece Lasting in India (2026)
The start-here routing guide to keeping furniture in good condition through Indian heat, humidity, monsoon, dust, hard water and termites — the one enemy and one habit for each material, a routine schedule you can actually follow, and where upkeep hands off to a professional.
FurnitureWooden Furniture Care in India: Cleaning, Polishing & Protection (2026)
A practical routine for keeping solid-wood and veneer/laminate furniture beautiful in Indian homes — gentle cleaning, the right polish for each finish, monsoon and sun defence, and quick fixes for water rings, heat marks and scratches.
FurnitureDoor Polishing & Refinishing in India: Melamine, PU, Duco & Oil Finishes Compared
What melamine, PU, Duco and traditional oil-wax finishes look like, how long they last, and how to strip, sand and re-polish a tired wooden or veneer door — plus indicative ₹ per door.
Home Doors & EntrancesRelated Tools — Try Free
Before vs After — Cost Reality Check
Compare what you expected to pay vs what you actually paid, category by category.
Reality CheckDoor Laminate Finish Selector
Answer a few questions and get a recommended door laminate finish family — woodgrain, solid, textured, gloss or matte.
Design SelectorWindow Cleaning Cost Calculator
Estimate professional window cleaning cost per visit and per year by access and frequency.
Window Calculator