
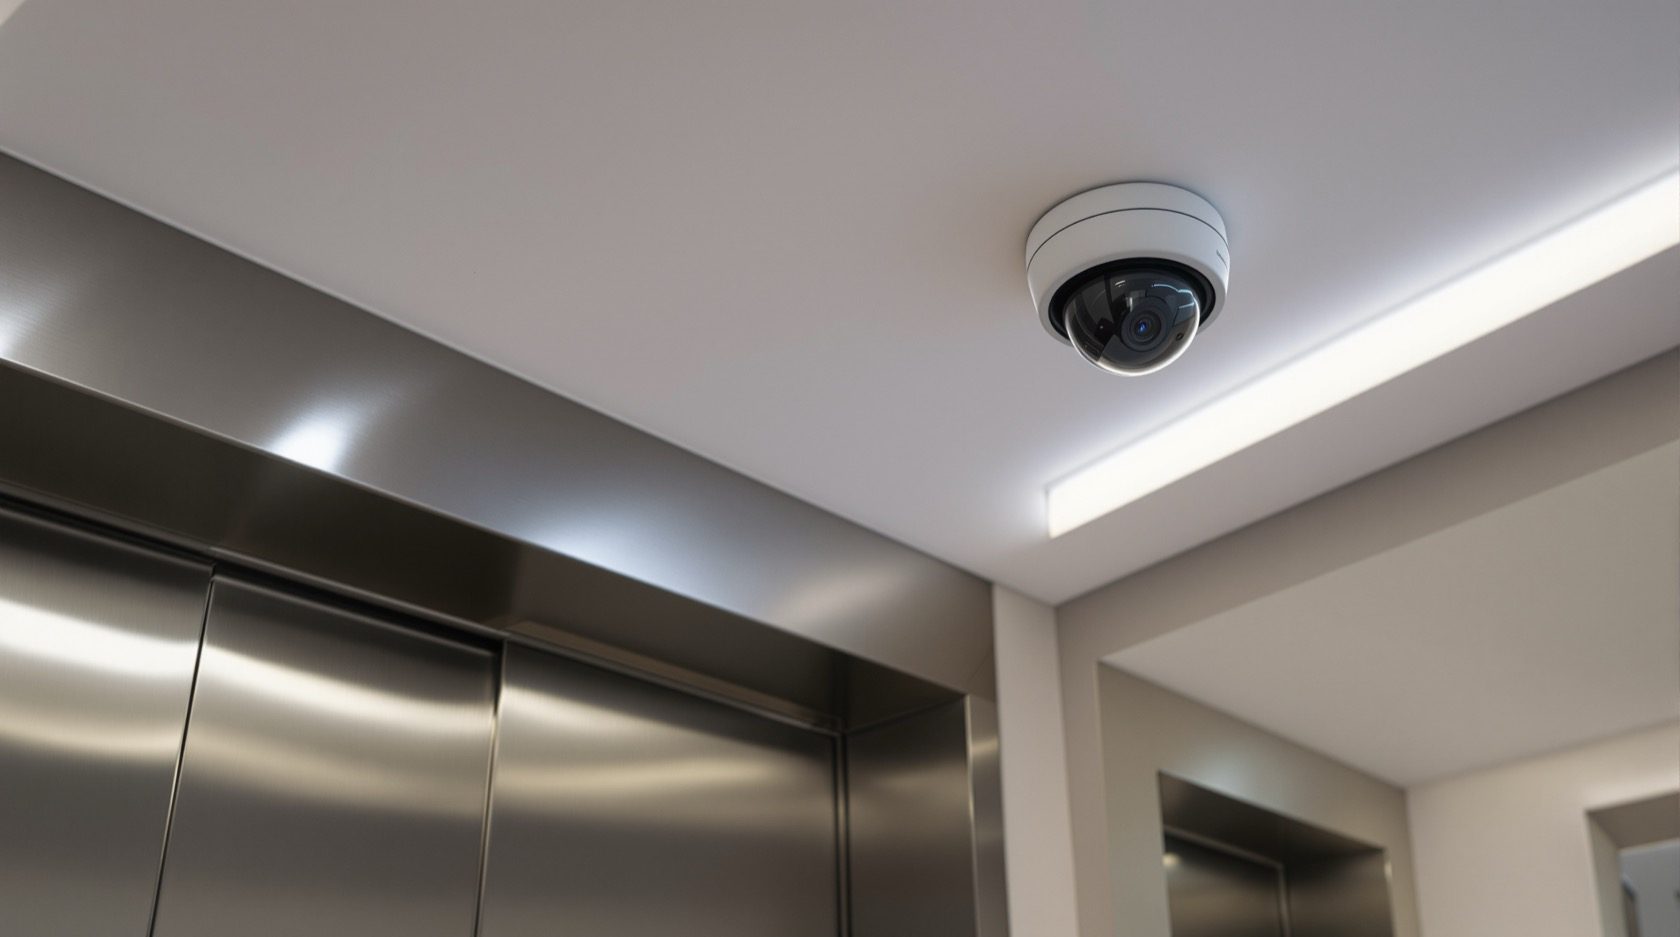
CCTV Placement for the Lift Lobby in India (2026): Faces at the Doors
Where to put a camera in an apartment lift lobby so it captures the face of everyone waiting for the lift — a vandal-resistant corner dome, the right height and angle, lighting, and the RWA consent and privacy rules for a shared common area.
The cctv placement lift lobby question is one every apartment society and gated community eventually faces: the lift lobby is the pinch point every resident, visitor, delivery agent and stranger has to pass through, yet it is a shared space, reachable by everyone, with its own politics and privacy concerns. Get one camera right here and you have a clean, timestamped face of nearly everyone who moves between floors. Get it wrong and you have a wall of footage showing only the backs of heads.
This guide is the lift-lobby chapter in Studio Matrx's CCTV hub. It applies the general camera placement principles to this one zone. Note the scope carefully: this is about the lobby — the common landing outside the lift on each floor (and the ground-floor lobby) — not the inside of the lift car, which is a separate, more sensitive decision handled by the society's lift and privacy policy. Cross-link, don't duplicate, the sibling zones: the staircase and the corridor / passage.
Scope & safety. This guide helps you plan and decide positions, then brief a professional. A lift lobby is part of a fire-egress path — a camera, its bracket or its cabling must never obstruct the lift doors, a fire door, a staircase entry or fire-fighting access. Mounting at height, structured cabling and any mains-electrical work belong to a licensed installer and electrician. Cameras belong only in the shared common area with a legitimate purpose — never inside flats, and positioned to respect residents under the spirit of the DPDP Act, 2023. Not legal advice.
What the lift lobby needs to capture
A lift lobby camera has one primary job: a clear, well-lit face of every person waiting for or stepping out of the lift. Everything else — the parcel left on the floor, the argument over the notice board, the person loitering — is a bonus that flows from a good face-height view of the waiting area.
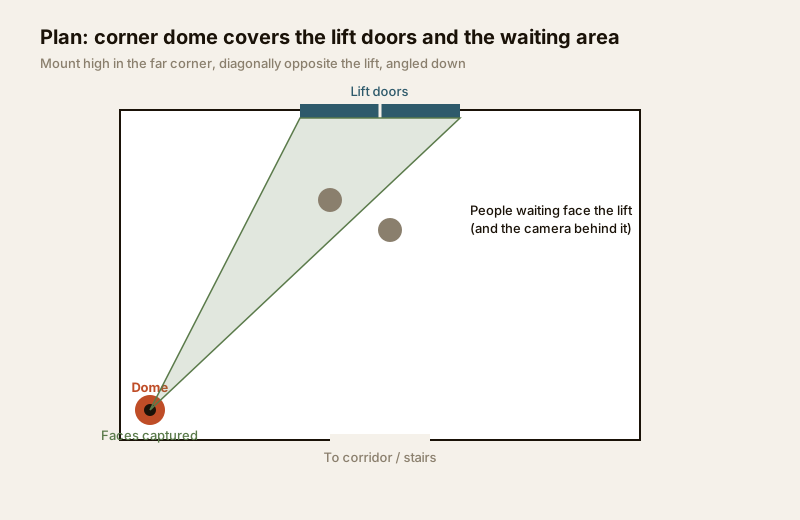
The lucky break the geometry hands you is this: people waiting for a lift naturally face the lift doors. They stand, look up at the floor indicator, and wait. So a camera placed behind the line where people stand — looking in the same direction they look — sees every face square-on. That single insight decides the whole placement.
The zone breaks into two coverage needs:
- The lift doors themselves — who opens them, who steps out, and at what time. This is the "identify anyone using the lift" record.
- The waiting area / landing — the floor space in front of the lift where people stand, and the openings from it to the corridor and staircase.
Camera choice for the lift lobby
Because a lobby is an indoor shared space that everyone can reach, the camera choice is driven less by weather and more by discretion, tamper-resistance and a wide enough view to hold the whole landing.
| Zone need | Camera to choose | Why it fits the lobby |
|---|---|---|
| Main lobby camera | Vandal-resistant dome (IK-rated) | Flush, hard to grab or turn; the dome form suits a ceiling corner and hides its exact aim |
| Reachable / low-ceiling lobby | IK10 metal dome | Impact-rated body survives a knock or a deliberate strike — see the vandal-proof / IK guide |
| Dim lobby, frequent power cuts | Dome with good low-light / IR | Lobbies are often gloomy; a low-light camera holds faces without blowing highlights |
| Wide ground-floor lobby | Wider-angle or a second dome | One camera cannot hold a large double-height lobby — plan two rather than stretch one thin |
For a typical residential floor lobby, a single 2MP–4MP vandal-resistant dome in the corner is the workhorse. Reserve bullets and turrets for outdoor lines — a protruding bullet at head height in a lobby is an invitation to be turned or covered. Confirm the shape for each spot with the camera type selector.
Height, angle and position
The corner dome lives or dies on three numbers.
| Spec | Recommended for a lift lobby | Reason |
|---|---|---|
| Mounting height | 2.6 – 3.0 m (ceiling corner, out of arm's reach) | Above a jumping reach so it stays a working camera, not a target |
| Horizontal position | Corner diagonally opposite the lift doors | Looks back at the faces of everyone facing the lift |
| Down-tilt | ~15° – 25° below horizontal | Captures faces, not the ceiling or the far wall |
| Distance to doors | 3 – 5 m across the landing | Close enough for a recognisable face, wide enough for the whole waiting area |
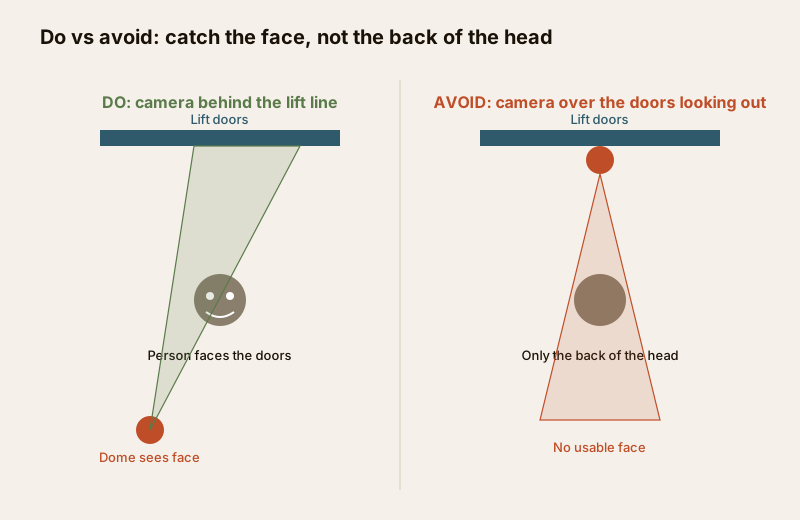
The golden rule for faces: place the camera behind the people, looking the way they look. The classic mistake is mounting the camera above the lift doors looking outward into the lobby — that seems logical, but it only ever sees the back of the head of anyone actually using the lift, because they have turned to face the doors. Put the camera in the opposite corner instead, and the same person is now facing straight at your lens.
For the underlying maths of height versus tilt versus identification distance, the camera height & angle guide and the mounting-height calculator let you dial it in for your ceiling.
Lighting — the make-or-break for a lobby
A lift lobby is one of the trickiest lighting environments in the whole building, and lighting decides whether the face you capture is usable.
- Chronic gloom. Many lobbies are internal, windowless and lit by one weak fixture. A camera set for a bright scene will render faces as dark smudges. Choose a camera with genuine low-light performance and, ideally, improve the lobby light itself — good even lighting helps residents and the camera.
- The lift-door backlight trap. When the lift arrives, its bright interior light spills into a dim lobby. A person stepping out is then strongly backlit — a bright doorway behind a dark silhouette. Without WDR (wide dynamic range), the camera exposes for the bright lift interior and the face goes black. Insist on a WDR-capable camera for any lobby that faces the lift straight on.
- Power cuts. Lobbies go dark in a cut, exactly when you might most want footage. Put the recorder (NVR/DVR) and the network switch on a UPS or inverter so the system keeps recording through a cut — a camera that dies with the lights is half a system.
Avoid aiming the camera straight into a glass lobby door or a bright window that will silhouette everyone against it — offset the angle so the light is behind or beside the camera, not behind the subject.
Vandal, consent and privacy — the shared-area realities
This is where a lobby camera differs most from a private gate or driveway. The lobby belongs to everyone, which creates two obligations.
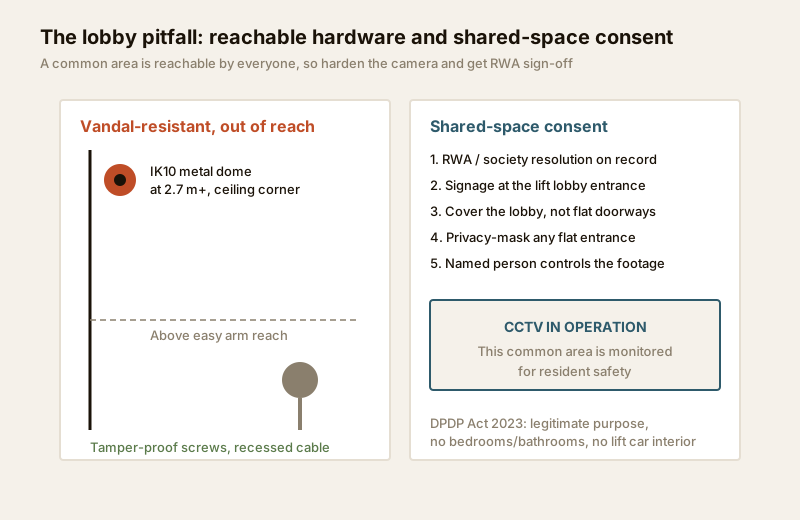
1. Harden the hardware, because it is reachable. Unlike an out-of-reach outdoor bullet, a lobby camera sits in a space anyone can loiter in. Use an IK-rated (impact-resistant) dome, mount it high in the ceiling corner, use tamper-proof screws, and conceal or recess the cabling so it cannot simply be pulled. A visible cable dangling to a camera is the first thing a determined person disables.
2. Get society consent and respect privacy. A camera in a common area needs the RWA / society's approval on record — ideally a managing-committee resolution or an AGM decision — not one owner acting alone. Along with that:
- Signage. Put a clear "CCTV in operation" sign at the lobby so residents and visitors know the common area is monitored — see the CCTV signage guide.
- Aim at the common space, not into flats. The camera should watch the lift and the shared landing, not point directly into any flat's front door or through a doorway into someone's home. Where a flat entrance unavoidably falls in frame, apply privacy masking — see the privacy masking guide.
- Never the sensitive spaces. No cameras in the lift car interior as a private-use concern for the society to decide, and absolutely never in areas with an expectation of privacy.
- Controlled footage. Name who can access recordings (usually the society office / a designated committee member), for how long footage is retained, and the legitimate purpose — resident safety — consistent with the DPDP Act, 2023.
Common lift-lobby pitfalls
- Camera over the doors looking out. The number-one error — captures only backs of heads. Put it in the opposite corner.
- Mounted within reach. A dome at 2 m on a side wall is easily covered or knocked askew. Go to the ceiling corner, above reach.
- No WDR against the lift backlight. Every person stepping out becomes a dark silhouette. Specify WDR.
- Blocking egress. A bracket or trunking that narrows the lift-door approach or a fire door is a life-safety failure — keep all hardware clear of the escape path.
- One camera for a huge ground-floor lobby. A double-height entrance lobby needs two views; do not stretch one wide lens until faces are unusable.
- Aiming into a flat's doorway. A privacy breach and a source of neighbour disputes — mask it or re-angle.
- Skipping the RWA resolution. One owner installing a common-area camera unilaterally invites objections; get it on the society record first.
Planning the lobby alongside the rest of the building
A lift lobby is one node in a vertical-circulation scheme. The same person moving through the building should be picked up handing off between zones: the lobby camera catches them at the lift, the staircase camera catches them if they take the stairs, and the corridor camera picks them up along the passage to their flat. Plan these as an overlapping chain, not isolated dots, using the CCTV placement planner to sketch the coverage and the coverage calculator to check each dome actually reaches the doors. For the society-wide picture, the gated communities security guide sets the common-area context.
When to bring in a professional. Decide the corner, the height and the target yourself — then hand the ceiling mounting at height, concealed cable routing, weatherproof terminations where needed, and NVR/UPS commissioning to a licensed installer. Anything at the mains board or a new circuit for the recorder is a licensed electrician's job; see the electrical hub. And route the decision to install a common-area camera through the RWA, not around it.
Key takeaways
- The lift lobby's one job is a clear face of everyone waiting for or leaving the lift — and people naturally face the lift, so a camera behind them sees every face.
- Put a vandal-resistant (IK-rated) dome in the corner diagonally opposite the doors, at 2.6 – 3.0 m, tilted ~15° – 25° down — never over the doors looking out (backs of heads only).
- Fight the lobby's gloom and the lift-door backlight with a WDR, good-low-light camera, and keep the recorder on a UPS for power cuts.
- Because the lobby is reachable and shared, harden the camera (tamper-proof screws, recessed cable) and never let any hardware block the lift doors or a fire-egress path.
- Treat it as a common-area decision: get the RWA's consent on record, add signage, privacy-mask flat doorways, keep out of the lift car and private spaces, and name who controls the footage under the DPDP Act, 2023.
References
- Digital Personal Data Protection Act, 2023 — a common-area CCTV needs a legitimate purpose (resident safety), society consent, signage, defined retention and a named controller; it must not capture the interior of flats.
- Manufacturer specification sheets — verify the IK (impact) rating, low-light / WDR performance and field of view for the exact dome model before ordering.
- National Building Code of India (SP 7), Bureau of Indian Standards, and local municipal bye-laws for any life-safety, egress, structural or electrical aspect of an install; verify the current edition via the BIS catalogue: https://www.services.bis.gov.in/
This is an educational overview, not legal advice. Mounting at height, cabling and any electrical work are qualified professional tasks, and common-area installation is a society decision — engage licensed installers, obtain RWA consent, and verify any standard's current status via the BIS catalogue before relying on it.
Export this guide
Related Guides — Deep-dive reading
CCTV Placement Staircase Guide (India 2026): Watch the Flight Without Blocking the Escape
Where to mount a camera on the staircase so it reads faces going up and down the flight, why it must never obstruct the escape route or handrail, and how to beat the dim, backlit stairwell in an Indian home or society.
SecurityVisitor Vehicle Management in India: A Professional Guide
The everyday weak point of every society and office gate is not the resident's car — it is the visitor, the cab, the delivery rider and the contractor who must be let in without opening the whole park to anyone. This is the process, not just the hardware: verify at the gate before the boom lifts, park visitors away from resident bays, and never jam the gate a fire tender needs.
SecurityCCTV Camera Placement in India (2026): The Principles Behind Every Good Position
The universal rules that decide whether a camera earns its keep — cover the choke points first, face the flow not a blank wall, keep the sun out of frame, mount out of reach, give each camera one job, overlap so there are no gaps, and respect your neighbours.
SecurityRelated Tools — Try Free
CCTV Identification-Distance Calculator
How far a camera can still identify a face or number plate (DORI 250 px/m), from resolution, lens and sensor.
Identify DistanceCCTV Camera Type Selector
Answer five questions and get the right camera form factor — dome, vandal dome, bullet, turret or PTZ — with reasons.
Camera SelectorCCTV Lens & Field-of-View Calculator
Focal length, sensor and resolution to field-of-view angle, scene width and DORI detect/observe/recognise/identify distances.
Lens & FoV