
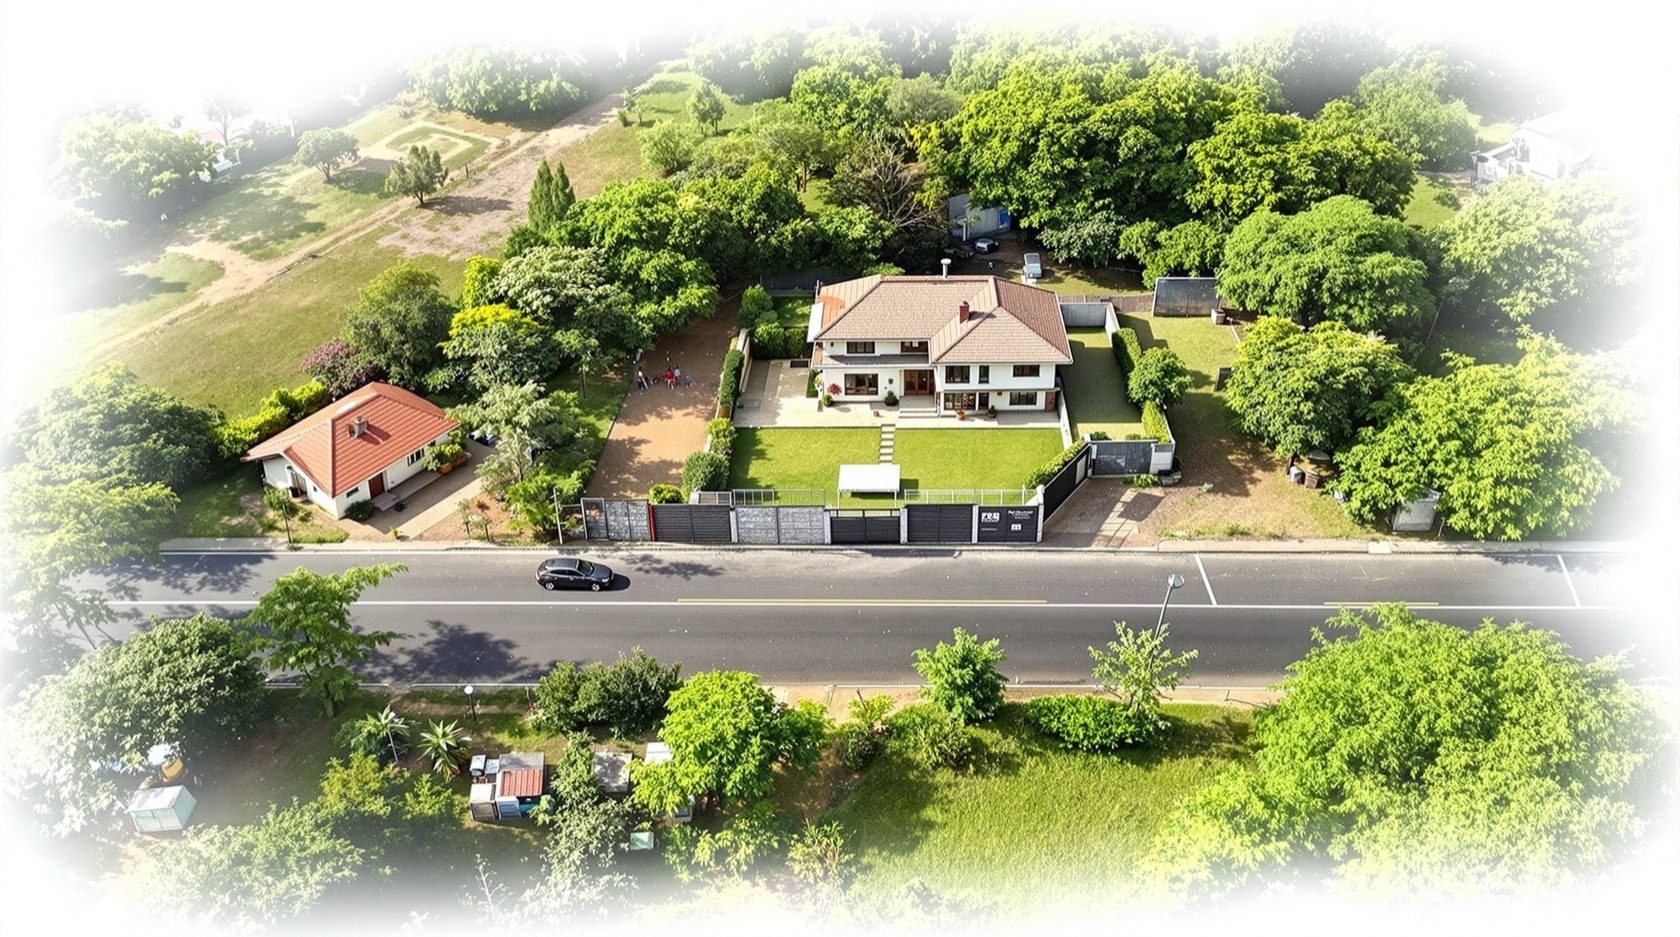
Site Security Assessment for Indian Plots and Homes
How to read a plot or an existing site for security before you build or move in — location and approach, natural surveillance, boundaries and levels, existing vegetation, environmental factors, and how the findings feed the design and the budget.
Most security failures are decided before a single camera is bought — by where the house sits on the plot, how the plot sits on the street, and what the site around it hides or reveals. A naturally overlooked, well-lit site that is hard to approach unseen makes every device you add work harder; an isolated, dark site full of blind cover fights you at every step. This guide teaches you to read a site for security — a bare plot before you build, or the ground under a home you are about to buy or already own.
It is a Section-B planning guide, going one level deeper than the master Security Risk Assessment Guide on one specific input: the site itself. Where the master ranks your overall risk, this reads the land and turns it into design and budget decisions. The Site & Perimeter Security Assessment walks these factors interactively, and the Home Security Risk Scorecard folds the result into your overall plan.
Scope & safety. This is a defensive planning guide. It teaches you to assess a site to find and fix weaknesses on your own land — never how to exploit a site or defeat a measure. It does not profile neighbours or groups; neighbourhood judgements belong in the separate neighbourhood risk assessment using public data and RWA/police channels. Life-safety and structural work — boundary structures, gates, mains electrical, drainage and flood works — is qualified work: specify it, then have a licensed professional design, build and certify it.
Why the site comes first
You cannot move a house once it is built, or easily change the street it faces. Every later layer — lighting, cameras, grilles, an alarm — is shaped by the site you started with. Reading the site early lets you design out weaknesses for a few thousand rupees at drawing stage that would cost lakhs to retrofit later, or, for an existing home, understand which weaknesses are the land's fault and which measures will actually counter them.
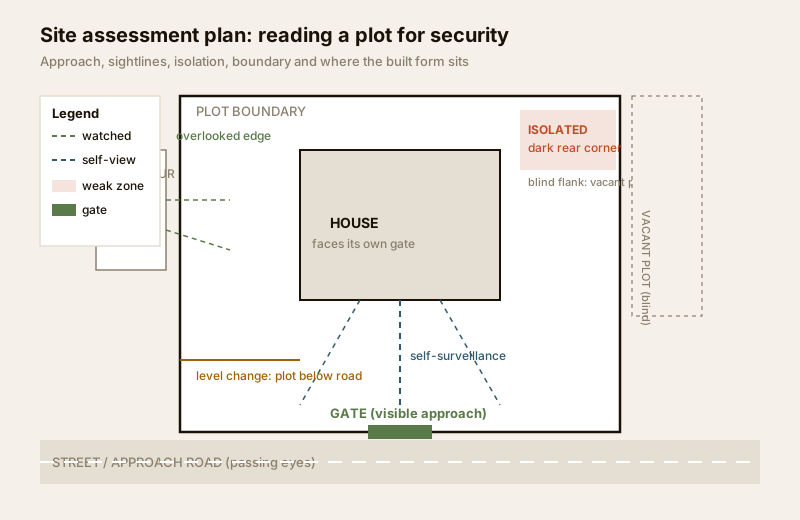
This guide walks the factors in survey order: how the site sits on the street, the surveillance it offers, its boundaries and levels, what grows or stands on it, its environment, and how the built form should sit on it. Do the survey twice if you can — once in daylight and once after dark, because isolation and lighting only show their true colours at night.
Location and approach: how the site sits on the street
Stand at the street and read the plot the way anyone approaching it would.
- Overlooked or isolated? A plot flanked by occupied houses with windows facing it is watched for free, all day. A plot beside a vacant lot, blank compound wall, park edge or under-construction shell has a flank no one sees. Note every edge and mark it watched or blind.
- The approach road. Is the plot on a busy through-road, a quiet internal lane, or at the mouth of a dead-end? A dead-end or cul-de-sac plot has less passing traffic to notice trouble; a corner plot has two exposed street edges but usually more passing eyes — each is a trade-off, not simply good or bad.
- Access and escape routes. Look honestly at how someone could reach the plot away from watching eyes — a service lane behind, a storm-drain easement, a shared side setback, a gap to the vacant plot next door. These are the routes a good design must light, wall or overlook. You are not planning an intrusion; you are finding the paths a defender must close.
- Distance to help. How far, and how fast, is the nearest neighbour, RWA gate or police station? A remote farm-plot and an inner-colony plot need very different amounts of self-reliant detection and response.
For a bare plot, you can still choose where the gate and the entrance face, and often which plot to buy at all. For an existing home, these factors are fixed — but naming them tells you precisely how much lighting, fencing and detection you must add to compensate.
Natural surveillance: what the site lets you see
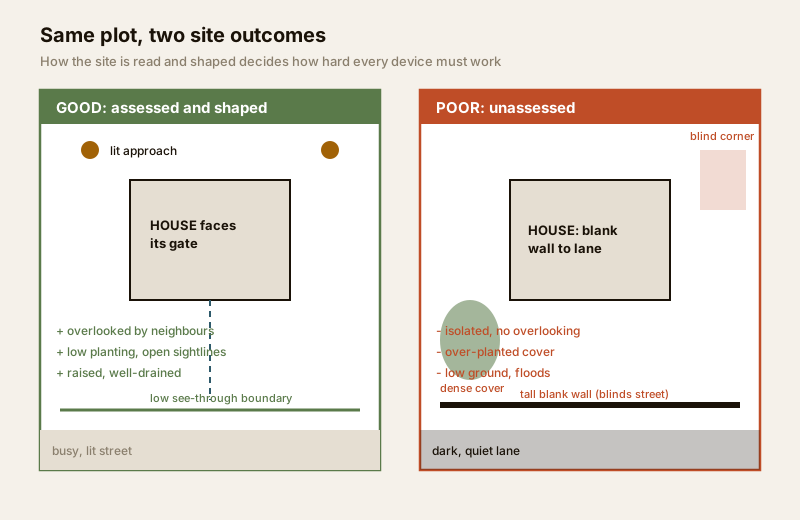
Natural surveillance is the single most valuable thing a site can give you: the more of the plot that is visible — from the street, from neighbours, and from inside the future house — the less an intruder can work undisturbed. Assess it as three overlapping fields of view.
| Surveillance field | Ask | Good sign | Weak sign |
|---|---|---|---|
| From the street | Can passers-by see the gate and front of the plot? | Open frontage, low or see-through front boundary, active street | Blank high wall, deep dark setback, dead lane |
| From neighbours | Do neighbouring windows and terraces overlook the plot edges? | Occupied houses with windows facing your flanks | Vacant plots, blank walls, shuttered sides |
| From inside the home | Will the house see its own gate, approach and yard? | Kitchen/stair windows onto gate and rear yard | Long blind side passages, hidden rear service yard |
A weak field in any row is a blind spot — and blind spots are the site factor that most reliably becomes a break-in path. Read more on finding and closing them in the blind-spot identification guide. The design fix is often free at planning stage: put a window where the blank wall was, pull the house forward so it faces its own gate, keep the front boundary low or perforated so the street can see in.
Boundaries and level changes
The boundary is where the site meets the outside world, and level changes quietly reshape it.
- Existing boundary. Wall, fence, hedge, or nothing? Note its height, condition, whether it can be climbed (a rough stone wall, chain-link, an adjacent structure that gives a leg-up), and whether it is seen along its whole length or turns blind corners. A tall solid wall keeps eyes out as well as intruders — it can reduce natural surveillance, so its design is a balance, covered in the perimeter vulnerability assessment.
- Level changes. A plot below the road lets someone drop in over the wall unseen and hides them once inside; a plot above the road is harder to enter and easier to watch. A slope, plinth, retaining wall or neighbour's higher terrace all change how climbable the boundary really is. Walk the levels and note where the ground helps an intruder up.
- The gate and its threshold. Where does the gate sit, is its approach visible, and does the level let a vehicle stop unseen beside it? The gate is the busiest and often weakest point — assess it with the entry and exit security assessment.
Existing vegetation and structures
What already grows or stands on and around the site can help you or hide an intruder — sometimes both.
- Trees and shrubs. Mature trees give shade and privacy, but a big canopy or dense shrub bank beside the boundary creates deep cover and can bridge a wall. The rule is simple: keep planting low near the boundary and house so it cannot conceal a person, and keep taller canopy clear of walls and first-floor windows. You are not clearing the plot; you are shaping sightlines.
- Outbuildings and the vacant next door. A servant quarter, pump room, vehicle shed, scaffolding on a neighbouring construction, a stack of building material — each is potential cover or a climbing aid. Note them and plan to light or overlook them.
- Ground-floor cover. Recesses, deep porches, stair-under voids and blank side passages are where someone can wait unseen. Mark them now so the design can light or open them up.
Environmental factors
Some site risks are not about intruders at all, yet they shape your security directly.
- Flooding and drainage. A low-lying or poorly drained plot floods in the monsoon, and flooding knocks out ground-level power, cameras and gate motors exactly when you need them. Note the plot's level relative to the road and drain, and any water-stain lines on existing walls. Route flood and drainage design to a professional and coordinate it with your electrical planning so devices sit above expected water and on protected circuits.
- Lighting. Is the lane lit by working street lights, or dark and patchy after dusk? A poorly lit approach is one of the most common — and most fixable — site weaknesses. Walk it at night and mark every dark stretch you would need to light yourself.
- Power reliability. Frequent, long power cuts mean any electrical measure needs battery or inverter backup to be real. Note the local supply reality now.
- Utilities and easements. Overhead lines, a shared drain, a common access strip or a utility easement can dictate where you can build and wall, and can create a right-of-way others use — worth mapping early.
Orientation and how the built form sits on the plot
For a plot you are about to build on, this is where a good site assessment pays for itself, because you still control the biggest lever: where the house sits and which way it faces.
- Face the house toward its own approach. Put habitable rooms, the kitchen and the stair window where they overlook the gate, drive and front — so the home watches itself. Avoid turning blank walls and dead side passages to the street or vacant plot.
- Position the entrance for visibility. A main entrance seen from the street and from inside is far safer than one tucked down a hidden side return.
- Use setbacks deliberately. Bye-law setbacks are unavoidable, but you choose what fills them — light and low planting that keeps sightlines open, not deep dark strips of cover. Assess side and rear setbacks as potential approach routes.
- Keep security clear of egress. However you arrange grilles, gates and the boundary, they must NEVER block a fire escape or exit route. This is a hard rule — coordinate it with your architect and the building regulations and compliance requirements.
If you are working with an architect, share this assessment directly — the security design guide for architects and the security planning guide for new homes show how these site findings become plan decisions.
The site security assessment checklist
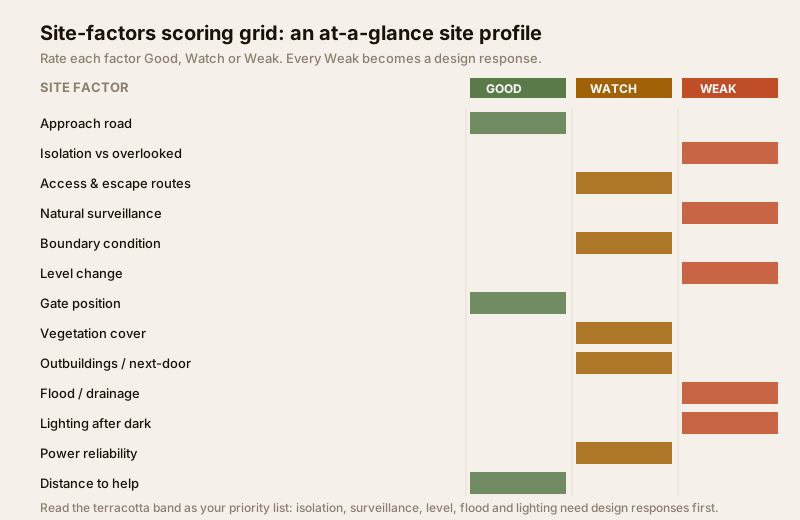
Walk the site with this table and rate each factor: Good (a natural strength, keep it), Watch (a mild weakness, note it), or Weak (a real gap that needs a design response or a countermeasure). Anything you rate Weak goes into your plan.
| Site factor | What to look for | Rating: Good / Watch / Weak |
|---|---|---|
| Approach road | Busy through-road vs quiet lane vs dead-end; passing eyes | |
| Isolation vs overlooked | Occupied houses vs vacant/blank edges facing the plot | |
| Access & escape routes | Service lanes, side gaps, easements away from watching eyes | |
| Natural surveillance | Street, neighbour and self-surveillance of the plot | |
| Boundary condition | Height, climbability, condition, blind corners | |
| Level change | Plot below/above road; slopes that ease climbing | |
| Gate position | Visible approach; can a vehicle stop unseen? | |
| Vegetation | Cover or climbing aid near boundary and house | |
| Outbuildings / next-door | Sheds, scaffolding, material stacks as cover | |
| Flood / drainage | Low ground, water stains, monsoon risk to power | |
| Lighting | Street and lane lighting after dark; dark stretches | |
| Power reliability | Cut frequency; need for backup | |
| Distance to help | Neighbour, RWA gate, police station reach |
The point of rating is not precision — it is to move from a vague "this feels exposed" to a specific, ranked list of site weaknesses you can design around or counter.
From site factors to design responses
Every Weak rating should map to a concrete response. Use this table to turn findings into decisions and a rough budget order — cheap design moves first, hardware later.
| Site factor found weak | Design / planning response | Rough Indian cost order |
|---|---|---|
| Isolated / un-overlooked edge | Face windows to that edge; low or perforated boundary; add lighting | Low at design stage; moderate to retrofit |
| Poor natural surveillance | Pull house forward; window onto gate and yard; open side passages | Free to low at design stage |
| Blind rear service yard | Light it, overlook it from kitchen/stair, avoid deep recesses | Low |
| Climbable / blind boundary | Right-height wall with sightline breaks; assess before adding topping | Moderate (professional) |
| Plot below road level | Raise plinth, design boundary and gate for the level, watch drop-in points | Moderate to high (professional) |
| Vegetation cover | Keep planting low near boundary/house; clear canopy off walls | Low, ongoing |
| Flood-prone / poor drainage | Professional drainage; mount devices above water; protected circuits | Moderate to high (professional) |
| Dark lane / approach | Motion-sensor and dusk-to-dawn lighting on the approach and gate | Low to moderate |
| Unreliable power | Battery/inverter backup for cameras, gate motor, VDP | Moderate |
| Remote / far from help | Weight toward detection + a clear response plan and numbers | Varies |
Notice how many of the high-value responses are design decisions, not purchases — which is exactly why the site assessment must come before the budget, not after. For a bare plot, this table shapes the drawings; for an existing home, it tells you which countermeasures actually earn their place. Sequence the spending with the security cost planning guide.
When to bring in a professional
Do the walk-around assessment yourself — you can read a site's exposure with your own eyes. But hand the resulting work to qualified people wherever life-safety, structure or services are involved: drainage and flood works, retaining and boundary structures, gates and their motors, mains electrical, and any structural perimeter. Specify what the site needs and why, then let a licensed engineer or installer design, build and certify it. For a bare plot, an architect should fold this assessment into the design from the first sketch; for a larger or remote property, a one-off professional site survey is money well spent.
Re-read the site when it changes
A site assessment is a snapshot. The vacant plot next door gets built on — or demolished, opening a new blind flank. The council fixes or removes a street light. A new service lane appears behind. Trees you planted grow into cover. Re-walk the site after any change to the surroundings, any renovation, and at least once a year, and update your plan with the site and perimeter tool.
Key takeaways
- The site decides the ceiling of your security. Read location, approach, surveillance, boundaries, levels, vegetation, environment and orientation before you spend on hardware.
- Natural surveillance is the most valuable free measure — an overlooked, open, self-watching site beats a walled-blind one every time.
- Rate each factor Good / Watch / Weak, then map every Weak to a concrete design response, cheap design moves before hardware.
- For a bare plot, design out weaknesses at drawing stage; for an existing home, name which weaknesses are the land's fault and counter only those.
- Route drainage, structural and electrical work to licensed professionals, keep security clear of fire egress, and re-read the site whenever the surroundings change.
Start with the Site & Perimeter Security Assessment, fold the result into the master risk assessment, then browse the full security guides collection to plan each response in depth.
This is an educational planning guide. It is strictly defensive and does not describe how to exploit a site or defeat any security measure. Drainage, structural, boundary, electrical and electronic-lock work is qualified professional work — engage licensed designers and installers and verify any applicable National Building Code or municipal bye-law requirement for your project.
Export this guide
Related Guides — Deep-dive reading
Blind Spot Identification for Home Security in India
A defender's method to find and close the blind spots around an Indian home — the corners no camera, light or neighbour can see. Walk it by day and after dark, map each coverage gap, and fix it by re-aiming cameras, adding light, trimming planting and opening sightlines.
SecurityHome Lighting and Visibility Security Assessment for Indian Homes
How to assess your home's security lighting after dark — checking every entry, path and boundary for coverage, uniformity and glare, testing what each camera can actually see at night, and turning the findings into a simple lighting plan.
SecurityEntry and Exit Assessment for Indian Homes
How to audit every way IN and OUT of your home or building — a complete inventory of doors, gates, windows, balconies and forgotten access points, rated for how easily each could be used to get in and how well it serves escape in an emergency, turned into a hardening priority list.
SecurityRelated Tools — Try Free
Site & Perimeter Security Assessment
Rate your site across five areas — site, neighbourhood, perimeter, entry/exit and lighting — for a readiness score and prioritised fixes.
Site AssessmentCross-Ventilation Analyzer
Estimate airflow and air changes per hour (ACH) from room size, window areas, layout, and local wind — with NBC 2016 Part 8 compliance check.
Ventilation CalculatorWindow Grill Design Selector
Pick a window grille style and material by priority — security, looks, budget, view — and estimate cost.
Window Tool