
Flooring Quality Inspection in India: The On-Site QC & Snagging Checklist for Delivery, Laying and Handover (2026)
A homeowner's stage-by-stage flooring QC checklist with pass/fail criteria - what to inspect at material delivery, what to watch during laying, and how to snag the floor before you sign off.
A floor is one of the few things in your home you cannot quietly fix later. Once tiles are bedded in adhesive or stone is set in mortar, a wrong shade, a high edge or a hollow tile means breaking up the work and starting again - paying twice for the same square foot. The good news is that almost every flooring defect can be caught at one of three checkpoints with nothing more than your eyes, a straightedge and a coin. This is the on-site quality inspection and snagging checklist Studio Matrx hands homeowners so they can sign off a floor with confidence instead of regret.
Inspection is not about distrusting your contractor. The best mason in India still ships tiles that the dealer mixed across lots, still beds the odd hollow tile on a busy day, and still appreciates a client who flags a problem on day one rather than at handover. Catching defects early is cheaper and friendlier for everyone.
The three checkpoints
Flooring QC has exactly three windows, and each closes:
1. At delivery - before a single box is opened for laying and before you sign the delivery challan. Once boxes are cut open and tiles are on the floor, the dealer will not take back a wrong lot.
2. During laying - while adhesive or mortar is still workable and tiles can be lifted and reset. Lippage, hollow tiles and slope must be caught now.
3. After laying / at handover - the snag walk, before final payment and before furniture lands. Grout, cleaning, chipped edges and missing pieces get listed here.
Miss a checkpoint and the fix gets an order of magnitude more expensive. Below, each stage gets a pass/fail table you can carry on your phone.
Stage 1 - Inspection at material delivery
The delivery truck is your single best chance to reject the wrong material. Open boxes from different pallets, not just the top one, and check the printed end-label on each box before you accept the consignment.
| Check at delivery | What to verify | PASS | FAIL (reject / replace) |
|---|---|---|---|
| ISI / BIS mark | Box and tile carry the ISI mark with IS 15622 licence number (mandatory under the tile QCO) | Mark + licence number present | No ISI mark, or unbranded "open stock" for main areas |
| Brand / model / size | Matches your written quote and order (e.g., 600x600 mm, the exact design) | Exact match | Wrong design, size or finish |
| Calibre | The calibre code (W, or a number) is identical on every box | One calibre across all boxes | Mixed calibres - causes lippage |
| Shade / lot (batch) | Same shade and lot/batch number on every box | One lot, plus your 5-10% spare from the same lot | Multiple lots - patchy colour |
| Quantity & spares | Count boxes against the order; confirm the extra 5-10% wastage allowance | Full count + spare present | Short, or exact-area only (no spare) |
| Breakage in transit | Open 3-4 boxes from different pallets; check corners and faces | Negligible breakage within trade norm | Heavy breakage - note on challan, claim |
| Warping / bowing | Sight along the diagonal of a few tiles; lay two face-to-face | Flat, edges meet | Visible bow / rocking |
| Surface defects | Glaze pinholes, scratches, chipped edges, printing blur | Clean face, crisp edges | Seconds-grade defects |
| Stone slabs (if marble/granite) | Inspect full slabs in daylight: veining, hairline cracks, resin fills, thickness 16-20 mm | Sound, consistent, declared origin | Cracks, heavy fills, relabelled origin |
| GST invoice & e-way bill | Tax invoice with GST (tiles 18%), e-way bill for transport | Valid GST invoice received | Cash "kaccha" bill only - no warranty/credit |
For the laboratory side of these checks - water absorption, breaking strength and abrasion - see our guide on tile testing and quality in India. Why calibre and lot matter so much: ceramic and vitrified tiles shrink slightly and unevenly during firing, so factories sort the output into calibre bands (tiny size groups) and shade lots (dye batches). Mixing a 599.4 mm tile with a 600.2 mm tile across one floor guarantees uneven joints and lippage; mixing two lots guarantees a colour band you will see every day in raking light. Insist on one calibre, one lot, plus spares from that same lot - the spare is for the cracked-tile replacement you will inevitably need years later. For more on grading and sorting, see our guides on tile grades and sorting in India and spotting fake tiles in India.
Sign the delivery challan only after this check. Write any breakage or shortfall on the challan before signing - that note is your claim.
Stage 2 - Inspection during laying
This is the highest-value checkpoint because the floor is still fixable. Visit while the mason is actually working, ideally the first morning, so the laying pattern, level and slope are set correctly from the start rather than corrected after 100 sq ft.
| Check during laying | Tool / method | PASS criterion | FAIL trigger |
|---|---|---|---|
| Floor level / flatness | 2 m aluminium straightedge / spirit level across tiles | Gap under straightedge approx <=3 mm over 2 m | Visible dip or hump, rocking straightedge |
| Lippage (edge step) | Straightedge across a joint; run a finger / coin across | Step approx <=1 mm (large tiles allow a hair more) | Edge you can feel or catch a nail on |
| Hollow / debonded tiles | Tap every tile with a coin or tap rod (ring test) | Solid, dull-flat sound everywhere | Hollow drum sound = poor adhesive coverage |
| Adhesive coverage | Lift a fresh tile occasionally to inspect the back | Approx 80%+ coverage (90%+ wet areas), no big voids | Five-blob "dabbing", bare corners |
| Joint width & alignment | Look down a run; check spacers used consistently | Even joints, straight lines, aligned grid | Wandering joints, varying gaps |
| Slope in wet areas | Spirit level toward the drain; pour a mug of water | Approx 1:80 to 1:100 fall, water runs to drain | Flat floor, water ponds away from trap |
| Skirting & cut edges | Check cuts at walls, door frames, corners | Neat, consistent, factory edge outward | Jagged cuts, gaps stuffed with grout |
| Expansion / movement joints | Confirm gap at walls and across large/outdoor runs | Perimeter gap left, movement joints at spec | Tiles tight to wall - tenting risk |
| Layout / pattern start point | Confirm the setting-out before bulk laying | Full tiles at the focal sight-line, balanced cuts | Thin slivers at the doorway, off-centre |
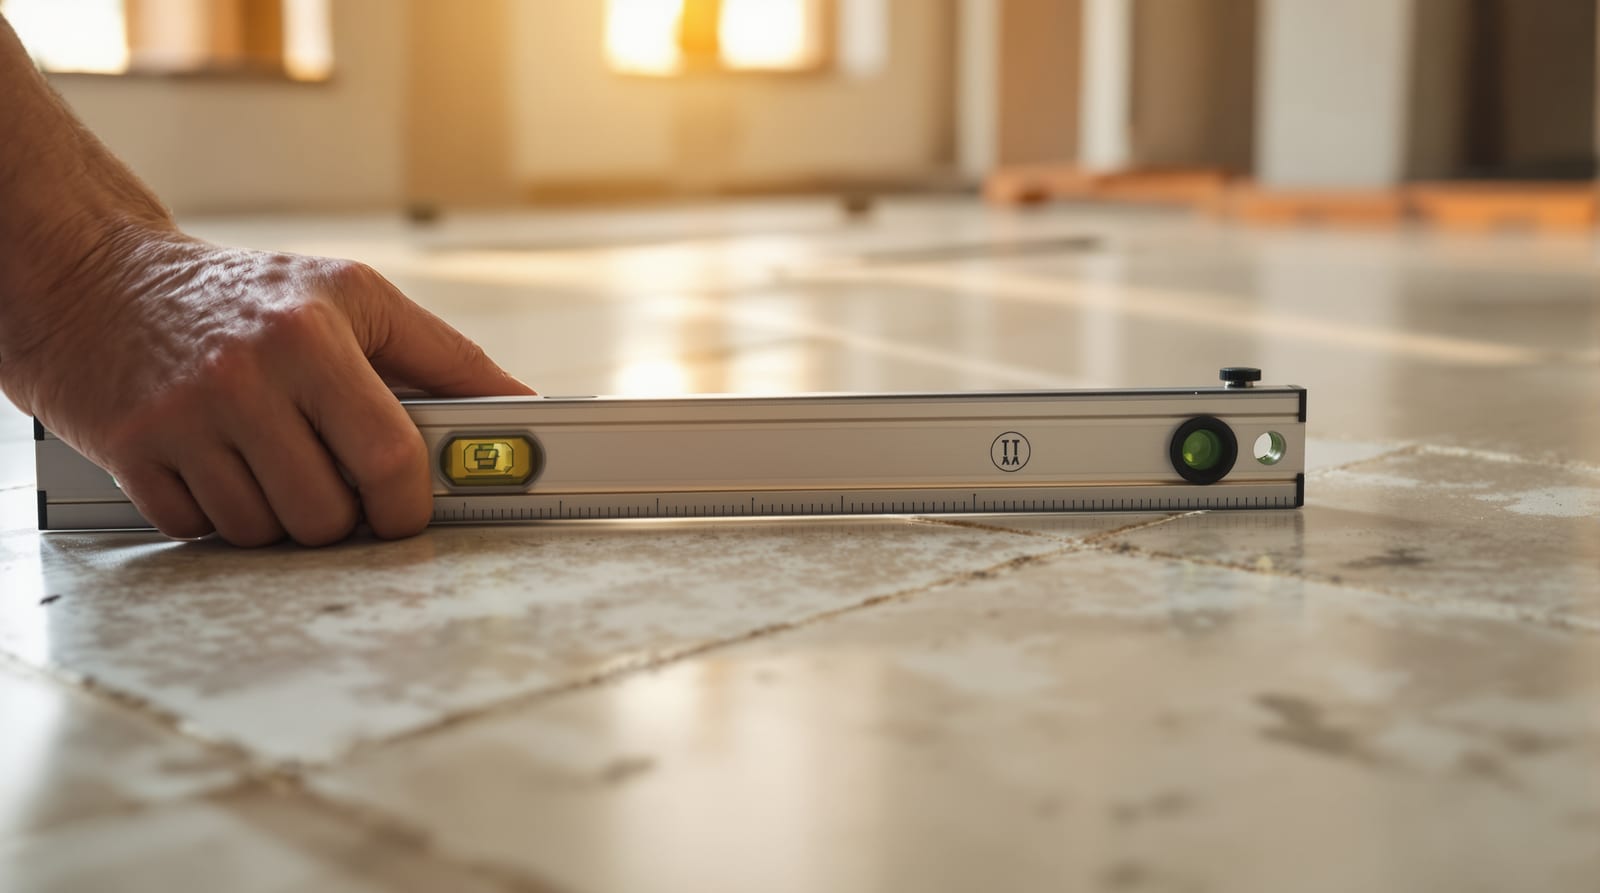
The two checks that catch the most defects
Two simple tests catch the majority of laying faults, and the diagram below shows both.
The straightedge (lippage and level). A floor should read as one plane. Lay a 2 m straightedge or a long spirit level across several tiles in different directions. A daylight gap under it, or a step you can feel where two tile edges meet, is lippage - usually from mixed calibre, an uneven adhesive bed or rushed laying. A small step looks trivial now but becomes a stubbed toe, a dirt-catching ridge and a crack-prone edge later.
The tap test (hollow tiles). Walk the laid area and tap each tile with a coin, a key or a metal tap rod. A well-bedded tile gives a solid, dull sound. A hollow, drum-like ring means the adhesive did not fully grip - an air void under the tile. Hollow tiles crack underfoot, pop loose, and sound hollow forever. They come from "dabbing" five blobs of adhesive instead of combing a full bed. Insist the mason lifts and re-beds any tile that rings hollow while the adhesive is fresh; for the right technique, see our guide on flooring installation mistakes in India.
A practical rule for the whole stage: walk the room slowly in socks. Your feet find lippage, rocking tiles and slope problems that your eyes miss.
Stage 3 - The snag walk after laying
Once grouting is done and the floor has cured, do a deliberate snag walk before final payment. Snagging means making a written list of every defect, with location, so the contractor fixes them in one round rather than you noticing them piecemeal over months. Do it in good daylight and again with a raking torch held low across the floor at night - low-angle light reveals lippage, scratches and uneven grout that overhead light hides.
| Snag-walk item | What good looks like | Flag if... |
|---|---|---|
| Grout colour & fill | Even colour, joints fully filled and tooled, no gaps | Patchy colour, sunken/cracked joints, haze left on tiles |
| Grout haze / film | Tiles clean and clear | Cloudy cement film not washed off |
| Chipped / scratched tiles | No chips at corners or door lines | Chips, scratches, cutter marks |
| Edge & skirting joints | Clean lines, silicone at wet-dry junctions | Gaps, missing silicone at shower edge |
| Expansion / perimeter gaps | Soft joint left, not grouted solid at walls | Hard grout right up to wall (tenting risk) |
| Wet area drainage | Bucket of water drains fully to the trap | Standing puddles after 5 minutes |
| Spare tiles handed over | Labelled box of same-lot spares left with you | No spares, or spares from a different lot |
| Cleaning & protection | Floor washed, sealed if stone, covered for further work | Adhesive blobs, paint splatter, no protection |
| Documentation | GST invoice, warranty card, brand/model recorded | No paperwork - no warranty claim later |
Hold back a small final payment until the snag list is cleared - it is the only leverage that reliably gets snags fixed. Keep your labelled spare tiles somewhere safe; matching a tile years later from the same lot is the difference between an invisible repair and an obvious patch. See our guide on cracked tile replacement in India for why same-lot spares matter so much.
Marble and granite: the slab inspection difference
Stone is graded by the eye, not a box label, so the inspection shifts to the slab itself. Always inspect full slabs standing up in daylight before they are cut. Look for the natural veining and colour you actually approved, hairline cracks (run a wet cloth over the slab - cracks darken and show), large resin fills and patches, and consistent thickness (typically 16-18 mm for tiles, 18-20 mm for slabs). Tap the slab - a clear ring means sound stone, a dull thud can mean a hidden crack. "Italian marble" and premium granite names are sometimes relabelled, so verify origin against your quote. After laying, stone needs the extra snag checks of even polish, no lippage between slabs, and proper sealing - see our guides on how to buy marble in India and how to buy granite in India.
How this fits your whole purchase
Inspection is the last line of defence, but it works best on top of good buying. A vendor who supplies one calibre and one lot, gives a GST invoice, and states the water-absorption group and PEI rating up front makes your on-site checks fast. Choosing that vendor is itself a quality decision - our guide on flooring vendor selection in India covers how to pick one, and how to evaluate a builder floor before buying in India applies this same QC eye to a ready-built home. To turn this article into a tick-box list you carry on site, use the Studio Matrx flooring quality checklist tool, and to confirm a tile's spec is right for the room, the tile water absorption classifier and tile PEI grade selector.
Frequently asked questions
How do I check for hollow tiles at home?
Tap each laid tile with a coin, a key or a small metal rod and listen. A solid, dull, flat sound means the tile is well bedded in adhesive. A hollow, drum-like ring means there is an air void underneath - the adhesive did not fully grip. Mark every hollow tile and ask the mason to lift and re-bed it while the adhesive is still fresh. After full curing, fixing a hollow tile means breaking it out, so the tap test during laying is your best window.
What is lippage and how much is acceptable?
Lippage is the small height step between the edges of two adjacent tiles - when one tile sits higher than its neighbour. Lay a straightedge across the joint and run a finger across it. For most home floors a step of about 1 mm or less is acceptable; large-format tiles allow a hair more, but anything you can clearly feel or catch a fingernail on is a fail. Lippage usually comes from mixed calibre, an uneven adhesive bed or rushed laying, and it must be corrected while the tile can still be lifted.
What should I check before signing the tile delivery challan?
Before signing, open boxes from different pallets and confirm: the ISI mark with IS 15622 number, the exact brand, size and design from your order, identical calibre on every box, the same shade/lot number on all boxes plus your 5-10% spares from that lot, the full quantity count, and acceptable breakage. Note any breakage or shortfall in writing on the challan before you sign - that note is your claim. Insist on a GST invoice and an e-way bill for transport.
Do I really need spare tiles?
Yes. Tiles crack, chip and stain over a floor's life, and lots go out of production. A labelled box of spares from the exact same calibre and shade lot is the only way to make a future repair invisible. Buy 5-10% over your area as wastage-plus-spare, and make sure the leftover same-lot box is handed to you at the end - do not let the contractor take it away.
When is the best time to inspect the work?
Inspect at three windows: at delivery before signing the challan, during laying on the first morning while adhesive is still workable (this is the most valuable visit - lippage, hollow tiles and slope are all fixable then), and at handover for the snag walk before final payment. Hold back a small final payment until the snag list is cleared.
Export this guide
Related Guides — Deep-dive reading
Flooring Buying Mistakes in India: 12 Costly Purchase Errors and How to Avoid Them (2026)
From ordering the exact area with no spare and losing the dye-lot, to mixing calibre, buying seconds for living rooms, skipping the ISI mark, paying full advance and ignoring transport and loading charges, here are the purchase mistakes that quietly inflate a floor's true cost.
Flooring & SurfacesHow to Buy Floor Tiles in India: The Complete Buyer's Playbook for Size, Spec, Grade, Quote & Delivery (2026)
From deciding size, finish, PEI and water-absorption group for each room to reading the box spec and ISI mark, matching calibre and lot, spotting seconds, and getting an honest all-in quote.
Flooring & SurfacesSpotting Fake Tiles in India: How to Catch Seconds, Fake ISI Marks, Misrepresented Stone and Under-Spec Tiles Before You Buy (2026)
The trader's tricks and the buyer's counter-tests: seconds sold as first quality, fake or absent ISI marks, branded-look unbranded tiles, mislabelled water-absorption and PEI, resin-filled marble, dyed granite and relabelled imported stone.
Flooring & SurfacesRelated Tools — Try Free
Cross-Ventilation Analyzer
Estimate airflow and air changes per hour (ACH) from room size, window areas, layout, and local wind — with NBC 2016 Part 8 compliance check.
Ventilation CalculatorFlooring Quality Checklist
Score your floor's quality with an interactive on-site inspection checklist — delivery, laying and finish.
Flooring ToolTile Water Absorption Classifier
Classify a tile by its water-absorption percentage into its IS 15622 group and see where it can be used.
Flooring Tool